Omnitracs 5.8SR New Features and Enhancements
Routing
- Route templates are automatically recalculated.
- You can now calculate text custom properties.
Dispatching
- You can now define rules to ignore when selecting stop resequencing as an autonomous optimization option.
- You can use real time traffic to help optimize routes in FleetView.
Active Alert
- The new Active Alert Web application provides an easy way to alert your customers to the status of their orders.
Compliance
- Omnitracs now provides support for the new Canadian North of 60th Parallel rule.
- A Recalculate button is now available in the Driver Log Editor for ELD companies.
- Violation warnings in the Unassigned Vehicle Activity Editor are now more informative.
Telematics
- You can now receive diagnostic trouble codes the Relay and AMG-C, and view the codes in Telematics Diagnostics. In addition, if you have enabled the DTC exception type, you will receive alerts when codes are received, and they are included on the DTC History and Active DTC reports.
HOS Mobile
- The Login screen has been redesigned.
- There have been changes to paper log mode when the driver loses Bluetooth connection.
- The North of the 60th parallel Canadian rules have been implemented.
- When a driver rejects UVA offered from the Relay, each rejected event is automatically annotated to say "Driver indicated the record is not attributable to driver." The annotations will appear in the mobile eRODS file to make it clear to enforcement officers that the UVA was rejected.
- Inspection forms are now available in French when that is the language selected in the mobile’s language settings.
Relay
- The default operating mode for all newly shipped Omnitracs Relays is now ELD Mode.
- Enhancements were made to improve the performance of processing UVA.
There were also several software corrections made in this release.
Route Templates Automatically Recalculated
Found In Omnitracs Client
There are times when you need to re-geocode a service location that is on a route template, such as if the customer moves. In the past, when this happened the distances on the route template were not automatically updated to reflect this change; you had to make a change directly to the route template to force the distances to be recalculated. Now, when you re-geocode a service location the distances on all route templates this service location is on are automatically recalculated, and the change is reflected on the Route Template and Stop Template lists.
Note: If you choose to update the route template properties, all the route template's properties will be updated with the corresponding properties from the daily route.
Calculating Text Custom Properties
Found In Omnitracs Client
Starting in the 5.8 version of Omnitracs, you were able roll up information contained in order custom properties, and have them displayed at the service location, stop, and route level. Now, this functionality has been expanded to include text custom properties for those items, and a new calculation method has been added. To calculate the text custom properties, simply set up an order customer property of type Text. Then, on the route, stop, or service location, create a calculated custom property that uses the order custom property, and select the calculation method. The new calculation method, Concatenate Distinct, displays all the distinct values for that custom property. For instance, if the order custom property had the values Sale, COD, Delivered, Sale, and Dropped, the calculated custom property would display Sale | COD | Delivered | Dropped; the second Sale is not shown because it is the same as a value already listed. Concatenate Distinct does respect case, so Sale and sale would be considered distinct values.
The results will be shown in the appropriate grid.
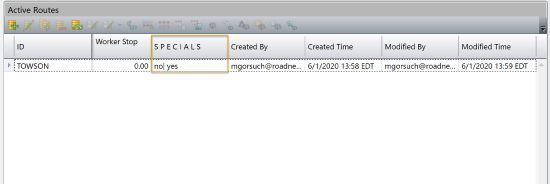
As part of this enhancement, the semi-colon was replaced by a pipe symbol ( | ) between the individual custom property entries when the entries are concatenated.
Stop Resequencing Rules to Ignore
Found In Omnitracs Web
Currently, if you use autonomous optimization and have Omnitracs suggest changes to the sequence of your routes, you are forced to follow any routing rules that you have set up in Omnitracs. Now, you can choose which rules you want ignored when Omnitracs attempts to optimize the routes with autonomous optimization enabled.
To define the rules you want ignored, in the Administration module, click the green button and scroll to Regions. Add a new region or edit an existing region. On the Autonomous Optimization tab under Dispatch, if it isn't already enabled, check the Autonomous Stop Resequencing box. Click the Autonomous Stop Resequencing arrow. The Rules to Ignore that are relative to stop resequencing display. Check the appropriate boxes to ignore specific rules when resequencing stops on a route.
Hint: Use the Ignore All and Ignore None buttons in the Rules to Ignore section to quickly select or deselect all options.
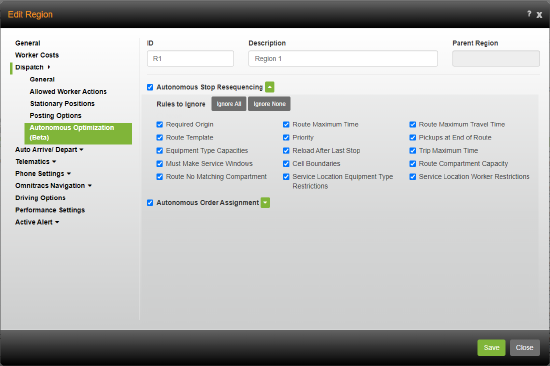
Save your changes to have Omnitracs ignore certain rules when resequencing stops to optimize routes.
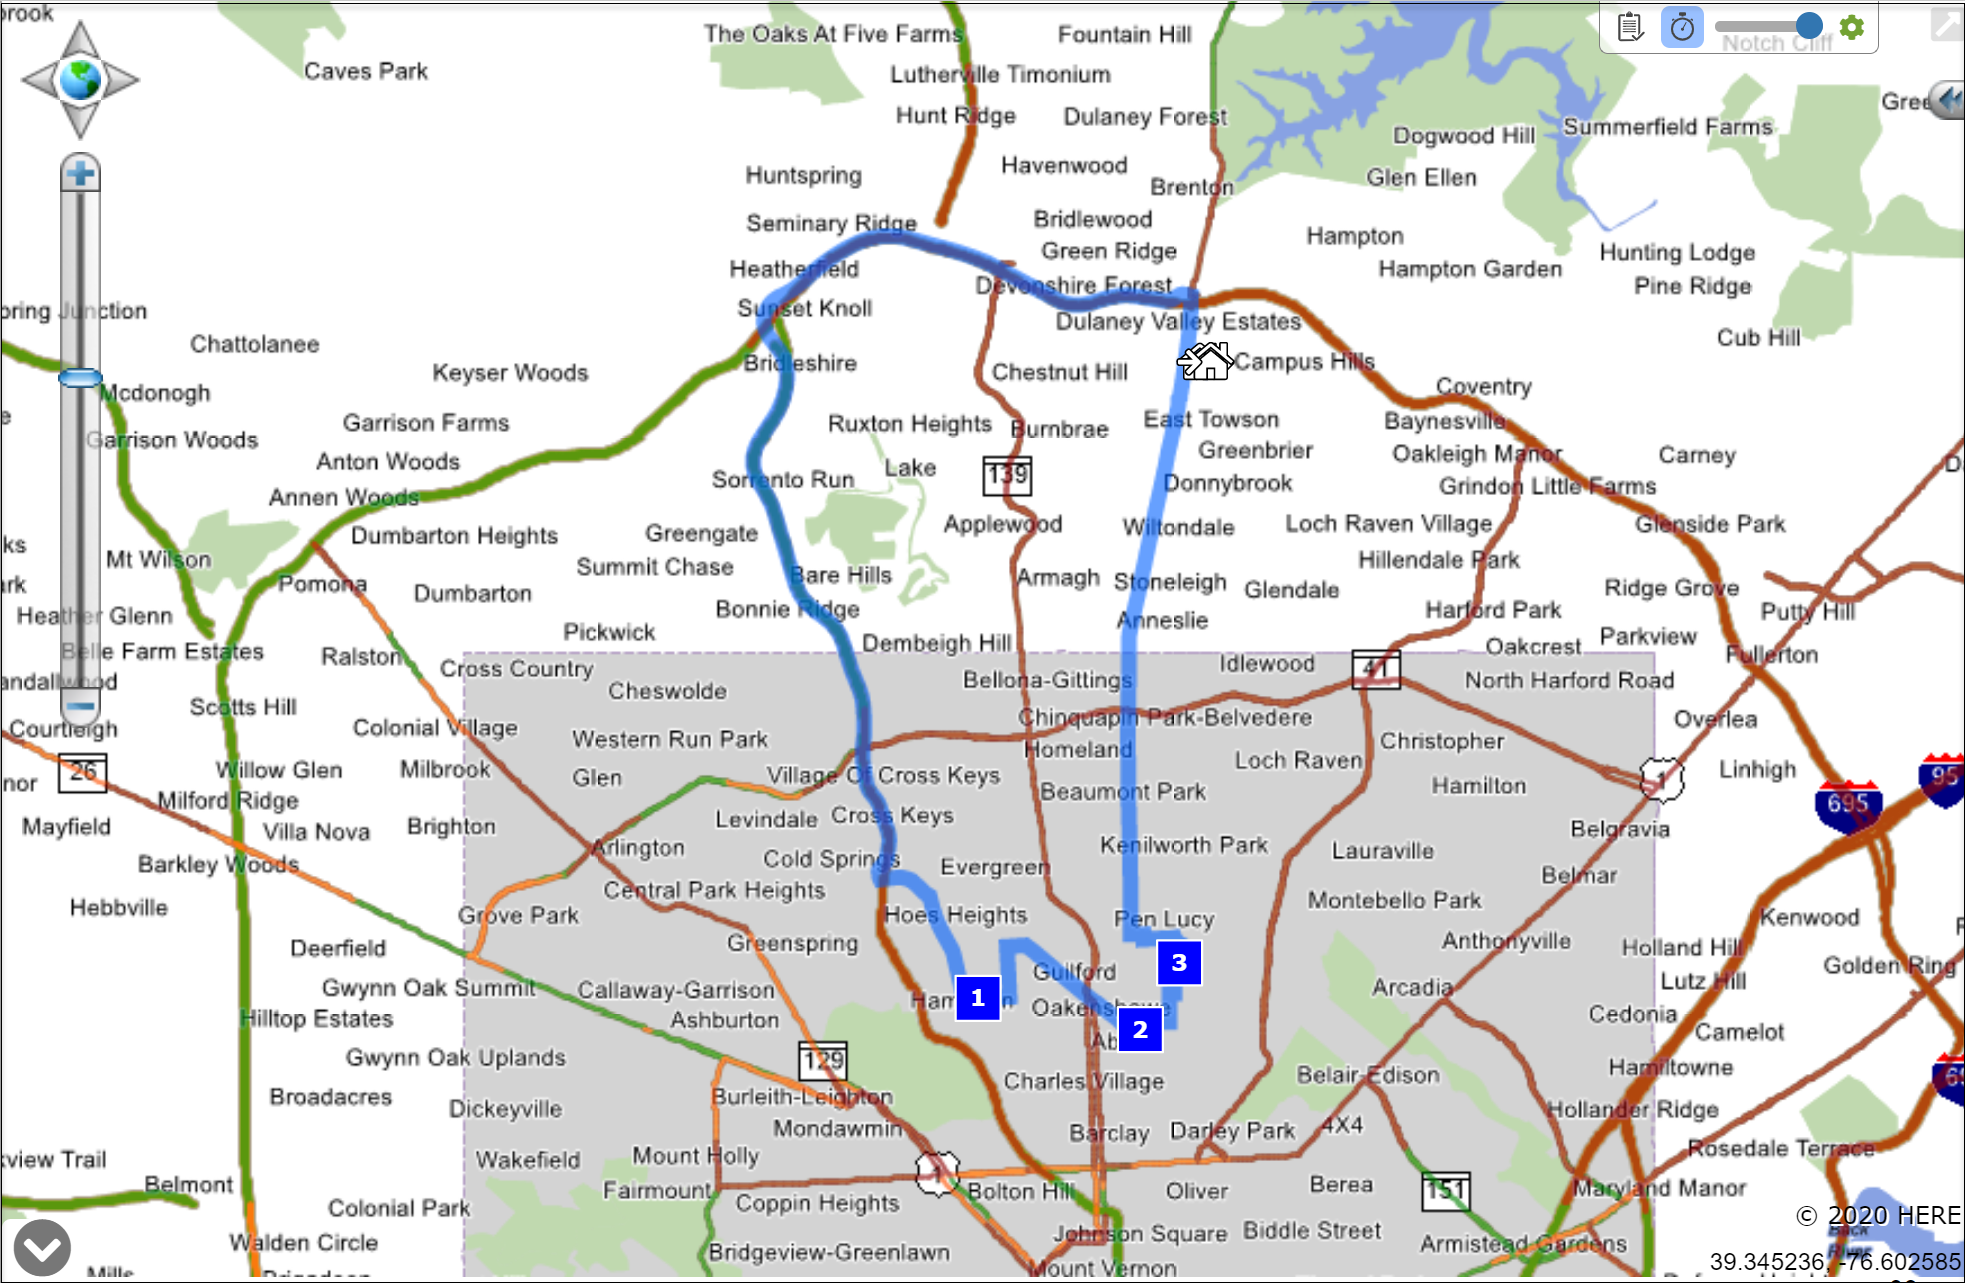
Using Real Time Traffic in FleetView
Found in Omnitracs Web
As any dispatcher knows, traffic conditions can unexpectedly change, causing your drivers to have to adapt. Now, you can have the current traffic conditions considered when sequencing a route or using Autonomous Dispatch. You can also view the traffic conditions on the map.
In order to use real time traffic, you must enable it for the region. In the Administration module, click the green button and scroll to Regions. Add a new region or edit an existing region. On the left click Dispatch, then General; the General page opens. Check Use Real Time Traffic to Calculate Paths.
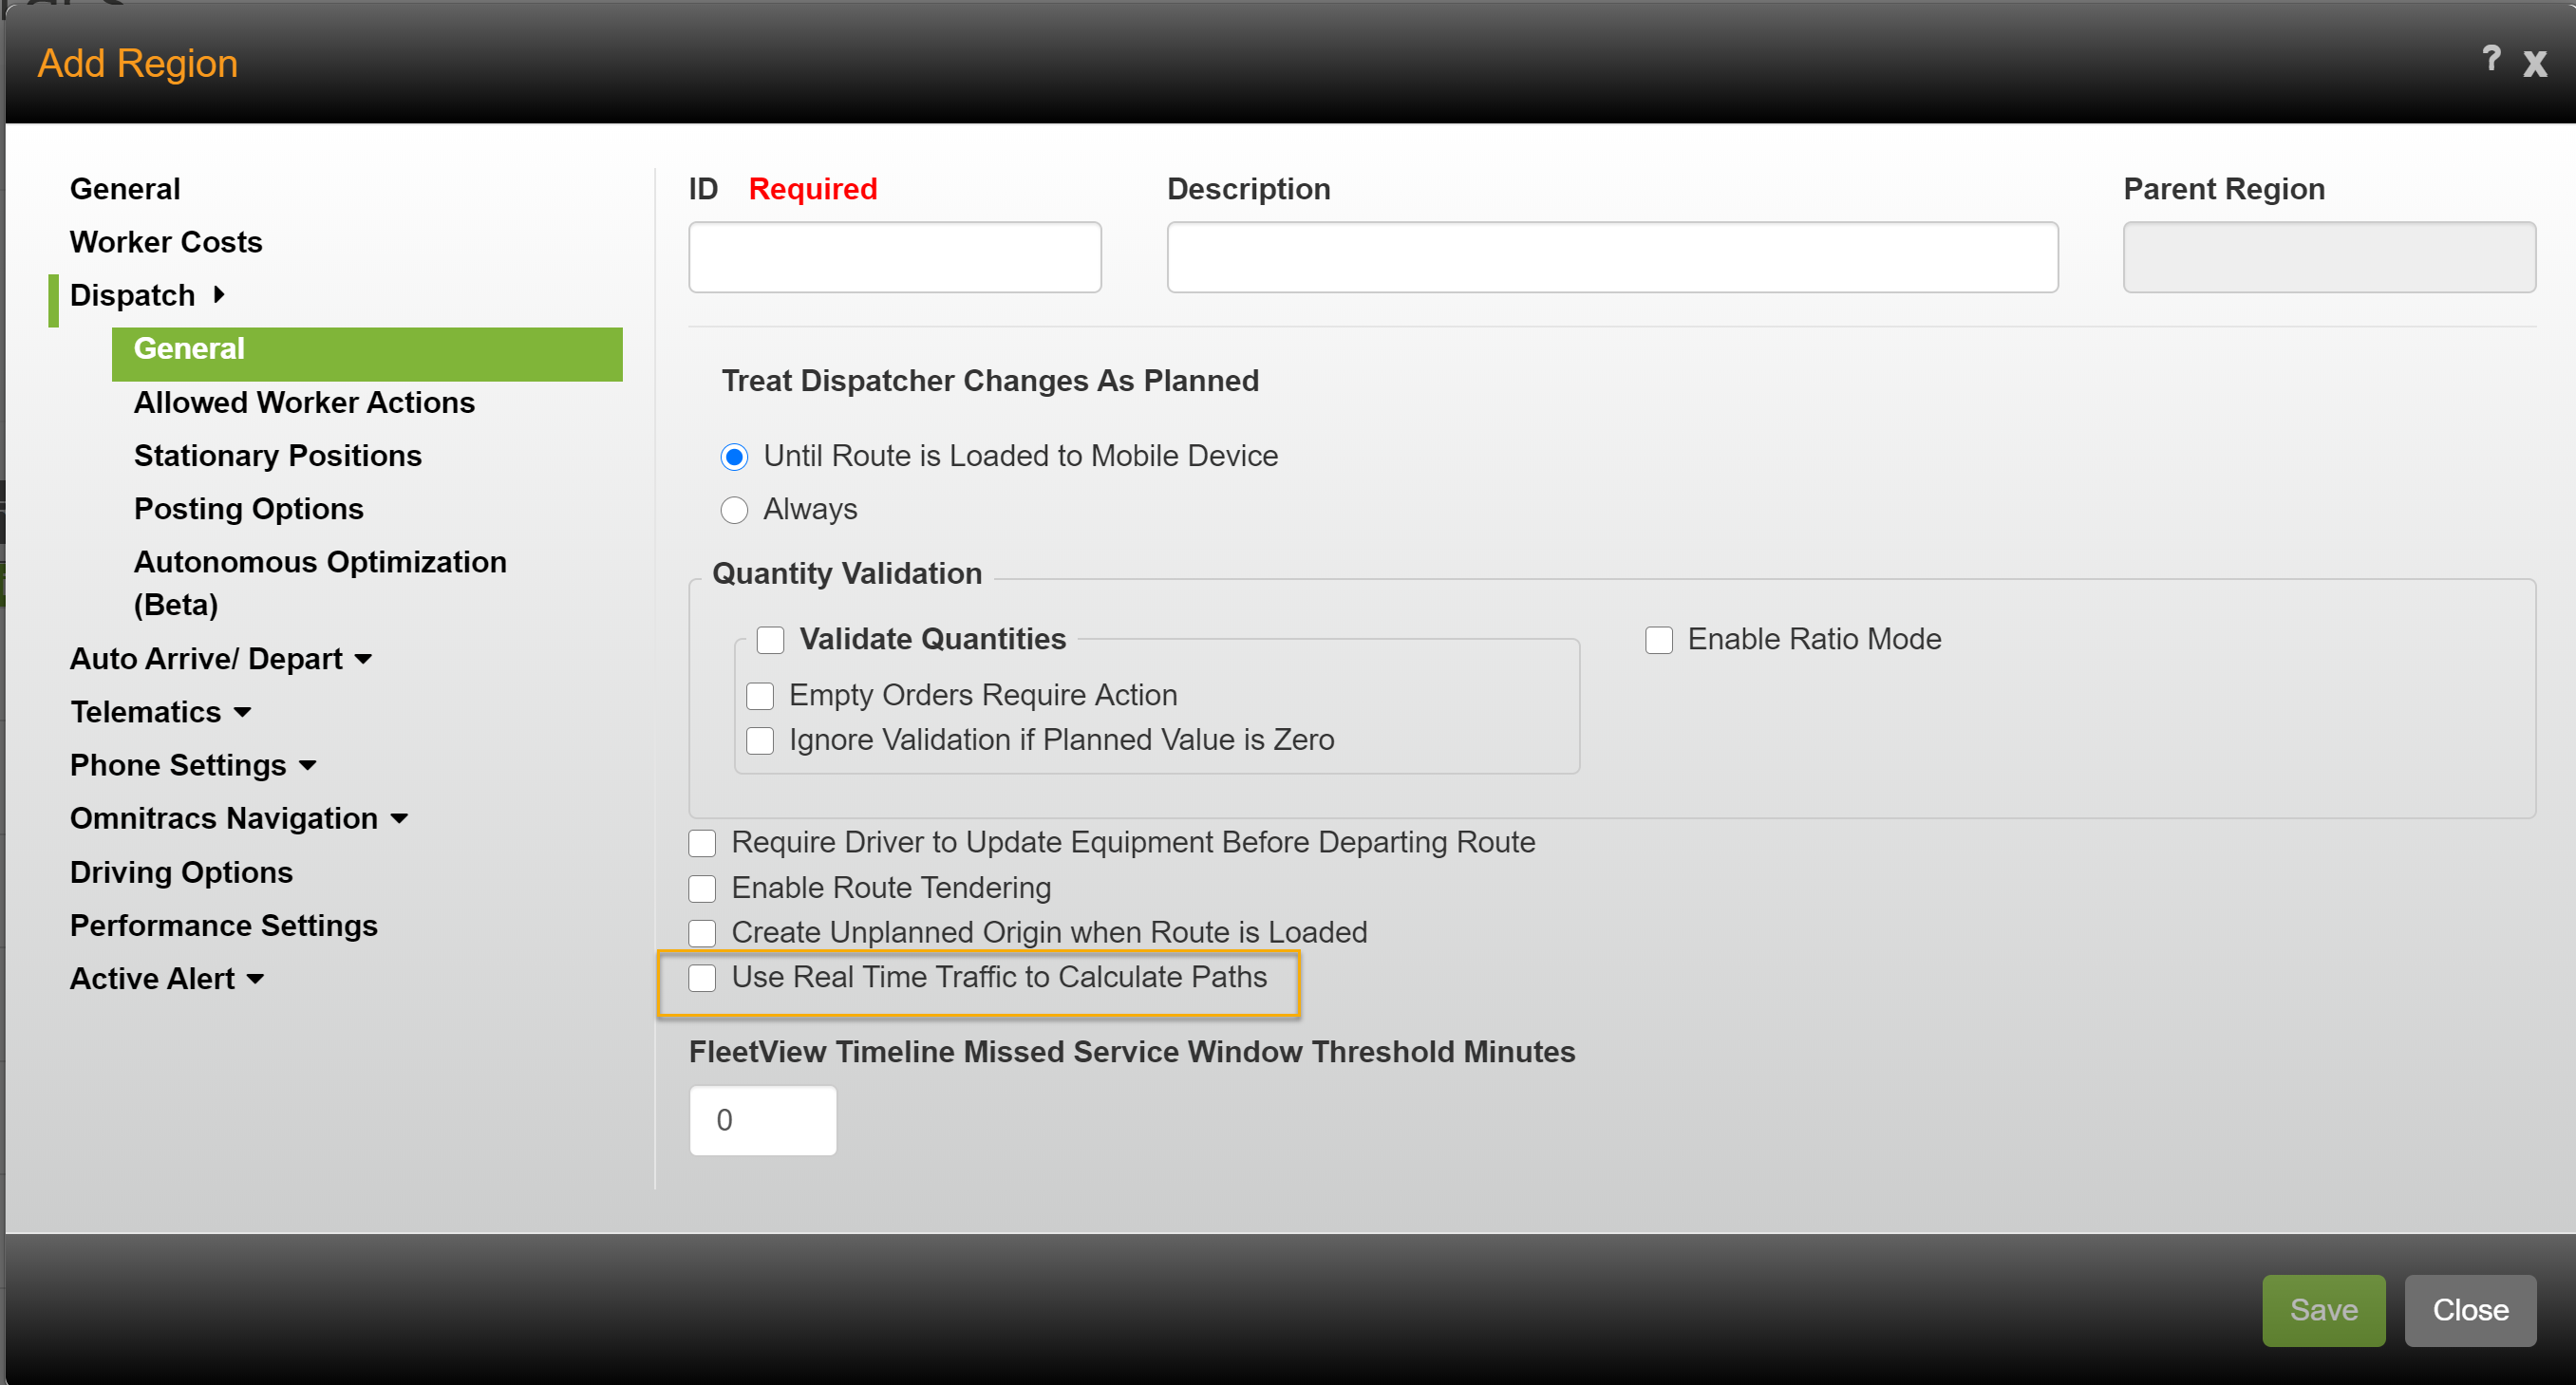
To see the traffic conditions on the map, click the arrow button and check Traffic.

The real time traffic conditions appear on the map, and the road segments are colored to reflect the traffic conditions:
Green - traffic is not delayed
Orange - traffic is delayed
Red - traffic is stopped
Introducing the Active Alert Web Application
Omnitracs Active Alert allows you to send email alerts and text notifications to your customers to keep them up-to-date on the status of their orders. A web link can be included in an alert or notification that directs your customers to the Omnitracs Active Alert Web Application.
The Omnitracs Active Alert Web Application is an easy way to show your customers where their orders are within the pick up and delivery process. When you include a link in an alert or notification, your customers have a way to access up to the minute information about their service. The web application lets your customers view key order information stored in Omnitracs so they know when to expect service, as well as when the service is complete. The web application is a template that is provided by Omnitracs and can help you quickly and easily use Active Alert.
There are a number of steps necessary to set up Active Alert so that it seamlessly sends notifications to your customers. Once Active Alert is enabled, you need to define the necessary settings for the business unit, as well as add email senders, recipient types, and recipient type templates. You also need to create subscriptions for each service location, which assigns recipient emails and mobile numbers to the recipient and alert types for that service location.
Creating an Email Sender
Before you can send emails from Active Alert, you must enter an email address that will be used as the From or Reply to address when an email alert is sent to your customer.
To enter your Email Sender, do the following:
- Click Administration.
- Click the green button and scroll to Email Senders. The Email Senders list displays.
- Click Add. The Add Email Sender window displays.
- Enter an Email Address.
- Enter a Description for your email sender.
- Click Save. Enter as many email senders as needed.
- Click Close to return to the Email Sender list. The list displays all email senders created.
When you save your email sender, a verification message from Amazon Web Services is sent to the email address. The person receiving the verification message must click on the link included in the message to verify the email address. You will assign this email sender when you set up Active Alert settings for the business unit.
Entering Active Alert Business Unit Settings
The Active Alert page on the Business Unit window defines the settings Omnitracs will use to display service information and send service alerts. You need to define the Active Alert settings for the business unit before you can use Active Alert to send alerts and notifications.
To define Active Alert settings for the business unit, do the following:
- Click Administration.
- Click the green button and scroll to Business Unit. The list of business units displays.
- Add a new business unit or edit an existing one.
- Click the Active Alert tab.
- On the Active Alert - General Settings page, enter the appropriate information.
In the Display Settings area, choose the options that define how the quantity and date/time information is displayed to your customer in Omnitracs Active Alert. Choose the Unit type or size alias that should be used to display the delivery quantity. In the Unit Precision field, enter the number of digits that should appear after the decimal when quantity information is displayed. Click the arrow to open a list, then choose the Date Format to be used for delivery dates. Click the arrow to open a list, then choose the Time Format to be used for delivery times.
In the ETA Window Buffer area, enter the information that will determine how wide the ETA window will be, that is displayed to the customer. In the Minutes Before and Minutes After fields, enter the number of minutes before and after the projected arrival time to make the displayed window. In the Round to Nearest field, choose how closely you want the window to be rounded, to the nearest Minute, Five Minutes, Quarter Hour, or Half Hour. For instance, if the projected arrival time is 10:32, and the Minutes Before is 15, the Minutes After 15, and Round To Nearest is Quarter Hour, the ETA window shown to the customer would be 10:15 to 10:45.
In the Missed Service Window Settings area, enter the settings that will be used for sending alerts when it is projected that a driver’s arrival time will miss a service window. In the Send if Missed by Minutes field, enter the minimum number of minutes a driver's projected arrival time must miss a service window by for an alert to be sent. In the Additional Alert Threshold field, enter the number of additional minutes a driver must be projected to miss the service window by for another alert to be sent.
In the Scheduled Alert Settings area, enter how long to wait before a route is considered cancelled and an alert is sent. In the Unscheduled Stop Cancellation Threshold (Hours) field, enter the amount of time that should elapse between the time that a dispatched route is moved back to planned and the route's planned start time, before considering a stop cancelled.
Note: If a dispatched route is moved back to planning and remains in planning for one hour or more, AND the amount of time between the current time and the route start time is less than the Unscheduled Stop Cancellation Threshold (Hours), a cancellation alert is sent.

- On the Active Alert - Email Settings page, select the email sender address that will be used for sending alerts. Click the arrow to open the list and then chose the email sender to be used for the business unit. Use the [Browse] button to upload up to two images to be used in your active alert emails.
- On the Active Alert - SMS Settings page, if you use an SMS provider other than the default Omnitracs SMS provider, click the arrow and select the Provider Type from the list that pops up. You can define settings for SMS Gateway Providers Twilio, Nexmo, and Plivo. Once you enter the authentication information, you will want to enter a phone number and send a test message to ensure the system is working properly with your new settings.
Note: If your company has purchased the default Omnitracs SMS provider, you will not see the SMS Settings page.
- Click Save.
- Click Close to return to the list of business units.
Creating Recipient Types
After defining settings for the business unit, you will need to create recipient types. Active Alert recipient types are a way to create and manage alerts that inform customers about their service. For instance, you may have one recipient type for customers that receive deliveries and want to know the expected arrival of their package or when a package has been delivered, while another recipient type may be for vendors from who you will pick items up and want to only know if an order has been canceled.
To add a recipient type, do the following:
- Click on Maintenance.
- Click the green button and scroll to Active Alert Recipient Types.
- Add a new Recipient Type.
- Enter an ID
- Enter a description for the recipient type.
Note: Currently, the settings on the General tab are not used for the new Active Alert web application.
- On the Template tab, define how you want to contact your customer, text or email, and what to include in the message.
Click Add, to add a new template. Event types tell what type of alert is being sent. Choose the Event Type: Initial ETA, Updated ETA, Minutes Before Service, Serviced, Cancelled, Unserviceable, Missed Service Window, Arrived, Scheduled, Rescheduled. Choose the Notification Method and enter the Subject and Body of the message.
You can use specific fields to customize the message sent to your customer, so they know you are referring to them and their order. When entering the Subject and Body text, the fields should be surrounded by curly brackets {FIELD} to indicate that it is a field. To provide a link to the active alert web application in an SMS notification, include the field {WEB_LINK} in the body of your recipient type template. To include a web link in an email alert, you should include a tag and the field, <a href="{WEB_LINK}"> Track your delivery </a>, in the body of your recipient type template. See Available Fields for Message Templates for information on what can be included in the Subject and Body fields. Click Preview to see what the alert will look like when sent to your customer.
Notes: If you select SMS as the Notification Method, any text you enter in the Subject field is ignored.
If you are creating SMS text messages, see SMS Message Guidelines for information on creating messages that meet CTIA guidelines.
Only one template can be created for each notification method and alert type pair. For example, you can create only one message template for initial ETA alerts sent by email.
- Click Save Template to save the new template. You can create as many templates as necessary for the recipient type.
- Click Save to save the recipient type.
When you have completed these set ups, you must then add recipient and event types and recipient emails or mobile numbers to the service location.
Adding Subscriptions for Service Locations
Note: If you prefer, you can import active alert information when importing service locations into Omnitracs. Refer to the online help in Omnitracs for more information about importing service locations.
After you set up recipient types, you will create subscriptions for the service location that tell Omnitracs Active Alert which alerts to send and to whom they should be sent. Recipients are the email addresses and/or phone numbers where notification messages will be sent.
To add a subscription, do the following:
- Click on Maintenance.
- Choose Service Locations. The Service Locations list window appears.
- Edit the desired service location.
- Click on the Active Alert tab.
- To add a Subscription, click Add.
- Click the arrow to open a list, then choose a Recipient Type.
- Choose a Notification Method.
- Enter the email address or phone number of the recipient and click Add. Continue to enter an email address or phone number and click Add until all recipients are added.
- Check the appropriate Alert Types for the recipient(s) you are adding.
Scheduled—check to have the recipient(s) receive an alert when a stop's route is moved to Built status or Dispatch phase in Omnitracs.
Rescheduled—check to have the recipient(s) receive an alert when the ETA of the stop no longer meets the originally scheduled window.
Initial ETA—check to have the recipient(s) receive an alert when the estimated time of arrival is calculated, based on when the driver leaves the depot.
Updated ETA—check to have the recipient(s) receive an alert when the estimated time of arrival changes.
Minutes Before Service—check to have the recipient(s) receive an alert a specified number of minutes before receiving service. Enter the number of minutes before service that you would like the recipient to receive a notification. You can click on the number field and enter any number from 1 to 60 or you can click the up and down arrows to change the number in increments of 5.
Arrived—check to have the recipient(s) receive an alert when the stop is arrived. This can be an automatic arrival of the stop or when the worker presses Arrived on the mobile device.
Serviced—check if the recipient(s) should receive an alert once service is completed.
Missed Service Window—check to have the recipient(s) receive an alert if the driver's arrival time is projected to miss a service window, such as when a route is running early or late. When setting the active alert options for the business unit, you can specify the number of minutes a driver must be projected to miss the service window by for this the alert to be sent.
Important: In order for the recipients to be sent the message types you choose, the selected recipient type must contain corresponding message templates for those message types using the notification method selected. For example, if you want the recipients to receive initial ETA alerts via email, the recipient type you choose must have a message template set up for initial ETA messages sent by email.
Canceled and Unserviceable alert types are automatically enabled for the recipient and therefore do not appear as an option. However, just like the other message types, in order to have Canceled and/or Unserviceable notifications sent, corresponding message templates must exist for the recipient type selected.
- Click Apply. The new subscription is added to the list. You can add as many subscriptions as you need.
- Click Save to save the changes to the service location.
Viewing the Active Alert Web Application
Depending on how you set up Active Alert, your customers can receive an email or SMS messages when an order is scheduled, rescheduled, when an initial ETA is available, when the ETA is updated, a certain number of minutes before the stop is serviced, when the stop is arrived or serviced, and/or when the worker is going to miss the location's service window. If you include the <a href="{WEB_LINK}"> Track your delivery </a> tag and field in the body of your template for a recipient type, your customer will find a link in the email or SMS message that, when clicked or tapped, opens the Active Alert Web Application.
Notes: Your customer can click the link any time after receiving the email or text message to see the current status of the order.
The link expires after seven days.
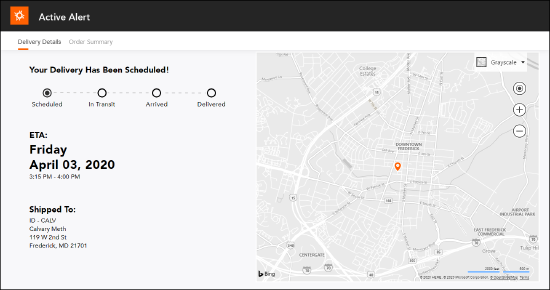
The Active Alert Web Application gives your customer details on the status of one or more orders. If a customer is set to receive an alert when an order is scheduled or gets rescheduled, the customer receives an email or SMS message with a link to the web application. On the Delivery Details screen, the application shows a scheduled status and the customer sees the estimated date and time of arrival and the shipping information. If that order gets cancelled or is unserviceable, your customer receives a new alert with a link that takes them to the web application which shows the cancelled or unserviceable status. Once the route starts, if set up to receive alerts for an initial ETA, an updated ETA, a missed service window, and/or a certain number of minutes before service, your customer receives a new link to the web application, which reflects an in transit status. Finally, your customer can receive an alert when the worker arrives at the service location and/or when the stop is serviced. The link included in the alert shows the web application with the appropriate status, Arrived or Delivered.
Your customer will also see worker information on screens with the Cancelled, Unserviceable, In Transit, Arrived, and Delivered status.
A map is included in the web application. The destination is marked on the map when the alert is sent for scheduled, rescheduled, cancelled, unserviceable, and serviced orders which display as Scheduled and Delivered statuses in the web application. The location of the worker/equipment is marked on the map when the alert is sent for initial and updated ETA, minutes before service, missed service windows, and arrived orders, which display as In Transit and Arrived statuses in the web application.
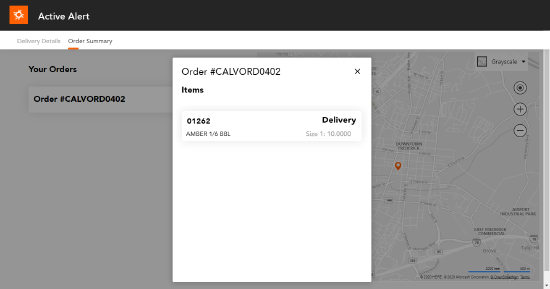
The Order Summary screen shows the order number and the order quantity. If you work with line items, when the customer clicks or taps the order, the list of line items displays with each line item quantity.
Available Fields for Message Templates
The following fields are available to design email and text service alert templates. All fields must be entered surrounded by curly brackets: {FIELD}. Any field that is present in a message template but is missing data when the message is sent will appear blank.
| Key | Description |
| {ORDER_NUMBER} | The order number(s) for the order(s) being serviced on the stop. |
| {LOCATION_ID} | The service location’s ID. |
| {LOCATION_DESCRIPTION} | The service location's description. |
| {ADDRESS_LINE1} | The service location’s address. |
| {ADDRESS_LINE2} | The remainder of the service location’s address, such as suite number. |
| {STANDARD_INSTRUCTIONS} | Any instructions associated with the service location. |
| {PHONE_NUMBER} | The service location's phone number. |
| {FAX_NUMBER} | The service location's fax number. |
| {STORE_NUMBER} | The service location's store number. |
| {PRIMARY_CONTACT} | The name of the contact for the service location. |
| {ALTERNATE_CONTACT} | The name of a second contact for the service location. |
| {COUNTRY} | The country the service location is in. |
| {CITY} | The city the service location is in. |
| {STATE} | The state the service location is in. |
| {ZIP} | The zip code, or postal code, for the service location. |
| {ACCOUNT} | The account the service location belongs to. Note: Accounts can only be entered in Omnitracs Client. |
| {ZONE_ID} | The zone the service location is in. Note: Zones can only be entered in Omnitracs Client. |
| {LOCATION_”CUSTOM PROPERTY NAME”} | Custom property information for service locations. You can use this field to have information for any custom properties for service locations appear in the message. For example, if you have a custom property for service locations named LoadingDock, enter the field as: {LOCATION_LoadingDock} Note: Custom Properties can only be entered in Omnitracs Client. Important: You must use the custom property’s assigned Name, not its Display Name, when entering this field. The name cannot contain any spaces. |
| {ORDER_"CUSTOM PROPERTY NAME"} | Custom property information for orders. You can use this field to have information for any custom properties for orders appear in the message. For example, if you have a custom property for orders named DepositRequired, enter the field as: {ORDER_DepositRequired} Note: Custom Properties can only be entered in Omnitracs Client. Important: You must use the custom property’s assigned Name, not its Display Name, when entering this field. The name cannot contain any spaces. |
| {DRIVER1_NAME} | The name of the route’s driver. |
| {DRIVER2_NAME} | The name of the second driver on the route. |
| {ETA_START_DATE} | The start date of the estimated time window when the service location will be serviced. |
| {ETA_START} | The start of the estimated time window when the service location will be serviced. |
| {ETA_END} | The end of the estimated time window when the service location will be serviced. |
| {ETA} | The estimated time of arrival at the service location. |
| {DEPARTURE} | The time the driver leaves the service location after servicing the order. The actual departure time will be provided if available. If the order has not been serviced yet, the projected departure time will be provided. |
| {CONSIGNEE} | The person who signed for the order. |
| {TIME_ZONE} | The time zone the service location is in. |
| {SERVICE_SUMMARY} | A summary of the stop, including the number of orders and quantity picked up/delivered. |
| {SERVICE_DETAILS} | Details for each order on the stop. Each order will be on its own line and include order number and quantity. Note: You cannot use this field in the Subject field; it can only be used in the Body of the message. |
| {EMAIL_TEMPLATE_IMAGE1} {EMAIL_TEMPLATE_IMAGE2} | Images that are uploaded in the business unit’s Active Alert settings. These can be added anywhere in the body of the message. |
| {WEB_LINK} | A web link that, when clicked or tapped, displays the web application with the status of the order. A map shows the destination of the order or the current location of the equipment/worker making the pick up/delivery. When including this field in the body of an email template, you should include an anchor tag with the field, such as <a href="{WEB_LINK}"> Track your delivery </a>. The words "Track your delivery" can be changed to reflect what your company wants your customer to see in the alert or notification. |
For instance, your template may look like this:
Your Order: {ORDER_NUMBER} was delivered at {DEPARTURE}.
Your customer would see
Your Order: 1234 was delivered at 08:00.
SMS Message Guidelines
The Omnitracs SMS engine for Active Alert follows the Industry Standards set by the CTIA (Cellular Telecommunications Industry Association). None of the information presented here should be construed as offering business or legal advice. Work with your legal team to ensure your program offerings are compliant with the applicable standards and requirements.
Sample SMS Messages
SMS messages are limited to 160 characters, including symbols and spaces. Below are samples of each type of SMS message, including SMS keyword compliance items.
INITIAL ETA SMS:
Your Company Name order, {ORDER_NUMBER}, to {LOCATION_DESCRIPTION} is on its way. ETA is {ETA_START}- {ETA_END}. Msg&Data rates may apply. Reply STOP to end, HELP for help.
EXAMPLE: Your Omnitracs order, ABC123456, to Towson #1234 is on its way. ETA is 12:15 pm- 01:30 pm. Msg&Data rates may apply. Reply STOP to end, HELP for help.
UPDATED ETA SMS:
We have had an unexpected delay. Your new ETA for order# # {ORDER_NUMBER} is {ETA_START}- {ETA_END}. Questions: 1-800-CSNUMBER.
MINUTES BEFORE SMS:
Our driver will be at {LOCATION_DESCRIPTION} in just a few minutes, order number {ORDER_NUMBER}. Questions: 1-800-CSNUMBER.
ARRIVAL SMS:
Our driver has arrived at {LOCATION_DESCRIPTION} with your delivery, order number {ORDER_NUMBER}. Questions: 1-800-CSNUMBER.
DELIVERY COMPLETE SMS:
Our driver has delivered order# {ORDER_NUMBER} to {LOCATION_DESCRIPTION}. {CONSIGNEE} signed for the delivery. Questions: 1-800-CSNUMBER.
CANCELED SMS:
We are sorry today’s delivery was cancelled. Order# {ORDER_NUMBER} was cancelled. Reschedule: 1-800-CSNUMBER.
UNDELIVERABLE SMS:
Today’s delivery, order# {ORDER_NUMBER}, was unable to be delivered. Reschedule: 1-800-CSNUMBER.
For more information on SMS messaging standards and requirements, please visit the MMA website (Mobile Marketing Association- http://www.mmaglobal.com/) or the CTIA website (https://www.ctia.org/). Also see the Telephone Consumer Protection Act guidelines (https://www.tcpacompliance.us/content/tcpa_faq.html) for further information.
Compliance
New Canadian North of 60th Parallel Rule
In compliance with Canadian HOS regulations, Omnitracs now supports two new north of 60th parallel Canadian rules: CAN 7/80 North hrs. and CAN 14/120 North hrs. These rules must be paired with one of the pre-existing south of 60th parallel Canadian rules, the Canadian fertilizer exemption rule (CAN 14/180 Fertilizer hrs.), or a U.S. federal rule. The new rules can be assigned at the organization or driver level.
Drivers using the CAN 7/80 North hrs. or CAN 14/120 North hrs. rule will be switched to that rule when they cross north of the 60th parallel line; they will be switched back to their previous rule when they cross south of the line.
When this happens, a rule change event is inserted into the driver log.
For detailed information about the new rule sets, see the Canadian Justice Laws website:
https://laws-lois.justice.gc.ca/eng/regulations/SOR-2005-313/page-3.html#h-719612
Recalculate Button Available for ELD Companies
The Recalculate button in the Driver Log Editor and UVA tool is now available to users in ELD Mode companies. This button allows users to recalculate a driver’s logs—for instance, in order to clear false violations—as long as the driver has no pending edits. If the driver does have pending edits, the button is not visible.
More Informative Violation Warnings in the UVA Editor
Previously, if users were unable to assign UVA to drivers, they received a generic warning message saying the system was “Unable to find the right violation for the rule.” This message did not provide enough information to allow the support team to determine the cause of the problem.
Now the warning message includes the time of the record, the rule ID, and the violation type, information that will help the support team diagnose the issue.
HOS Mobile
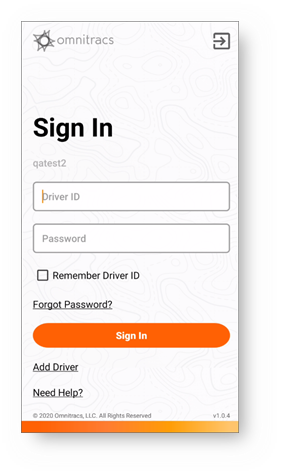
New Login Screen
This release includes a redesigned login screen. Please note that the hamburger menu has been removed but the options that were available from that menu (adding a driver and accessing online help) are now accessible via links at the bottom of the screen.
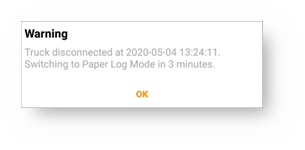
Changes to Paper Log Mode
If a driver loses Bluetooth connection while in Drive status and the vehicle powered down before the connection was lost, the driver will not be automatically switched to Paper Log Mode. Instead, the driver receives a prompt to start Paper Log Mode.
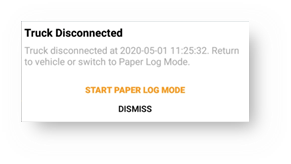
The driver can either start Paper Log Mode or dismiss it. If the driver dismisses the prompt, they can change their duty status to On or Off Duty.
If the vehicle powered down after the Bluetooth connection was lost, the driver will be automatically switched to Paper Log Mode and cannot dismiss it.
New North of 60th Parallel Canadian Rules
Omnitracs HOS Mobile now supports the new north of 60th parallel Canadian rules: CAN 7/80 North hrs. and CAN 14/120 North hrs. These rules must be paired with a pre-existing south of 60th parallel rule.
Drivers using one of the new rules will be switched to the north of 60th parallel rule when they cross north of the 60th parallel line; they will be switched back to the previous rule when they cross back south of the parallel.
When this happens, a rule change event is inserted into the driver log and the log header displays the correct rule.
If a north of 60th rule has not been selected for the driver on the host, the driver's rule will not change.
For detailed information about the new rule sets, see the Canadian Justice Laws website:
https://laws-lois.justice.gc.ca/eng/regulations/SOR-2005-313/page-3.html#h-719612
Software Corrections
| Issue Key | Release Notes | Component |
|---|---|---|
| RPE-7960 | The issues with the Roadnet Active Alert web application notification settings for Email and SMS subscriptions have been resolved. | ActiveAlert |
| RPE-8198 | Quantities are displayed correctly in the Delivery Detail report for an undeliver/redeliver stop when the Business Unit has "Use Line Items" disabled. | Dispatching |
| RPE-7907 | Some users were receiving an unexpected error when trying to Cease Dispatch selected routes. This has been corrected. | Dispatching |
| RPE-7752 | The Autonomous Dispatch settings at the region level now provide the ability to specify which algorithm rules to ignore when configuring stop resequencing. | Dispatching |
| RPE-7714 | There was an issue that was causing exception email notifications to be sent at the wrong time. This has been corrected. | Dispatching |
| RPE-7672 | Tracking routes are prevented from starting without current GPS. | Dispatching |
| RPE-8197 | Fixed a bug that caused Cease Dispatch to fail with an unexpected error on unplanned routes with missing event data. | Dispatching |
| RPE-5941 | A defect was found that prevented a user from geocoding a service location directly from the map in FleetView. This has been resolved. | Dispatching |
| RPE-8197 | Fixed a bug that caused Cease Dispatch to fail with an unexpected error on unplanned routes with missing event data. | Dispatching |
| RPE-7945 | A Tracking route will now create and arrive at a stop when nearby locations are retrieved and the regional setting for Minimum Stop Time is achieved. | iOSMobile |
| RPE-7758 | There was an issue that was preventing some iOS devices from getting GPS data. This has been corrected. | iOSMobile |
| RPE-7640 | Customers with large numbers of service locations were receiving errors trying to search for service locations. The search was improved to reduce the instances of these errors. | Maintenance |
| RPE-7785 | There was an issue where the Navigation Region settings were not always saving properly. This has been corrected. | Navigation |
| RPE-8377 | There was an issue that was causing the traffic speed prompt to cover the quick menu. This has been corrected. | Navigation |
| RPE-8097 | There was an issue that was causing Navigation to crash if there was an invalid waypoint on a trip. This has been corrected. | Navigation |
| RPE-7553 | The break clock was showing the wrong amount of time until a break is needed. This has been corrected. | Navigation |
| RPE-7307 | There was an issue causing the screen to go blank when departing the origin and navigating to the first stop. This has been corrected. | Navigation |
| RPE-3825 | There was an issue in Portrait mode where the Add to Trip option was not visible in the menu. This has been corrected. | Navigation |
| RPE-5073 | There was an issue that could cause the application to crash when changing orientation from portrait to landscape, or landscape to portrait. This has been corrected. | Navigation |
| RPE-1217 | There was an issue where some waypoints were not being properly placed along highways. This has been corrected. | Navigation |
| RPE-2332 | There was an issue where the destination icon was appearing for waypoints in the next turn and next next turn window. This has been corrected. | Navigation |
| RPE-8262 | Several improvements were made to stabilize the integration between Drive and Navigation. | Navigation |
| RPE-7870 | When a depart actions is completed in Drive, the same stop information was sent to OT Navigation multiple times, causing OT Navigation to recalculate the route and lose track of the current progress. This has been corrected. | Navigation |
| RPE-5422 | A change was made so that when Navigation receives a request from Drive or others app, to cancel a route, it will cancel it, without asking for a second confirmation. | Navigation |
| RPE-5226 | There was an issue that was preventing some users from being notified about railway crossings. This is fixed in the 2020.1 map version, but not in the prior map versions. | Navigation |
| RPE-8023 | OT Navigation will now attempt to read the phone number or serial number for Android OS 10 devices to pre-authenticate or auto-enable the application. Additional changes to Android OS 10 may block us in getting those device identifiers. | Navigation |
| RPE-7895 | There was an issue that was causing Omnitracs Client to crash when changing regions. This has been corrected. | Planning |
| RPE-7496 | There was an issue that was causing the previous weeks values to import incorrectly when importing recurring orders. This has been corrected. | Planning |
| RPE-7676 | There was an issue preventing large scheduled Mobile Forms from being sent. Now, if a report attachment is larger than 5 MB, the following message is sent to the user: "The report for <Report_Description> was too large to attach to an e-mail and will need to be run manually." | Reporting |
| RPE-7673 | The schedule report form did not preserve saved Mobile Form value - it reset to a very first item in the list. It is corrected. | Reporting |
| RPE-7428 | A new maintenance item type is displayed in the report as "Maintenance Stop" which enlarged one column width and narrowed Order Number column. Appropriate column adjustments were made to fit long order names. | Reporting |
| RPE-7780 | Calculated custom properties can now be configured bases on Order Text custom properties. These values can be calculated using the Count, Distinct Count and Concatenate calculation methods. The Sum calculation method is not supported for Order Text custom properties. The calculated values can be rolled up to the Unassigned, Stop and Route grids. | Routing |
| RPE-7779 | Running Suggest Route on a routed stop with calculated custom properties enabled resulted in an unexpected error. This has been corrected | Routing |
| RPE-7759 | There was an issue that was preventing several pieces of fault monitoring data from appearing, including unit address, fuelltd, engineTimeLtd, and distanceLtd. This has been corrected. | Telematics |
| RPE-8202 | There was an issue that was preventing the driver from loading a route onto the mobile device. This has been corrected. | Telematics |
| RPE-7943 | There was an issue that could prevent routes that were not completed from being included when routes were retrieved using actual route information. This has been corrected. | Web Services |
| RPE-7939 | Added the ability to POST new Route Plans to the Routing Module using a new query parameter "setStatusToRouting". The default behavior remains that new Route Plans will be saved to the Dispatching Module where they are immediately ready to be executed. | Web Services |
| RPE-7670 | Times were not being returned for the Worker Log Details API. This has been corrected, and times are now included when returning EditTime, ModifiedDate, and RecordTime. | Web Services |
| RPE-1359 | Refactored the way we retrieve Worker's Log Events to improve performance. | Web Services |
| RPE-8013 | stopType is now returned with stopInfo from the Event service. | Web Services |
| XRS-1123 | When the Driver Log Details Web Service was called, the odometer value was empty. This issue has been resolved | Web Services |
| DCMD-2288 | There was an issue where after the user cancelled navigation, and then responded to the confirmation message, no additional information was received from the Navigation application. This has been corrected. | Drive |
| DCMD-2871 | There was an issue that was preventing Drive from syncing properly over satellite. This has been corrected. | Drive |
| DCMD-1838 | Drive can now work with the Google Managed Play Store. | Drive |
| DCMD-2685 | There was an issue where the variance was not be calculated properly when product was split. This has been corrrected. | Drive |
| DCMD-2801 | There was an issue when integrating trips when drivers and vehicles within an organization had duplicate IDs. Now, to distinguish between these driver and vehicles, add d:: or v:: to indicate if it is a driver or truck. | Drive |
| DCMMD-2381 | A change was made to prevent the user from configuring the navigator heartbeat. | Drive |
| DCMD-1275 | A warning message appears if a SQL Lite database is not present when the driver attempts to toggle between dip and volume. | Drive |
| DCMD-2786 | Several display issues revolving around bulk load of locations have been corrected. | Drive |
| DCMD-2650 | There was an issue that was causing the Drive application to freeze under certain circumstances. This has been corrected. | Drive |
| DCMD-2194 | There was an issue that was causing the work alone timer to behave in an unpredictable manner. This has been corrrected. | Drive |
| DCMD-2193 | There was an issue that was causing load variances to be incorrect if the product was split. This has been resolved. | Drive |
| DCMD-1687 | Text to speech is now available for custom dialogs. | Drive |
| DCMD-663 | The Rest Break screen was modified slightly so that the Non HOS Break option appears on the same line as the other options in most circumstances. | Drive |
| XRS-7 | Inconsistencies in the Trailer ID field of the Driver Log Report and ELD Driver Log Report have been resolved. | HOS Mobile |
| XRS-587 | An issue that sometimes caused HOS data (such as drive status) to be missing from driver logs has been resolved. | HOS Mobile |
| XRS-1020 | An issue that caused the Driver Log Report not to display the driver’s current HOS rule set has been resolved. | HOS Mobile |
| XRS-1043 | Drivers could not access their assigned route if they navigated away from the Schedule screen after selecting OK in the Assigned New Route(s) prompt. They had to log out and log back in again to see the route. This issue has been resolved. | HOS Mobile |
| XRS-1535 | Problems with deleting devices for customers who have Omnitracs Navigation enabled have been resolved. | Compliance |
| XRS-4 | For some drivers, the Violation Summary by Driver report did not include Daily Drive and Daily Duty values. This issue has been resolved. | Compliance |
| XRS-12 | A discrepancy between the mileage shown in the driver’s log and the corresponding mileage in the Trip Report has been corrected. | Compliance |
| XRS-24 | When users exported the data in the Manage Fuel Receipts window, the data was always shown in gallons, even for companies using metric units of measure. This issue has been resolved. | Compliance |
| XRS-558 | The ELD Driver Log Report was missing header data if the driver rejected the first UVA event of the day. This issue has been resolved. | Compliance |
| XRS-601 | Some drivers erroneously received a validation error message when they tried to correct a false violation. This issue has been resolved. | Compliance |
| XRS-610 | Sometimes when users selected the vehicle ID in the UVA tool to assign the UVA, no events appeared on the list. This issue has been resolved. | Compliance |
| XRS-942 XRS-943 |
Some users were prompted to enter a location for a UVA event when they tried to assign it, which prevented them from being able to assign it at all. This issue has been resolved. | Compliance |
| XRS-1330 | Duplicated drive events were causing eRODS transfers to fail. This issue has been resolved. | Compliance |
| XRS-1460 | The New Mexico tax rate has been updated from .0438 to .04378. | Compliance |
| XRS-1523 | Leading and trailing spaces in output comments were causing eRODS files transfers to fail. This issue has been resolved. | Compliance |
| XRS-1019 XRS-1082 |
The ELD Driver Log Report report no longer sporadically displays an error message when users try to generate it. | Compliance |
| XRS-546 | Some users were unable to assign UVA to a driver. Instead, they received an error message prompting them to enter a location for the event. This issue has been resolved; users can now assign UVA without receiving this error message. | Compliance |
| XRS-821 | An issue that prevented some users in AOBRD companies from generating the Driver Log Report has been resolved. | Compliance |
| XRS-966 | The Oregon weight-mile tax rate has been updated to reflect the correct rate of .2150. | Compliance |
| XRS-12884 | Some logs indicated a hard brake event even though the vehicle was not moving when the event was triggered. This issue has been resolved. | Relay |
| XRS-13865 | Speed spikes are now correctly flagged as anomalies rather than black box events. | Relay |
| XRS-16502 | Overspeed events were being created even if they were disabled in the host settings. This issue has been resolved. | Relay |
| XRS-1555 | Some Relays were defaulting to AOBRD Mode instead of ELD Mode when outages caused lost connections. This issue has been resolved. | Relay |