Omnitracs 5.8 New Features and Enhancements
Strategic Planner
- You can now clone recurring orders in Strategic Planner.
- You can have Strategic Planner assign a required origin to selected recurring orders.
- The Service Pattern Analyzer now reports service locations that did not have enough data to be included in the analysis.
- Licensing in Strategic Planner differentiates between modeling and operational sessions.
- You can permanently regeocode service locations from the Strategic Planner map.
Routing
- You can permanently regeocode service locations from the Route Planning map.
- When choosing to create a route template from a daily route in Routing, you can choose to have the original route template's properties overridden by the daily route properties or not.
- You can import daily orders into multiple routing sessions during a single import process.
- When using the menu option or toolbar icon to combine routes in Route Planning, you now receive a confirmation message asking if you are sure you want to combine the routes. Simply click Yes to proceed to combine the routes.
- When you create a location substitution, the descriptions of both the original and new service location are displayed, as well as their IDs.
- You can restrict workers from servicing specific service locations.
- You can create maintenance locations so you can track equipment when it goes into a shop for service.
- You can roll up information contained in order custom properties to be displayed for routes, serviceable stops or unassigned order groups.
- There are now columns in the Orders list for Stop Sequence Number and Planned Stop Sequence Number so that you can easily see where the order falls on a route. If the order is unassigned, these columns will be blank.
- When importing service time overrides and service window overrides for service locations, you can now choose to have the override information be added cumulatively, instead of the last record being the only one imported.
Dispatching
- Route cards and the Overview in FleetView indicate if a Telematics device is using satellite to communicate.
- You can have Omnitracs automatically make suggestions about how to optimize your routes while they are in progress.
Telematics
Navigation
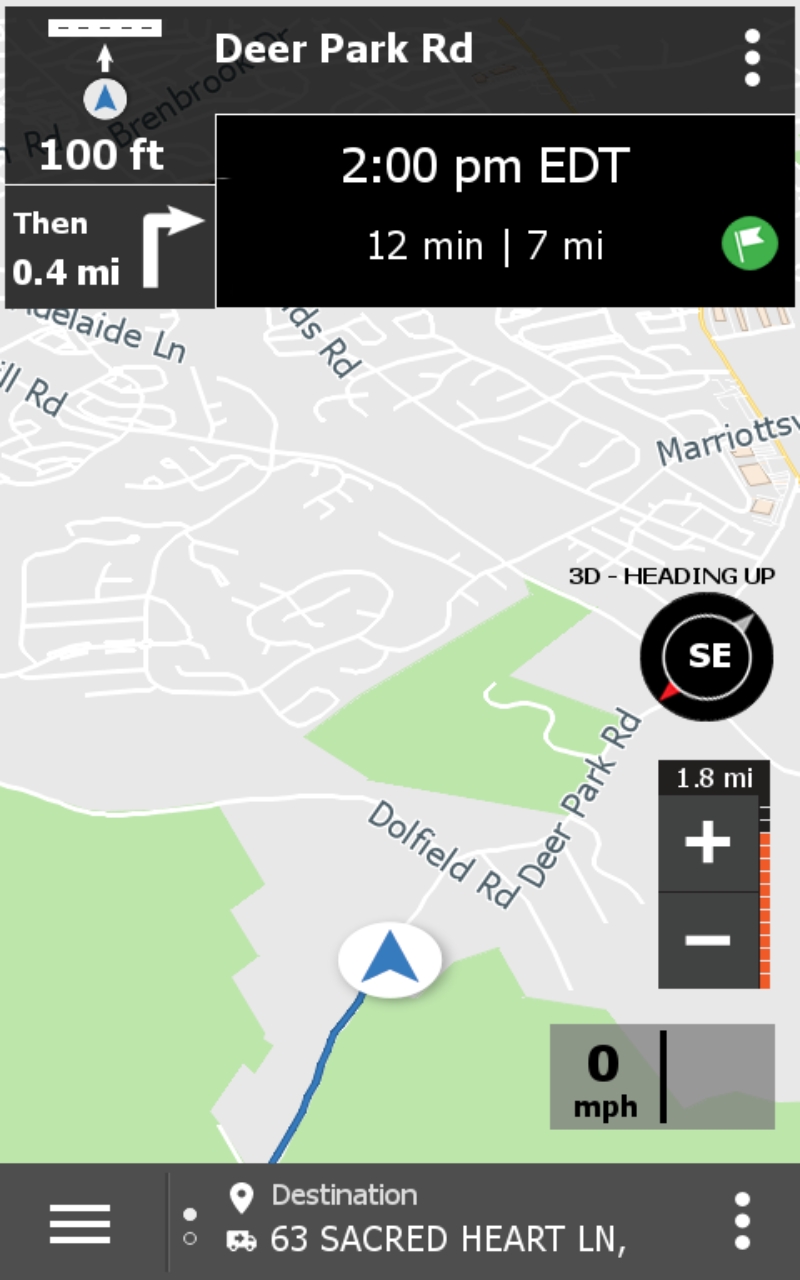
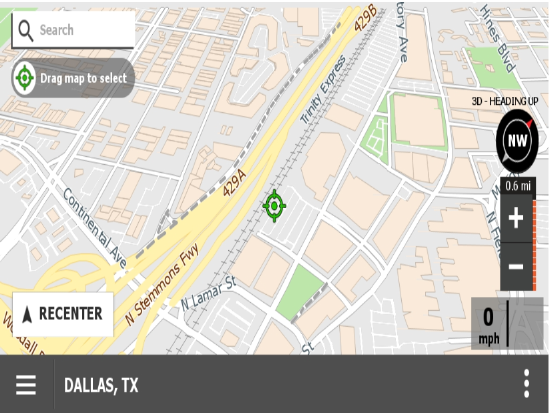
- You can have real time traffic conditions considered when a new route path is considered for the driver.
- You can now use Omnitracs Navigation in portrait mode. A number of screens have been optimized to display in portrait mode.
- Some pop-up prompts have been redesigned to provide to a consistent look.
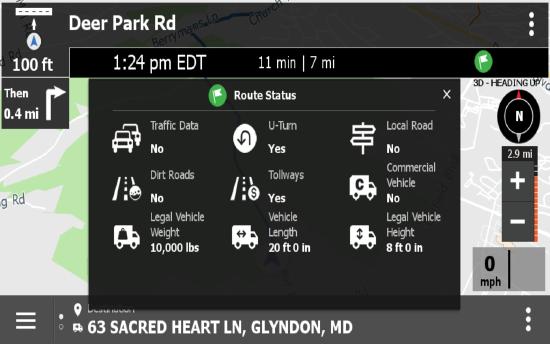
- The Route Status window has been updated so you can easily see which path setting has been deviated from or followed.
- The junction view has been redesigned. an exit sign is now displayed over top the map and will auto close if you do not close it manually.
- New path settings that the driver can set have been added to allow for real time traffic to be applied to your path and to set a time limit that determines how often a path is recalculated.
- Omnitracs Navigation prompts the worker if there is a faster path and will automatically re-route the path, unless the worker dismisses the suggestion. The re-route suggestion will be read aloud and displayed on the screen.
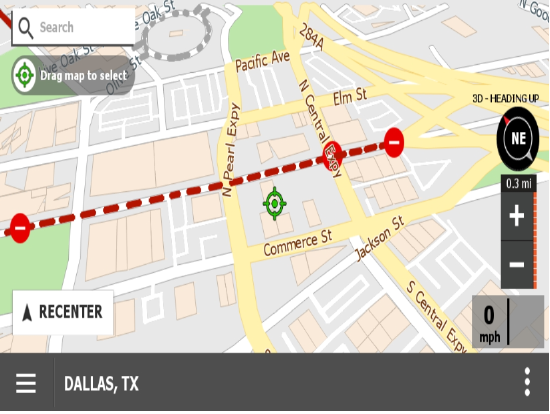
- Roads with high traffic display in red. Roads with medium traffic display in orange.
- The maps now display disabled and blocked roads.
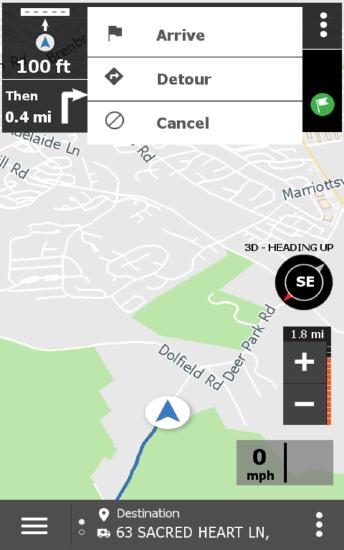
- Access to the Detour, Arrive, and Cancel options have been moved to the kabob menu at the top of the map. Press the kabob menu and the options display in a list.
- More information is provided when receiving turn-by-turn audible directions.
- Waypoints are now passed from Roadnet Mobile to Omnitracs Navigation. You can choose to enforce waypoints or allow re-routing using real time traffic.
- Building outlines can now be seen on the map.
Reporting
- If you use region hierarchy, you can now select lower level regions when running the Telematics Diagnostic Report.
- The Equipment Position History CSV report can be generated for up to 31 days in a CSV file format.
- The Equipment Position History report can be generated for only a single day.
- You can choose to show active diagnostic trouble codes for specific equipment or for all active equipment in the Active DTC report.
- You can run an error report that displays issues with your Telematics devices.
Roadnet Mobile
- You can no longer add new Java phone devices in Omnitracs.
- When the worker adds a new stop to a route on the mobile device, it will be added as the next stop to be serviced.
Omnitracs Mobile Manager
- You can choose a depot when logging into Omnitracs Mobile Manager and see information based on that depot.
- You can see maintenance stops that are assigned to a route.
Insight
- You can change the time scale that displays on a KPI
- The Stop Sequence Score (Cumulative) measure has been added to Insight.
Order Status
- The word Driver has been changed to Worker, so that it is the same throughout Omnitracs.
Active Alert
- You can now send alerts when a stop is Scheduled, Rescheduled, and Arrived.
- A new Business Unit setting, Unscheduled Stop Cancellation Threshold, allows you to define how long to wait before a route is considered cancelled and an alert is sent, when that route is moved from dispatched back to planned.
- You can now add the ETA start date to your message templates.
Drive/Command
- There are new configuration options in Command that can provide an improved experience of what the driver sees in Drive.
- If you use Compliance, we have improved the support of co-drive within the Drive mobile application.
- If you use Compliance and a Co-Driver is logged in to Drive, the workers can be marked as Primary and/or Active.
- If you use Compliance, you can see the HOS Duty Status for both workers logged into Drive.
- If you use AMG-C Satellite Mode, when the worker is in satellite mode, Drive will not send photos, document scans, files, or signatures back to Omnitracs until the device is re-connected to wi-fi or regular cellular data is restored.
- A warning displays if the worker does not complete a stop and attempts to navigate to the next stop. Also, if the worker does not complete the stop, the next stop will not be auto-arrived.
- A warning displays if the worker attempts to log out of Drive while a trip is still active.
Administration
- You can now view a log of changes made to a region, who made the change and when it was made.
Web Services
- There are new REST APIs to allow you to more easily integrate with Omnitracs.
Mobile Application Management
- You can now download the latest mobile application installation files for your mobile device management system or to manually load the file(s) onto a mobile device.
- You can use Omnitracs Installer to manage the installation and update of Omnitracs applications loaded on your mobile devices.
HOS Mobile
-
Mobile API users can now bypass the prompt that asks drivers to confirm their logout in the integrated logout so they aren’t prompted twice. A new field called “skipconfirmation” has been added to the integratedlogout command. If this field is set to 1 (true), the logout process will skip the initial “Are you sure you want to log out” prompt. All other logout prompts will still appear.
There were also several software corrections made in this release.
Cloning Recurring Orders in Strategic Planner
There may be times when you want to create a new recurring order that is essentially the same as as an existing recurring order, only changing or two items such as the service location or cycle quantity. Now, instead of having to create a new recurring order from scratch, you are able to clone an existing recurring order. To clone an existing recurring order, right click on the order and choose Clone from the menu; the Add Recurring Orders window opens. Enter a Recurring Order Number, and make any other changes you want to the recurring order. Click [Save].
Note: If the original recurring order was routed, the cloned recurring order will be unrouted on the territory.
Assigning a Required Origin to Recurring Orders
There are some recurring orders that you want to make sure originate from the closest depot, or origin. The Assign Required Origin tool lets you select recurring orders that you want to have Strategic Planner assign to the closest depot. Once this process is complete, these recurring orders will be assigned to a territory that uses this depot when Create Territories is run.
Notes: Strategic Planner uses the existing time/distance matrices to determine the closest depot. If the recurring order is not included in the matrices yet, such as if it is for a new service location, then XY calculation will be used to determine the closest depot.
- In the Strategic Planning manifest, or Recurring Orders list, select the recurring orders that you want to assign.
Note: Only unassigned recurring orders can be assigned a required origin using this method. - Right-click on a selected order and choose Assign Required Origin from the menu that pops up. The Assign Required Origin window opens.
- Use the arrows to move depots between the Active Depots and Inactive Depots lists. Only depots in the Active Depots list will be considered when the required origins are assigned.
- Click [Assign]. The selected recurring orders are assigned to the closest depots. Once the process is complete, the Recurring Orders list at the bottom of the window is updated to show the Required Origin for each recurring order.
- Click [Close].
Updates to the Service Pattern Analyzer
The Service Pattern Analyzer is a tool that analyzes your archived routes and suggests recurring orders and service patterns that you may want to use when running Strategic Planner. However, you may have service locations that don't have enough data to be valid for the analysis; for instance you may have a service location that only received one delivery in the past year and that delivery occurred three months ago. These service locations are considered exceptions. Now, there is a separate page on the .csv that the Service Pattern Analyzer creates that lists these exceptions, along with a brief explanation of why they were not included in the analysis, and why recurring orders were not created for them.
Updates to Strategic Planner Licensing
Strategic Planner licensing counts total territories in “Operational” planning sessions across all regions and all business units. Users have full functionality in “Operational” planning sessions. The number of territories used out of the total licensed count is displayed on status bar. “Modeling” planning sessions are for “what-if” scenarios. Existing territories in modeling sessions are not counted against the Strategic Planner contracted licenses; however, users are restricted from implementing the planned territories. Users have restricted export and printing functionality in modeling sessions.
Regeocoding Service Locations in Route Planning & Strategic Planner
If you discover that a stop's service location is geocoded incorrectly, such as if a store moved, you can re-gecode the stop directly in the Route Planning/Route Dispatch/Strategic Planner map. When you re-geocode the stop, the stop's service location is regecoded.
Note: The geocode for the stop's on archived routes will not be updated with the service location's new geocode.
1. From the Route Planning/Route Dispatching workspace, right-click the route you want to work with and select Fit on Map from the menu that pops up, or click the Fit on Map icon. The route selected will display on the map.
Note: To see the map as a picture of the Earth, showing trees, buildings, and other physical features, click Layers, then check Satellite. The display changes from a traditional map view to a satellite picture of the area. If you are zoomed out too far, the Satellite mode will not be available.
2. Right-click on the stop/unassigned you want to regeocode on the map and select Geocode, then Permanent, from the menu that pops up.
3. When you move your cursor over the map, it will change to indicate you are ready to regeocode the stop/unassigned. Click the spot on the map where you want to assign the new geocode. The stop will move to that spot, and the latitude and longitude of the new coordinate will be displayed at the bottom of the map.
Hints: While placing the geocode, you can still navigate the map using the zoom slide bar or the directional palette.
If you do not place the stop exactly where you want it the first time, you can click on the map again to reassign it. You can do this as many times as you need to before proceeding.
4. To accept the new geocode, click the Apply icon at the bottom of the map.
To restore the stop's/unassigned's previous coordinates, click the Cancel icon at the bottom of the map.
Updating Route Template Properties
When you create daily routes from route templates, you may need to change one or more of the route properties - for instance the normal worker may not be available so you need to replace the worker on the daily route. In the past, when you updated an existing route template from a daily route, all the route properties were automatically carried over to the route template. Now, you have the option of whether or not the route template properties will be updated with the daily route's properties.
Importing Orders into Multiple Routing Sessions
There may be times, especially if you use weekly routing, when you want to import daily orders into different routing sessions, but you don't want to run through the import process multiple times. Now, you can specify the routing session that an order should be added to when importing orders. Some important points about this enhancement:
- Session date has been added to the Import Orders data transfer layout.
- If the session date is not specified, the order will be added to the current active session, as happens now.
- If the session date is specified, the order will be added to the first operational session with that date. If no session exists, it will be created.
Note: If you use depot context with your sessions, you should not import the session date.
To import orders into multiple routing sessions, you need to do a couple of simple things.
- Add the Session Date to your import file.
- In the Data Transfer Layout, map Session Date to the proper field in your order file.
- Import your orders as you normally would.
The information for importing the session date is outlined in the table below.
| Field | Required | Max. Length/Range | Description |
|---|---|---|---|
| Session Date | No | Date | The date of the routing session the order should be added to. If an operational session without this date does not exist, it will be created. Orders that do not specify a session date will be added to the session that is active when they are imported. |
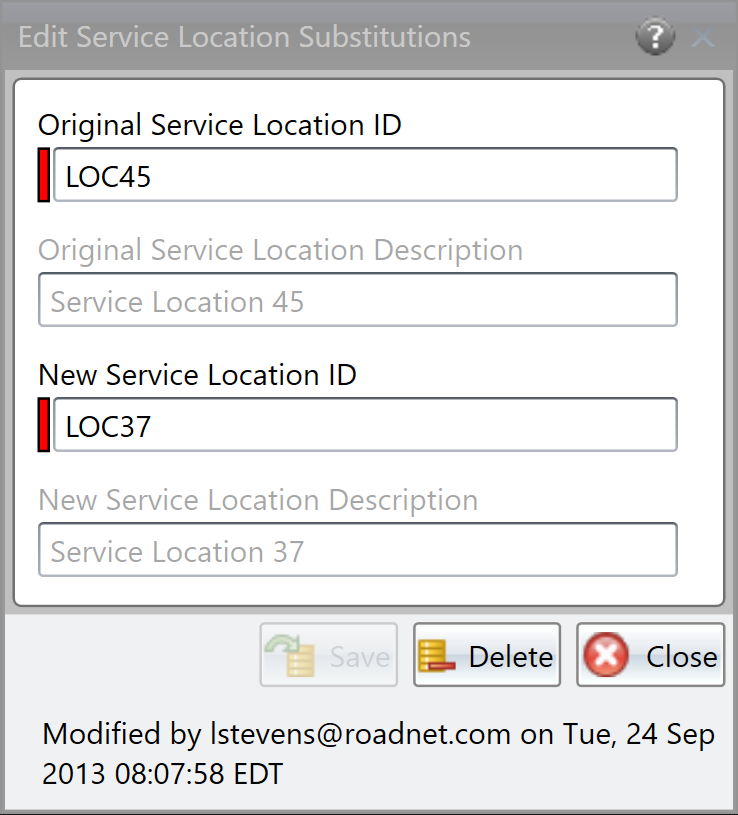
Service Location Descriptions Displayed when Creating Service Location Substitutions
Service location substitutions allow you to assign one service location address to two or more service locations. For example, if you have several stops within one building-different floors, departments, etc.-you may choose to group them so that they are represented by one address in order to avoid having them routed separately. Or, one service location may be temporarily unable to receive orders and may wish to have its orders delivered to a neighboring service location. When the routes are created, the order for the original service location will be routed to the substitute service location, and the original service location will not appear as a stop on a route.
To help confirm that you entered the proper ID for the service locations, the Description of the service locations will be displayed below the ID on the Service Location Substitution window.
Restricting Drivers from Specific Service Locations
You may have some customers that require the driver servicing their location have special permission to be there. For instance, the driver may need special permission to be on a military base or at a health care facility. Now, you can specify drivers that can or can not service specific service locations, and have this information considered when routes are created.
- You can create worker restrictions for individual service locations.
- Workers will not be assigned to routes containing service locations they can not service when routes are created.
- Worker restrictions are considered for route templates.
- You can not import worker restrictions
- You can be alerted when a stop on a route, or a stop template on a route template, breaks a worker restriction.
- A column has been added to all unassigned, order, and stop, as well as the service locations, list that displays any worker restrictions for that service location.
- You can choose to have worker restrictions ignored when many actions are done, including Create Routes, Suggest Route, Autonomous Optimization, Route Optimization, and when inserting an order or stop onto a route.
Setting Up Worker Restrictions
- Click on the Maintenance menu and scroll to Service Locations. The Service Locations list opens.
- Click the Add icon to add a new service location or, to change a service location, select the service location then click the Edit icon. The Service Location window opens.
- Click the Worker Restriction tab to open the Worker Restriction page.
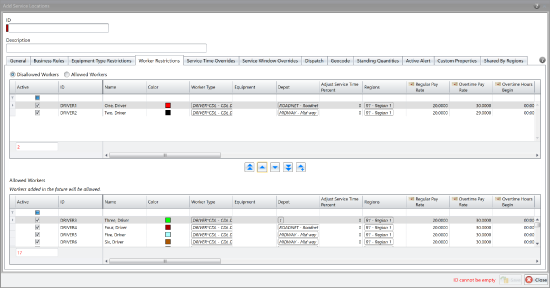
- Select whether the top list is workers that are allowed or disallowed from servicing the location.
Note: If you choose to Disallow workers, any workers that are added will automatically be allowed at the service location. Likewise, if you choose to Allow workers, any workers that are added will automatically be disallowed at the service location. - Click the arrows to move workers between the Allowed Workers and Disallowed Workers list.
Note: To add a worker and have them automatically added to the top list, click the Add New Worker icon. - When all the workers have been moved to the proper list, continue setting up the service location, the click [Save].
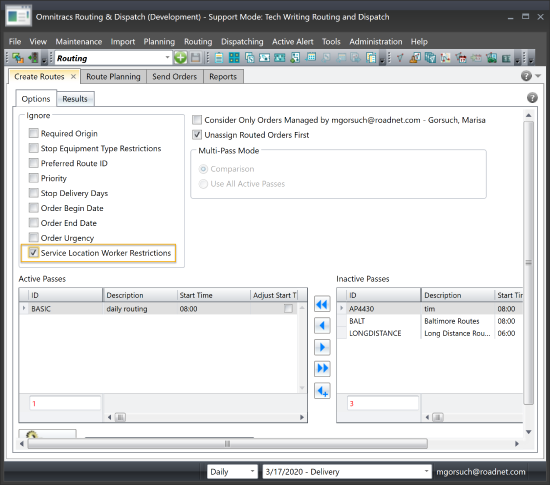
Consider Worker Restrictions When Creating Routes
If you have created worker restrictions, they are automatically considered when you create routes. However, if you don't want to consider the worker restrictions when creating routes, you can have Omnitracs Routing ignore them.
- If necessary, click Routing, then Create Routes. The Create Routes window opens.
- In the Ignore box on the Options page, check Service Location Worker Restrictions. Omnitracs Routing will ignore any worker restrictions when creating routes.

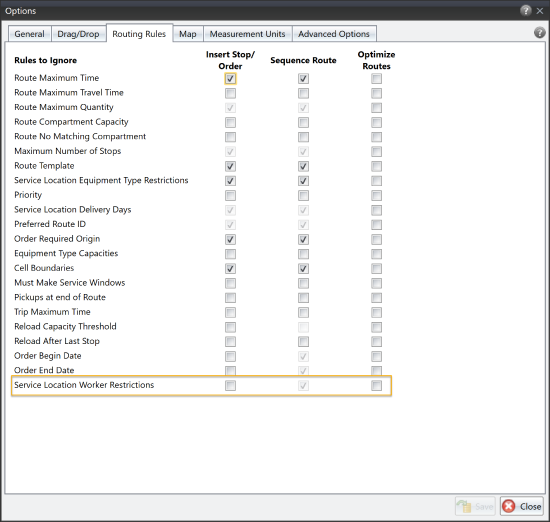
Ignoring Worker Restrictions when Suggesting Routes
You can use Suggest Route to have Omnitracs Routing suggest the best possible route to place an unassigned order or a stop on, based on the guidelines and restrictions you define, including any worker restrictions. However, you can choose to have Omnitracs Routing ignore the worker restrictions when suggesting routes.
- In Route Planning, right-click on the unassigned order or stop that you want to place on a route and choose Suggest Route from the menu that pops up. The Suggest Route window opens.
- Click on the Options tab to open the Options page.
- In the Rules to Ignore box, check Service Location Worker Restrictions.
- Select the other appropriate options, then click [Suggest] on the Suggestions page. Omnitracs Routing suggests the best routes for the unassigned order/stop.
Ignoring Worker Restrictions when Inserting Stops or Optimizing Routes
Normally when you insert stops onto a route, or have Omnitracs Routing optimize a route, all the guidelines and restrictions you have established are used. You can choose to have many of these restrictions ignored when performing these actions, including worker restrictions.
- Click on the Tools menu and scroll to Options. The Options notebook opens.
- Click on the Routing Rules tab. The Routing Rules page opens.
- To have worker restrictions ignored when stops are inserted onto a route, check Service Location Worker Restrictions under Insert Stop/Order.
To have worker restrictions ignored when routes are optimized, check Service Location Worker Restrictions under Optimize Routes. - Click [Save].

Alert Flags
You can choose to be alerted when a route or stop breaks one of the rules or guidelines you have defined. For instance, if a stop or stop template is placed on a route with a worker that is not allowed for the stop's service location, you can choose to have an alert flag appear in the Alerts column in the Stop list or Stop Template list.
Note: If you have Has Stop Alerts selected as a Route Alert, you will be alerted that a stop on the route has an alert, such as service location worker restriction is broken, on the route list.
- Click on the Administration menu and scroll to Regions. The Regions list opens.
- To add a region click the Add icon, or to change an existing region select the region and click the Edit icon. The Regions window opens.
- Click on the Alert Options tab. The Alert Options page opens.
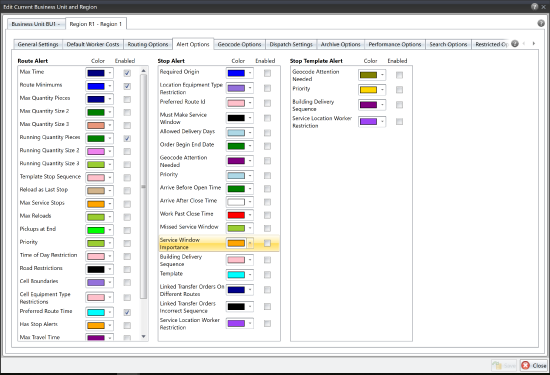
- To be alerted that a stop has broken a worker restriction, check Service Location Worker Restriction under Stop Alerts.
To be alerted that a stop template has broken a worker restriction, check Service Location Worker Restriction under Stop Template Alerts. - Click [Save].

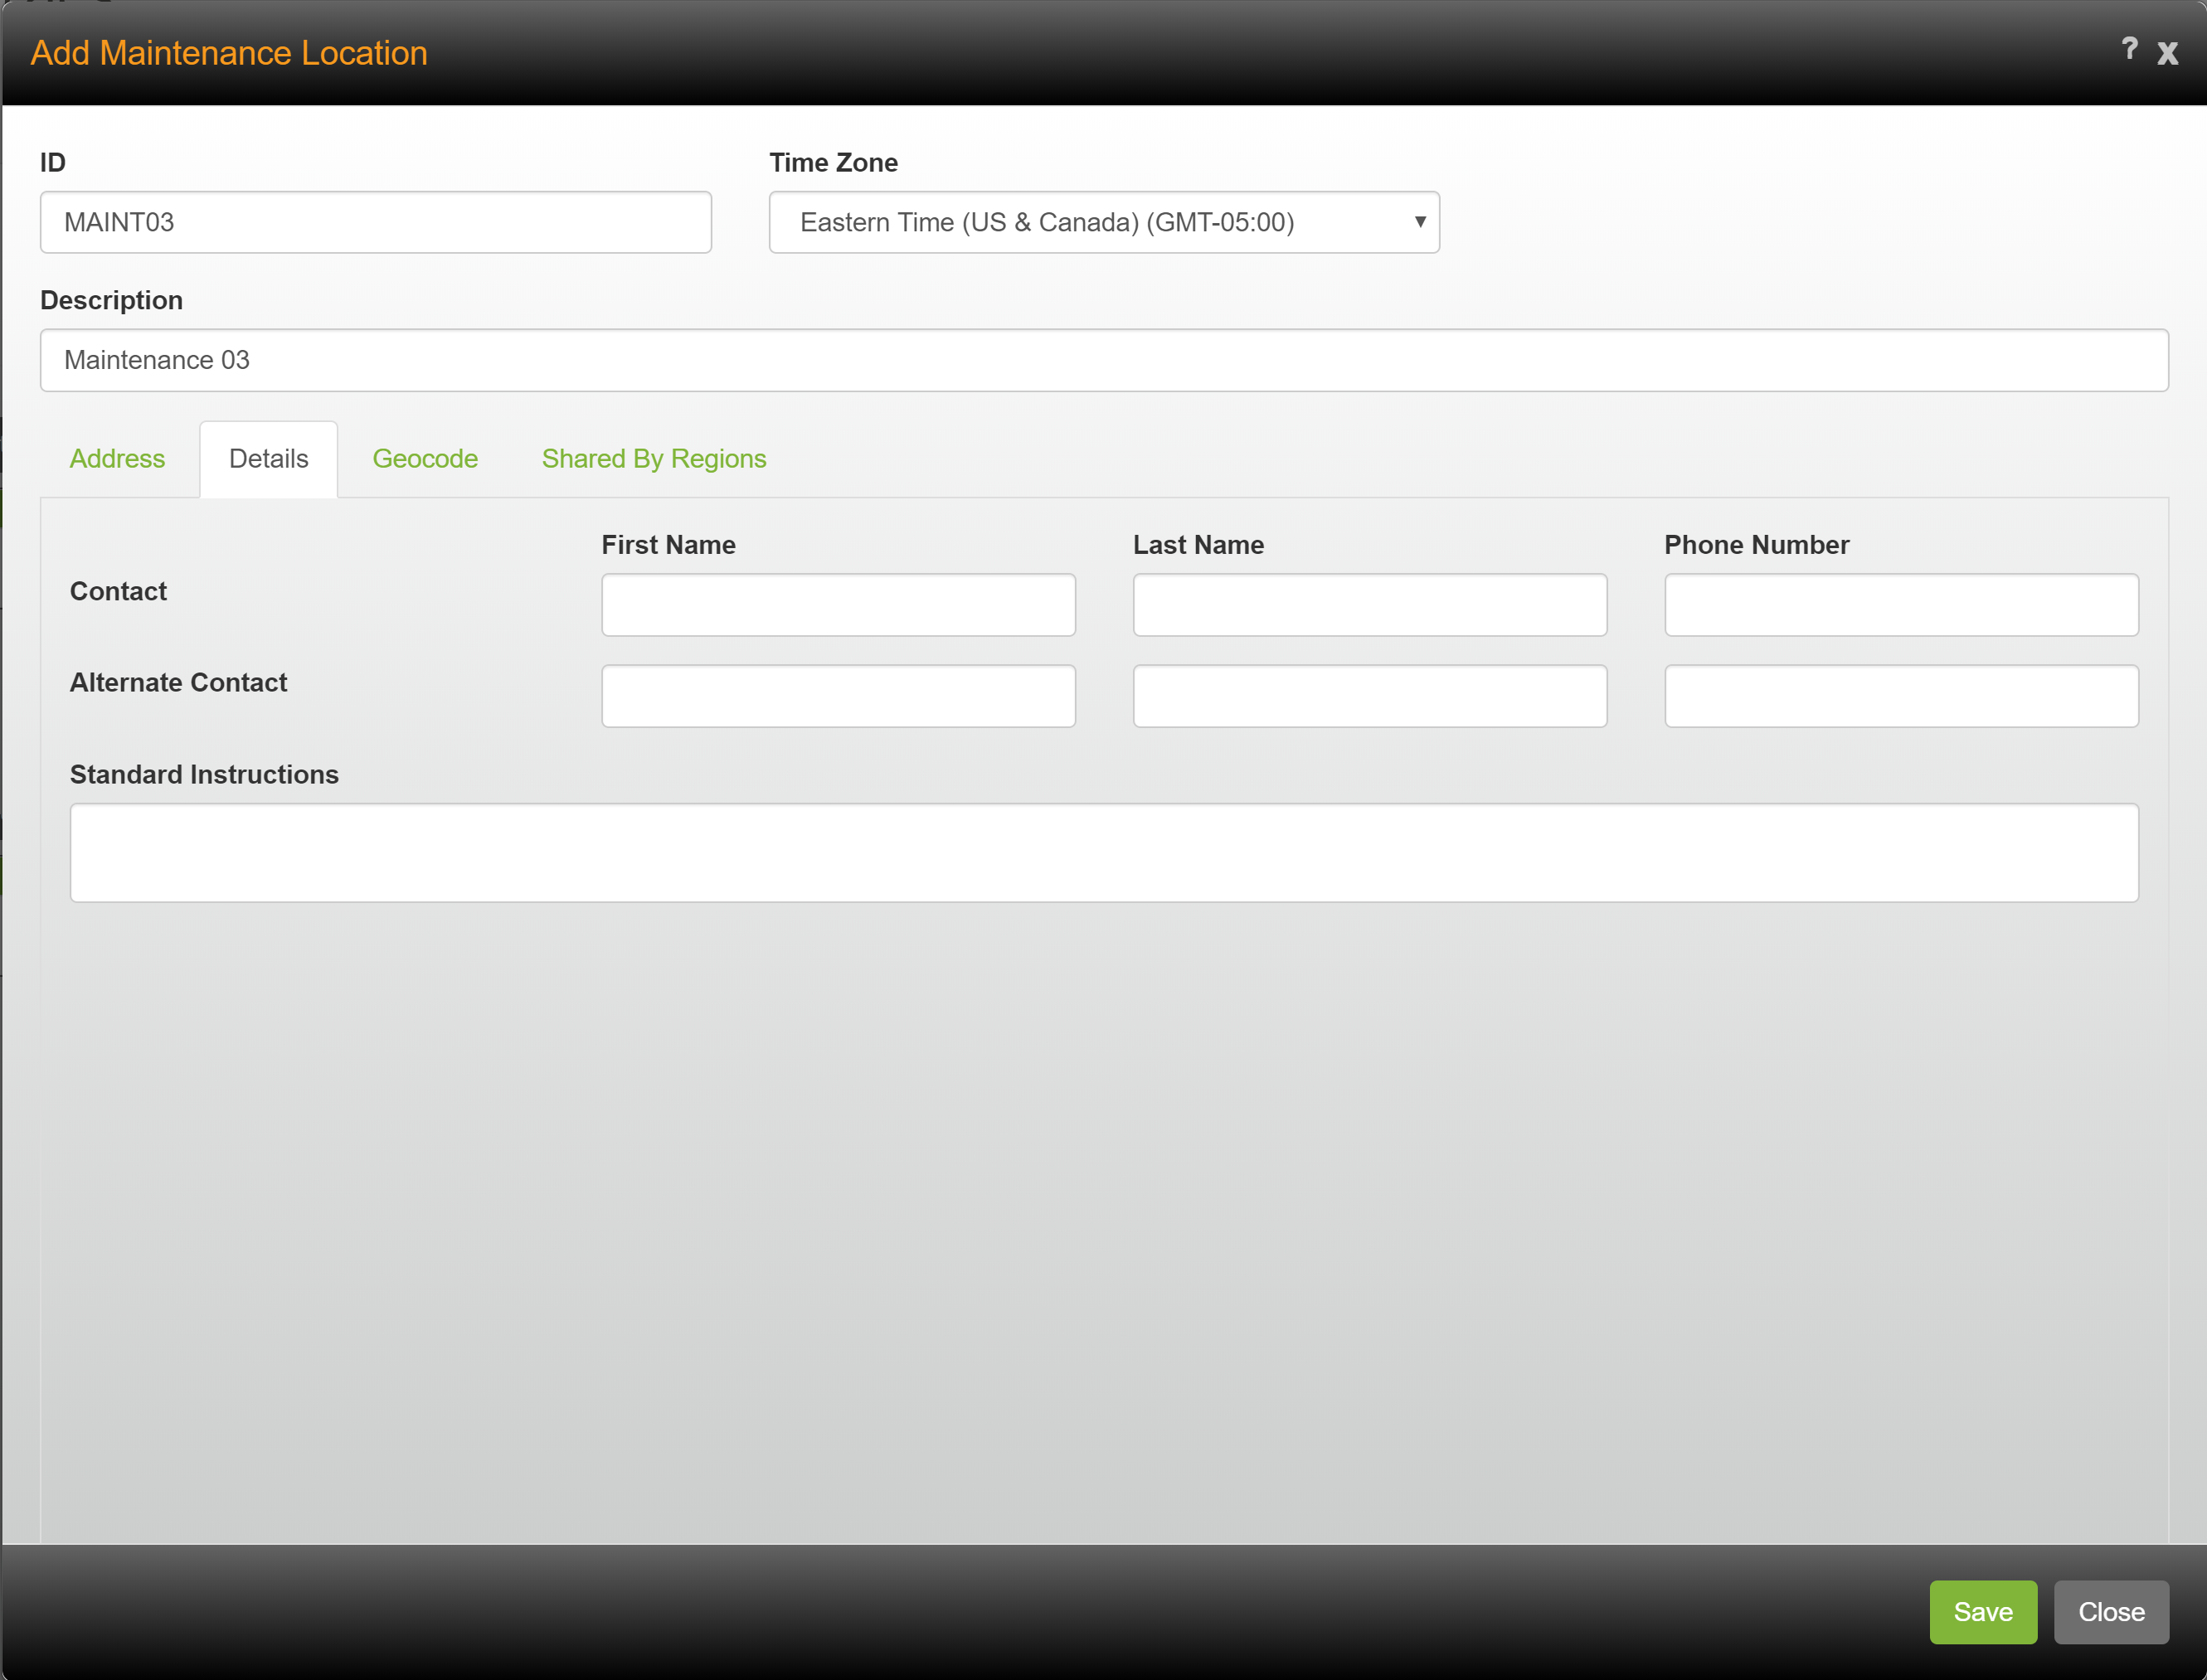
Using Maintenance Locations
Maintenance locations are the shops where you take your equipment to have maintenance done. The maintenance locations could be your own shops, or other businesses who perform service for you. You can add a maintenance location to a route, specifying the amount of time needed for the maintenance; once the maintenance location has been added to the route it is considered when you sequence, optimize, or perform other actions on the route.
- You can add maintenance locations.
- You can import maintenance locations.
- You can specify whether maintenance locations are identified by the ID and/or Description in grids.
- When you use Send Orders to transfer routes to a host system, maintenance locations are automatically included.
- You can add maintenance stops to your existing Planning routes.
- You can not add maintenance locations to Strategic Planning routes.
- Maintenance locations are considered when you sequence, optimize, or perform other actions on a route.
- You can create custom properties for your maintenance locations.
- The following reports have been updated to include maintenance stops when they are on the route: Actual Stop List, Actual vs Planned, Driver Manifest, Simple Actual Stop List, Simple Stop List, and Stop List.
- Insight will include maintenance stops in KPIs in the same manner it handles other stops.
Adding Maintenance Locations
The first step in using maintenance locations is to add them.
In Omnitracs Web
- Click on the Maintenance icon to open Maintenance.
- Click the green button and scroll to Maintenance Locations; the Maintenance Locations list opens.
- Click the [Add] button; the Maintenance Location window opens.
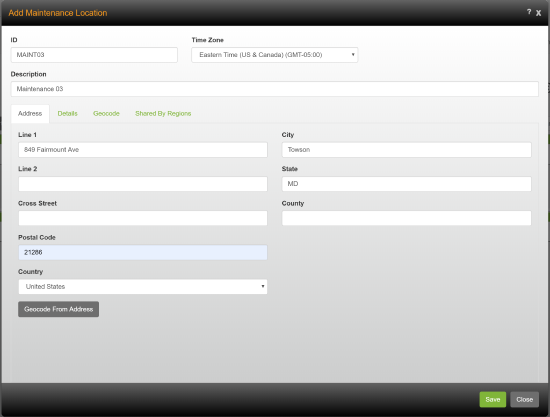
- Enter the unique ID for the maintenance location. You must enter an ID.
- Click the Timezone arrow and select the timezone to use for the maintenance location's times.
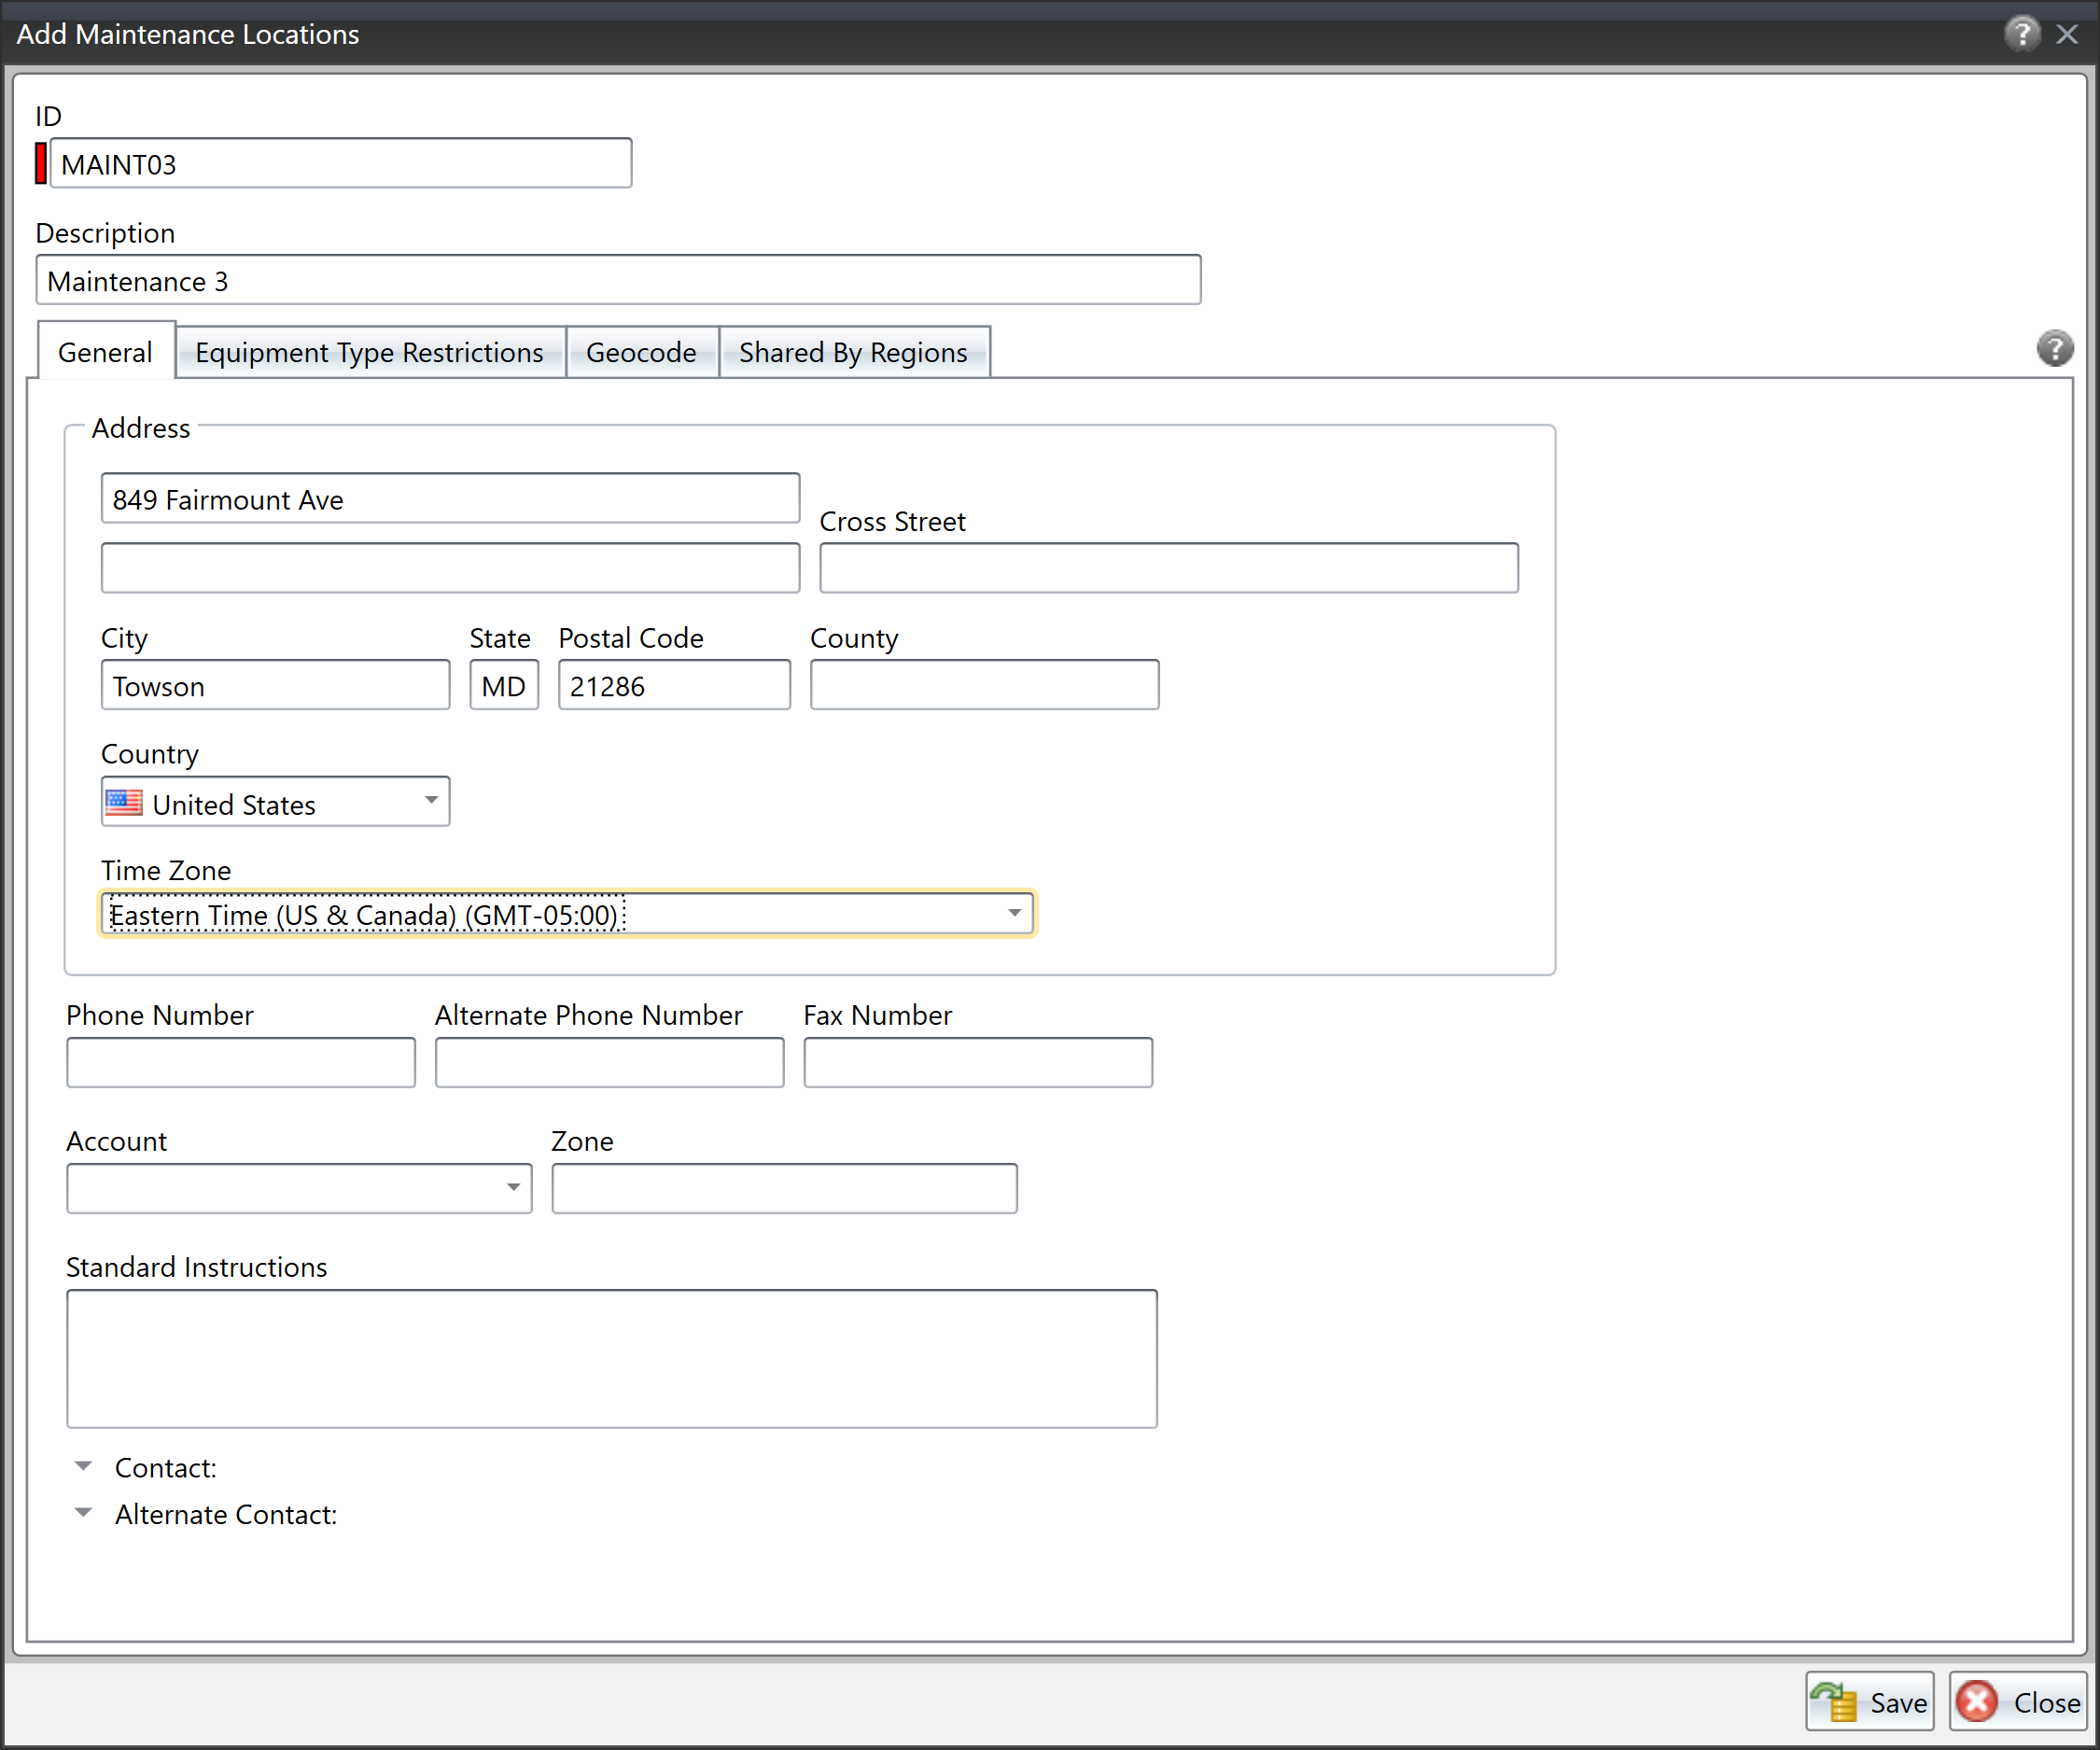
- Enter a Description for the maintenance location.
- On the Address page, as much information as possible for the maintenance location's address. Click the [Geocode from Address] button to geocode the maintenance location based on the address.
- Click the Details tab to open the Details page.
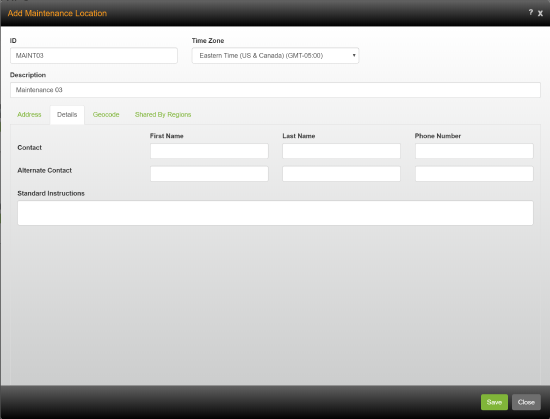
- Enter the contact information for the maintenance location.
- Enter the standard instructions for the maintenance location. The standard instructions appear on the driver's manifest and on the mobile device.
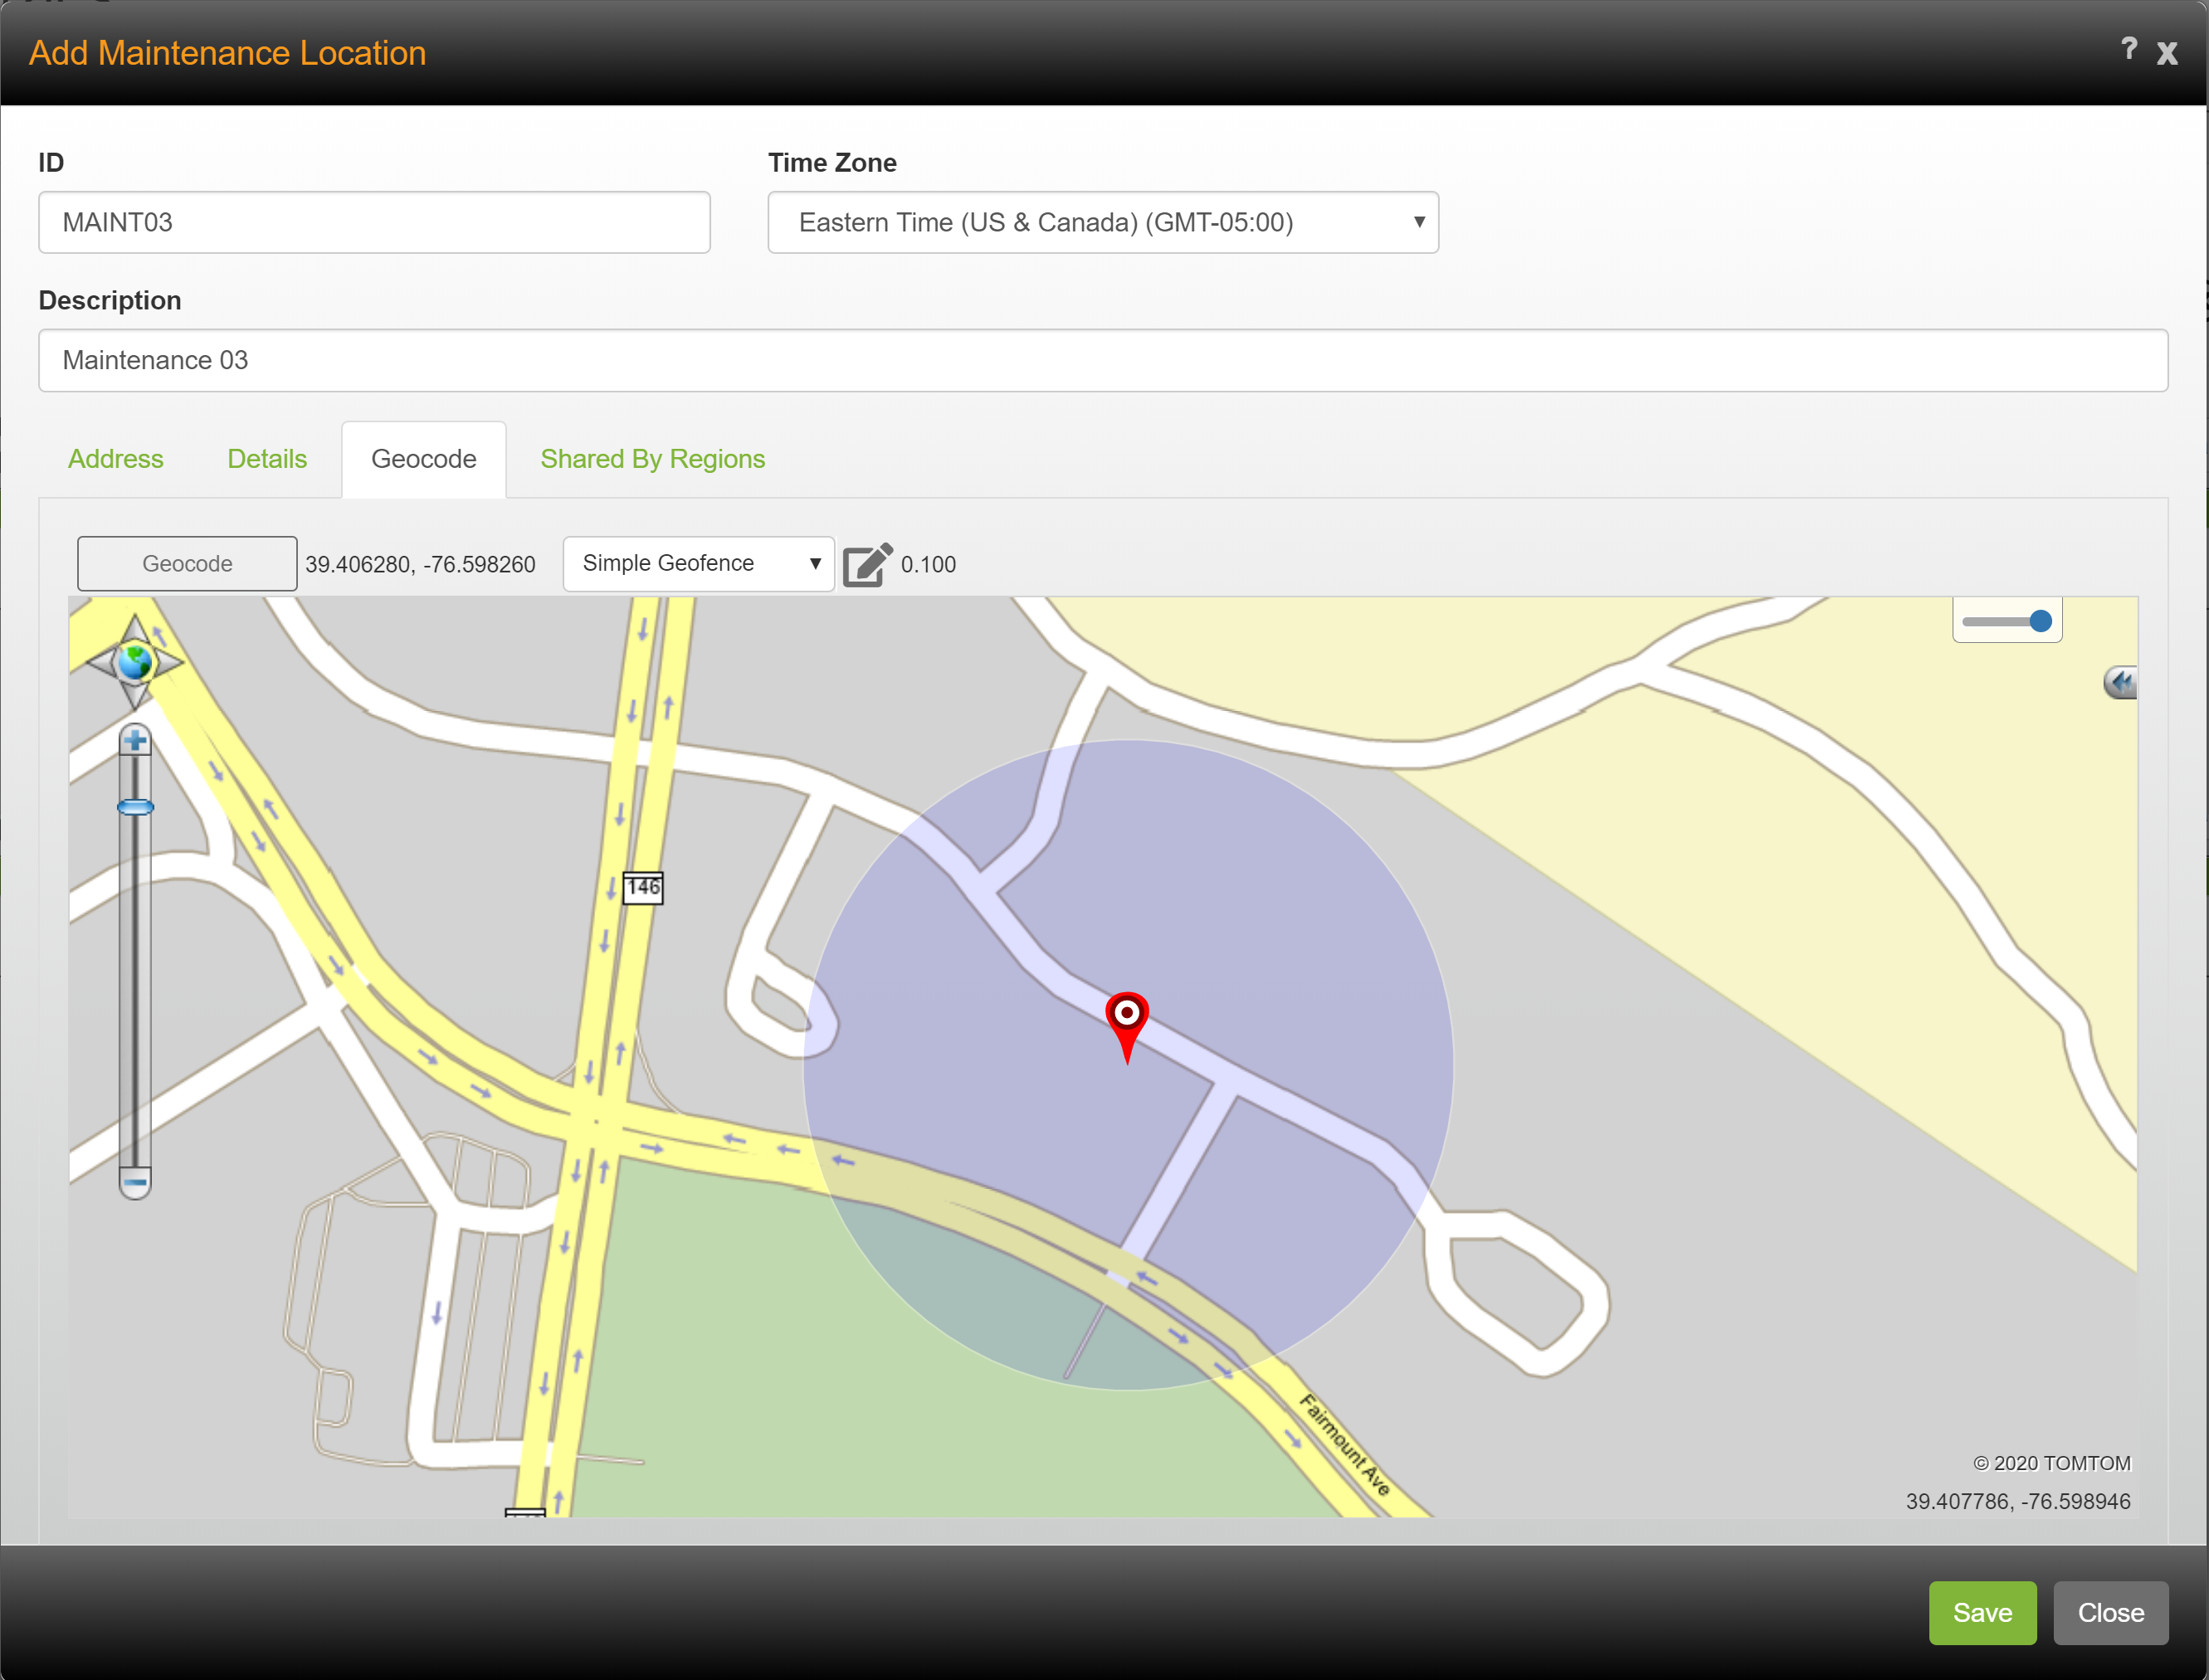
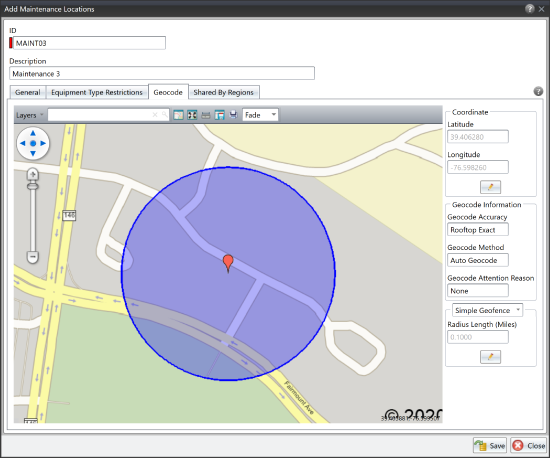
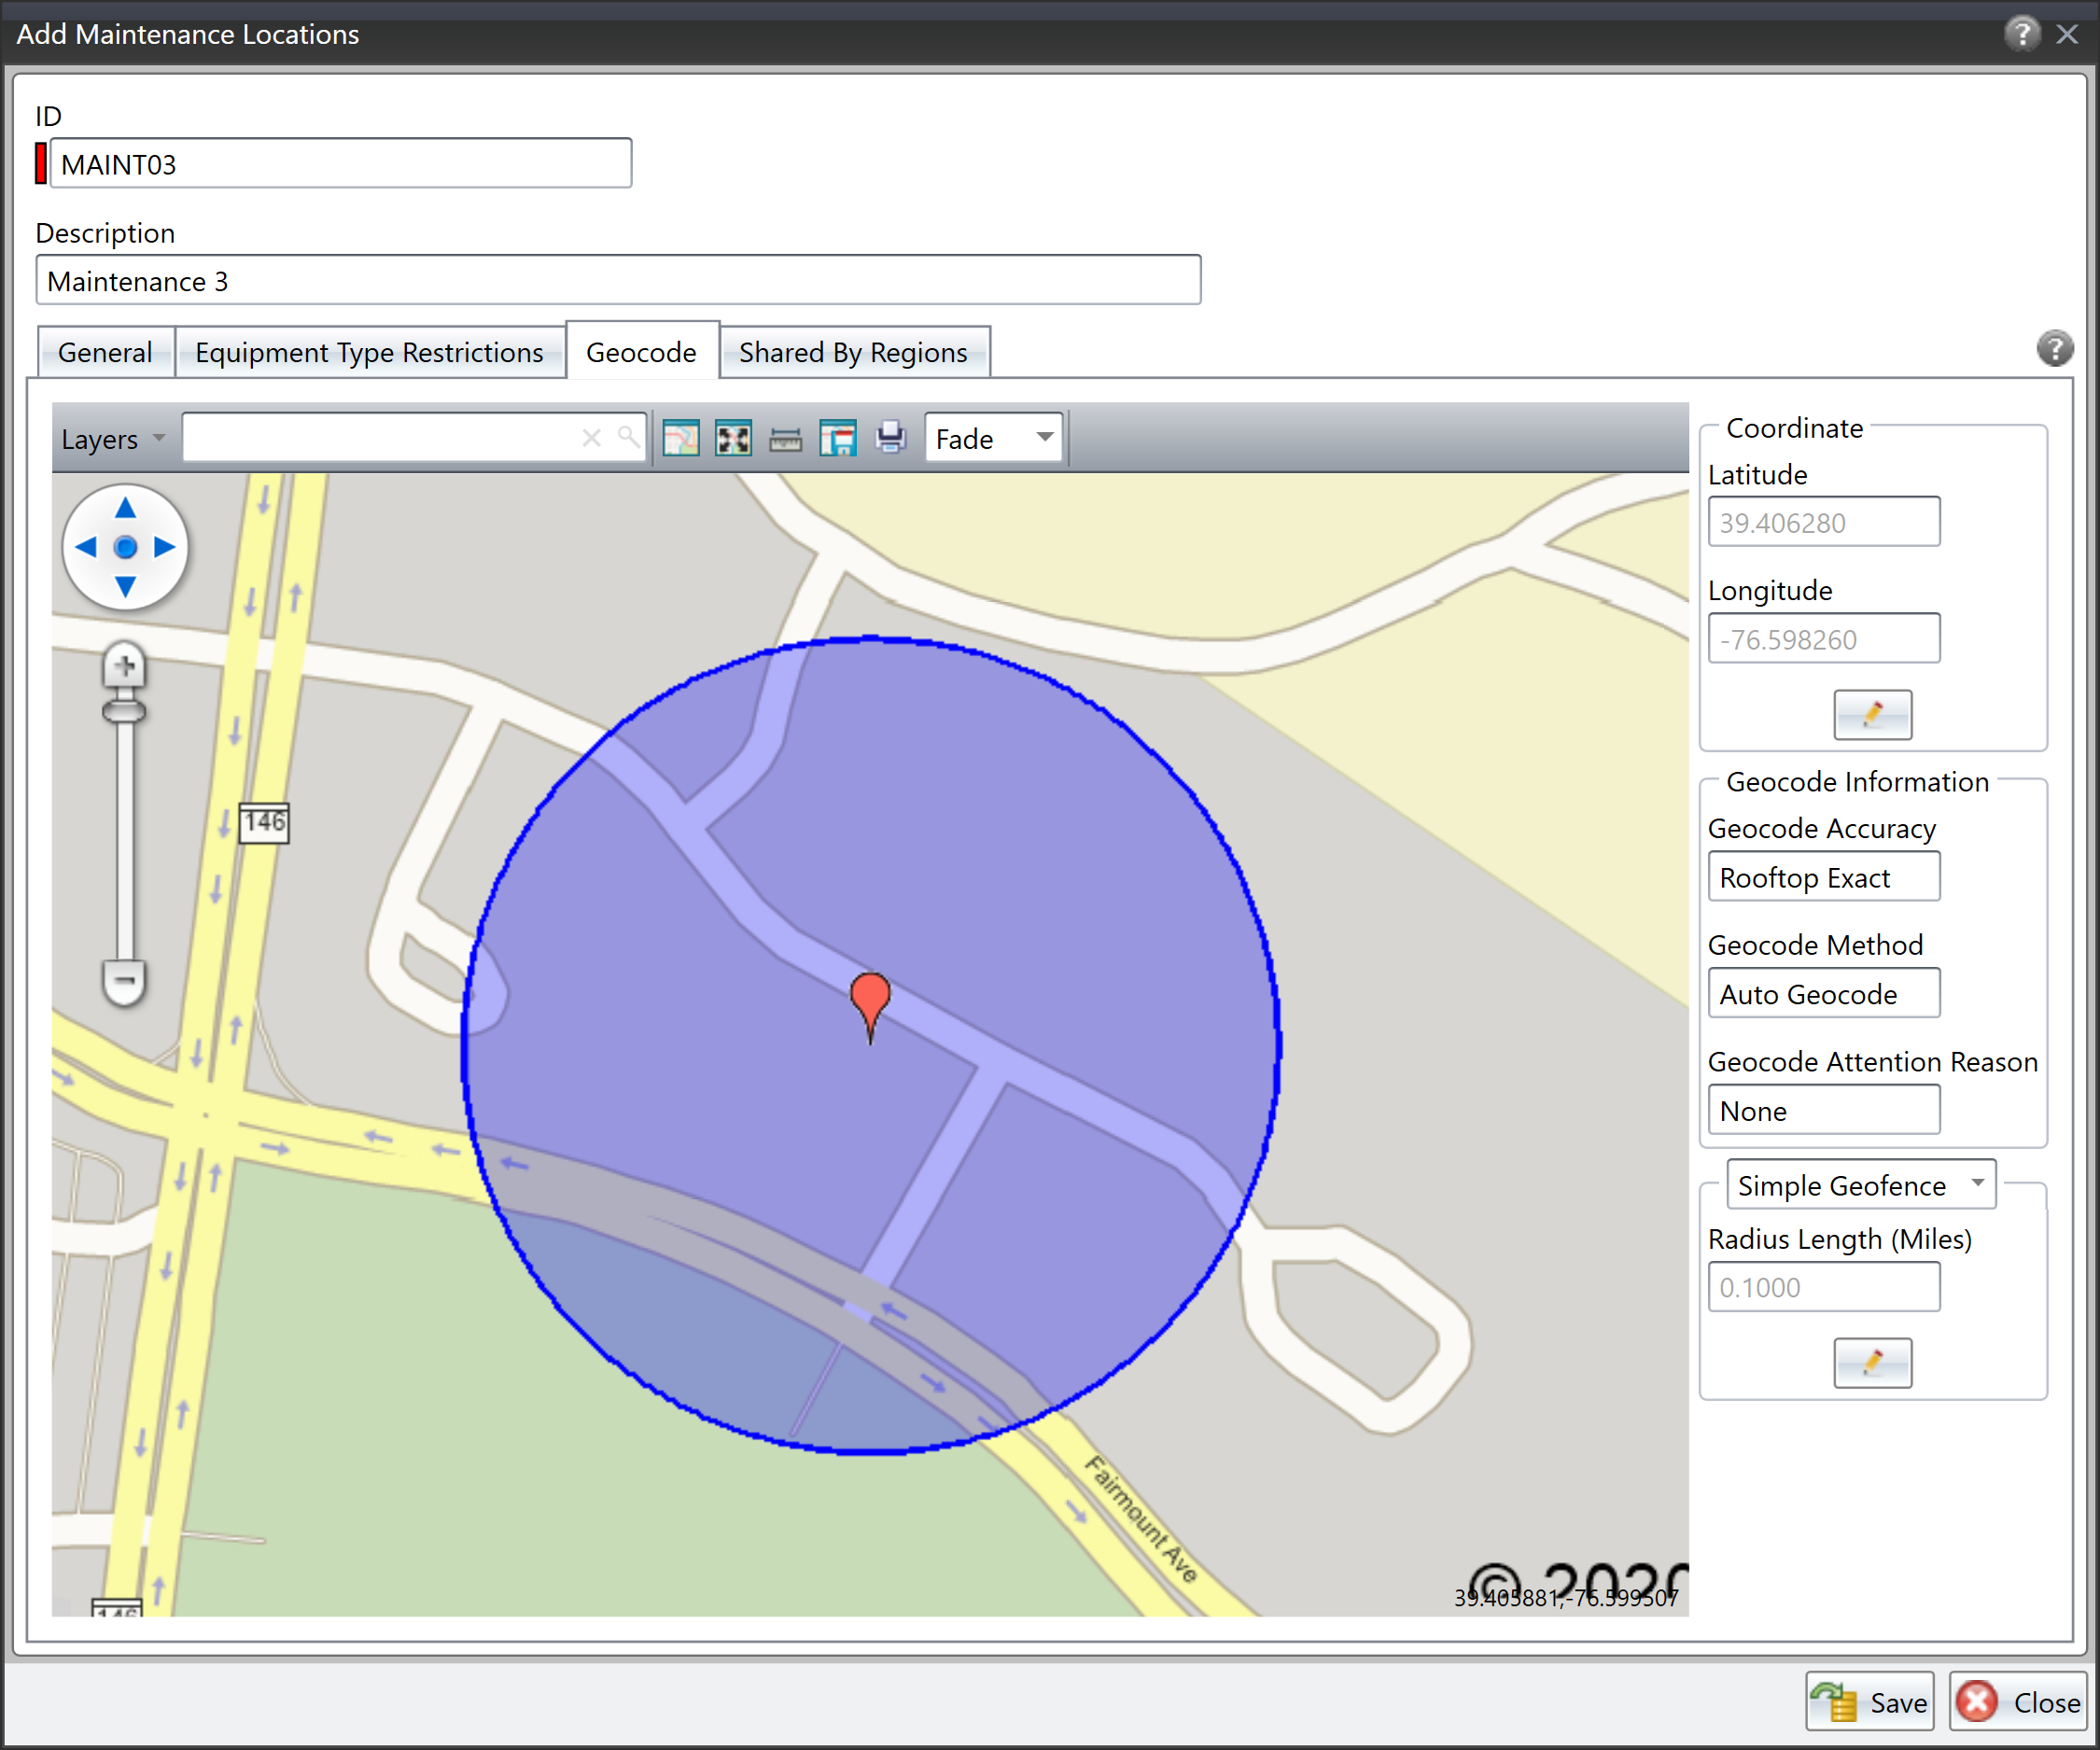
- Click the Geocode tab to open the Geocode page. Confirm the maintenance location's geocode is correct; if necessary click the [Geocode] button and regecode the maintenance location.

- If the maintenance location should be available for other regions to use, click Shared By Region to open the Shared by Region page. To share the location with all other regions, check Shared to All Regions. To only share the maintenance location with specific regions, check the regions in the list.
- Click the[Save] button.

In Omnitracs Client
- Click on the Maintenance and scroll to Maintenance Locations; the Maintenance Locations list opens.
- Click the Add icon; the Maintenance Location window opens.
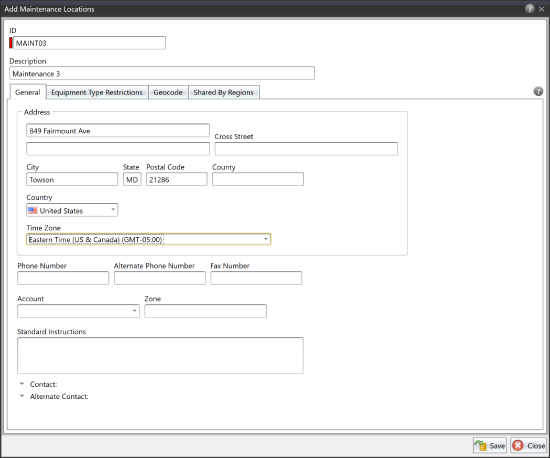
- Enter the unique ID for the maintenance location. You must enter an ID.
- Enter a Description for the maintenance location.
- On the General page, as much information as possible for the maintenance location's address.
- Click the Timezone arrow and select the timezone to use for the maintenance location's times.
- Enter the Phone Number, Alternate Phone Number, and Fax Number.
- Click the Contact and Alternate Contact arrows to enter the contact information for the maintenance location.
- Enter the standard instructions for the maintenance location. The standard instructions appear on the driver's manifest and on the mobile device.
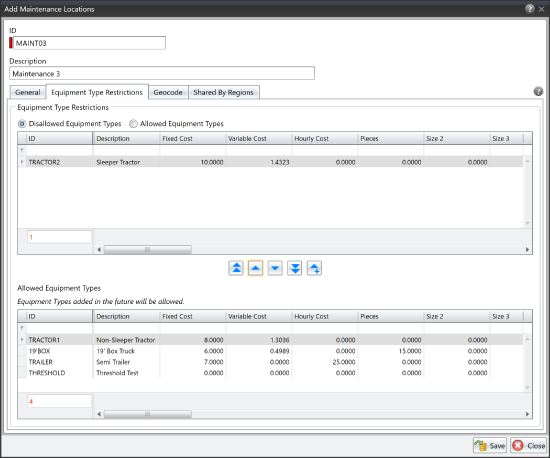
- If you want to restrict equipment that can or can not go to this maintenance location, click the Equipment Type Restrictions tab. The Equipment Type Restrictions page opens.
- Choose whether you are selecting Disallowed Equipment Types or Allowed Equipment Types, and use the arrows to move the equipment types to the proper list.
- Click the Geocode tab to open the Geocode page. Confirm the maintenance location's geocode is correct; if necessary click the [Geocode] button and regecode the maintenance location.
- If the maintenance location should be available for other regions to use, click Shared By Region to open the Shared by Region page. To share the location with all other regions, check Shared to All Regions. To only share the maintenance location with specific regions, check the regions in the list.
- Click the[Save] button.

Importing Maintenance Locations
Found in Omnitracs Client
If you have a large number of maintenance locations, you may want to import them instead of adding them manually. You can import maintenance locations in Omnitracs Routing & Dispatching.
- Click the Import menu, select Maintenance Items, then Maintenance Location. The Import Maintenance Locations window opens.
- If you wish to customize your import, click Service Location Options and choose the appropriate options as described below.
Coordinate Formats - click the arrow and choose the appropriate format the latitude and longitude are in.
Do Not Geocode - check if you do not want Omnitracs Routing & Dispatching to geocode service locations automatically upon import.
Only Update Existing Locations - check if you only want the import to update existing service locations with new information. Any new locations in the import file will be ignored. - If you want to change your data transfer layout set, click on the Data Transfer Layout Set arrow and select the data transfer layout set you want.
- If you want to change the name or location of the file being created, to one other than that defined by the layout set, enter or browse to the new file name or location in File Path Override.
- Click the [Import] button to begin the import process. The progress bar displays the status of the import.
- When the import is complete a results window opens, showing the number of imported items and any warnings.
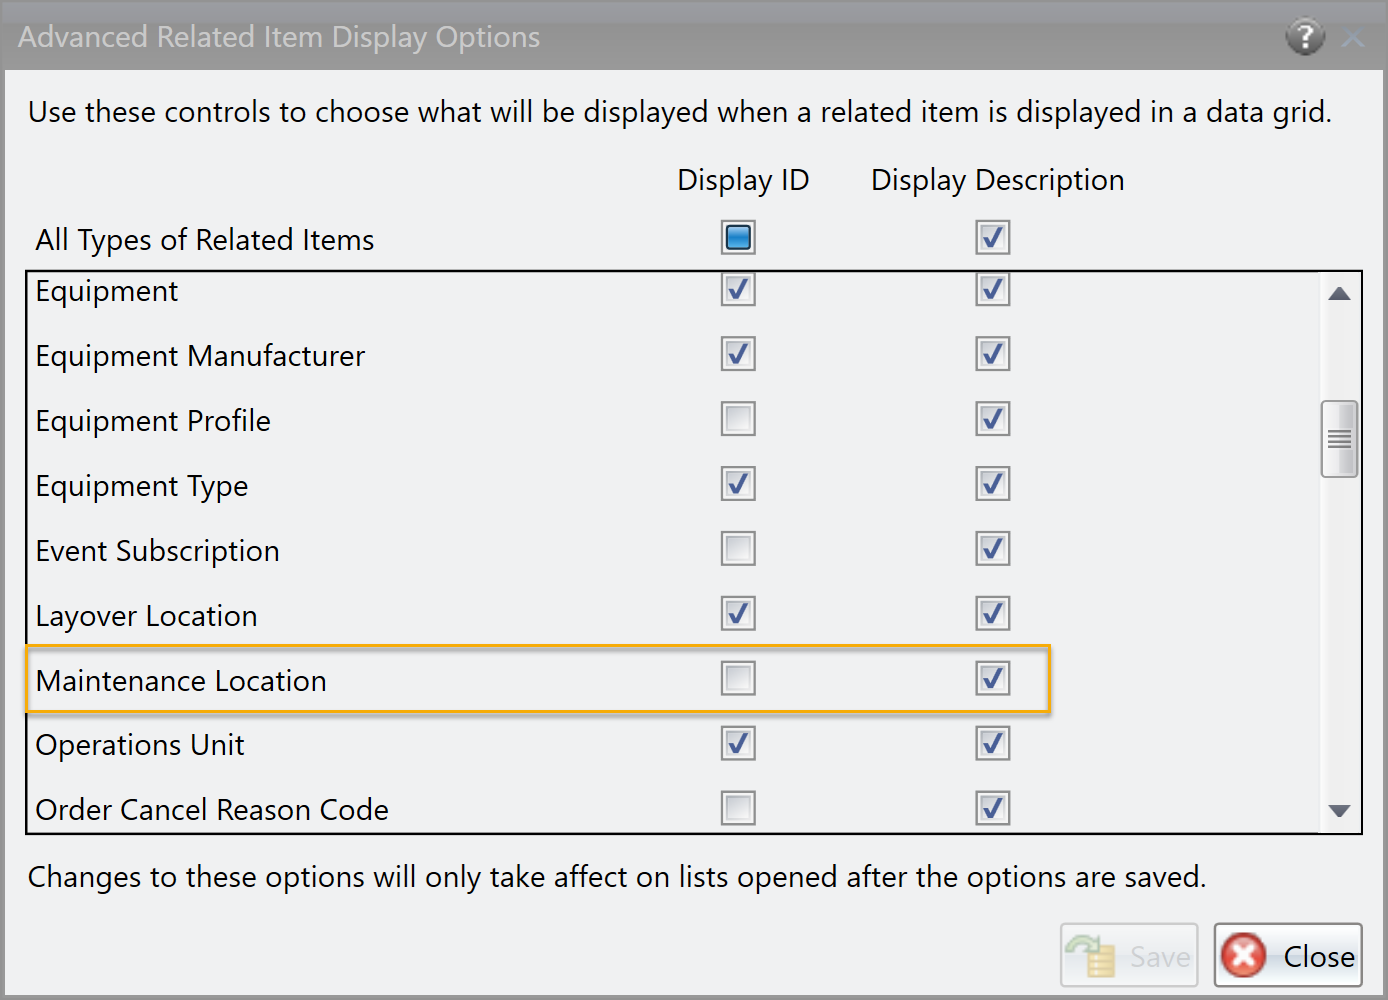
Choosing How the Maintenance Location is Displayed
Like other maintenance items, you can define how a maintenance location is identified in grids where they are included, such as a stop list. Like other maintenance items, you can choose to have the maintenance locations identified by only the ID, only the Description, or both.
In Omnitracs Client
- Click the Tools menu and choose Options. The Options notebook opens.
- In the Related Item Display in Data Grids area, click the [Advanced] button. The Advanced Data Display window opens.
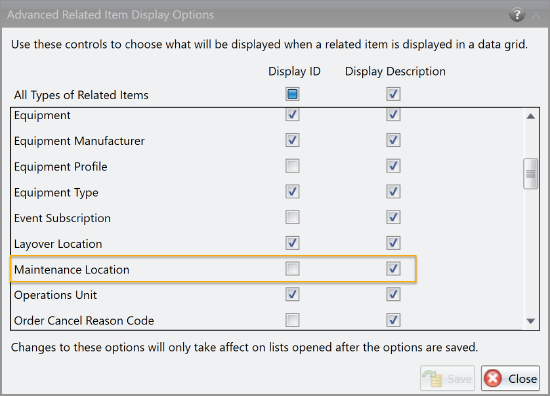
- Scroll to find Maintenance Location in the list. Check ID and/or Description to have maintenance locations identified by those items in grids.
- Click [Save].
Adding Maintenance Locations to Routes
Once you have created your maintenance locations you can add them to routes. Maintenance locations are not added to routes during the Create Routes process, but you can manually add them. Once maintenance stops have been added to routes, they can be sequenced, optimized, and otherwise handled the same as other stops.
Note: Maintenance stops can not be added to a route once the stop following the maintenance stop has been arrived.
In Omnitracs Client
- Open the stop list for the route you want to add the maintenance location to.
- Right-click on the stop/depot that should precede the maintenance location and choose Insert, then Maintenance Stop, from the menu that pops up. The Insert Maintenance Stop window opens.
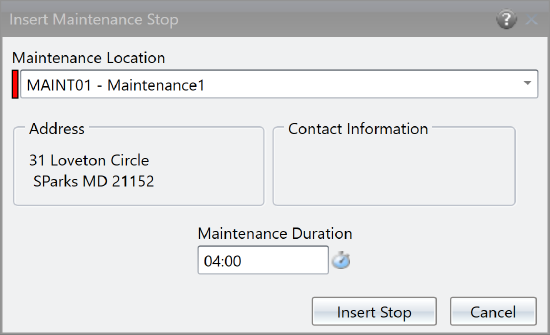
- Click the Maintenance Location arrow to open a list of maintenance locations and choose the proper maintenance location.
- Enter the amount of time needed for the maintenance in the Maintenance Duration field.
- Click [Insert Stop]. The maintenance stop is added to the route.
In Omnitracs Web
- In FleetView, open Route Details for the route you want to work with.
- In the route's stop list, right - click on the stop or depot that should precede the maintenance stop and choose Insert Maintenance from the menu that pops up. Or, check the box for the the stop/depot, then click the Route Actions menu and choose Insert Maintenance. The Insert Maintenance Stop window opens.
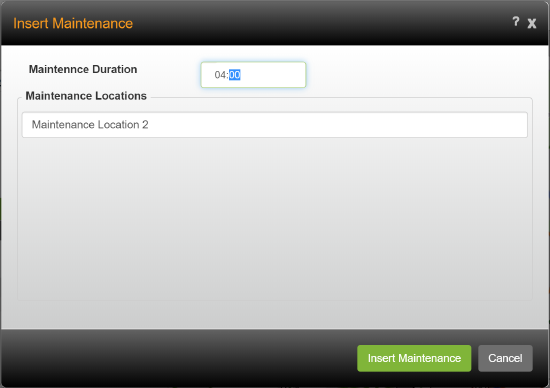
- Enter the time need to complete the maintenance in the Maintenance Duration field.
- In the Maintenance Locations field, start typing the ID of the maintenance location; choose the maintenance location from the list that appears.
- Click [Insert Maintenance].
Creating Custom Properties for Maintenance Locations
Found in Omnitracs Client
Custom properties let you enter and track information about your maintenance locations that Omnitracs does not include. Custom properties can only be added in Omnitacs Routing & Dispatching.
- Click the Administration menu and select Custom Properties. The Custom Properties list opens, listing all existing custom properties.
- To add a new custom property, click the New item icon.
The Add Custom Properties window opens. - Click the Object to Customize arrow and select the Maintenance Locations.
- Click the New item icon. The Add Custom Property Detail window opens.
- Enter a name for the custom property detail you are adding in the Name field. The Display Name field will automatically populate with the same characters entered in the Name field. The Name will only appear in the Custom Properties list and the Display Name will appear throughout Omnitracs. You can edit the Display Name as desired.
-
Enter a description of the custom property in the Description field. This field is not required.
- Click the Data Type arrow and select the format that will be used for the custom property's data. You will only be allowed to enter data for the custom property using the format selected here. Also, if you import data for custom property fields, the imported data must follow the format selected here.
-
Click the [Save] button. A new Add Custom Property Details page appears allowing you to add more custom properties for the selected object. If you are finished adding custom properties for the object, click the [Close] button.
Once the custom properties have been added you can enter the values when adding or importing the maintenance locations.
Calculated Custom Properties
In Omnitracs Client
Custom properties allow you to include information about your orders, locations, routes, and other entities, that is of interest to your organization but is not normally tracked in Omnitracs. But this information was only available on the level the custom property was created for; for instance order custom properties were only shown on orders. But, what if you wanted to see the results of the order custom properties for all the orders on a route. For example, if you had an order custom property for cost, but you wanted to see the total cost for all orders on a route? Now, you can create a route custom property that rolls up the order custom properties for all the orders on the route.
- You can create calculated custom properties for routes, unassigned order groups, and serviceable stops
- All calculated custom properties are based on order custom properties
- The calculated custom properties can be the result of summing, concatenating, or counting or a distinct count of the orders' custom property entries.
- Order custom properties of type integer, decimal, and time can be used to create calculated custom properties.
Before you can create the calculated custom property, you need to create the order custom property. Once the order custom property has been created, follow the steps below to create the calculated custom property.
Note: Order custom properties that existed prior to the Omnitracs 5.8 release can not be used to create calculated custom properties.
- Go to Admin > Custom Properties to open the Custom Properties list.
- Select the route custom properties, then click the Edit icon. The Route Custom Properties list opens.
- Click the Add icon. The Add Route Custom Property window opens.
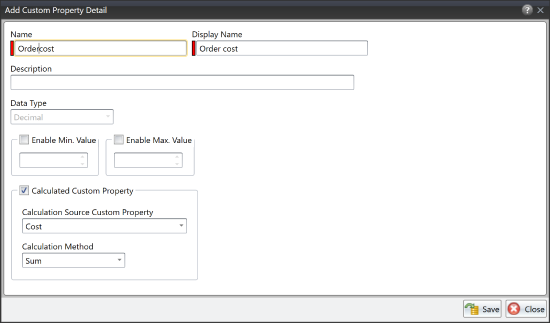
- Enter the custom property name and display name.
- Check Calculated Custom Property.
- Click the Calculation Source Custom Property arrow and choose the order custom property that will be used.
- Click the Calculation Method arrow and choose the method of calculation. The options are
Sum - add the entries for the order custom properties and display the total for the route
Count - count the number of orders with a value in that custom property
Distinct Count - count the number of orders with distinct values in that custom property
Concatenate - display each unique order custom property.
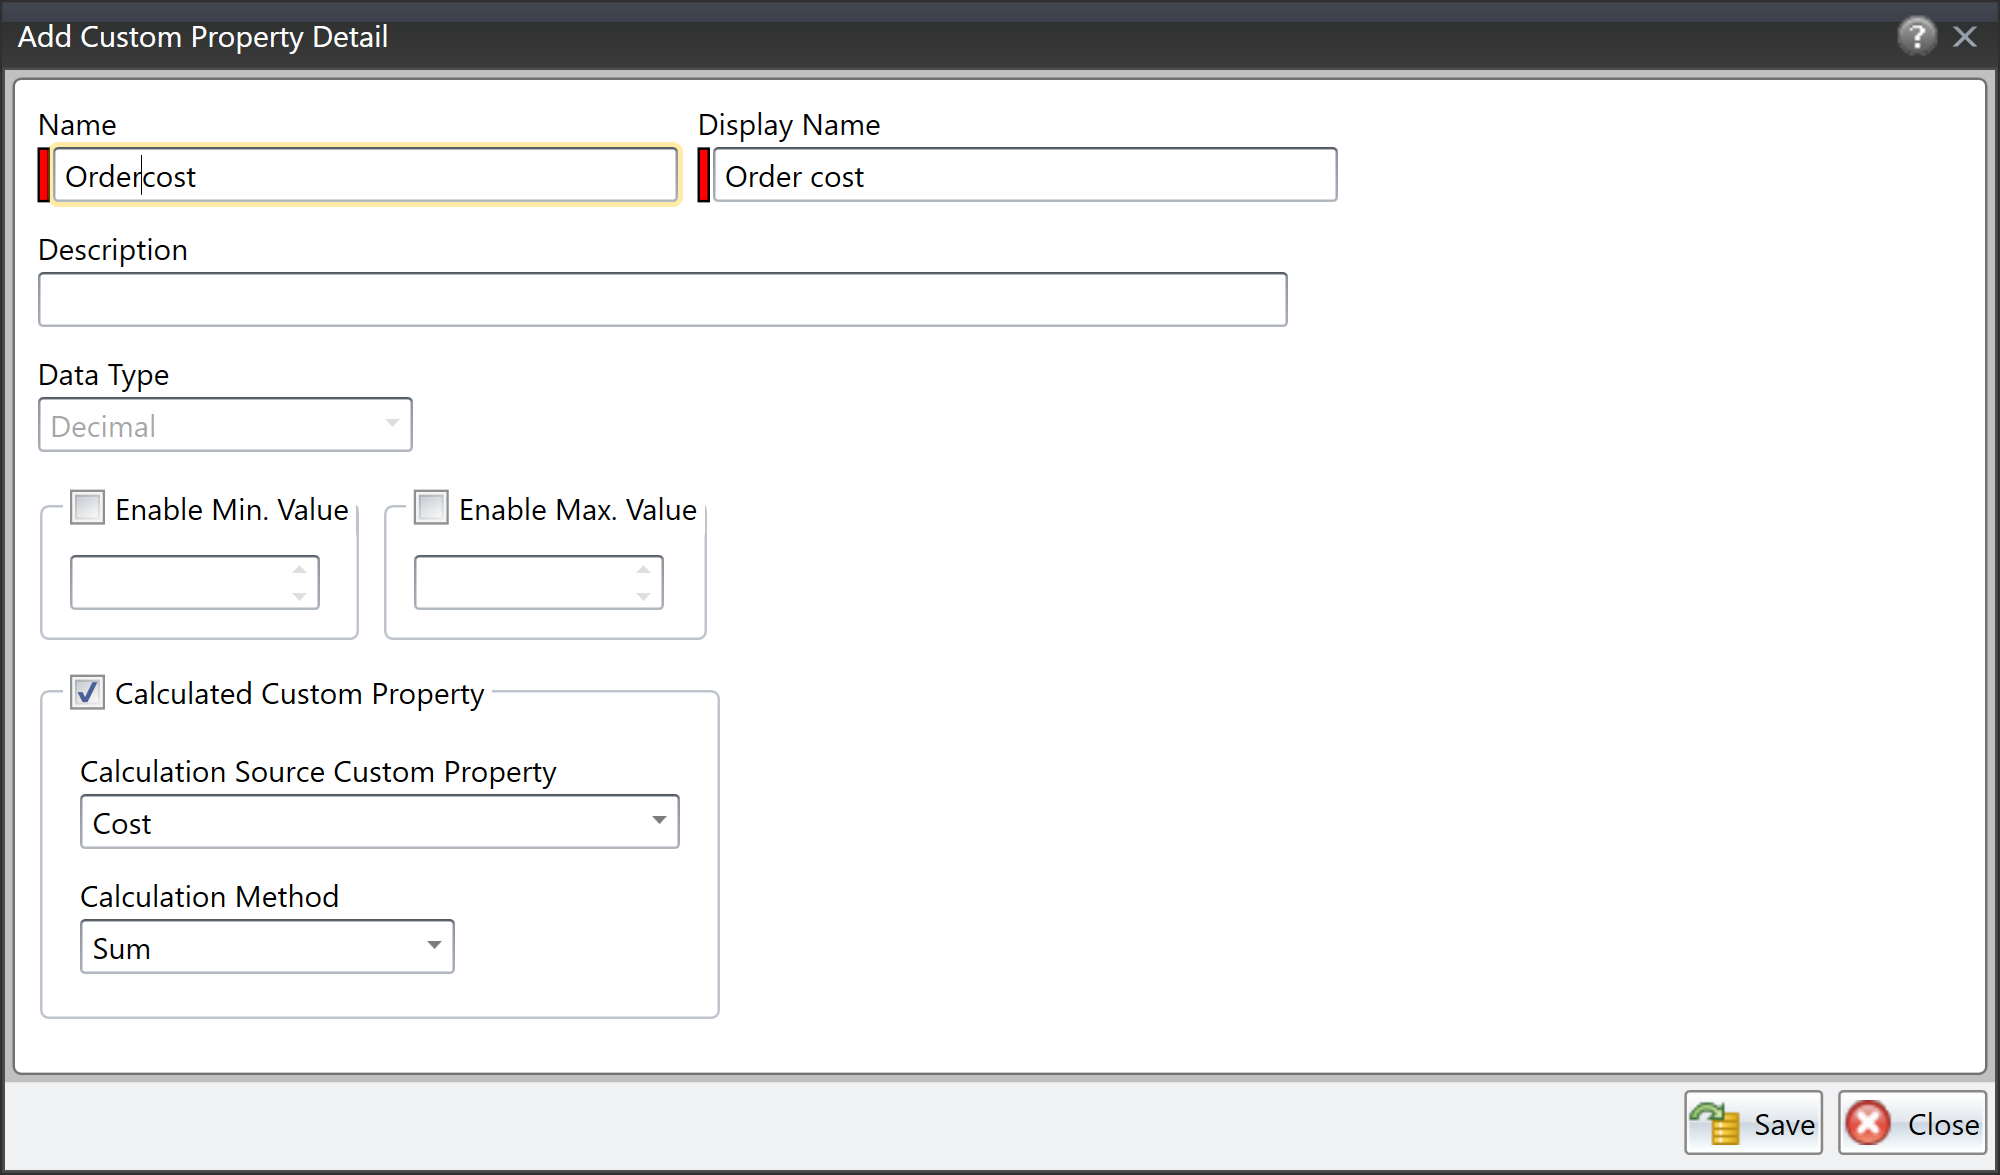
Importing Override Information Cumulatively
Found in Omnitracs Client
You can use service window and service time overrides to define service information for specific days of the weeks or order classes. You can import this information, putting the different service window overrides on separate lines in the service location file. In the past, however, the last record was the only one that was saved for the service location. For instance, you may deliver to a restaurant that has a service window of 08:00 - 11:00 on Monday, Tuesday, and Wednesday, but on Thursday and Friday the service window is 08:00-10:00. If you imported this information, only the Thursday and Friday service window information would successfully be imported. Now, you can choose to have the last record in the import file be imported, or to have all the override information imported as long as it does not conflict.
Note: If the service window overrides or service time overrides have conflicting information, the last record will be the one imported for the service location.
Click the Import menu and select Import Service Locations. In the Service Locations Options area, check Import Service Time/Service Window Overrides as Cumulative.
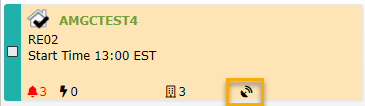
New Icon Indicates when Satellite Communication is Being Used
In Omnitracs Web
When you are monitoring your routes in FleetView, it may be important for you to know if the Telematics device is communicating through cellular or satellite. To help you quickly determine which mode is currently being used for a route, a satellite icon now appears on the route cards and on the vehicle information in the Overview in FleetView to alert you that the Telematics device is using satellite for communication.
Using Autonomous Optimization
Note: If you want to be part of the beta program for Autonomous Optimization contact Customer Support and ask to have the feature enabled.
Found in Omnitracs Web and Roadnet Mobile for Android
Even with all the tools available to assist with routing in FleetView, sometimes a route sequence can end up a bit jumbled or you may find that an unassigned order needs to be placed on a route after you are done planning for the day. With many different stops, each with its own service windows, manually adjusting routes based on new information can be difficult for a dispatcher. Quickly finding the best solution for changing the sequence of a route takes a lot of work and most dispatchers don't have that time to spare.
Now, with autonomous optimization, also known as autonomous dispatch, Omnitracs can do that work for you. When enabled, autonomous optimization will periodically analyze a route and re-optimize it if there is a better solution available. It can also automatically find the best route to place an unassigned order on, based on a number of rules that you choose to apply.
For instance, if the worker is late leaving the depot and there is a risk of missing service windows, autonomous optimization analyzes the route sequence and sends a suggested re-route to the mobile device. The worker has the ability to accept it or reject it. If the worker rejects the re-route, you can require that a reason be provided for the rejection. Autonomous Optimization is enabled for an entire region. In Fleetview, you choose which optimization type is assigned to each route. This feature provides an extra level of support for both the dispatcher and worker to ensure that all service windows, or other requirements defined by pass options, are being met, that unassigned orders are automatically assigned to the most appropriate routes, and that routes are running as effectively as possible.
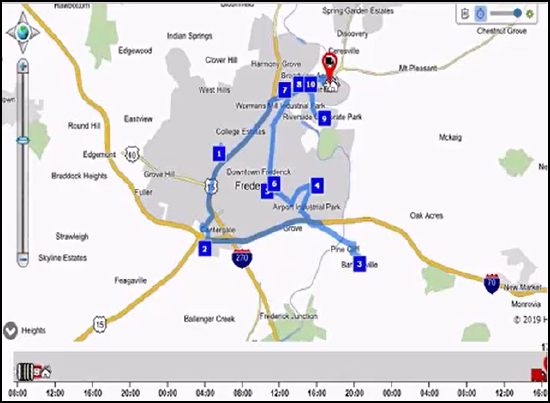
Notice that the sequence of this route is jumbled and inefficient.
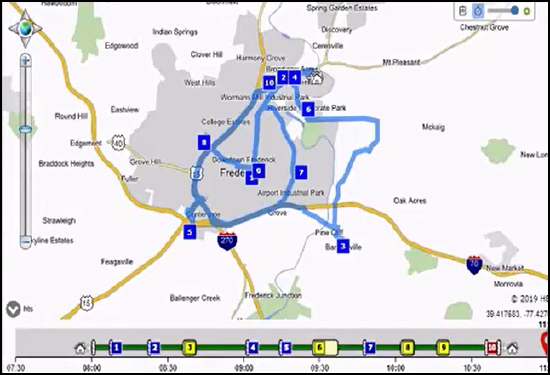
Autonomous Optimization is able to analyze the route and suggest an optimal sequence.
Some of the features of Autonomous Optimization include:
- you can have Autonomous Optimization automatically resequence routes throughout the day.
- you can have Autonomous Optimization evaluate routes throughout the day and automatically assign unassigned orders so that they meet the pass goals.
- you choose which method of optimization individual routes receive.
- the worker can accept or decline a resequenced route.
- the worker can choose to refuse all route optimization, when declining changes to the route.
- if reason codes exist, the worker must choose a route optimization rejection reason code when declining an optimized route.
- the worker sees a notification in Roadnet Mobile when an optimized route is available.
Enabling Autonomous Optimization for a Region
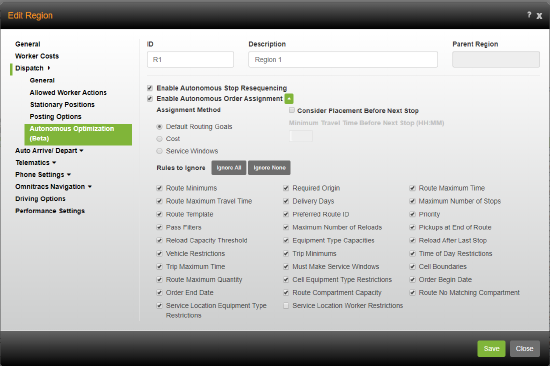
In order to use Autonomous Optimization you must enable it for the entire region in Region Settings. You can then enable it for individual routes in FleetView.
In Omnitracs Web
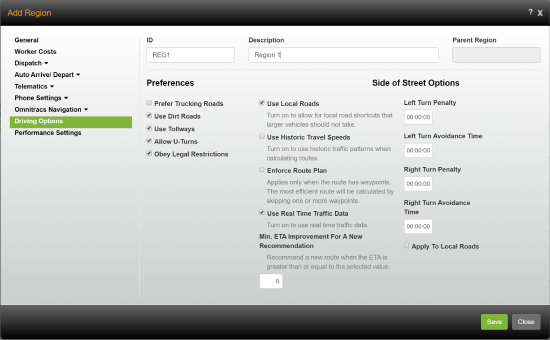
Click on the Administration icon to open Administration. Click on the green button and scroll to Region. The Region list displays. To add a region, click the [Add] button or to edit an existing region, click the Edit icon. The Add/Edit Region window opens. Click Dispatch and then click the Autonomous Optimization tab. See below for information on the options you may define when enabling autonomous optimization.
If you would like to have real time traffic considered when stops are being resequenced, you must check the Use Real Time Traffic Data region setting and set the Min. ETA Improvement For A New Recommendation on the Driving Options tab.
Setting the Autonomous Optimization Options For The Region
Once you access the Autonomous Optimization tab, you can choose whether routes can be resequenced or unassigned orders can be added to routes, and the options that determine how unassigned orders are added. When unassigned orders are automatically placed on routes, you can define the assignment method, minimum travel time before the next stop, and rules that will be ignored when assigning orders and stops.
Notes: Depending on settings, you may not be able to choose an Assignment Method and you may not see some Rules to Ignore options. You can disable Autonomous Optimization for individual routes even if it is enabled for the entire region. For more information see Autonomous Dispatch.
- In the Add/Edit Region window, click Dispatch, then Autonomous Optimization.
- Check Enable Autonomous Stop Resequencing if you want Omnitracs to automatically evaluate routes throughout the day to see if the stops can be re-sequenced to meet more service windows.
- Check Enable Autonomous Order Assignment if you want Omnitracs to automatically evaluate routes throughout the day and place unassigned orders on them. If checked, you can define an Assignment Method, the Minimum Travel Time Before Next Stop, and Rules to Ignore.
Note: Click the arrow to show/hide the Assignment Method, Minimum Travel Before Next Stop, and Rules to Ignore options.
The Assignment Method options are:
Default Routing Goals — select to use the routing goals that were used to create the route, when assigning an order or stop to a route.
Cost — select to make the most important factor the least amount of additional cost, when assigning orders or stops to a route.
Service Windows — select to make making service windows the most important factor, when assigning orders or stops to a route.
Note: Depending on the Autonomous Option you enable, assignment methods may not be available.
The Consider Placement Before Next Stop option is:
Consider Placement Before Next Stop — check to allow an unassigned order to be placed as the next stop on a dispatch route in progress. In the Minimum Travel Time Before Next Stop field, enter the minimum amount of time a worker must be from reaching the next planned stop to allow Omnitracs to assign an order as the next stop on the route. If you do not want to allow assignments that would change the stop that a worker is currently en-route to, do not check Consider Placement Before Next Stop.
The Rules to Ignore options are:
Rules to Ignore — check the appropriate boxes to ignore rules when assigning orders to a route. Hint: Use the Ignore All and Ignore None buttons in the Rules to Ignore section to quickly select or deselect all options.
Route Minimums — check to allow the Min Percent of Preferred Time and Min Percent of Route Capacity set in the pass to be exceeded if adding a stop.
Route Maximum Travel Time — check to allow a route to exceed the maximum travel time if adding a stop.
Route Template — check to allow stops to be added to locations that aren't part of route template used to create that route.
Priority — check to allow an unassigned or stop to be added to a route before or after a service location with a higher priority when assigning a route.
Pickups at End of Route — check to allow pickups anytime during the route, not just at the end.
Reload After Last Stop — check to consider adding a stop that is not a reload to the end of a route.
Time of Day Restrictions — check to allow a stop to be added if its delivery time would be during time of day restrictions settings when assigning a route.
Cell Boundaries — check to consider adding stops to a route that are not inside cells.
Order Begin Date — check to allow the order to be delivered before its begin date.
Required Origin — check to allow orders to leave any depot not just the required depot.
Delivery Days — check to allow a delivery on a day that is not a service location's delivery day when assigning an order to a route.
Service Location Equipment Type Restrictions — check to allow an order to be placed on a route with an equipment type other than that specified by the location.
Service Location Worker Restrictions — check to allow an order to be placed on a route with a worker other than that specified by the location.
Pass Filters — check to allow routes to be assigned even if they conflict with the parameters set under pass templates filters.
Reload Capacity Threshold — check to allow a reload to be added even if it exceeds the reload capacity threshold when assigning a route.
Vehicle Restrictions — check to allow a vehicle to be used even if it conflicts with vehicle restrictions when assigning a route.
Trip Maximum Time — check to allow trip maximum runtime to exceed what has been set for the pass.
Route Maximum Quantity — check to allow the route to exceed the route maximum quantity if adding a stop.
Order End Date — check to allow the order to be delivered after its end date.
Route Maximum Time — check to allow a route to exceed the maximum runtime if adding a stop.
Maximum Number of Stops — check to allow a route to exceed the maximum number of stops.
Preferred Route ID — check to allow a stop or service location to be added to a route without the preferred route ID when assigning an order to a route.
Maximum Number of Reloads — check to allow the maximum number of reloads to be exceeded if adding the stop to a route.
Equipment Type Capacities — check to allow a route to exceed the maximum capacities determined by equipment type if adding a route.
Trip Minimums — check to allow a trip to be added even if it does not meet the Min Paid Time per Trip and Min Percent of Trip Capacity for the pass.
Must Make Service Windows — check to allow a stop to be added to a route if it conflicts with the service window settings for the pass and or service locations.
Cell Equipment Type Restrictions — check to allow equipment to be added to a route that travels inside a cell with equipment type restrictions.
Route Compartment Capacity — check to allow an order to be added to a route even if it will overload a compartment.
Route No Matching Compartment — check to allow an order to be added to a route even if the route's equipment does not have a compartment that allows one of the order's product types.
HOS Driver Remaining Duty Time Today — check to allow a worker's remaining hours of service (HOS) duty time to be exceeded when assigning an order to a route.
HOS Driver Remaining Drive Time Today— check to allow a worker's remaining hours of service (HOS) drive time to be exceeded when assigning an order to a route.
Note: Depending on the autonomous option you enable, some rules are not available.
- Click the [Save] button when you are finished setting up or making changes to the region.
Reasons for Rejecting a Route Optimization
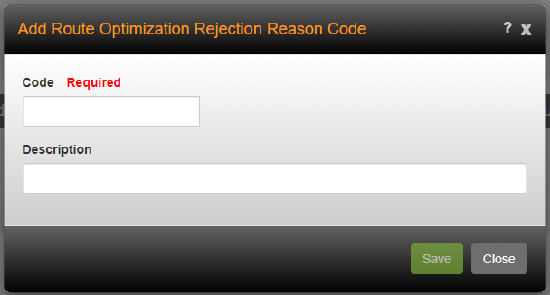
When a route is optimized, the proposed route with changes is sent to the driver, who has the option to accept the changes or reject them. When the worker rejects a re-route, you may want to require that a reason be provided for the rejection. Route optimization rejection reason codes are added in Omnitracs and sent to Omnitracs Roadnet Mobile, so that when the worker rejects an optimized route suggestion, they can pick the reason it was rejected from a list.
Note: If route optimization rejection reason codes exist in Omnitracs, the worker is required to choose one when rejecting an optimized route on the mobile device.
In Omnitracs Web
Click on the Maintenance icon to open Maintenance. Click on the green button and scroll to Route Optimization Rejection Reason Codes. The Route Optimization Rejection Reason Codes list opens.
To add a new Route Optimization Rejection Reason Code, click the Add icon. The Route Optimization Rejection Reason Codes window opens. Enter the Code and Description for the reason code. Continue to add route optimization rejection reason codes until you have entered all that are necessary. Click Save.
Working with Autonomous Optimization in FleetView
Once you enable Autonomous Optimization for the region, you must turn on Autonomous Dispatch for individual routes. FleetView allows you to easily manage which routes will or will not be optimized and to quickly see if a route has been optimized.
Note: Only routes that have run in the last 7 days will be displayed in the list. If the route is not available you will need to add the route.
Once a route is enabled, it will remain enabled until you disable it.
To manage Autonomous Optimization for your routes, follow these steps.
- Press Route Actions. The Route Actions menu displays.
- Select Autonomous Dispatch from the Route Actions menu. The Autonomous Dispatch window displays with a list of routes in the region that are eligible for optimization.
- To enable autonomous dispatch, for each route that is listed, check the type of optimization you would like that route to receive: Stop Resequencing or Order Assignment.
Stop Resequencing - routes are automatically evaluated throughout the day to see if they can be re-sequenced to meet more service windows.
Order Assignment - routes are automatically evaluated throughout the day and unassigned orders are placed on them and the route is optimized.
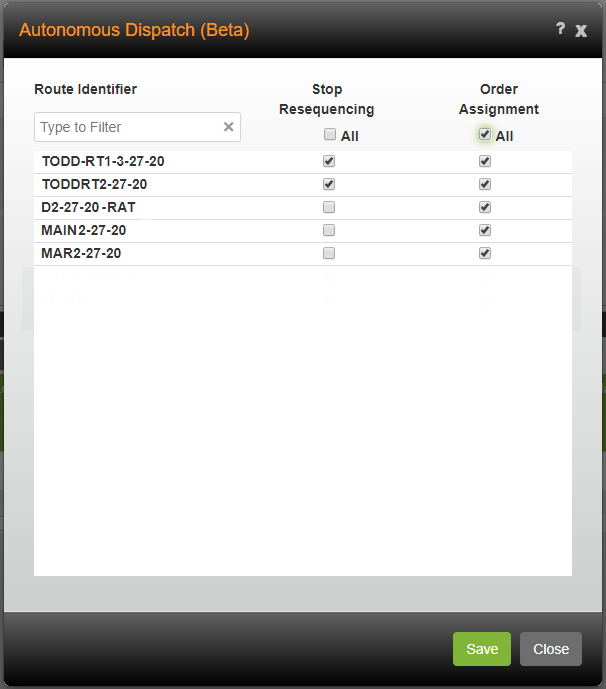
Notes: If you want all the routes in the list to receive optimization, check All under the appropriate optimization type.
To find a specific route in the list, begin typing in the Route Identifier filter field. The routes that meet your criteria display in the list.
If you add routes during the day, after you have assigned optimization types, you must return to Autonomous Dispatch and assign optimization types to the new routes.
To disable Autonomous Optimization for a route, uncheck the optimization type that you do not want assigned to the route.
- Press Save to assign autonomous dispatch to the chosen routes.
Once a route has been optimized, autonomous dispatch sends workers a suggested sequence for the route. The workers have the ability to accept or reject those suggestions. With many routes operating at one time, it may be difficult for a dispatcher to keep track of changes. Omnitracs makes it easy to see which routes have or have not been optimized in FleetView.
An icon is displayed on the route card if the route has been optimized with Autonomous Optimization or if Autonomous Optimization has been manually disabled for the route. When you hover over the autonomous dispatch icon, a tooltip shows the impact of the accepted suggestion on the route, including: the current state, the number of accepted optimizations, the last recorded impact on the route (the effect on the overall time, distance, cost, missed service windows and missed service window time) along with the time and date that the last optimization was sent and the time and date that the last optimization was accepted.
If the suggested optimization is accepted or manually disabled, it will be noted on the route details screen. For disabled routes, a semi-transparent autonomous dispatch icon appears on the route card.
The Autonomous Dispatch Resequence Stops State and Autonomous Dispatch Assign Orders State columns in the routes grid will tell you whether autonomous dispatch is disabled for a route, and if so, will display one of the following reasons:
Enabled - autonomous dispatching is assigned to this route.
Disabled by driver-the worker has disabled Autonomous Optimization for the route from the mobile device. This value is only visible in the Autonomous Optimization Resequence Stops State column.
Disabled by excessive rejection- the worker has made three consecutive rejections of changes suggested by Autonomous Optimization. This value is only available in the Autonomous Dispatch Resequence Stops State column.
Unsupported in Region - Autonomous Optimization has not been enabled for the route's region.
Route Ineligible- the route is ineligible for Autonomous Optimization. A route is considered ineligible if it not optimized based on the pass options when loaded to the device. If this is the case, Omnitracs assumes that the route sequence is intentional.

If you choose to have unassigned orders automatically assigned to routes using Autonomous Optimization, you can see if an attempt has been made to assign the order to a route. In the Unassigned Orders section of Fleetview, you can see how many times Omnitracs has attempted to place the unassigned order on a route, the last date and time an attempt was made, what types of constraints kept the order from being placed on a route, such as Route Maximum Time or Order End Date, and any error codes associated with an attempt to assign the order to a route

Managing Optimized Routes on the Mobile Device
When an optimized route is sent to the mobile device the worker receives a notification.
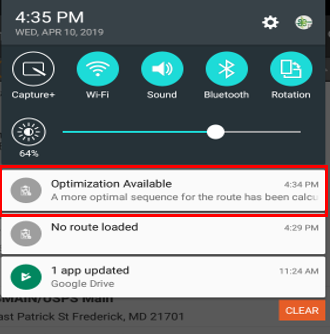
When the worker clicks on the notification, Roadnet Mobile opens to the Review Optimization screen.
Notes: The only way to access the Review Optimization page is to click on the notification. If the notification is ignored, the optimization for the route is ignored too. If the route is successfully optimized again, another notification is sent to the worker's device.
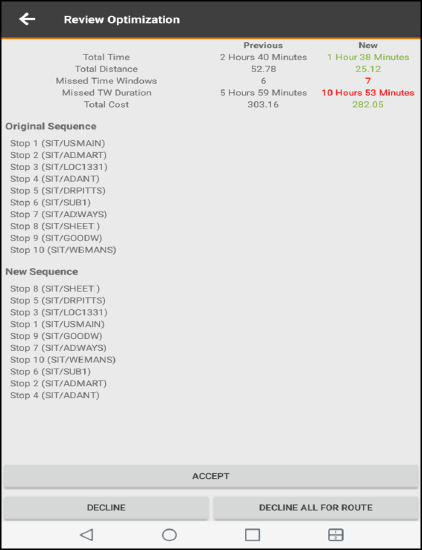
Optimized routes can be accepted or declined. The worker can also decline any future optimizations. As well, once the worker declines optimization for a route three times in a row, that route will no longer be eligible for optimization.
You can see how a worker responds to an optimization by viewing the Autonomous Optimization information for the route in FleetView.
Note: If route optimization rejection reason codes exist, after declining an optimized route the worker must choose a reason code before being able to return to the route.
When a route optimization is accepted, the worker is returned to the route, which now includes the changes. If the optimization changes the next stop on the route, the worker will be redirected to the new next stop.
Adding Contact Information for a Panic Button Call
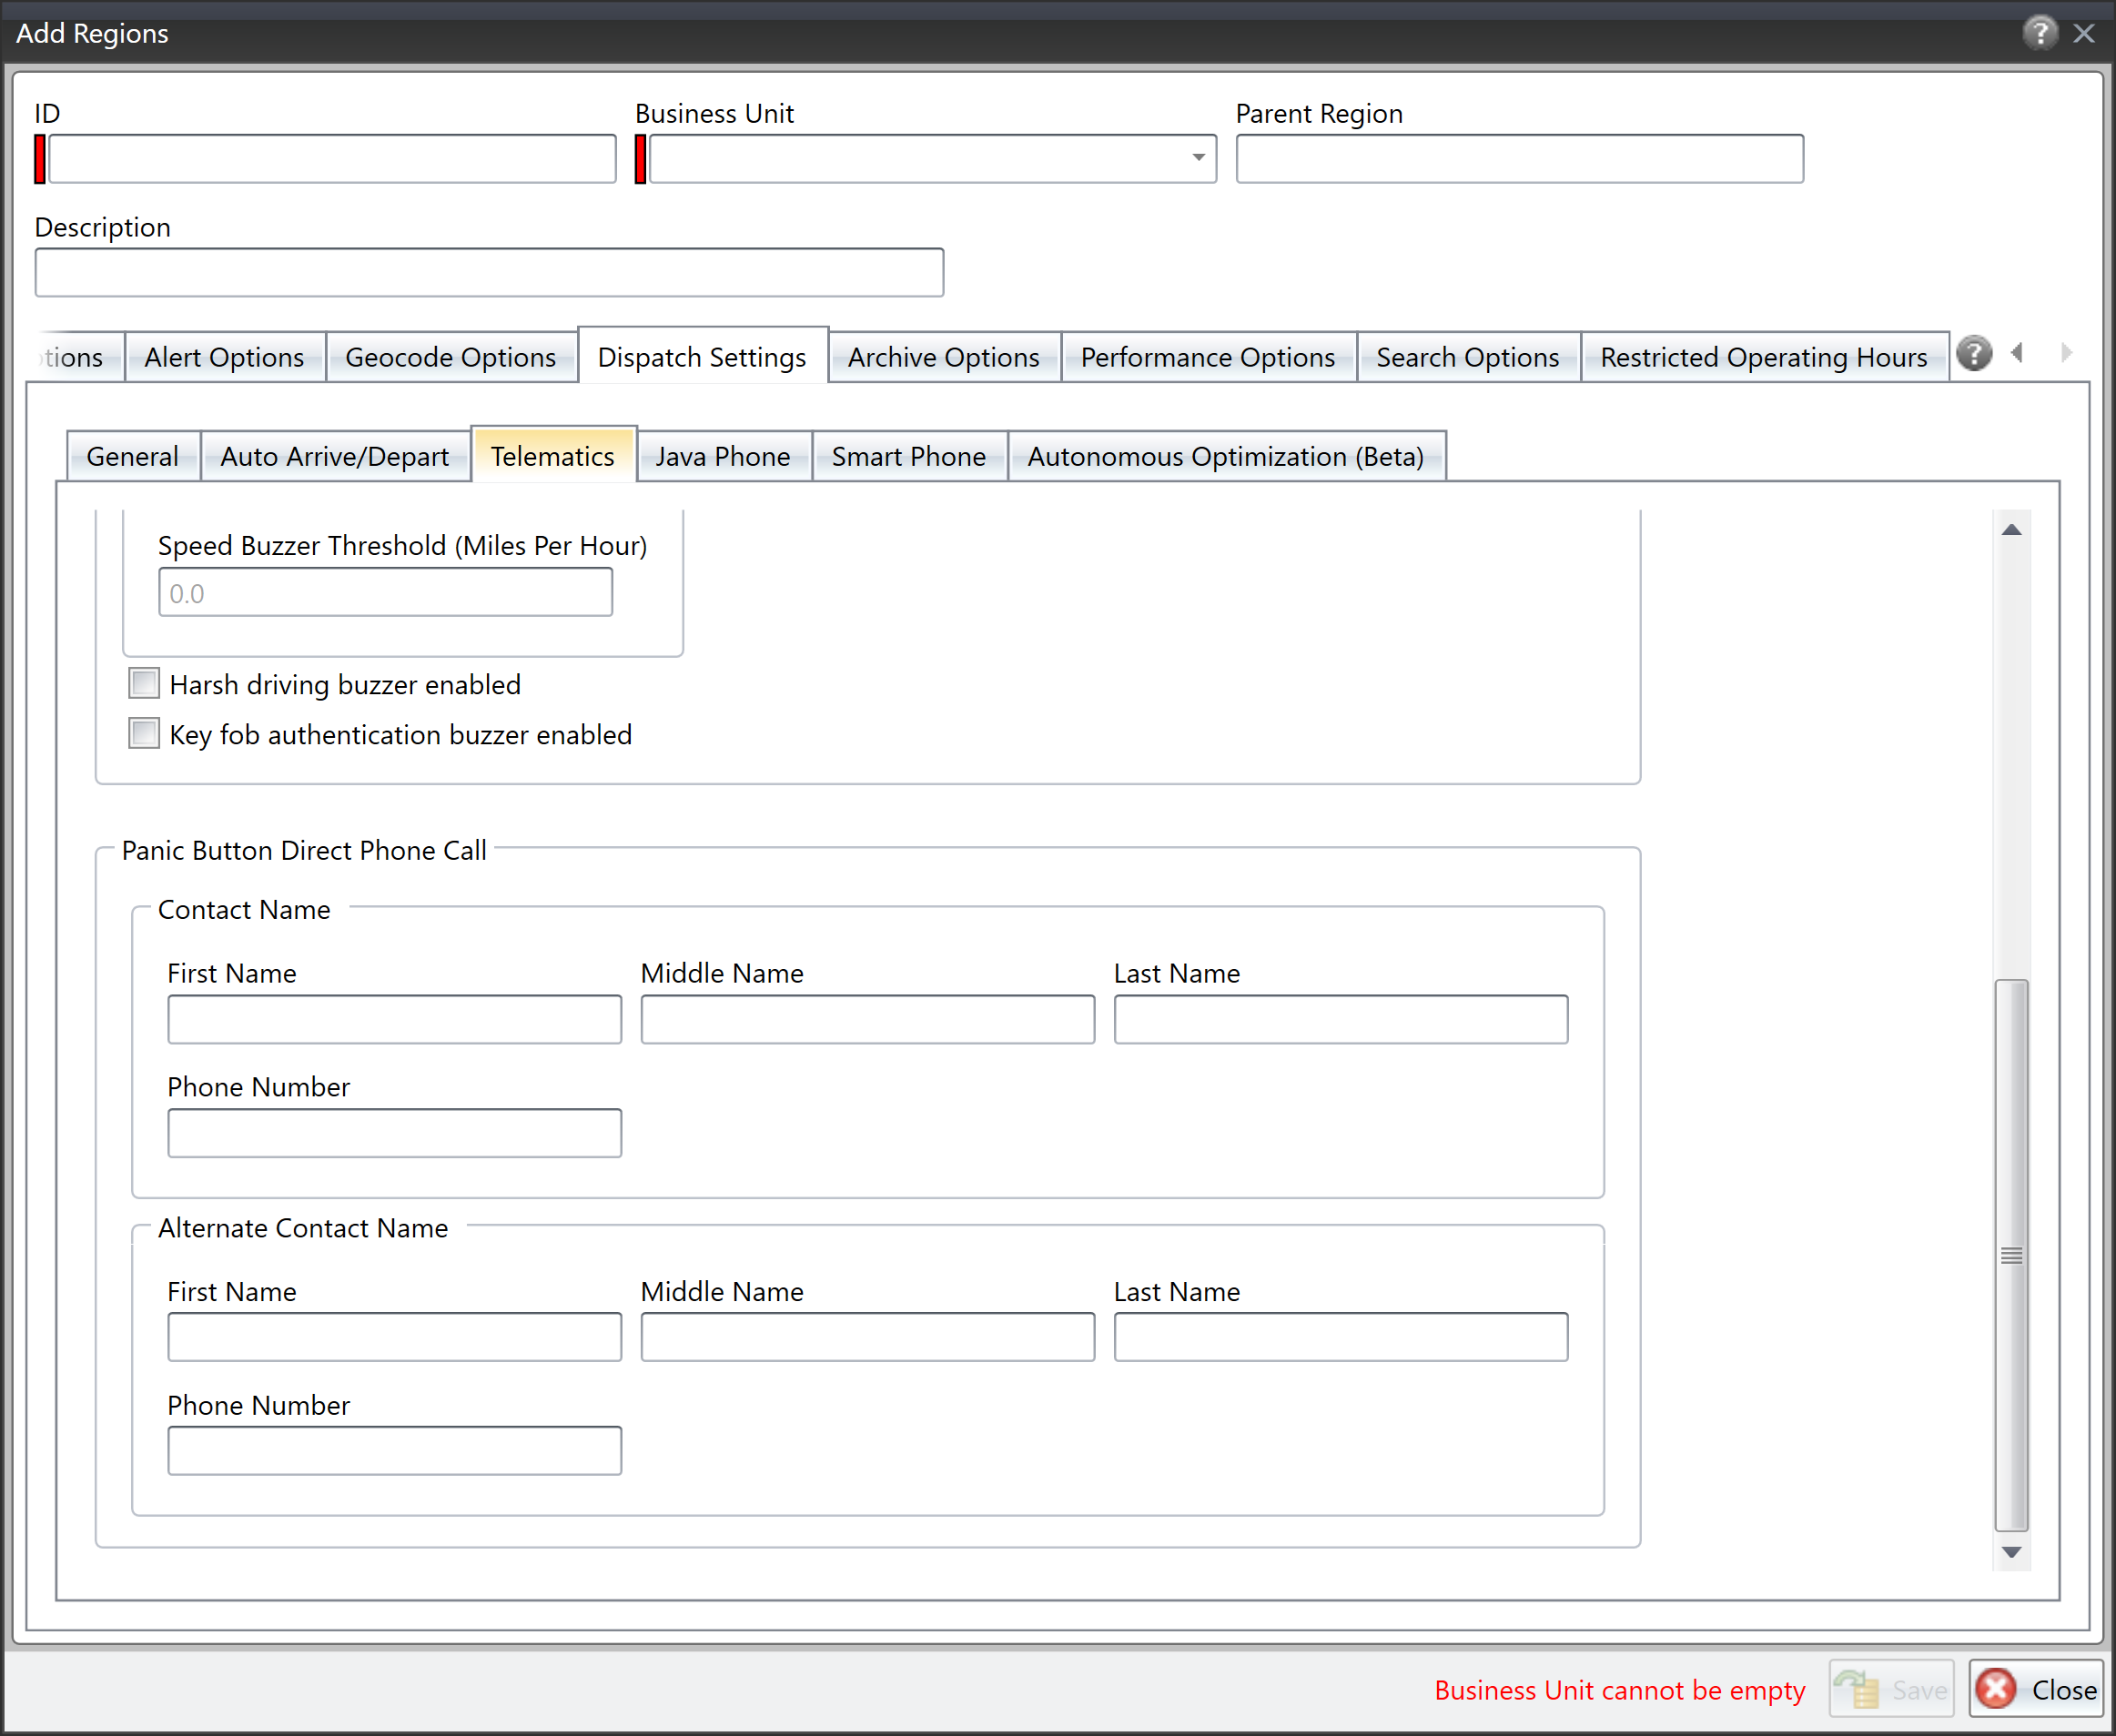
If a driver has an emergency and presses the panic button, an alert appears in FleetView and the equipment is added to the security list to help alert the dispatcher. But, what if the dispatcher is not at the computer at the time? If you provide contact information, Omnitracs can call the dispatcher when a panic button is pressed. In order to contact the proper person, the contact information needs to be available; you can now add the contact name and phone number for the region.
In Omnitracs Web
Click on the Administration icon to open Administration. Click the green button and select Regions; the Regions list opens. To add a region, click the [Add] button, or to change an existing region click the Edit icon for the region. On the left side click Telematics, then Panic Button Direct Phone Call. The Panic Button Direct Phone Call page opens. Enter the name and phone number of the contact, and a second contact, who should be called when a driver presses the panic button. Click [Save].

In Omnitracs Client
Click on Administration, then Regions; the Regions list opens. Click the Add icon to add a new region, or click on the region and then on the Edit icon to change an existing region; the Region notebook opens. Click on Dispatch Settings, then Telematics. Enter the name and phone number of the contact, and a second contact, who should be called when a driver presses the panic button. Click [Save].
Using Real Time Traffic
Note: If you are interested in using real time traffic, contact Omnitracs Customer Support to have the option enabled for your organization.
As anyone involved in transportation knows, the current traffic conditions can affect the best path for your driver to take. Now, you can use real time traffic data to affect changes made to your routes in Omnitracs, as well as how the routes may appear on a map.
- If you are using Omnitracs Navigation, the route paths can be changed based on the real time traffic data. In addition, the map will indicate the traffic levels.
- If you are using Autonomous Optimization, real time traffic will be considered when the routes are re-sequenced or unassigned orders are assigned to routes.
- In FleetView, you can choose to show the real time traffic on the map.
Setting the Options for Your Regions
If you want to use real time traffic with Omnitracs Navigation or with Autonomous Optimization, you need to configure it for your regions.
- Click the Administration icon to open Administration.
- Click the green button and scroll to Regions, the Regions list opens. To add a new region, click [Add]; to update an existing region click the Edit icon. The Region window opens.
- Click Driving Options on the left side; the Driving Options page opens.
- If you are using waypoints to ensure the route follows the specified path and want that path followed even if traffic conditions change, check Enforce Route Plan. If the path can be changed due to changing traffic conditions, do not check Enforce Route Plan.
Note: This setting only applies to Omnitracs Navigation. - If you want to have current traffic conditions considered when calculating a route, check Use Real Time Traffic Data.
Note: Real Time Traffic Data is not used when calculating Planning routes. - If you only want the driver presented with a new route if it saves a defined amount of time, enter the minimum number of minutes that the change will save in Min ETA Improvement for a New Recommendation.
Note: This option is only available if Enforce Route Plan is not selected and Use Real Time Traffic Data is selected. - Click [Save] to save the settings.

Setting Real Time Traffic from the Mobile Device
If you would like your workers to be able to define their own settings for real time traffic, they can be changed on the mobile device at Menu > Path Settings.
The worker must enable Use Real Time Traffic, to have the current traffic conditions when calculating a route. If the worker only wants a new path suggested if it saves a defined amount of time, after enabling real time traffic, the worker must enter the minimum number of minutes that the change will save in Minimum ETA Improvement for a New Recommendation.
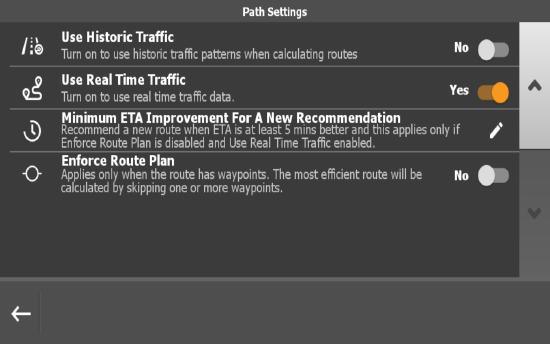
Notes: The Minimum ETA Improvement For A New Recommendation option is only available if Enforce Route Plan is disabled and Use Real Time Traffic is enabled.
If the worker wants the original path to be followed without variation, Enforce Route Path must be enabled.
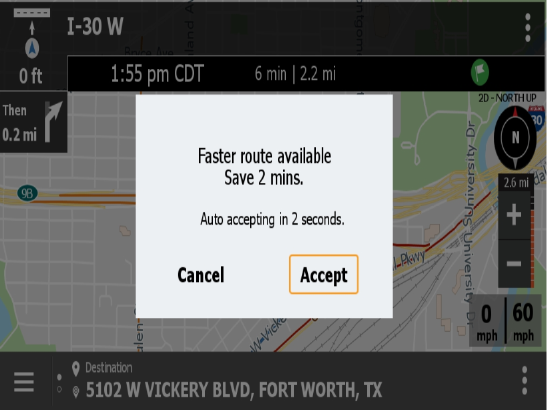
On the mobile device, when there is a faster path available, how much time is saved with the new path suggestion is read aloud and displays on the screen. The path is automatically re-routed unless the worker dismisses the suggestion.
When looking at the map, the traffic icon designates that a path is based on real time traffic data. The traffic icon is crossed out when real time traffic is disabled or if there is trouble downloading the traffic data.
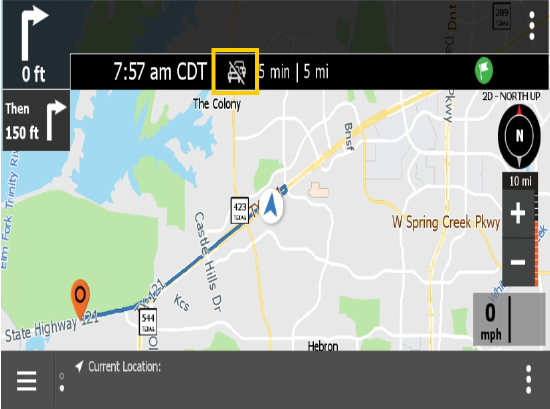
The roads also display differently when real time traffic has been applied to the path. The color over the road is different, based on how heavy the traffic is. The worker will see a red layer if traffic is heavy, while orange displays if there is medium level traffic.
Displaying Real Time Traffic in FleetView
To see real time traffic conditions on the map, click the arrow button and check Traffic. The real time traffic conditions appear on the map, and the road segments are colored to reflect the traffic conditions:
Green - traffic is not delayed
Orange - traffic is delayed
Red - traffic is stopped
Enhancements to Omnitracs Navigation
Many updates have been made to Omnitracs Navigation for the 5.8 release. The following enhancements have been included:
- The junction view has been redesigned. Previously when you approached an on or off ramp that was part of your path, the display changed to show just an exit sign. Now the sign displays to the side of the map, so you can still see the map. If you do not close it manually, the junction sign automatically closes once you pass through the on/off ramp.
- Turn-by-Turn audible directions have been expanded. When previously you might only hear "turn left," now the road name and distance are included with the instruction.
- Waypoints are now passed from Roadnet Mobile, ensuring that the paths provided in both Roadnet Mobile and Omnitracs Navigation are the same. If you always want the path followed, even if Omnitracs Navigation can provide a better path due to changing traffic conditions, be sure to check Enforce Route Path, at Menu > Path Settings.
Viewing in Portrait Mode
Currently, Omnitracs Navigation can only be used while in landscape mode. Numerous screens have been optimized so they can be viewed in portrait mode on your mobile device. More screens will be optimized in future releases.
Updated Pop-up Prompts
In an effort to make the look and feel of Omnitracs Navigation more consistent throughout the application, pop-up boxes will change. The expected answer to a prompt will display on the bottom right of the pop-up with an orange box around it.

Route Status Enhanced
To make it clearer which path and vehicle settings are being followed or violated, the Route Status window has been enhanced. You can now see the setting name, along with how it is set. If the path violates a setting, it is highlighted in orange.
Options Moved So You Can See More Map
So that more of the map can be seen, the Arrive, Detour, and Cancel options have been moved to the kabob menu at the top of the map. This is especially helpful in portrait mode where map space is less available. Press the kabob menu and the options display in a list.
Distinguishing Buildings on the Map
So you can determine where on a street a building is located, you can choose to view the outline of buildings on the map. To see buildings on the map, go to Menu > Settings > Map Settings > Map Style and turn on Show Buildings.
More Road Types Display on the Map
You can now see disabled and blocked roads on the map. Disabled roads appear as a gray stripes where the road runs. Blocked roads show as red stripes where the road runs.
Selecting Regions in Telematics Diagnostic Report
Found in Omnitracs Web
Telematics Diagnostics provides information about your Telematics devices, which can not only help troubleshoot problems in the field, but can help you simply check the status of all your devices. Previously, if you used region hierarchy, you could only choose to view the entire region. You could not choose to view just a lower level within the region. Now, if you use region hierarchy, you can choose to view information on all the devices with your company, information about an entire region and at the same time, view only information from the lower level of another region.
To see information from lower levels of a region, open the report at Reports > Telematics Diagnostics report. Click the Select Regions arrow to open a list of regions and then select the regions that should be included on the report. Click the arrow beside a region to view the levels below it. You can check one or more lower levels. If you want to see all the levels included in a region, check the region at the top level. Click [Run] and then click the report to open it. The lower levels of information for the region are included in the report.

Generating an Equipment Position History Report
Found in Omnitracs Web and Client
Because the Equipment Position History report was taking a long time to run and for some, crashing before it completed, a new Equipment Position History CSV report has been added to the list of reports. The Equipment Position History Report CSV can be run to include up to 31 days of information. It can only be generated in CSV format. The CSV format can handle large amounts of data in a quicker amount of time. The existing Equipment Position History Report has been changed to only provide a single days worth of information. It can be generated in PDF or Excel format. You must use the report that is suitable for the length of time that you want information generated.
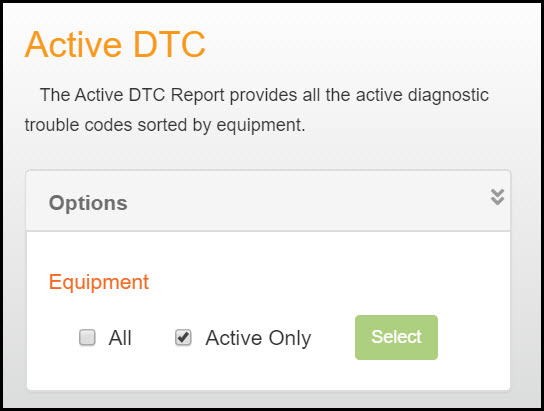
Reporting Active Diagnostic Trouble Codes for Specific Equipment
Found in Omnitracs Web
Active diagnostic trouble codes alert you to potential mechanical problems or other issues related to your equipment. The Active DTC report lets you see a list of the trouble codes for your equipment, so that you can determine what repairs are needed immediately and which are not as urgent. Currently, the report shows you all active diagnostic trouble codes, historic and current. This can result in a number of codes that you do not need to see. Now, you have the option to see codes for specific equipment you select.
To limit which active diagnostic trouble codes you see on your report, choose the Equipment you want included. In the Reports module, open the Active DTC report. If the Options panel is not open, click the arrow to open the panel.
Choose which Equipment you want included in the report. Choose All to continue to see everything on the report, historic and current. Choose Active Only to show active diagnostic trouble codes for equipment with a status of active. To select specific equipment to include on the report, press the Select button. The Select Equipment window opens with a list of active equipment. To move equipment from the Excluded Equipment list to the Included Equipment list, highlight one or more items and click the arrow to move the equipment to the appropriate list. Press Save to save the list of specified equipment.
Note: If you want to select specific equipment to include on the report, the All or Active Only boxes cannot be checked.
Choose the Output Format and then click the Run button. The generated report will reflect the equipment choice you specified.
Showing Device Errors for Telematics Devices
Found in Omnitracs Web
Note: This report is only available for Roadnet Telematics customers.
When your Telematics devices are not functioning properly, you need to know if the reason is a malfunction or just a communications problem. The Telematics Device Error report lets you display errors associated with your devices. Issues you may see in the report include unplugged, not communicating, no GPS, or no vehicle data. The Telematics Device Error Report lets you select the regions and time frame for the information you want to see. The report is a csv file, so you can filter and manipulate the data as needed.
To generate a report that shows device errors, open the report at Reports > Telematics Device Errors report. Click the Select Regions arrow to open a list of regions and then select the regions that should be included on the report. Enter a start and end date for the report. Click Run to generate the csv file. The file includes the Telematics Device ID and Description, Equipment ID and Description, Equipment VIN, Equipment Last Used Region, Date and Time the error occurred, and the Error Type.
You can also schedule the Telematics Device Error report to be generated and emailed to recipients that you choose, on a daily, weekly, or monthly basis.
Java Phone Close to End of Life
Found in Omnitracs Web and Client
To continue efforts to move away from old technology, the Java phone is nearing end of life and will be deprecated at Omnitracs. With this, the ability to add new mobile devices with a platform of Java in Omnitracs is no longer available. You are still able to edit existing Java phones and Java phone region settings.
Adding Stops as Next Stop on the Route
Found in Roadnet Mobile for Android
Currently, when the worker adds a stop to the route on the mobile device, it is added to the end of the route. The worker must then go to the stop list and resequence the stop so that it is where the worker wants it on the route. If the stop your worker typically adds to the route is the next stop they intend to service, now you can have stops added by your workers placed as the next stop on the route. This saves the worker the steps of opening the stop list and resequencing.
To have stops that are added on the mobile device placed as the next stop, in Omnitracs Web, go to Administration > Region Settings > Add/Edit Region > Phone Settings > Smart Phone - Allowed Worker Actions and check Place Stops Next. The Add Stops option must be checked before you can turn on Place Stops Next.
Note: This option only works with Roadnet Mobile Android.
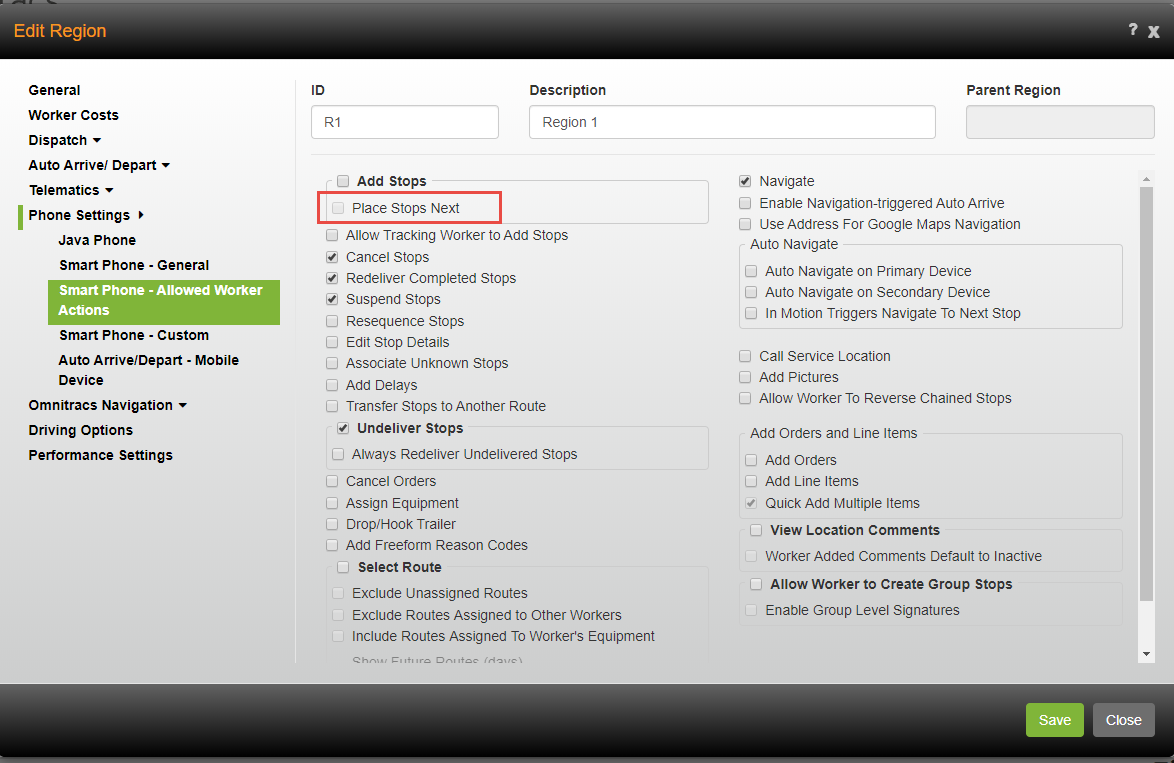
On the mobile device, when the worker adds a stop to the route, that stop is placed next on the route and is the stop that displays on the Proceeding to screen in Roadnet Mobile Android.
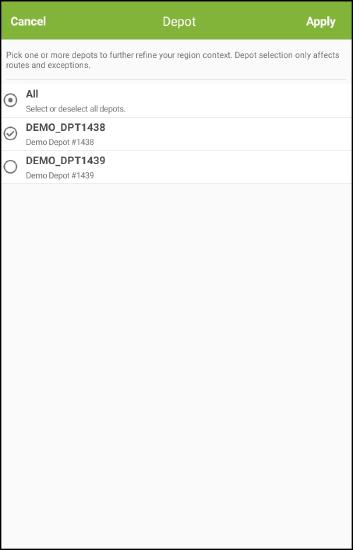
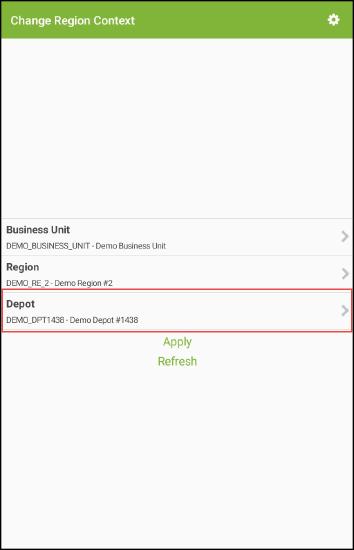
Viewing Information For A Specific Depot
Found in Omnitracs Mobile Manager
Omnitracs Mobile Manager lets you see information about your routes, workers, exceptions, orders, and more on your mobile device. Currently, the information is presented by business unit or region. You can now see route and exception information by a specific depot.
When you select a specific region to view, a depot selector displays on the Change Region Context screen. Tap the arrow beside the depot selector and a screen with all the depots available in that region displays. Pick one or more depots for which you want to see information. You can also chose All.
Currently, only route and exception information is filtered to the depot level. All other information displays at the chosen region level.
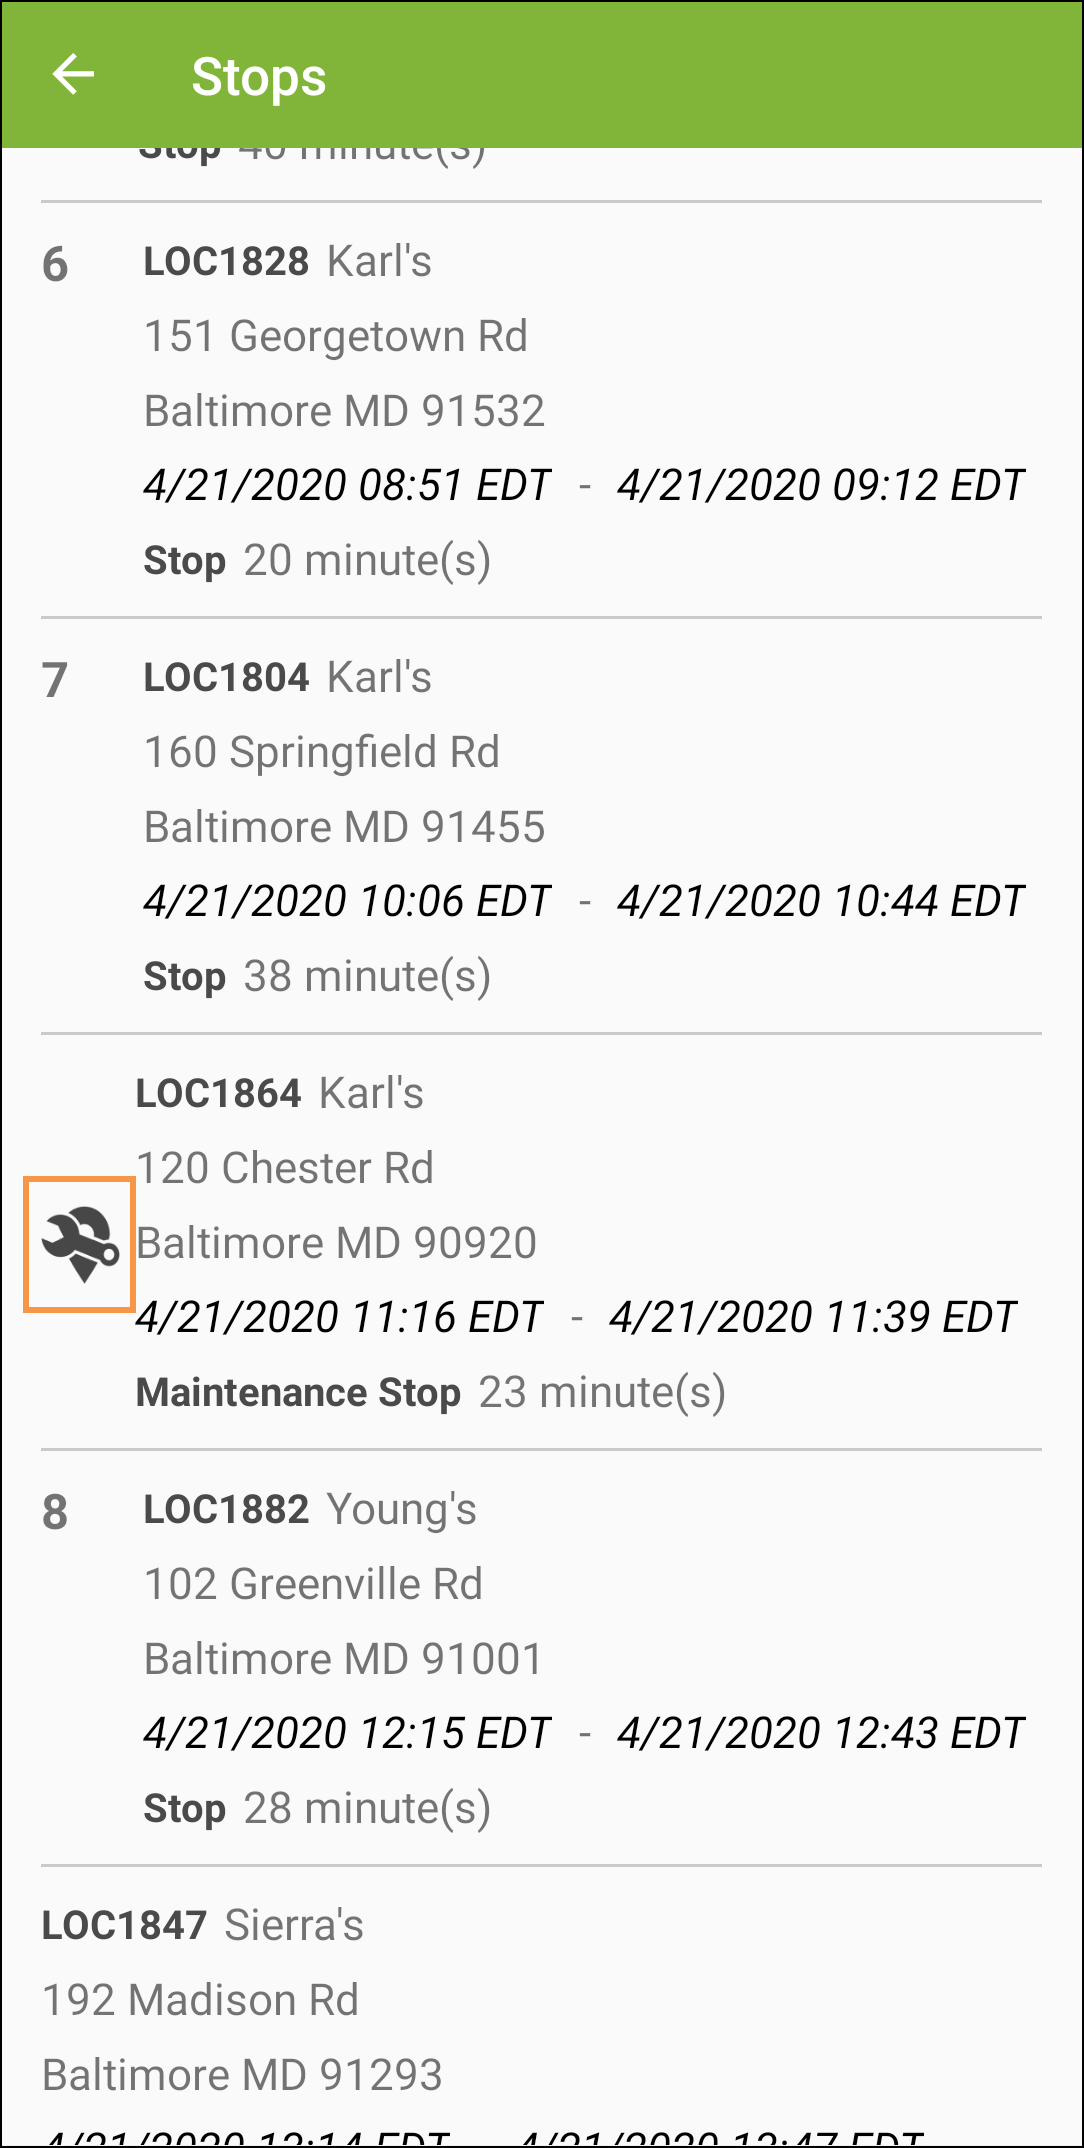
Viewing Maintenance Stops
Found in Omnitracs Mobile Manager
Maintenance locations are places you take your equipment to have maintenance done. You can now add a maintenance location to a route and see that stop on a route in Omnitracs Mobile Manager. The route status, when the equipment is at a maintenance stop, shows as a question mark (?).
Changing the Time Scale of Your KPI
Found in Omnitracs Web
When you look at a report in Insight, data is shown in the smallest increment of time available. So, if one piece of information is available down to the second, the whole report shows in seconds even when it is more helpful to see that information by the minute or hour. You can now change the time scale on KPIs to show in the increment you prefer.
To change the Time Scale on a KPI, go to KPI Settings, press Visualizations. Press the Time Scale arrow and then choose the time increment you want to use from the list that displays. Auto is the default which has the KPI display the smallest time increment available. You can change the time scale to Hours, Minutes, or Seconds. Press Apply to have the KPI change to the new time increment.
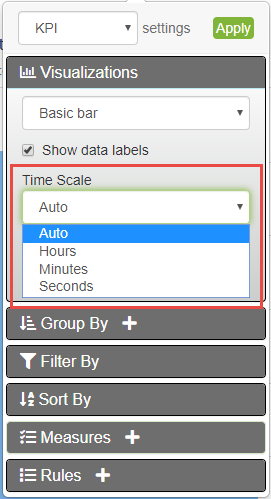
Note: The Time Scale is not available when you display the KPI as a Grid.
Adding the Stop Sequence Score (Cumulative) Measure
Found in Omnitracs Web
Currently, the Stop Sequence Score is calculated at the route level and is based on the calculation "actual number of sort steps/maximum number of sort steps." To see the information at a higher level, the route level scores are simply added up, giving all the routes the same weight without regard to their number of stops. This method of roll up limits the granularity of the information that is obtained.
The Stop Sequence Score (Cumulative) measure has been added to Insight. The actual number of sort steps and the maximum number of sort steps are now stored separately at the route level. When this information is seen at a higher level, each measure is added up separately and the formula turning the measures into a score is applied using the rolled up sums, providing more accurate information.
You can use the new template Stop Sequence Score (Cumulative) in the Templates list in Insight to see this information.
New Alert Types Added to Active Alert
Found in Omnitracs Web
Omnitracs Active Alert allows you to easily contact your customers with notifications or emails about the status of their order. Alerts can include emails or text notifications to the customer with information about the initial or updated ETA of their delivery, confirmation that their service is complete, and more.
Now, Omnitracs has added new alert types that let your customers know when a delivery is scheduled or rescheduled, and when a package has arrived. Arrived, Scheduled, and Rescheduled alert types are now available in Active Alert.
Adding Alerts to A Recipient Type Template
To send alerts for arrivals, scheduled deliveries, and rescheduled deliveries, you will need to add a recipient type template for each alert type.
- To add a template to a recipient type, go to Maintenance > Active Alert Recipient Types.
- Add a new Recipient Type or edit an existing one.
- Complete the fields on the Recipient Type - General tab as needed.
- Click the Templates tab.
- Click Add to create a new template.
- Click the Notification Method arrow and choose if you want to send an email alert or a text notification using SMS.
- Click the Alert Type arrow and choose the alert type you want to set up. The new alert types that have been added are Arrived, Scheduled, and Rescheduled.
- An Arrived template sends an alert when the stop is arrived. This can be an automatic arrival of the stop or when the worker presses Arrived on the mobile device.
- A Scheduled template sends an alert to the customer when a stop's route is moved to Built status or Dispatch phase in Omnitracs.
- A Rescheduled template will send an alert to the customer when the ETA of the stop no longer meets the originally scheduled window.
- Enter the Subject and Body for the template.
- Click Save Template and the new template displays in the list of templates for the Recipient Type.
- Click Save to save the Recipient Type.
Updating Alert Types for a Service Location
After you have updated your recipient types with templates for the new alerts, you will need to update your service locations active alert settings.
- On the Maintenance > Service Location page, add or edit a service location.
- Click the Active Alert tab.
- In the Subscriptions area, add a new subscription or edit an existing one.
- In the Alert Types area, check the Scheduled, Rescheduled, and/or Arrived type to add one or more of them to the subscription.
- Click Apply and then click Save to save your changes.
Determining When to Send A Cancellation Alert
In Omnitracs Web
If your dispatchers move routes in and out of Dispatch phase frequently during the day, you may find that a lot of cancellation alerts are being sent to your customers, just because the stop was moved back to planned by the dispatcher. Now, Active Alert can control how many cancellation alerts are being sent, just because a route is moved back into Planned status. A new Business Unit setting lets you define how long to wait before a route is considered cancelled and an alert is sent, when that route is moved from dispatched back to planned.
To define this new setting, go to Business Unit > Active Alert > General Settings. In the Scheduled Alerts Settings area you will enter the setting that will be used for sending alerts when a stop's route is moved out of Dispatch phase. In the Unscheduled Stop Cancellation Threshold (Hours) field, enter the amount of time that should elapse between the time that a dispatched route is moved back to planned and the route's planned start time, before considering a stop cancelled.
If a dispatched route is moved back to planning and remains in planning for one hour or more, AND the amount of time between the current time and the route start time is less than the Unscheduled Stop Cancellation Threshold (Hours), a cancellation alert is sent.
For example, if a route is moved from dispatched back to planned at 8:00 AM and remains there, and the Unscheduled Stop Cancellation Threshold (Hours) is set to 4 hours, because it has been back in planning for more than an hour, at 9:02 AM the first criteria for the route to be considered cancelled is met. The threshold criteria is then taken into account.
At 9:02 AM, a route that is planned to start at 12:00 PM is within the four hour threshold. A cancellation alert is sent at 9:02 AM.
At 9:02 AM, a route that is planned to start at 2:00 PM, is not within the four hour threshold, so both criteria are not met. A cancellation alert will not be sent. At 10:02 AM, the one hour or more criteria is still valid and the route that is planned to start at 2:00 PM now also meets the four hour threshold. A cancellation alert is sent at 10:02 AM.
Adding the Estimated Date of Arrival to Your Alert
Found in Omnitracs Web
Currently, when you ar informing your customer of when to expect service to occur, you can only add the estimated time of arrival start, {ETA_START}, and estimated time of arrival end, {ETA_END}, to your alerts. This provides your customer with a range of time in which a delivery will be made, but there is no way to inform the customer of what date that delivery will be made. You can now add the estimated date of arrival to your alert. Simply add the tag {ETA_START_DATE} in the Body of your template to include the date that the delivery is planned to occur. You can review the message to make sure that you have entered the tag correctly.
New Configuration Settings in Omnitracs Command
Omnitracs Command is a tool that helps define what a worker sees in Omnitracs Drive. There are several new settings in Command that can affect how the worker interacts with Drive.
You can have the HOS information displayed as a tab in Driver, instead of the worker clicking an icon to open a separate HOS window. The same information is displayed, whether it is a tab or a separate window, the only difference is in how the worker accesses the HOS information.
To have the HOS information displayed as a tab in Drive, click on the Workflow you want to update. The click the Universal Config menu, then HOS. The HOS window opens. Check Show HOS Integration as a Tab. Click [Save] to save the changes.
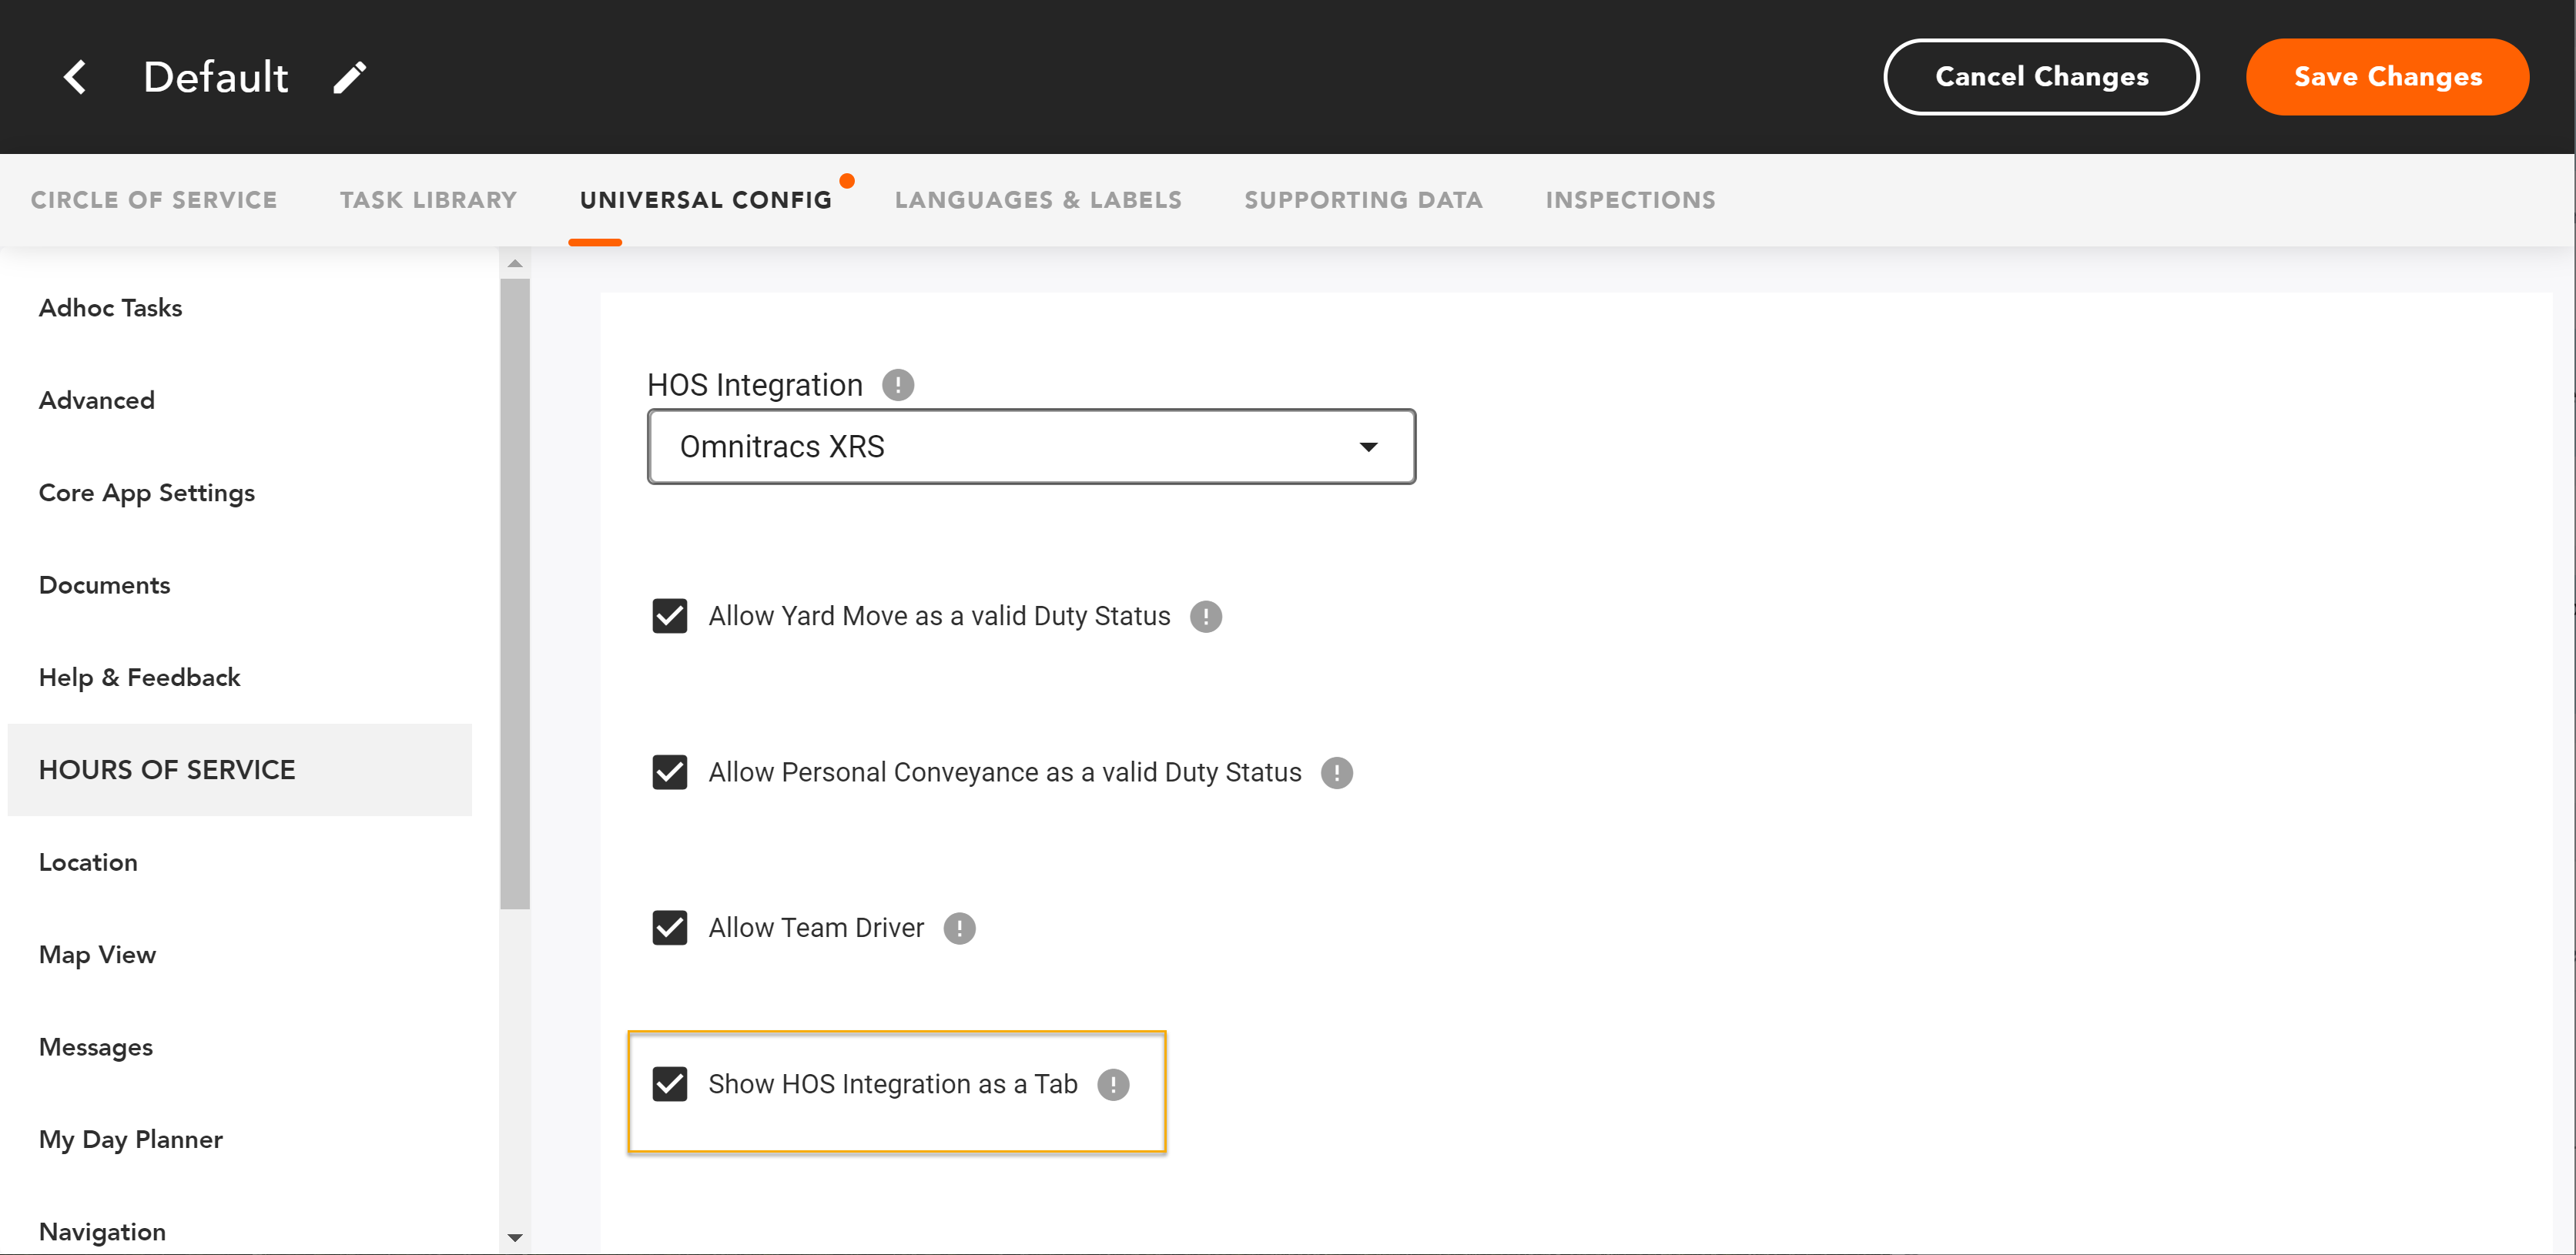
If you are using CoPilot as your navigation application, you can specify that the appropriate maps are being used in Drive to properly show your navigation path.
To specify the map provider used for Drive, click on the Workflow you want to update. Then click the Universal Config menu, then Map View. Click the Map Provider arrow and choose Trimble Maps. Then, enter the API key.
Note: Currently this setting only applies if you are using CoPilot as your navigation application.
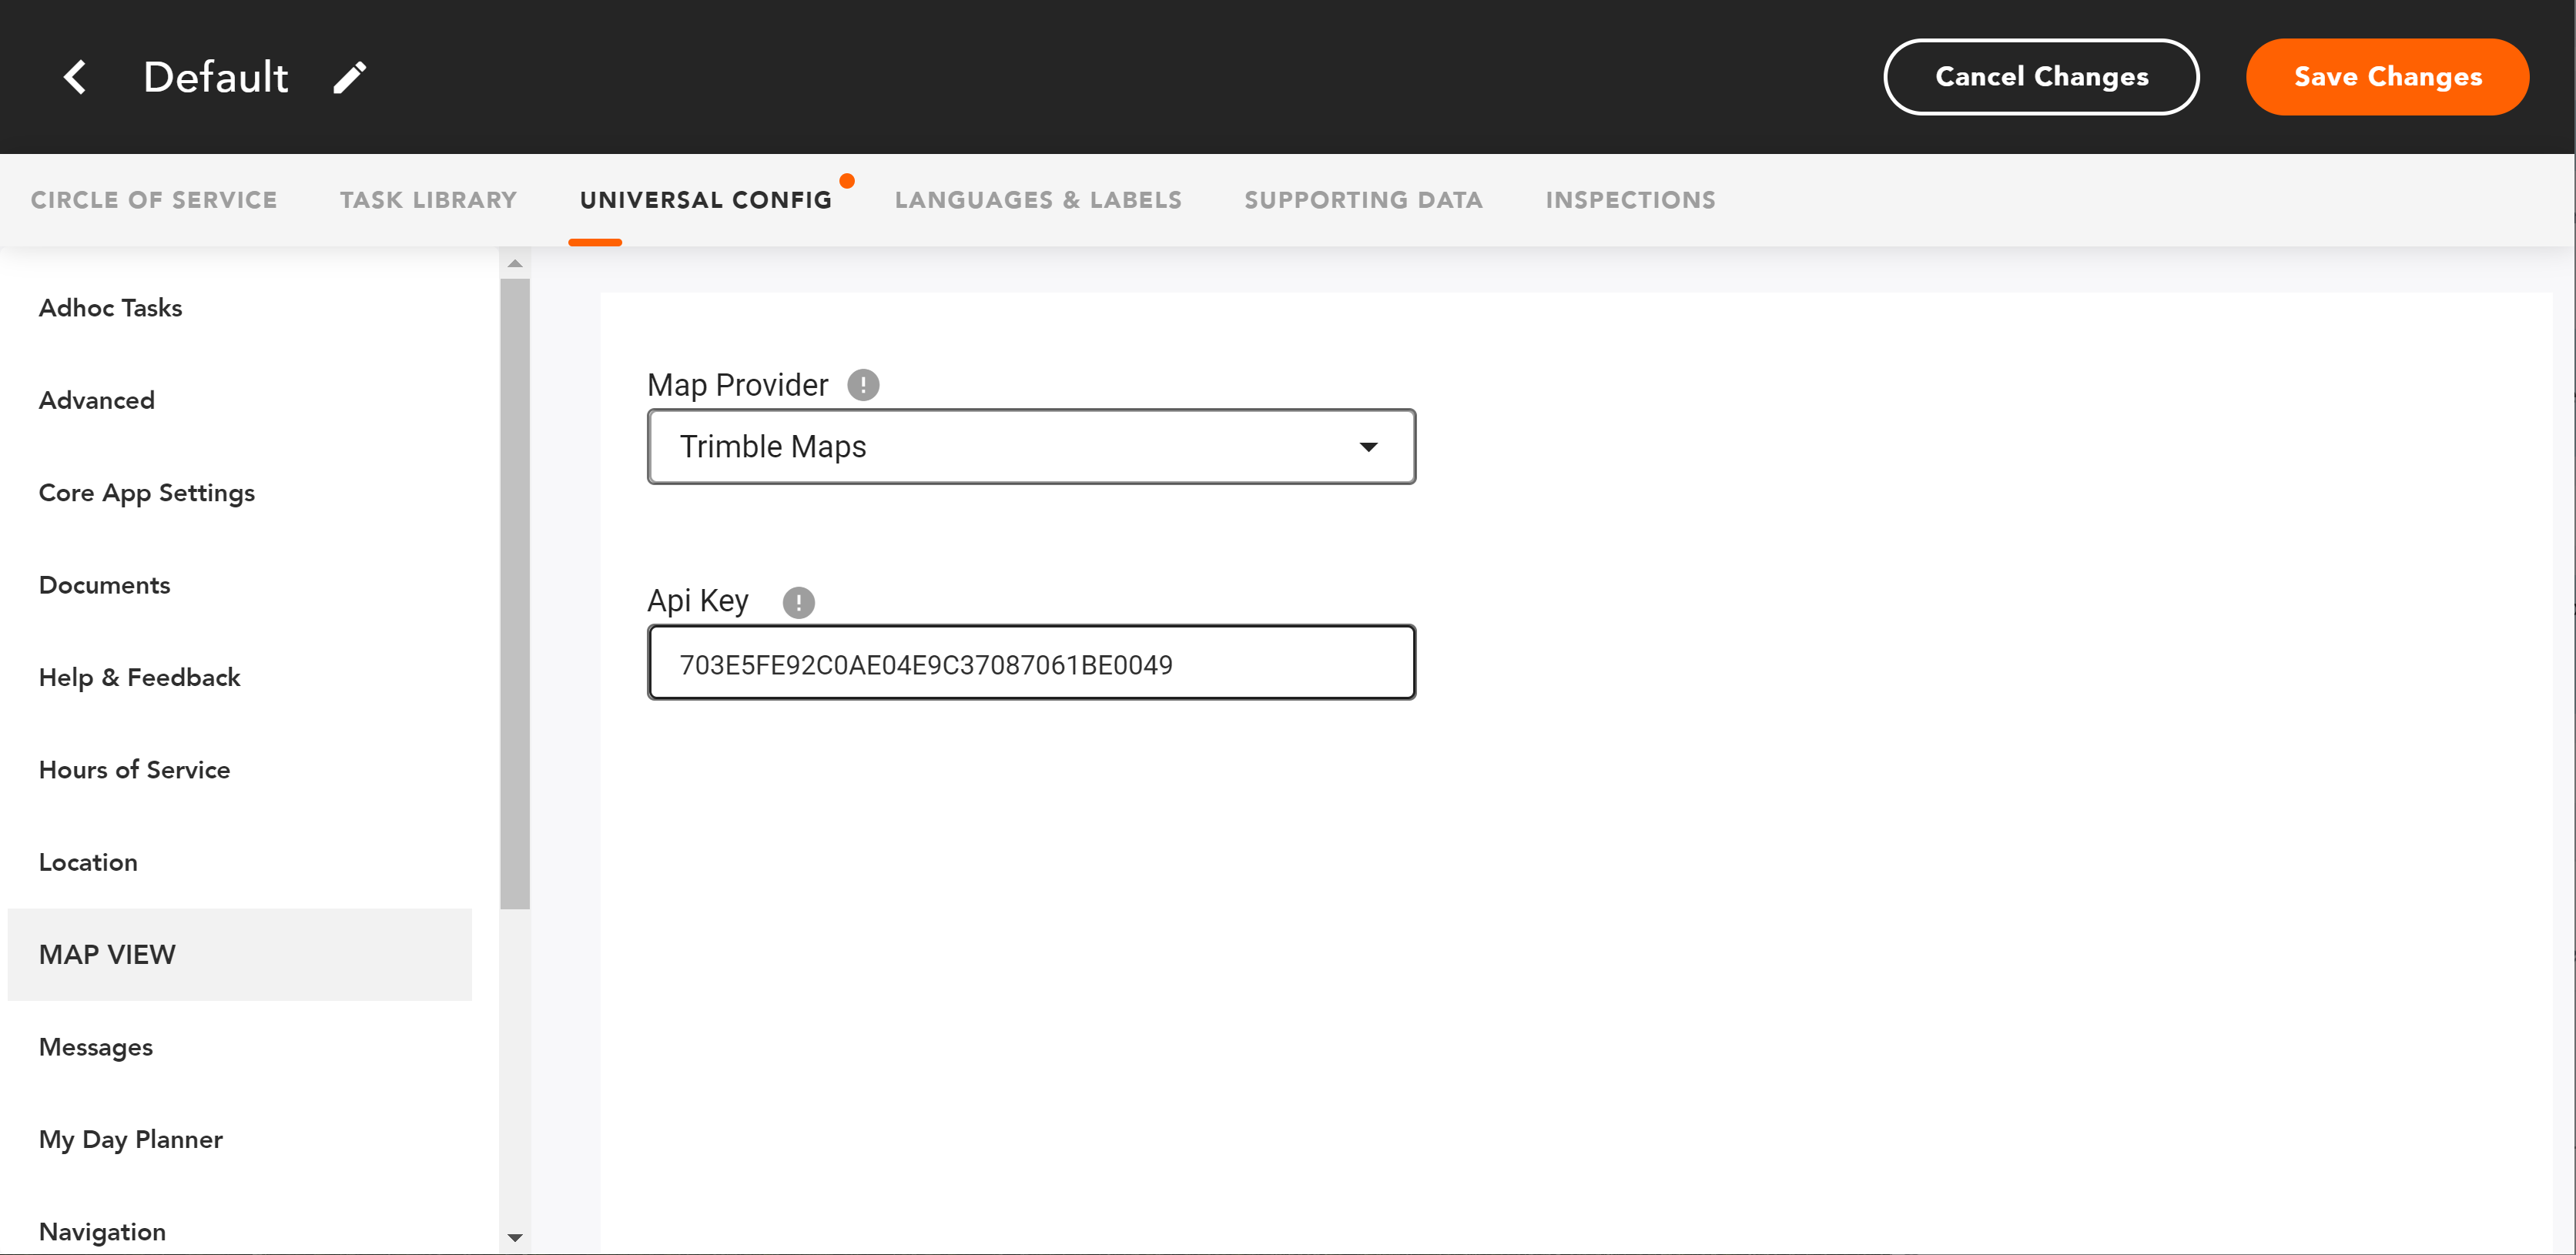
Currently, if a driver does not log out of Drive, the next time the driver opens the application he is automatically logged in. However, if you have multiple drivers using the same device, you may not want the application to automatically log in when another driver starts using the device. There is now an option in Command that will prevent the auto login from occurring; when any driver tries to use the application, they will be forced to login .
To prevent the driver from being automatically logged into Driver, click on the Workflow you want to update. Then click the Universal Config menu, then Corr App Settings. Check Force Login on App Start.
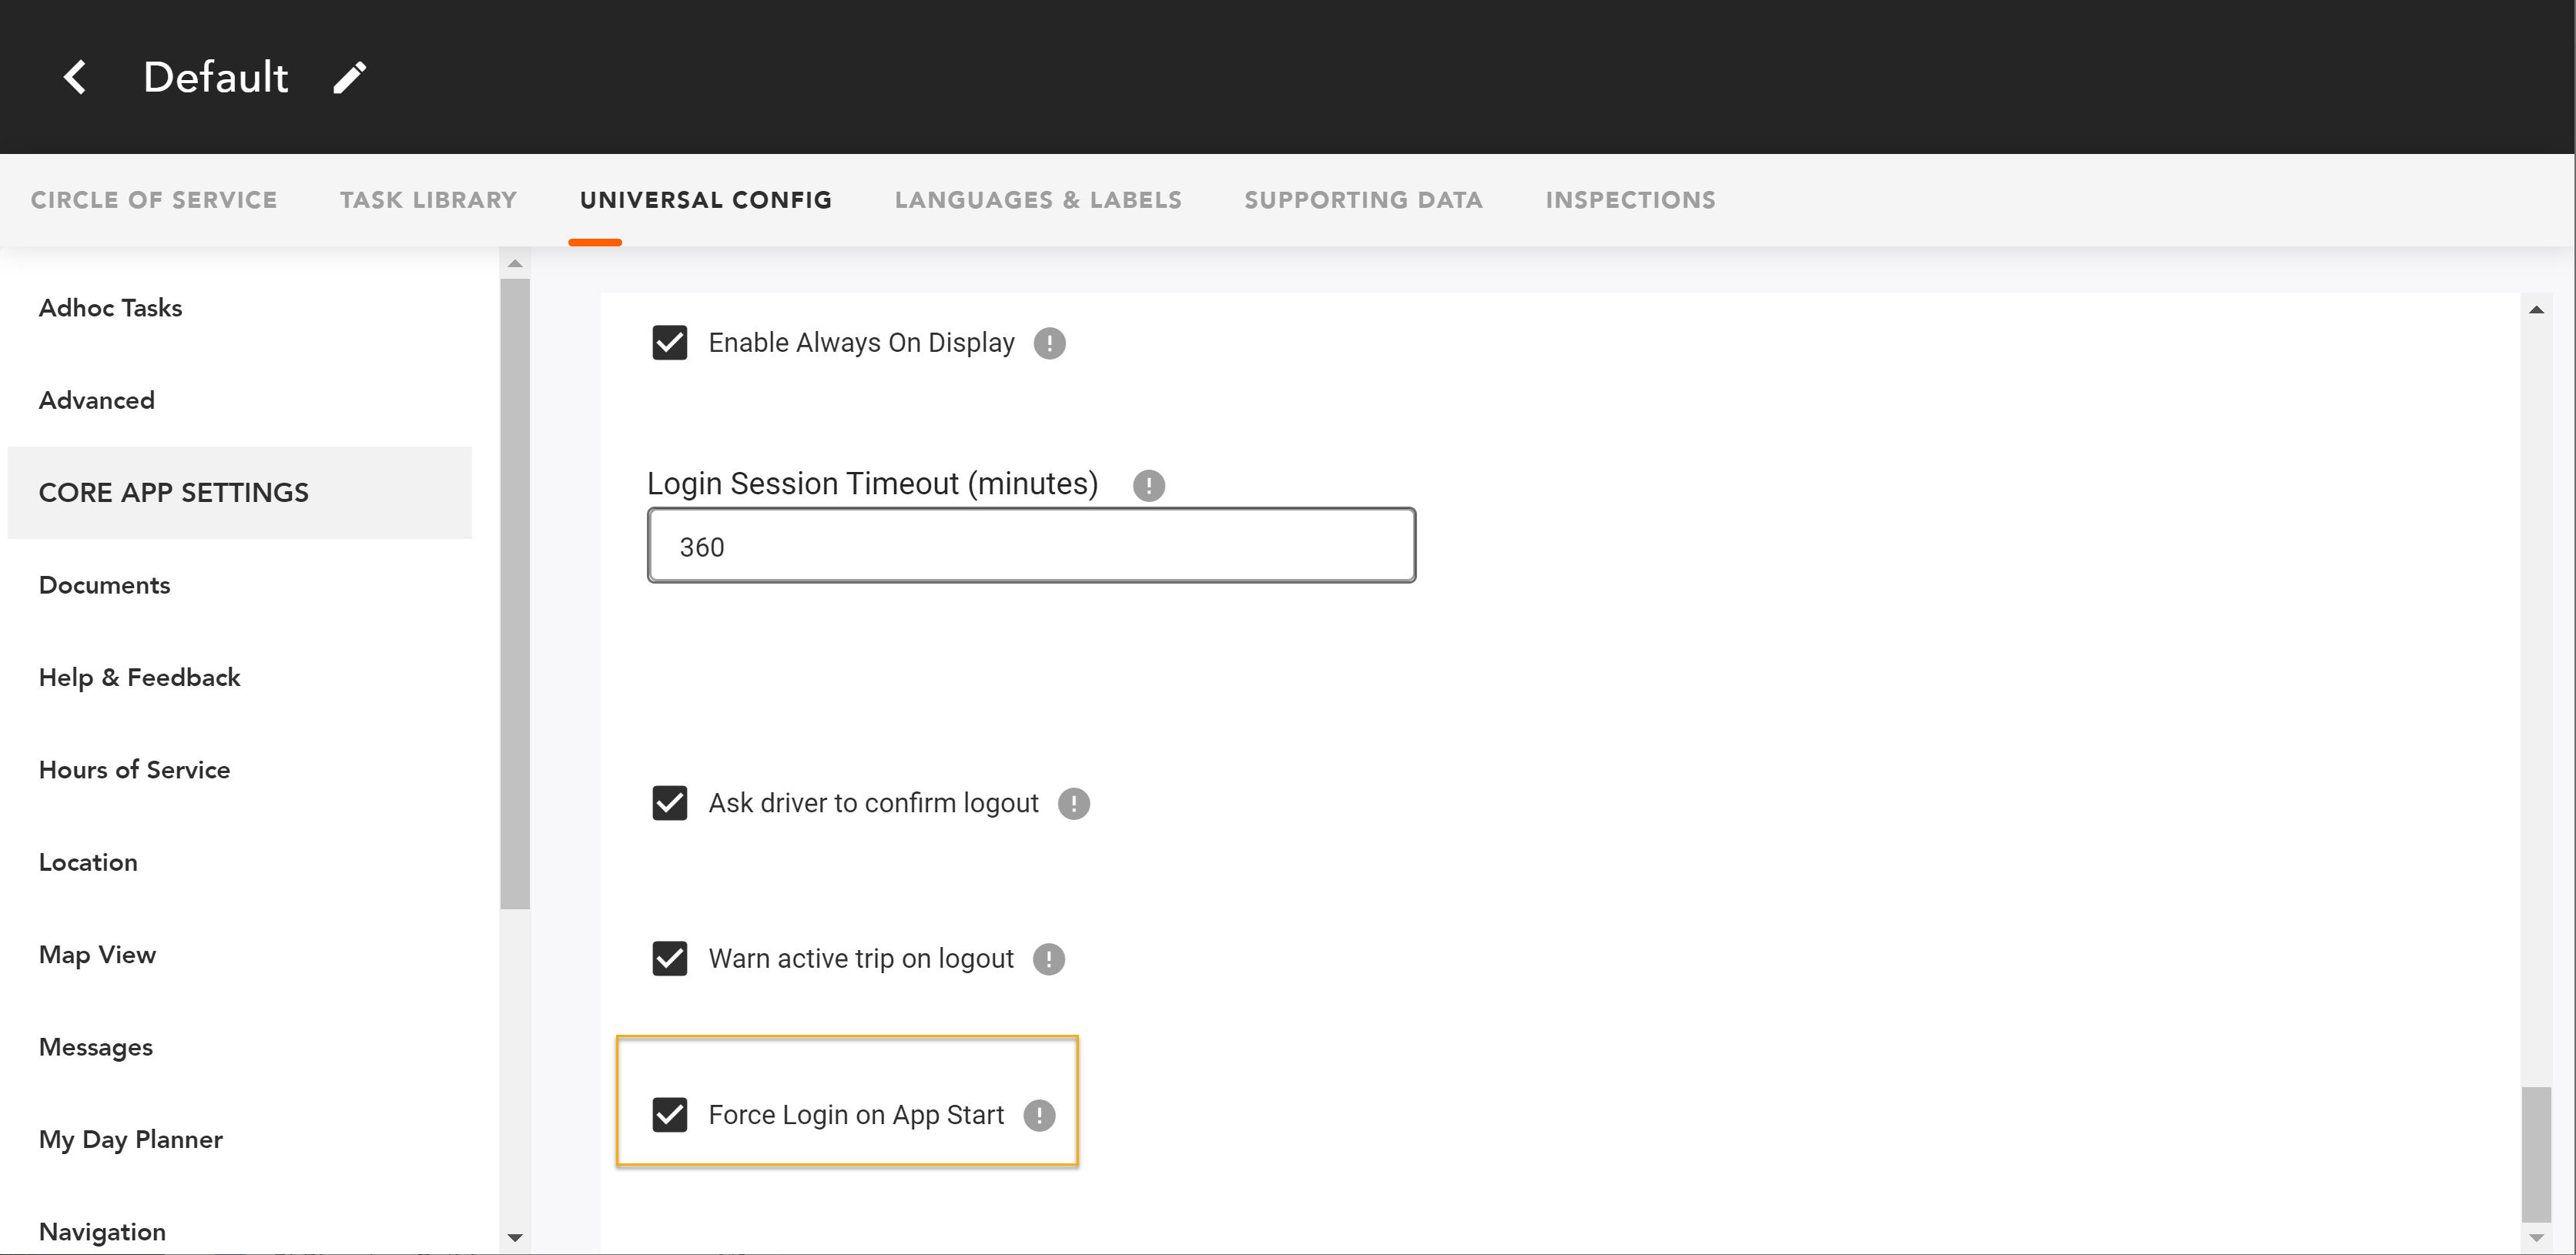
If you enter information that is not valid in Command, an error icon will now appear next to the page name to alert you to the problem.
Working with a Co-Driver in Drive
Found in Omnitracs Drive
Note: You must use Compliance to add a co-driver to a trip.
A co-driver is a second worker that is logged into Drive. A co-driver is the non-driving member of a Team of Drivers and can take over driving the vehicle while the first worker rests or performs other non-driving duties.
The login support for a co-driver in Drive has been improved to simplify the steps workers must follow when a second worker must login. Workers can also be marked as Primary, the current driver of the vehicle, and/or Active, the current user of the Drive app. This lets Drive control what functionality a worker has access to. For instance, only the Active Primary worker can complete a workflow task or edit Hours of Service logs but any Active worker can review trip, stop, and completed task information and high level HOS information. When the vehicle is moving, an Active Primary worker is not allowed to use Drive, but an Active co-driver can. These settings also establish who is recorded as driving, the Primary worker, while the equipment is moving.
Notes: The worker who logs into Drive first is listed first at the top of the menu. This is also the worker to whom the trip is assigned.
When the second worker logs in as a co-driver in Drive they are also logged into Hours of Service. The co-driver login option is only available after the first driver has logged in.
To add a co-driver to the trip in Drive, simply open the menu and tap Add Co-Driver. The second worker enters a login and password and taps Sign In. The second worker is added to the worker information at the top of the menu.
So that the worker interacting with Drive can be identified separately from the worker that is driving the vehicle, the workers are marked as Primary (P) and Active (A), at the top of the menu. The person who is driving the equipment and will have the HOS Duty Status of "On Duty Driving" is considered Primary. The person who is interacting with the Drive application is considered Active. If the correct worker is not marked as Primary or Active, tap the P or A associated with the appropriate driver to change the status. These statuses may be changed from one worker to the other throughout the trip, depending on who is driving and who is interacting with the Drive application. As well, one driver may be marked as both the Primary and Active driver. If the co-driver decides to go into the sleeper berth, then the Primary driver will also become the Active driver.
Note: If the first driver logs out, the second driver must re-enter their password to remain logged into Drive.
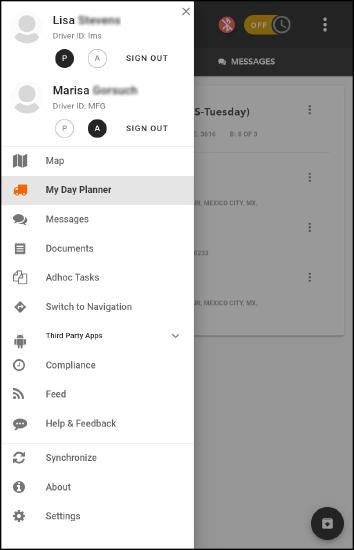
Viewing Hours of Service Information
When a co-driver is logged into Drive, both workers' Hours of Service information is available. When the HOS Clock is tapped or the HOS tab is viewed, the primary worker's information displays. The co-driver's information can be viewed by simply tapping the arrow at the top of the window. To return to the first worker's information, tap the arrow again.
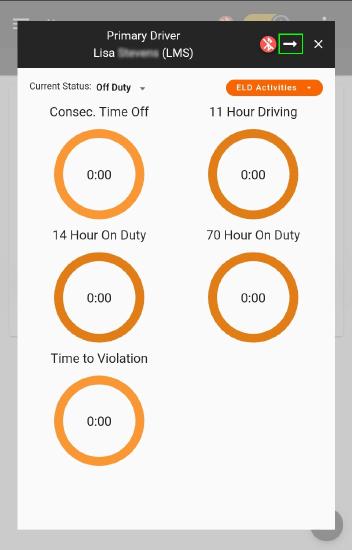
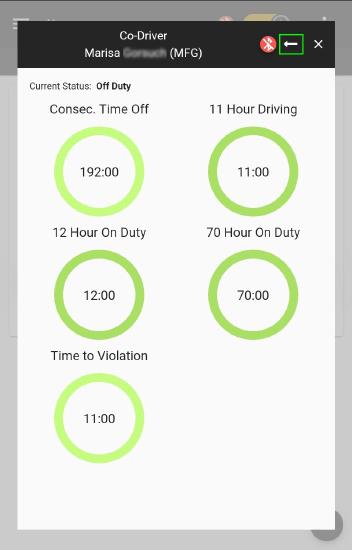
Even though the Active worker can see both worker's HOS Duty Status information, only the Active worker's information can be changed. The Active worker cannot change the other worker's duty status or edit the other worker's logs.
Providing You With More Information
To help you have a better user experience, more prompts and warnings have been added so that you know why Drive may not be working the way you think it should.
The worker will see a message when the following events occur:
- When the worker attempts to log out of Drive, but there is still an active Trip.
- When the worker attempts to navigate to the next stop without completing the previous stop.
- When the worker proceeds to the next stop without completing the previous stop and the next stop will not be auto-arrived.
Audit Trails for Regions
When someone changes a region setting, it can have a far reaching impact that affects your day to day operations. Now, there is an audit trail for changes to regions to you can see who made changes, when they were made, and what those changes were.
Some points about the audit log:
- If regions have been deleted, a [Show Deleted] button appears on the region list. Clicking this button adds the deleted regions to the list. You can not make changes to these regions, but you can view the audit log for the region.
- You can use a filter the audit log to reduce the number of entries. Simply enter the criteria in the Search field - a user name, field name, date, etc. - and the audit list reduces to only those items containing the search criteria.
- The audit log will only include changes that occur after the Omnitracs 5.8 release.
to view the audit log for a region, in Administration, click the green button and select Regions; the Regions list opens. Click the Audit Log icon for the region you want to review; the Audit Log opens.


New REST APIs
Omnitracs is releasing a suite of new REST APIs which will make it easier for you to integrate your systems with Omnitracs. REST APIs are available for the following actions and entities:
- Login - login information for the service user communicating with Omnitracs
- Locations - customers and other places your workers visit
- Workers - your employees who are monitored in Omnitracs
- SKUs - the SKUs for your products
- Equipment - your trucks and other vehicles monitored in Omnitracs
- Regions - the areas you are working with in Omnitracs
- Orders - the orders you are picking up and delivering to locations
- Route Plan - a planned route that will be tracked in Omnitracs
- Events - a way for subscribers to be notified about certain route, stop, and worker events.
- Distance by Jurisdiction - the distance each piece of equipment traveled in each legal jurisdiction
- Equipment Positions - list of GPS pings for each piece of equipment
- Route Actuals - actual times, distances, and other information about the route
- Worker Performance - information about worker efficiency
- Worker Compliance - information about the worker's HOS hours and status
- Worker Log - the worker log for AOBRD compliance
Downloading the Latest Applications for Your MDM System
Currently there is no consistent, easy way to receive the latest Omnitracs applications so that you can update your Mobile Device Management (MDM) system or download .apks to be manually loaded on your mobile devices. The Application Downloads page has been added to the Administration module in Omnitracs Web and allows you to easily download installation files for your mobile devices, computers, and MDM system.
Notes: Only those applications available to your company will display in the list.
The latest release of each application is available. Contact Omnitracs Support if you need to download a version other than the latest available release.
To download an individual application, follow the steps below.
- Click the green button and then scroll to Application Downloads. The Application Downloads page displays with a list of all applications that are available for you to download.
- Click the Download button next to the application you want to download. The installation file for the application is saved to your computer in the default download folder.
- Open the default download folder on your computer and copy the installation file to the device on which you want to install it or to the location that provides your MDM files.
Notes: If you are manually installing an application on a mobile device, a file manager application must be installed on the device.
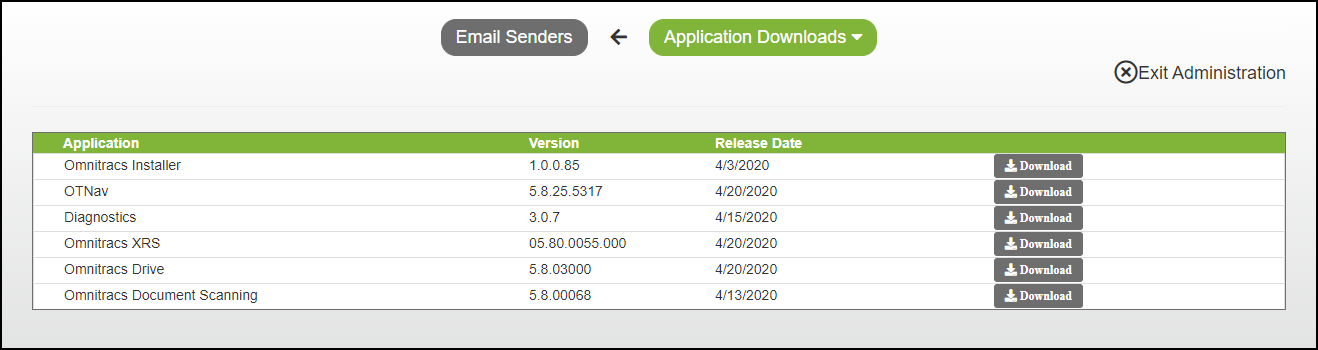
Automatic Installation of Omnitracs Mobile Applications
Omnitracs Installer is an easy way to manage Omnitracs applications that are used on mobile devices within your organization. This process is designed for customers that do not use an MDM system for application distribution. You can use Omnitracs Installer to download, install, and update other applications. It is available from the Application Download page or from a download link sent from the Mobile Devices page in Omnitracs Web.
Once it is installed, all the applications that are available for you to install on the mobile device display in a list in the installer application. Applications that display in the list on the mobile device can include:
- Omnitracs Installer
- Omnitracs Navigation
- Diagnostics
- Omnitracs Drive
- Omnitracs Document Scanning
- Omnitracs XRS
Note: Depending on your settings, you may not see all the available applications.
If you want to require mobile devices to have an internet connection before application installation and update files can be downloaded to the mobile device, check Installer App - Wifi Only for Downloads/Updates on the Business Unit - General tab in Omnitracs Web.
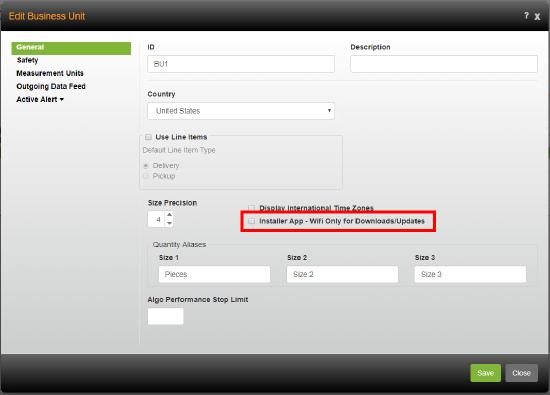
Loading Omnitracs Installer on the Mobile Device
To set up Omnitracs Installer on a mobile device, you must first download the installer to your computer or mobile device.
To download Omnitracs Installer directly to a mobile device, use the Send Application button on the Mobile Devices page in the Maintenance module.
Note: If you use Roadnet Mobile, Omnitracs Installer cannot be loaded to the mobile device using the Send Application button.
- In Omnitracs Web, click Maintenance.
- Click the green button and scroll to Mobile Devices. A list of your mobile devices displays.
- Click the Send Applications button.
- On the Send Application to Mobile Devices screen, check the devices you want to load Omnitracs Installer on and click the [Send] button.
On the mobile device, the worker receives a text message that includes a link for the worker to tap to download the application. The worker must then install Omnitracs Installer on the mobile device.
To manually copy Omnitracs Installer to a mobile device, use the Applications Download page to download the installation file. A file manger application must be installed on the mobile device to copy the installation file from a computer to the mobile device.
- In Omnitracs Web, click Administration.
- Click the green button and scroll to Application Downloads. The applications that are available for download display.
- Click the Download button next to Omnitracs Installer. The MobileInstaller-xxx-release.apk file, where xxx is the version of the file, is saved to your computer in the default download folder.
- Open an explorer window and navigate to the default download folder where the MobileInstaller-xxx-release.apk file was saved.
- Right-click on the file and choose Copy.
- Connect the mobile device to your computer using a usb cable. The mobile device’s explorer window should open automatically. If it does not, open an explorer window and find the mobile device in the list on the left.
- Open the file manager application on the mobile device.
- On the mobile device, navigate to the Download folder.
- Tap the MobileInstaller-xxx-release.apk file. The Omnitracs Installer installation screen displays.
On the mobile device, the worker must complete the installation of Omnitracs Installer on the mobile device.
Installing Omnitracs Installer on the Mobile Device
- On the mobile device, the worker taps Install.
- When the installation is complete, tap Done.
- If the Install unknown app screen displays, turn on Allow from this source, and then Tap Install Unknown apps at the top of the page to return to Omnitracs Installer.
- Enter the Identifier for the mobile device. The Identifier is the Mobile ID assigned when adding the mobile device to Omnitracs.
- Tap Save. Omnitracs Installer opens displaying a list of all the applications available to install on the mobile device.
Note: See the Omnitracs Installer User Guide for instructions on how to install other applications using Omnitracs Installer.
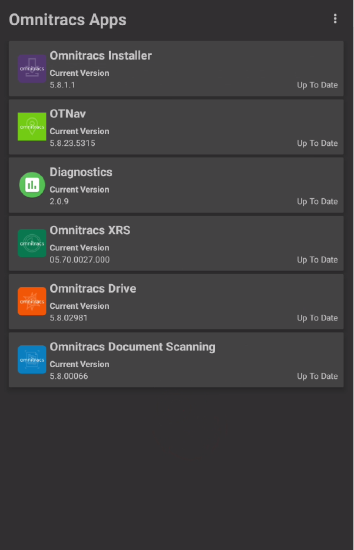
Software Corrections
| Issue key | Release Notes | Components |
|---|---|---|
| RPE-1526 | Validation for Active Alert recipient email addresses and User email addresses has been added to Omnitracs Web. | Active Alert |
| RPE-5040 | Due to changes the FMCSA made to the eRODS transfer file validation, the driver's licence field can now include asterisks, dashes and spaces. | Compliance |
| XRS-493 | The Oregon Weight-Mile Tax rate has been updated to the correct rate of .2150. | Compliance |
| RPE-4175 | A defect was discovered in the process that generates the output file of the Send Orders function which caused numerical values to be formatted incorrectly in languages such as Portuguese. This issue has been resolved. | Data Transfer |
| RPE-687 | The RA Bridge Wizard successfully uploads Mobilecast Routes from RTS to Insight. | Data Transfer |
| RPE-450 | A new option was added to Service Location import to "Treat Service Window Overrides as Cumulative". When this option is enabled the service locations that have different service window overrides on separate lines in the import file will now have an override created for each service window override included in the import file. | Data Transfer |
| RPE-4175 | A defect was discovered in the process that generates the output file of the Send Orders function which caused numerical values to be formatted incorrectly in languages such as Portuguese. This issue has been resolved. | Data Transfer |
| RPE-4110 | Fixed issue where the dispatcher could not open route details. | Dispatching |
| RPE-4111 | Fixed issue where drivers could not unload a route with multiple mid-route depots (first being cancelled). | Dispatching |
| RPE-4065 | Added time zone formatting to the Planned Route Date column to match it with the Routing Session Date column. | Dispatching |
| RPE-4112 | There was an issue preventing all regions from displaying when filtering regions in Insight. This only occurred when there was a large number of operations units. To reduce the potential for the issue to occur, only active operations units will be shown. | Insight |
| RPE-2113 | Previously when a column in the Service Location Substitutions grid on the Location's Business Rules tab was locked in the right hand position, the data in that column was not visible. This has been corrected. | Maintenance |
| RPE-2110 | The message displayed when a duplicate location substitution is being created has been modified to more clearly indicate the issue. | Maintenance |
| RPE-279 | There was an issue where the current region was not indicated when editing a Compliance entity in a customer with region hierarchy. This has been corrected. | Maintenance |
| RPE-1031 | There was an issue preventing the criteria from appearing in the drop down list when creating mobile forms. This has been corrected. | Miscellaneous |
| RPE-642 | The help for the Region - Map Dataset Regions page was not opening properly. This has been corrected and the help now opens. | Miscellaneous |
| RPE-4 | There was an issue where large routing jobs were causing the system to slow down. An optimization change was made in the algorithm when sequencing large routes to speed up the overall routing process. | Miscellaneous |
| RPE-5075 | There was an issue that was causing GPS pings to not appear in Equipment Position History. This has been corrected. | Miscellaneous |
| RPE-3182 | There was an issue preventing workers from seeing some messages sent from FleetView. This has been corrected. | Mobile |
| RPE-1532 | A route completes and unloads without issue when the last stop is set as the destination and it is reset and then redelivered. | Mobile |
| RPE-1284 | Made a change to ensure that back to back breaks are not combined during the sequence operation if the route has already been loaded to a device. | Mobile |
| RPE-1167 | Mobile no longer adds unknown stops to the server when dual device settings are configured to server side AAD. | Mobile |
| RPE-5080 | There was an issue where the Region settings for Omnitracs Navigation were not being saved. This has been corrected. | Navigation |
| RPE-4520 | There was an issue that was caused an error when Update Previous Days was used. This has been corrected. | Planning |
| RPE-4650 | There was an issue that routes with a start time that was late in the day were being created for the wrong day. This has been corrected. | Planning |
| RE-4522 | There was an issue that was preventing the previous weeks and days from being properly imported when using Import Planning Solution. This has been corrected. | Planning |
| RPE-1398 | Fixed a problem that was causing the weekly assignment to not be maintained when dragging orders to a new territory | Planning |
| RPE-1294 | There was an issue that caused users to receive an error when trying to invoke the Speed Editor in Strategic Planner. This has been corrected, and the user now sees this message - 'The item you have clicked is being refreshed. Please try again momentarily.' | Planning |
| RPE-1262 | There was an issue where re-plotting a territory in Strategic Planner could cause an error. This has been corrected. | Planning |
| RPE-3996 | When a recurring order was regeocoded, it was showing as Unassigned on the map until a Save occurred. This has been corrected. | Planning |
| RPE-1137 | There was an issue that caused the application to crash when closing the recurring orders list in Strategic Planner. This has been corrected. | Planning |
| RPE-917 | There was an issue causing territories to be assigned to the wrong depot during the 'Create Territories' process. This has been corrected. | Planning |
| RPE-804 | There was an issue that was causing the map to minimize when you selected Unroute on Territory or Unassign in Strategic Planner. This issue has been resolved. | Planning |
| RPE-4176 | There was an issue preventing the territory map from automatically refreshing after Create Strategic Routes was run. This has been corrected. | Planning |
| RPE-789 | When the map on the route planning manifest was small enough that the Fit on Map icon was hidden, clicking on the map's Fit on Map menu option did not resize the map. This has been corrected. | Planning |
| RPE-1813 | There was an issue causing the Mobile Form Result reports to show the wrong timestamp. This has been corrected, and both the Mobile Form Results by Location and Mobile Form Results by Driver reports show times in the local time. | Reporting |
| RPE-1747 | The Equipment Utilization report was showing an excessive amount of service time for some equipment. The issue was the report was including data for not completed routes. Now, the report will only display equipment utilization of completed routes. The report description is updated accordingly. | Reporting |
| RPE-1551 | There was an issue when scheduled Telematics Diagnostics report was sent as .txt file. The fix changed it to .csv. | Reporting |
| RPE-1438 | There was an issue where the Idling report and Insight were not showing the same number of idling events. This has been corrected, and now Insight and Reports show equal data. | Reporting |
| RPE-1281 | The Equipment Position History report was taking a very long time to load. The report was optimized and for 2 months it is generated for 10 min in IE and Google Chrome. | Reporting |
| RPE-1251 | There was an isse where not all route templates were appearing on the Route Template Stop List report. This has been corrected, and all templates are now added into the report. | Reporting |
| RPE-1235 | The Active DTC report was including inactive equipment on the report. A new "Active Only" option was added to the report in Omnitracs Web to filter inactive equipment. This option was not added to Omnitracs Client. | Reporting |
| RPE-1234 | There was an issue where the Off Day Delivery report was displaying very old dates. This has been corrected. | Reporting |
| RPE-992 | Previously, the Service Window Exemptions report was not filtering the Priority properly in some configurations. This has been corrected. | Reporting |
| RPE-632 | There was an issue causing the Equipment History report to fail to load the PDF when the report was created. Now, Equipment Position History report has separated into two reports: - CSV report should be used to generate up to 31 days of data. - PDF/Excel is limited by 1 day as it is too large to cover more. This one is designed as a printable version. |
Reporting |
| RPE-443 | The Service Window Exception report in Latitude and Route Navigator has been updated. The Priority Range slider now goes to 10 to accommodate the maximum Priority Override value that can be set on an order. | Reporting |
| RPE-1367 | Order quantities display their correct values when added by the dispatcher to a loaded route. | Roadnet Mobile-Android |
| RPE-1247 | Loading a route to a device completes when a stop has a Service Location Category that is not shared to the Service Locations region. | Roadnet Mobile-Android |
| RPE-1007 | An iMX Tracking worker will no longer be shown the origin picker when the region setting "Allow Tracking Worker to Add Stops" is disabled. | Roadnet Mobile-iOS |
| RPE-942 | Roadnet Mobile Tracking routes that are run on an iOS device will now arrive and depart at correct service locations. | Roadnet Mobile-iOS |
| RPE-5056 | Fixed an issue so users using iOS in the Mexico region not using a 24 hour clock can log in. | Roadnet Mobile - iOS |
| RPE-1390 | Previously, the Worker Line Item Default Type column displayed twice in the Orders grid in the Route Planning manifest. This has been corrected. | Routing |
| RPE-1283 | An issue was discovered that caused the application to close when attempting to toggle Depots on/off on the map in Route Planning. This has been resolved. | Routing |
| RPE-1180 | There was an issue where dragging and dropping a stop on the map in the Routing Manifest was placing the stop in the wrong sequence. Now, dragging stops on map route path when Show Full Paths is turned off, the stop is placed where it was dragged. | Routing |
| RPE-1021 | An issue that caused Omnitracs Client to unexpectedly close while dragging and dropping stops on a route after plotting the route on an existing map has been identified and resolved. | Routing |
| RPE-545 | Previously, route template plots would not display on the map in the route template manifest if the Marker Color By on the map options was set to Order Urgency or Service Pattern Set Color. This has been corrected. | Routing |
| RPE-517 | A confirmation prompt is now displayed when combining routes from the route and map context menus and tool bar icons. | Routing |
| RPE-1158 | There was an issue that was causing Unknown to appear in the Power Source column in Telematics Diagnostics when the Telematics device was not assigned to a vehicle. This has been corrected. |
Telematics |
| RPE-1467 | There was an issue that seemed to be preventing new Geotab devices from communicating with Omnitracs. The device refresh interval has been lowered, which should reduce this issue. | Telematics |
| RPE-4399 | There was an issue that was causing a Telematics route to be duplicated when Transfer Route Data was used. This has been corrected. | Telematics |
| RPE-1014 | The allowable Minimum Stationary Stop Time has been lowered to 30 seconds to allow customers with quick stops to capture that information. | Telematics |
| RPE-664 | There was an issue that was causing the Telematics device assigned to the Equipment not to appear in the Equipment list, and the region sharing is not shown correctly. This has been corrected. | Telematics |
| DCMD-3 | Co-drivers are able to use Drive while the vehicle is in motion. | Omnitracs Drive |
| DCMD-8 | Drivers will now be warned if they attempt to transition to Navigation before completing the current stop. | Omnitracs Drive |
| DCMD-10 | Users can now enter a Trimble Map key to allow integration with Trimble maps. | Omnitracs Drive |
| DCMD-439 | An icon appears if the session expires. The driver can press this icon to re-enter credentials and enter the session. | Omnitracs Drive |
| DCMD-459 | A warning appears when the driver logs out alerting them if they have active trips. | Omnitracs Drive |
| DCMD-496 | New type of configuration for Third Party App Details -> App Name. App Name's will now appear in the Languages and Labels tab and be available for configuring translations. | Omnitracs Drive |
| DCMD-501 | This confirmation dialog has been replaced by one that does not allow the logout event to be sent erroneously. | Omnitracs Drive |
| DCMD-571 | A dropdown option has been added to the Loading screen where a supplier can be selected. | Omnitracs Drive |
| DCMD-574 | Trips will auto complete if a Stop is removed and all remaining Stops on the Trip have been completed. | Omnitracs Drive |
| DCMD-575 | A status update is sent to TMW when a trip is not successfully sent to Drive. | Omnitracs Drive |
| DCMD-861 | Trips that were unplanned or reassigned update to planned status when assigned to a driver. | Omnitracs Drive |
| DCMD-688 | Can't reproduce anymore. I changed my car I was testing with and the InMotion popup appeared when required to appear. | Omnitracs Drive |
| DCMD-289 | XRS Mobile is notified of changes made to active Assets. | Omnitracs Drive |
| DCMD-577 | A status update is sent to TMW when the device receives the trip. | Omnitracs Drive |
| DCMD-644 | Dupe of another one but the User should get re-directed to Home page with Arrive task in this specific scenario. | Omnitracs Drive |
| XRS-945 | Issues that sometimes caused the vehicle data service in HOS Mobile to fail to start or to stop sending completely have been resolved. | HOS Mobile |
| XRS-991 | When a driver logged in to the mobile, information about editors, driver history, and vehicles used—information used when the eRODS file is generated—was not being stored properly and did not appear in the driver log as expected, resulting in problems with eRODS file transfers. This issue has been resolved. | HOS Mobile |
| XRS-1045 | The mobile app was crashing when violations were created or inserted and the driver tried to view violation logs in non-inspector mode. This issue has been resolved. | HOS Mobile |