Omnitracs 6.0 New Features and Enhancements
Overview
The Omnitracs One 6.0 release includes new features, enhancements, and software corrections.
New Features and Enhancements
Routing
- You can have hazardous materials considered when creating routes.
- You can now see which unassigned orders have selected alerts.
- You can now increase the highest allowed order urgency to allow more granularity between the orders' urgency.
- If you use numeric custom properties, you will now see separators, such as commas, in the list windows, making them easier to read.
Dispatching
- You can configure the route cards in FleetView to display the information you want.
- A user friendly description has been added to the Pending Route Optimization Suggestions window. The description helps you understand the changes that are reflected when the Assign Order suggestion type is applied to a route.
- When the Resequence Stops suggestion type is applied to a route using autonomous dispatch, the route's previous stop sequence and the suggested stop sequence now display on the Pending Route Optimization Suggestions window.
- Additional information has been added to the Optimization tab on the Route Details screen in Fleetview.
CEV
- The default values for overspeed and excessive overspeed have been updated.
- You can now retroactively request videos for critical events that are not set up to send video automatically.
- There are several updates to the Camera Health Status Report.
- Previously, a camera “health check,” in which the system attempts to connect to the camera, gather information, and send that information to the host, was performed every 15 minutes. Now the health check is performed every hour. Users can, however, trigger a health check by selecting the Refresh button on the Camera List screen in Omnitracs HOS Mobile.
- If a camera is already associated to a vehicle, you will now receive an error message if you attempt to associate a second camera to the vehicle.
Reports
- Changes have been made to enhance the security of the Compliance reports.
- The Reporting component has been reformatted to make it easier to find the proper report.
Maintenance
- Location categories has been added as an Omnitracs Maintenance item. Currently, you Location Categories list replicates your Service Location Categories list. You will use location categories to enter new categories; service location categories will be deprecated.
- You can now enter landmarks as a type of location and use them to help identify where service locations or stops are located.
Compliance
- Drivers can now enter more detailed inspection points for Canadian DVIR.
- The Distance filter in the UVA window now has more filtering options.
Navigation
- COVID-19 alerts and restrictions are available based on the worker's current location or destination.
- All screens are now available in portrait mode on an Android device.
- The vehicle width is now used to enhance your driver's navigation experience.
- Vehicle width has been added to the route status screen to indicate if the path follows or violates the setting.
- There are some enhancements to the activation process.
Strategic Planner
- You can now specify whether a recurring order can wrap from an anchored day or week when it is re-routed.
- If you drag and drop a stop or recurring order on a day that is not allowed by the service pattern, the Move Recurring Order window opens so you can choose a valid service pattern.
- The Optimize menu option has been renamed Optimize Territories to help clarify its function.
Telematics
- You can create exception rules so that you are alerted to events received from the Telematics accessories.
- Roadnet Telematics users who have installed software packages on their CalAmp LMU-5530 devices can now see the name, version, and status of those packages in Telematics Diagnostics and on the Telematics Diagnostics report.
Active Alert
- You can add a reason code to the recipient template for cancelled and unserviceable stops, so the reason that a delivery was not completed is included in the email or SMS message alert.
- When adding an Active Alert subscription to a Service Location, you can now assign just the default Cancelled and Unserviceable alert types to a subscription. Cancelled and Unserviceable are now visible in the Alert Types list. You cannot uncheck them and they are still added to each subscription.
- If a picture is taken at the time of delivery, the image displays in the web application when the stop has a status of Delivered.
- You can have a customer rate the driver's performance for a delivery. If you use Insight reporting, you can analyze those ratings using three new templates.
- Your customers can now sign for a delivery without coming into contact with the worker providing the service.
- You can use the default legal statement or create your own, when customers are signing for an order without worker interaction.
- You can add a {SIGNATURE} field to your templates so that when your customer clicks the link in an alert, the web application opens directly to the Delivery Signature screen and that customer can sign for a delivery without coming in contact with the worker.
- You can have Omnitracs send a verification request to new email and SMS alert recipients. Those recipients must consent to additional communications before you can send Active Alert messages and SMS notifications.
- If you choose to enable verification, you must add a Business Display Name to the Region > General page before you can add new recipients to service location subscriptions.
- When an email sender is added to Omnitracs, a message is sent to that email address with instructions on how to minimize messages being tagged as spam.
Roadnet Mobile
- Workers may need to manually change the location permission on their device after upgrading to Roadnet Mobile 6.0.
- Workers can see the status of the network connection while running Roadnet Mobile for Android.
- Workers can now add a mid-route depot to a route in Roadnet Mobile Andoid.
- Workers can refresh the Inbox to immediately receive messages, notes, and alerts in Roadnet Mobile for Android. The ability to force a refresh of the Inbox compliments contact-less signature in Active Alert.
- Workers can now select which region to work in when using Roadnet Mobile for iOS or Tracking for iOS.
Mobile Manager
- The ability to configure your dashboard is now accessed from the Settings page. The options icon has replaced the overview settings icon on the Overview page.
- You can choose which screen automatically displays when you log in to Mobile Manager.
- While on the map, you can tap on a piece of equipment or a stop to see more information.
- More Hours of Service information has been added to the worker information.
- A worker details screen has been added.
Drive
- Drivers will now see the declaration of inspection on the DVIR screen.
- Drivers can confirm that a Customs-Trade Partnership Against Terrorism inspection was performed when the DVIR was completed.
- Drivers can pick which Inspection Form to use when completing a DVIR.
- Asset types have been added for Quebec, along with DVIR inspection categories and inspection points.
- Drivers can now take a picture of a barcode to add an order during a Delivery or Pickup task.
- Scanned order IDs can be limited to numeric only.
HOS Mobile
- There is an update on Canadian ELD compliance.
- Changes were made so that Personal Conveyance continues even if the Bluetooth connection is lost.
- The Review Carrier Edits screen now shows the edit reason and comments.
- Some updates were made to the Big Day Extension.
- Drivers operating on Canadian rules will now receive alerts notifying them of how much time remains to complete their rest break requirement.
Performance Monitoring
- You can limit users who can access Performance Monitoring with a new role permission.
Command
Web Services
- A new field allows you to conditionally require your workers to collect signatures for a stop.
Centralized Messaging
- You can now share mailing lists to multiple regions.
Miscellaneous
- You can choose to have the vehicle path created based on the shortest time or the shortest distance.
- A new user assistance system is available with Omnitracs.
Routing
Considering Hazardous Materials when Creating Routes
Found in Omnitracs Client
If you transport hazardous materials, you know that carrying these materials can restrict the roads your equipment can travel. Tunnels, bridges, and some roads are off limits to trucks carrying hazardous materials. Now, when you run Create Routes, the routes created will consider any hazardous materials that you will be transporting, and avoid roads that prohibit hazardous materials.
Some things to consider when using routing orders with hazardous materials:
- You can only consider hazardous materials if you are using RouteNet v12 maps.
- You can choose to enable hazardous materials on the Map Editor so that hazardous material road restrictions will be considered for any paths created, including when routes are created and driver directions.
- If you do not use line items, you will specify the hazardous materials classification on the order. If you use line items, you will specify the hazardous material classification on the SKU.
- A Hazardous Materials column was added to the SKU, Line Items, Orders, Unassigned Order, Stop, and Route grids in Omnitracs Client and Web. The column shows the classification number for any hazardous materials associated with the order/line/SKU. Hover over the classification number to see the classification name.
- When routes are created, or sequenced, the path will avoid roads that prohibit hazardous materials. In addition, Suggest Route will consider hazardous material prohibitions when selecting the best routes to suggest.
- You can filter orders on whether or not they contain hazardous materials.
- You can import the hazardous material class information for SKUs, orders, and Routed Solution, as well as exporting the hazardous material class information using Send Orders.
Enabling Hazardous Materials Restrictions
In order to have hazardous material road restrictions considered throughout Omnitracs, including when creating or sequencing routes or printing driver directions, you need to enable the hazardous materials restrictions.
Note: You may not see the full effects of hazardous materials restrictions immediately after Enable Hazmat Restrictions is checked.
- Click the View menu and scroll to Map Editor. The Map Editor opens.
- Click the Rush Hour/Restricted Travel Settings icon. The Rush Hour/Restricted Travel Settings window opens.

- Check Enable Hazmat Restrictions.
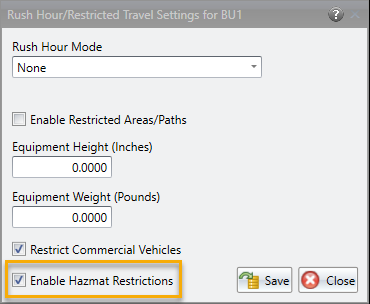
- Click [Save].
Specifying the Hazardous Materials on the Order
If you are not using line items, you need to specify what hazardous materials an order contains.
- From the Route Planning space, click the Add icon in the Unassigned Order Groups box. The Unassigned Orders window opens.
- Enter the Order Number, Service Location, and other information for the order.
- Click on the Hazardous Materials tab. The Hazardous Materials page opens.
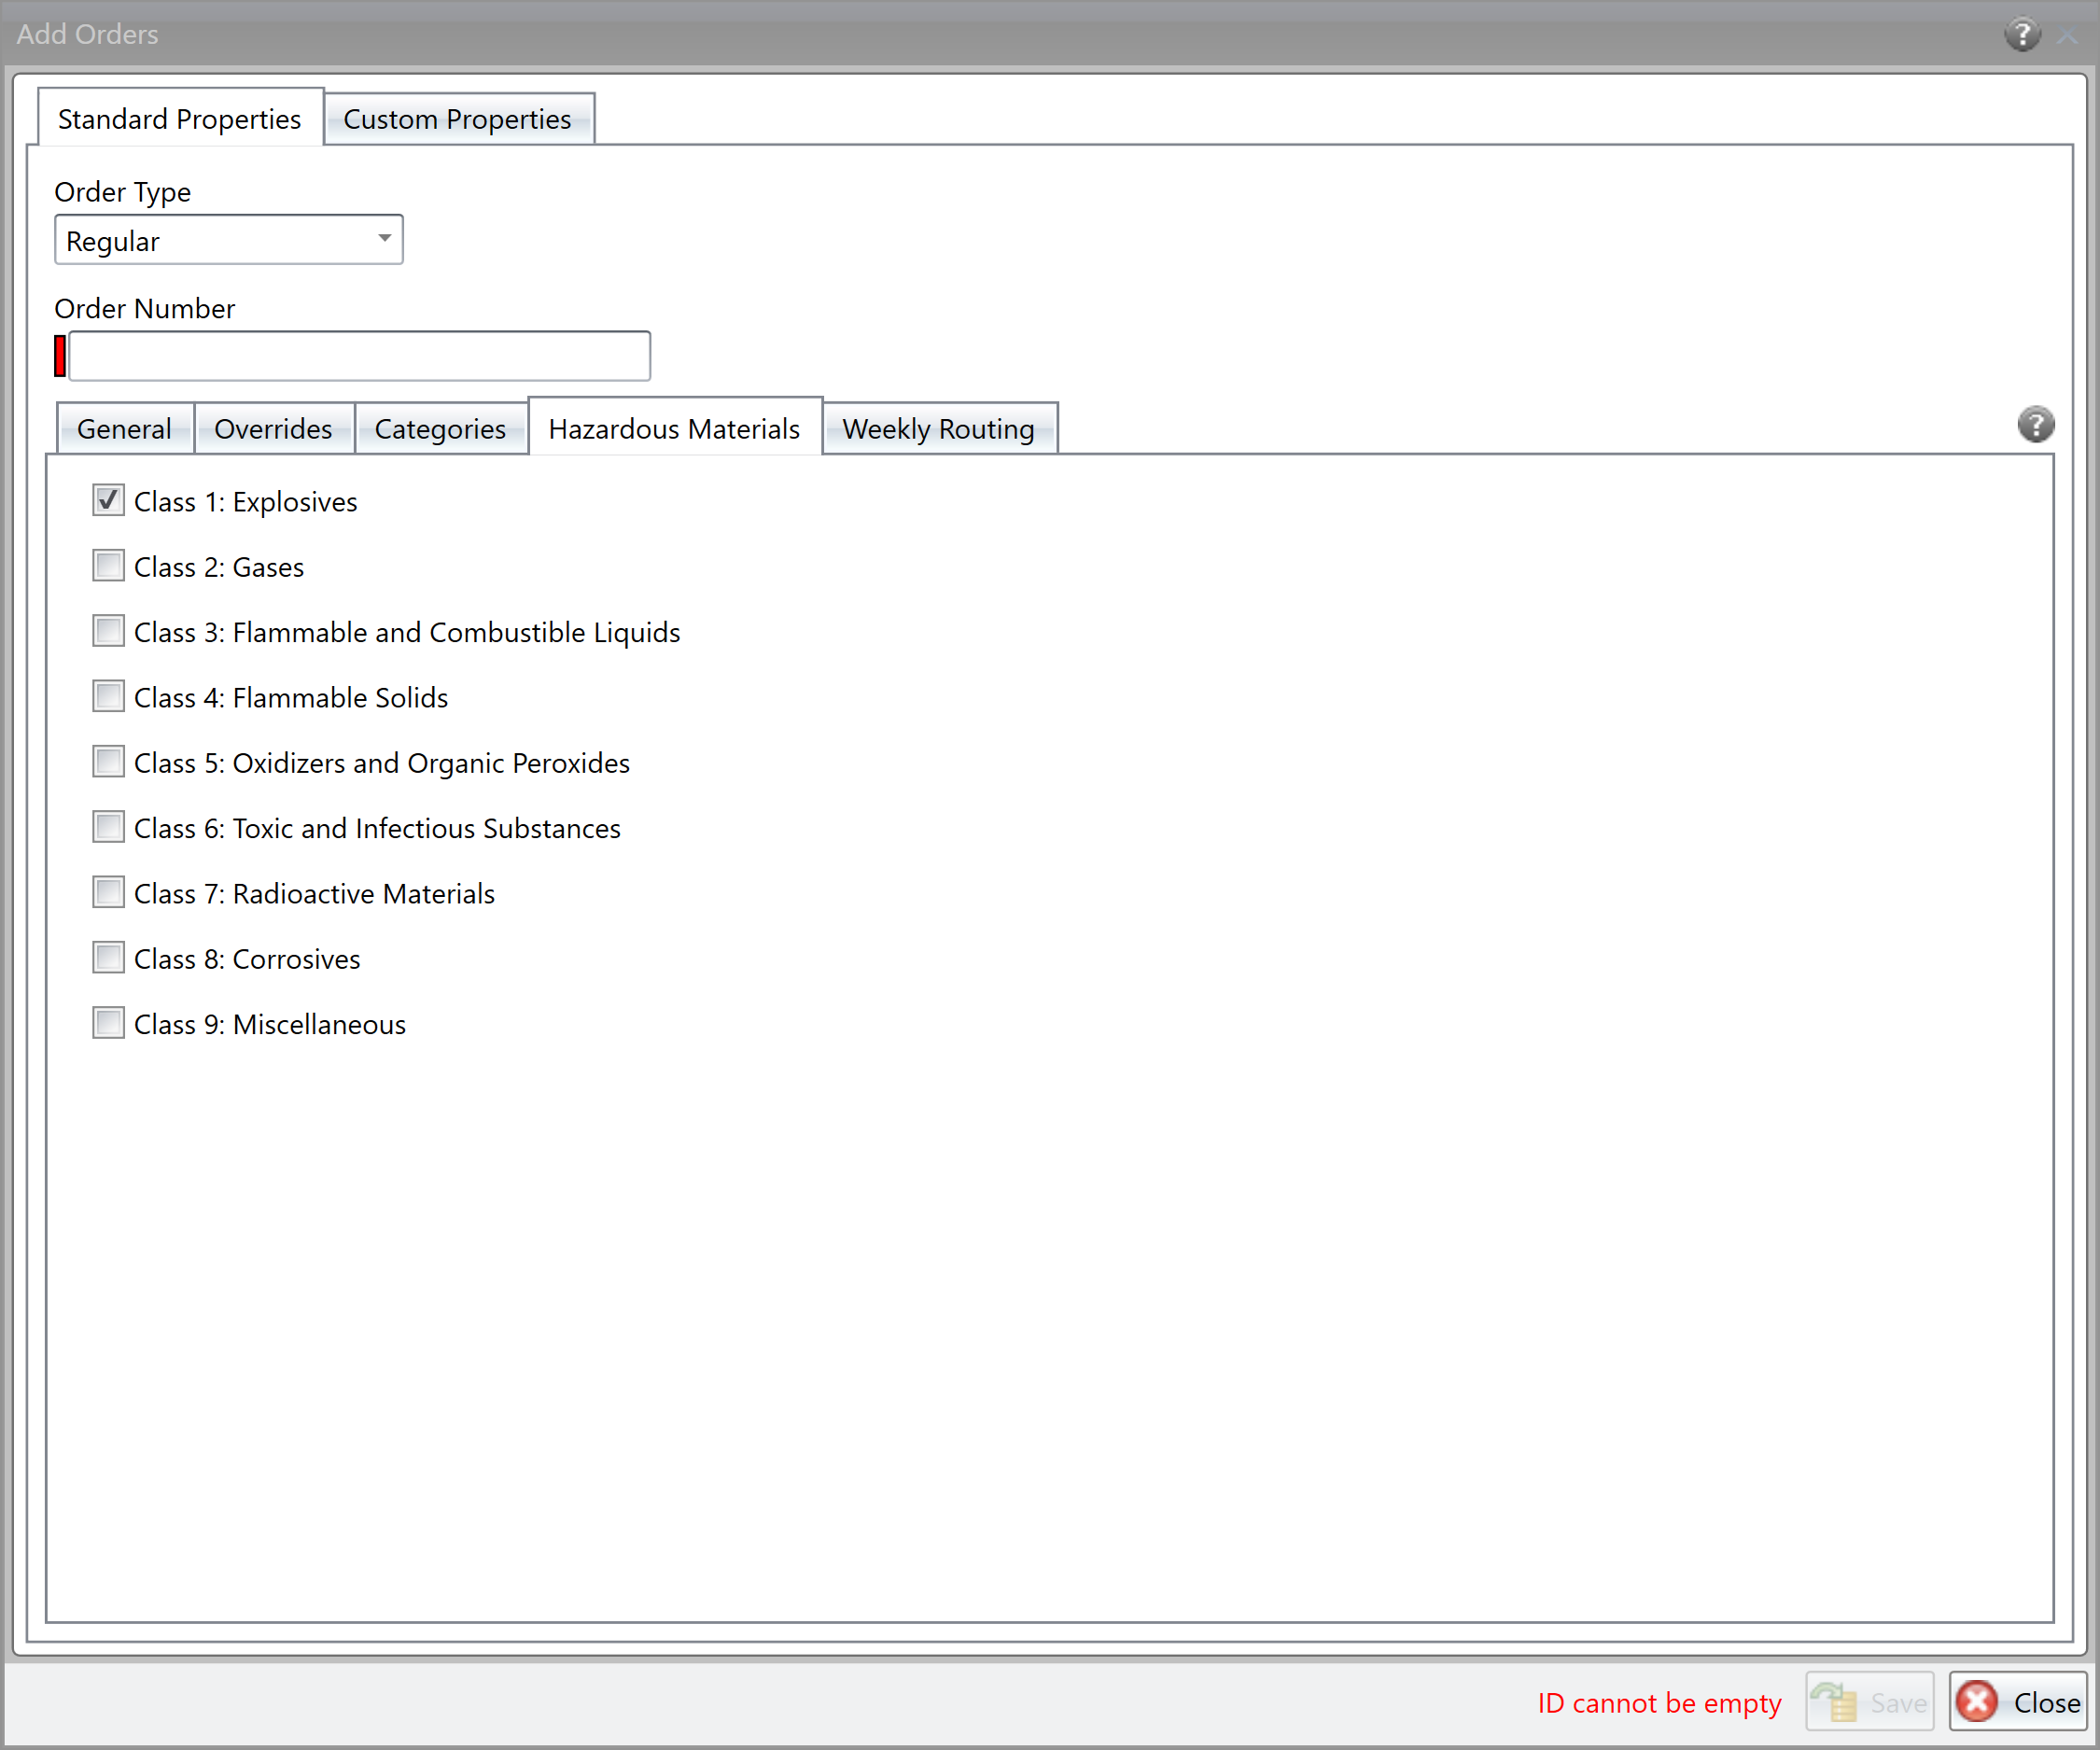
- Check the proper classification that reflects the type of hazardous material the order contains.
- Click Save.
Specifying Hazardous Materials on the SKU
If you are using line items, you can specify the hazardous material class for a SKU. When you select the SKU for the line item, the hazardous material class will be associated with the line item.
- Click the Maintenance menu and scroll to SKU. The SKU list opens.
- Click the Add icon. The SKU window opens.
- Enter the ID, select the package type, and other information for the SKU.
- Click on the Hazardous Materials tab. The Hazardous Materials page opens.
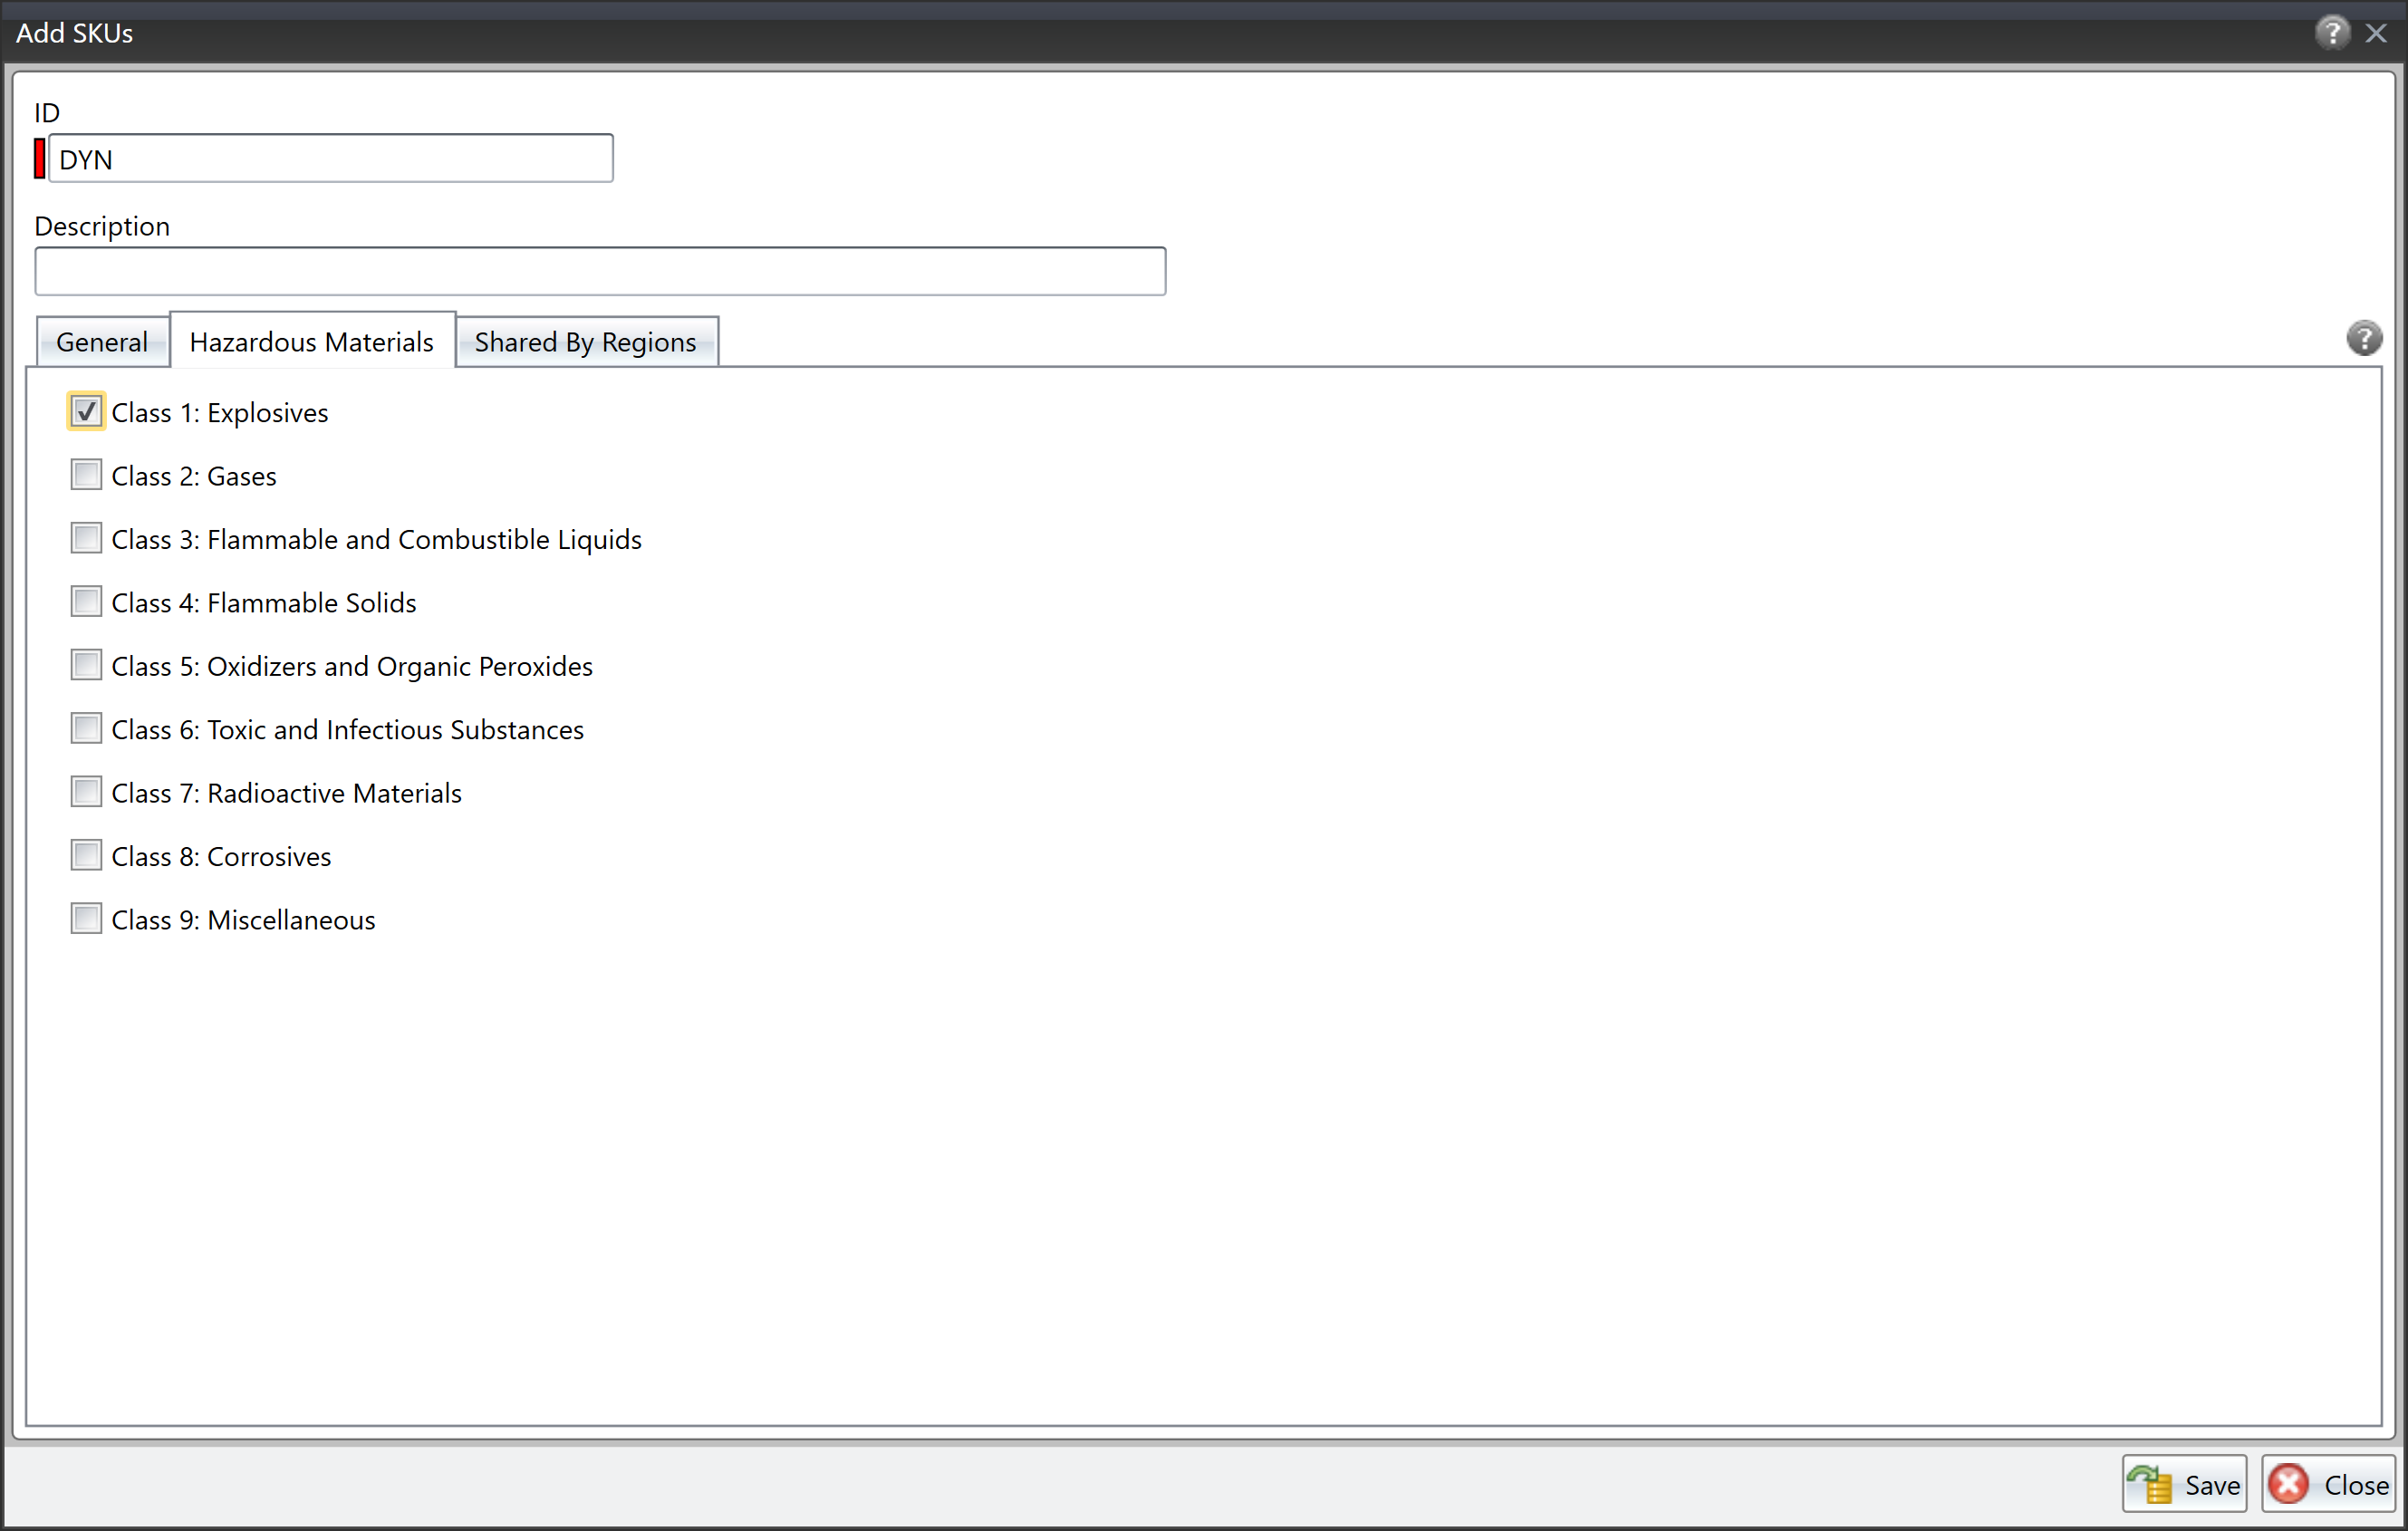
- Check the proper classification that reflects the type of hazardous material for the SKU.
- Click Save.
When you add a line item to an order, and you select the SKU for the line item, the hazardous material class defined for the SKU is associated with the line item and the order.
Importing and Exporting Hazardous Material Class Information
You can import the hazardous material class information for your orders, SKUs, and Routed Solution, as well as have the information exported with Send Orders. Simply update the appropriate data transfer layout.
| Field | Required | Max Length | Description |
|---|---|---|---|
| Hazardous Material Classes | No | 20 | The number representing the hazardous material class for the order. The options are: 1 - Explosives 2 - Gases 3 - Flammable and Combustible Liquids 4 - Flammable Solids 5 - Oxidizing Substances 6 - Toxic Substances and Infectious Substances 7 - Radioactive Materials 8 - Corrosives 9 - Miscellaneous Hazardous Materials If the order contains multiple hazardous materials classes, separate each item with a pipe symbol (|). |
Filtering Orders for Hazardous Materials on the Routing Pass Template
When creating a filter for your routing pass template, you can specify that orders containing hazardous materials are included or excluded from the pass.
To include/exclude orders that contain any class of hazardous material from the pass, check Contains Hazardous Materials on the Filters - Include or Filters - Exclude page of the Routing Pass Templates window.
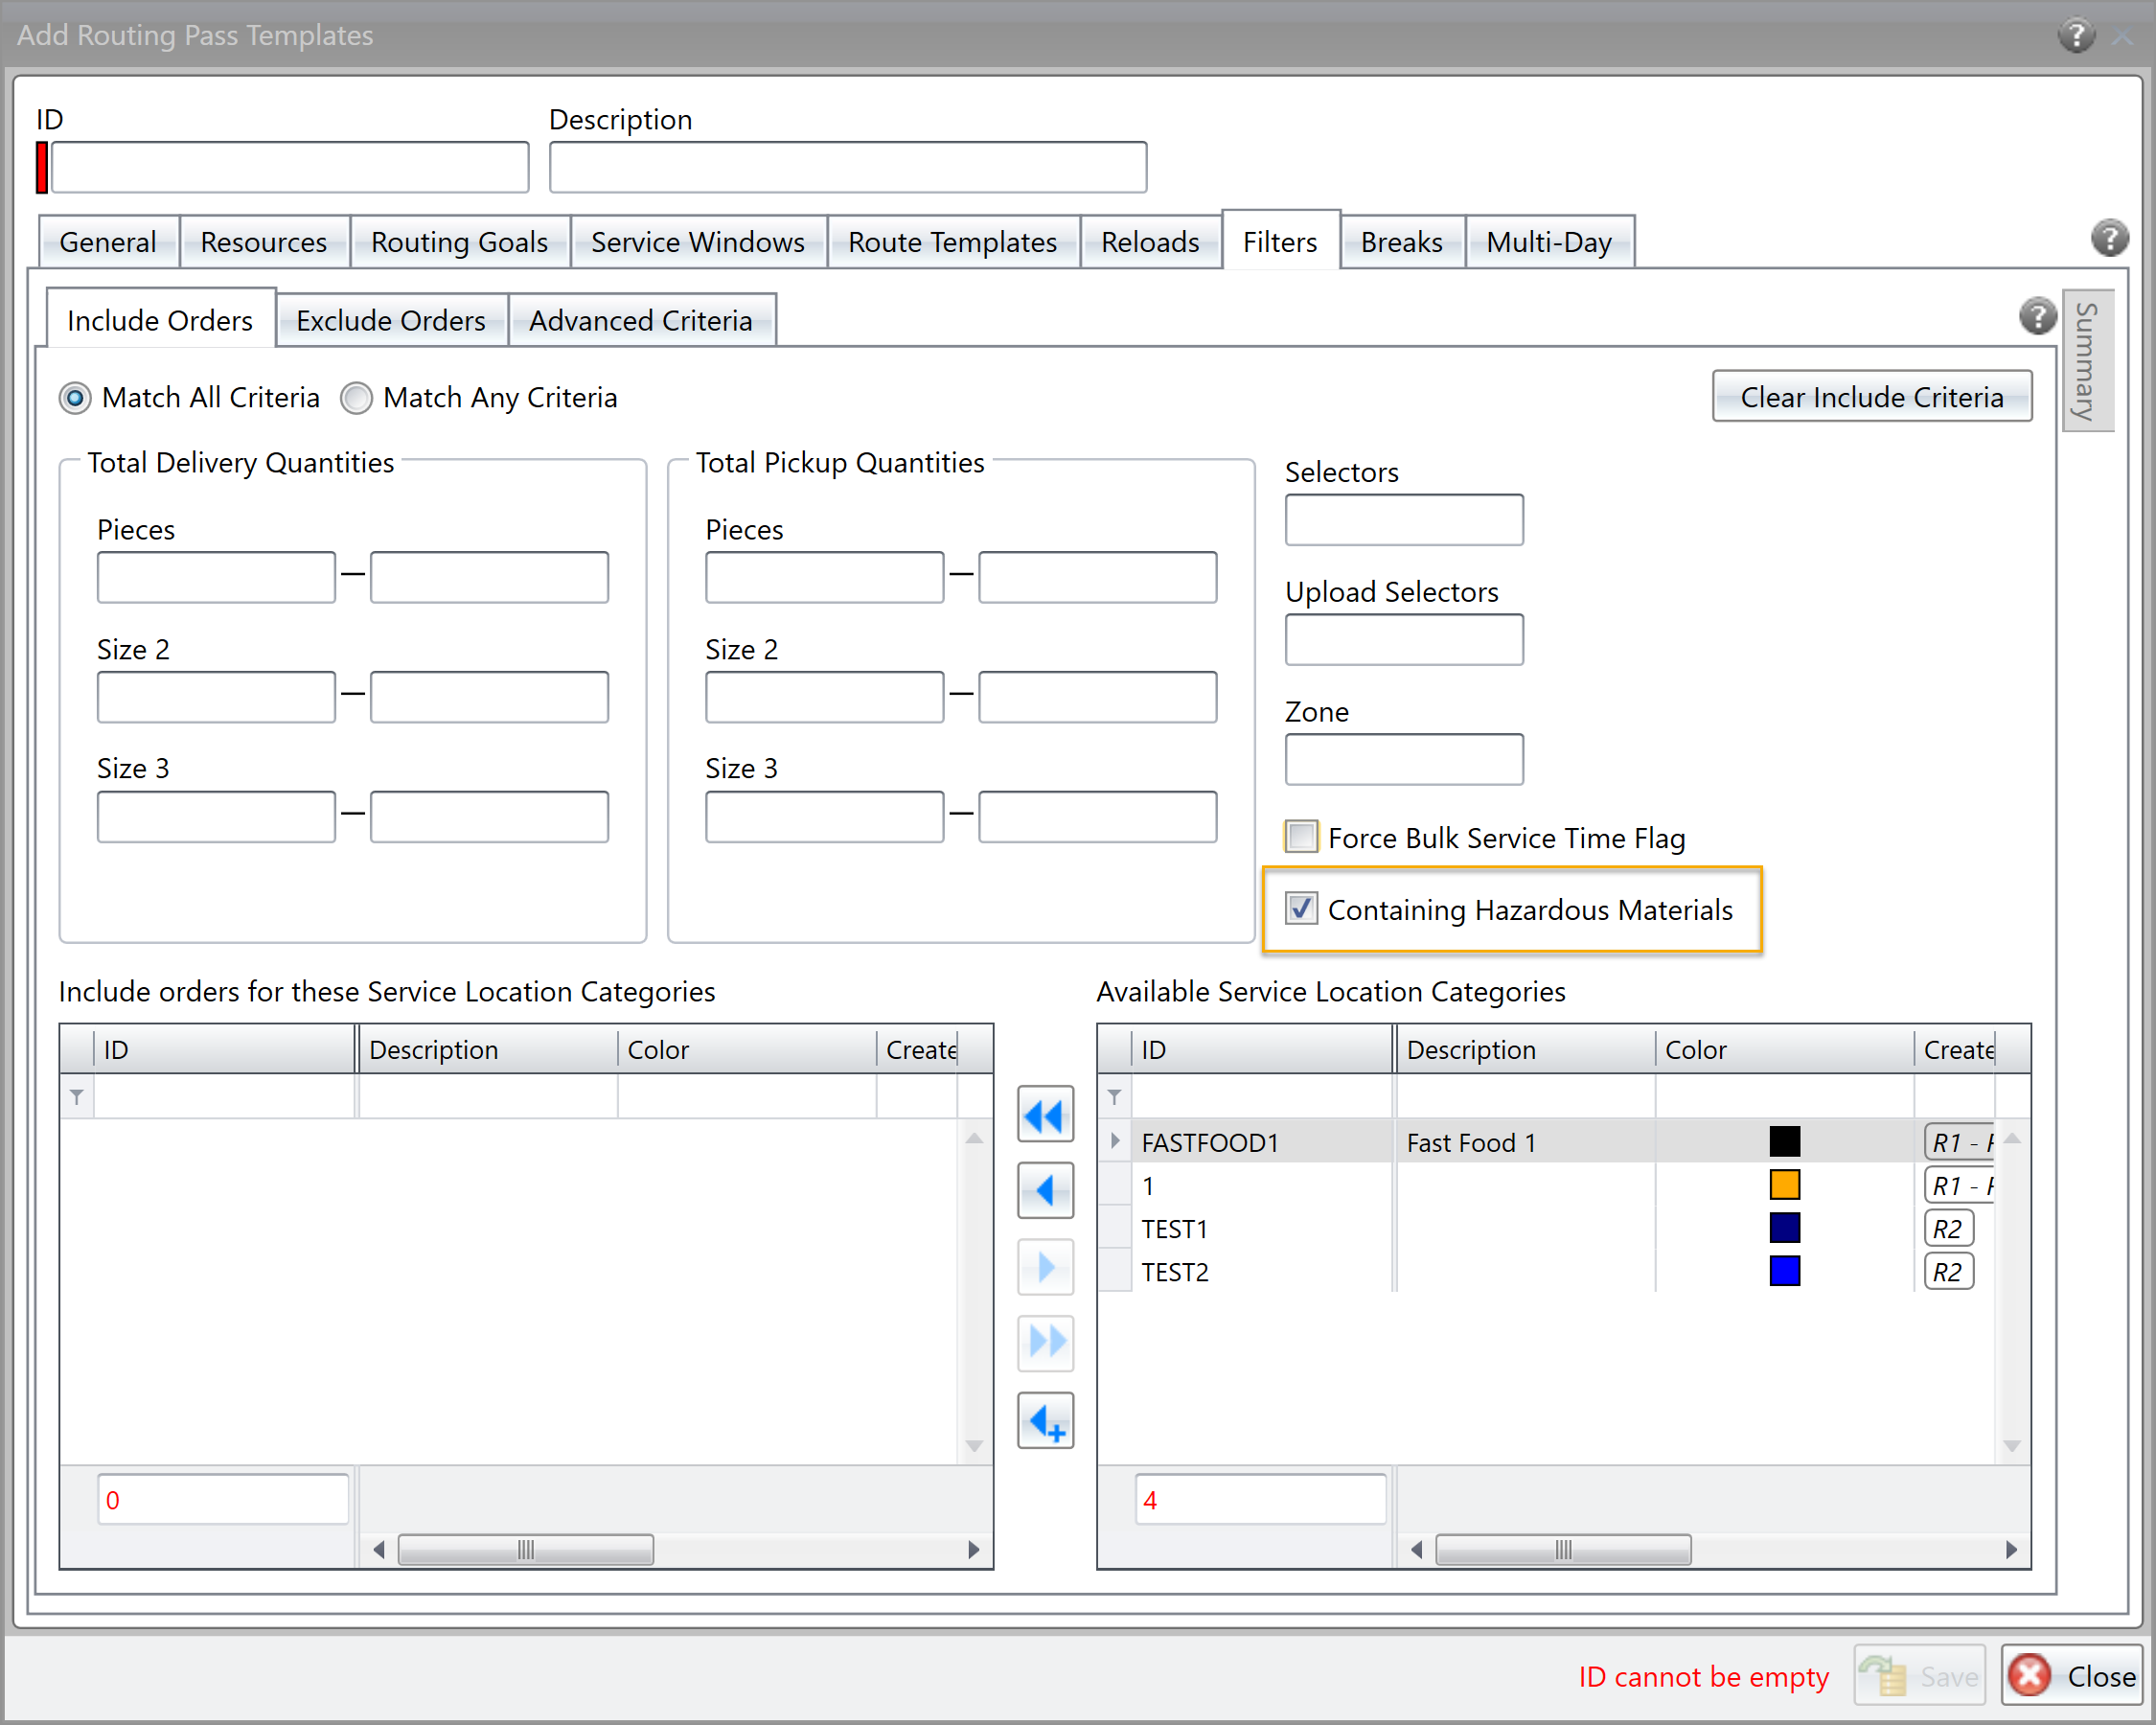
To include/exclude orders that contain a specific class of hazardous materials from the pass, create an Advanced Filter on the Routing Pass Template.
New Alerts for Unassigned Orders
Found in Omnitracs Client
When evaluating your unassigned orders to add them to routes, you may want to be alerted to some of the service location's parameters that could affect which route the unassigned should be placed on. For instance, if the service location has a high priority level, you may not want to put the unassigned on a route that already has several priority orders.
Some features of the unassigned alerts:
- You can see which alerts have been triggered for an unassigned in the new Alerts column in the Unassigned list.
- The alerts only appear on the Unassigned list, not the Orders list.
- To have the text of the entire row colored the highest alert, check Display Text with Alert Color on the General page of the Options notebook.
Configuring Alerts for Unassigned Orders
Click the Administration menu and scroll to Regions, then add/edit a region to open the Region window. Click the Alert Options tab to open the Alert Options page. In the Unassigned Order Group Alert, check Enable for the alerts you want to use.
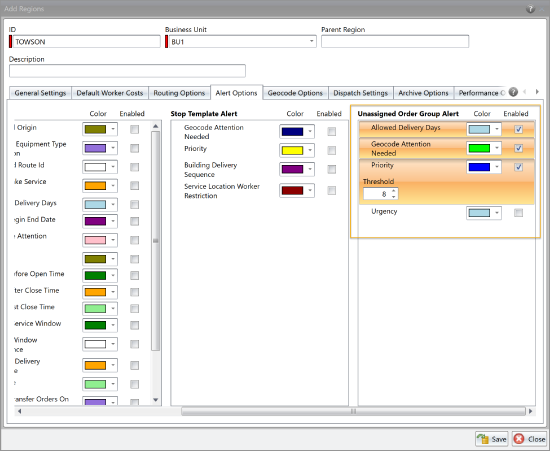
The available alerts are:
- Allowed Delivery Days - the session date is not a valid delivery day for the service location. If the unassigned is routed on the session date, it will be considered an off day delivery.
- Urgency Threshold - the unassigned has an urgency higher than the defined threshold.
- Geocode Attention Needed - the service location’s geocode should be reviewed, based on the selections made on the Geocode Options tab.
- Priority - the priority is greater than or equal to the threshold set in the Priority Threshold. For instance, if the Priority Threshold is set to 8, all unassigned with a priority of 8 or 9 would be flagged.
If you want the row text to be colored to indicate an alert, drag and drop the alerts in the order of importance. The row coloring will be based on the first alert that is triggered for that unassigned.
Note: If you want row coloring, you must also check Display Text with Alert Color on the General page of the Options notebook.
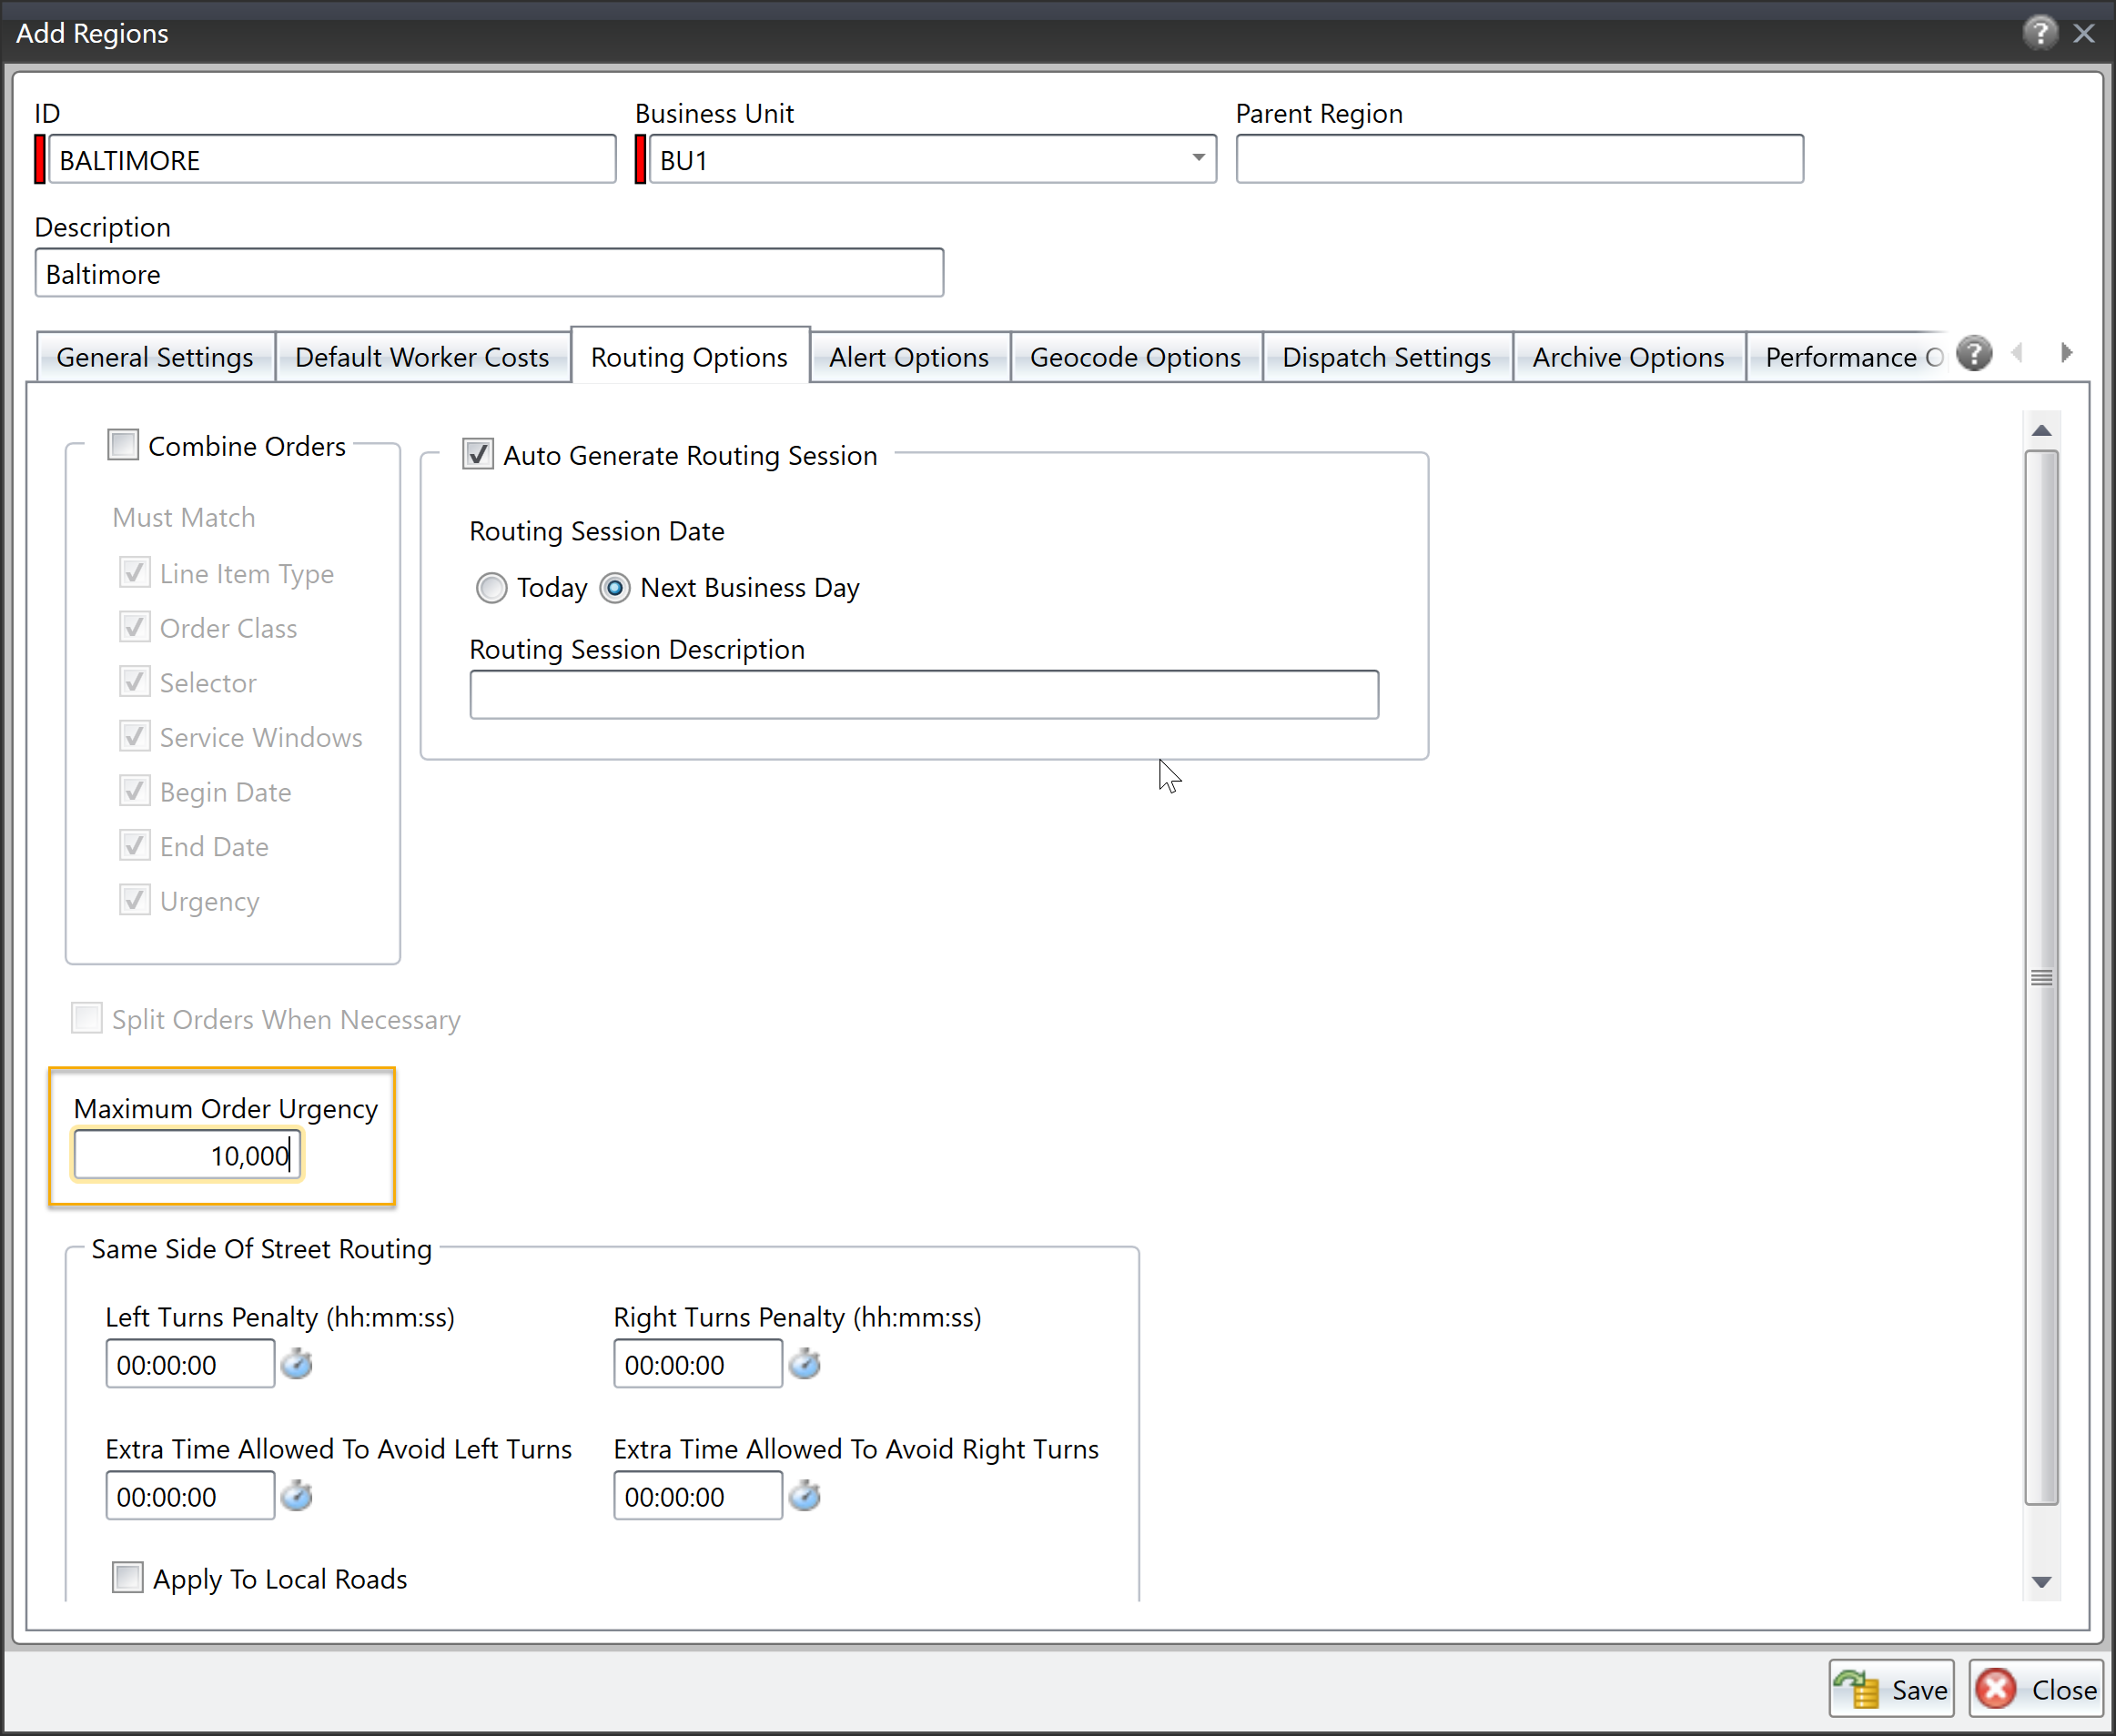
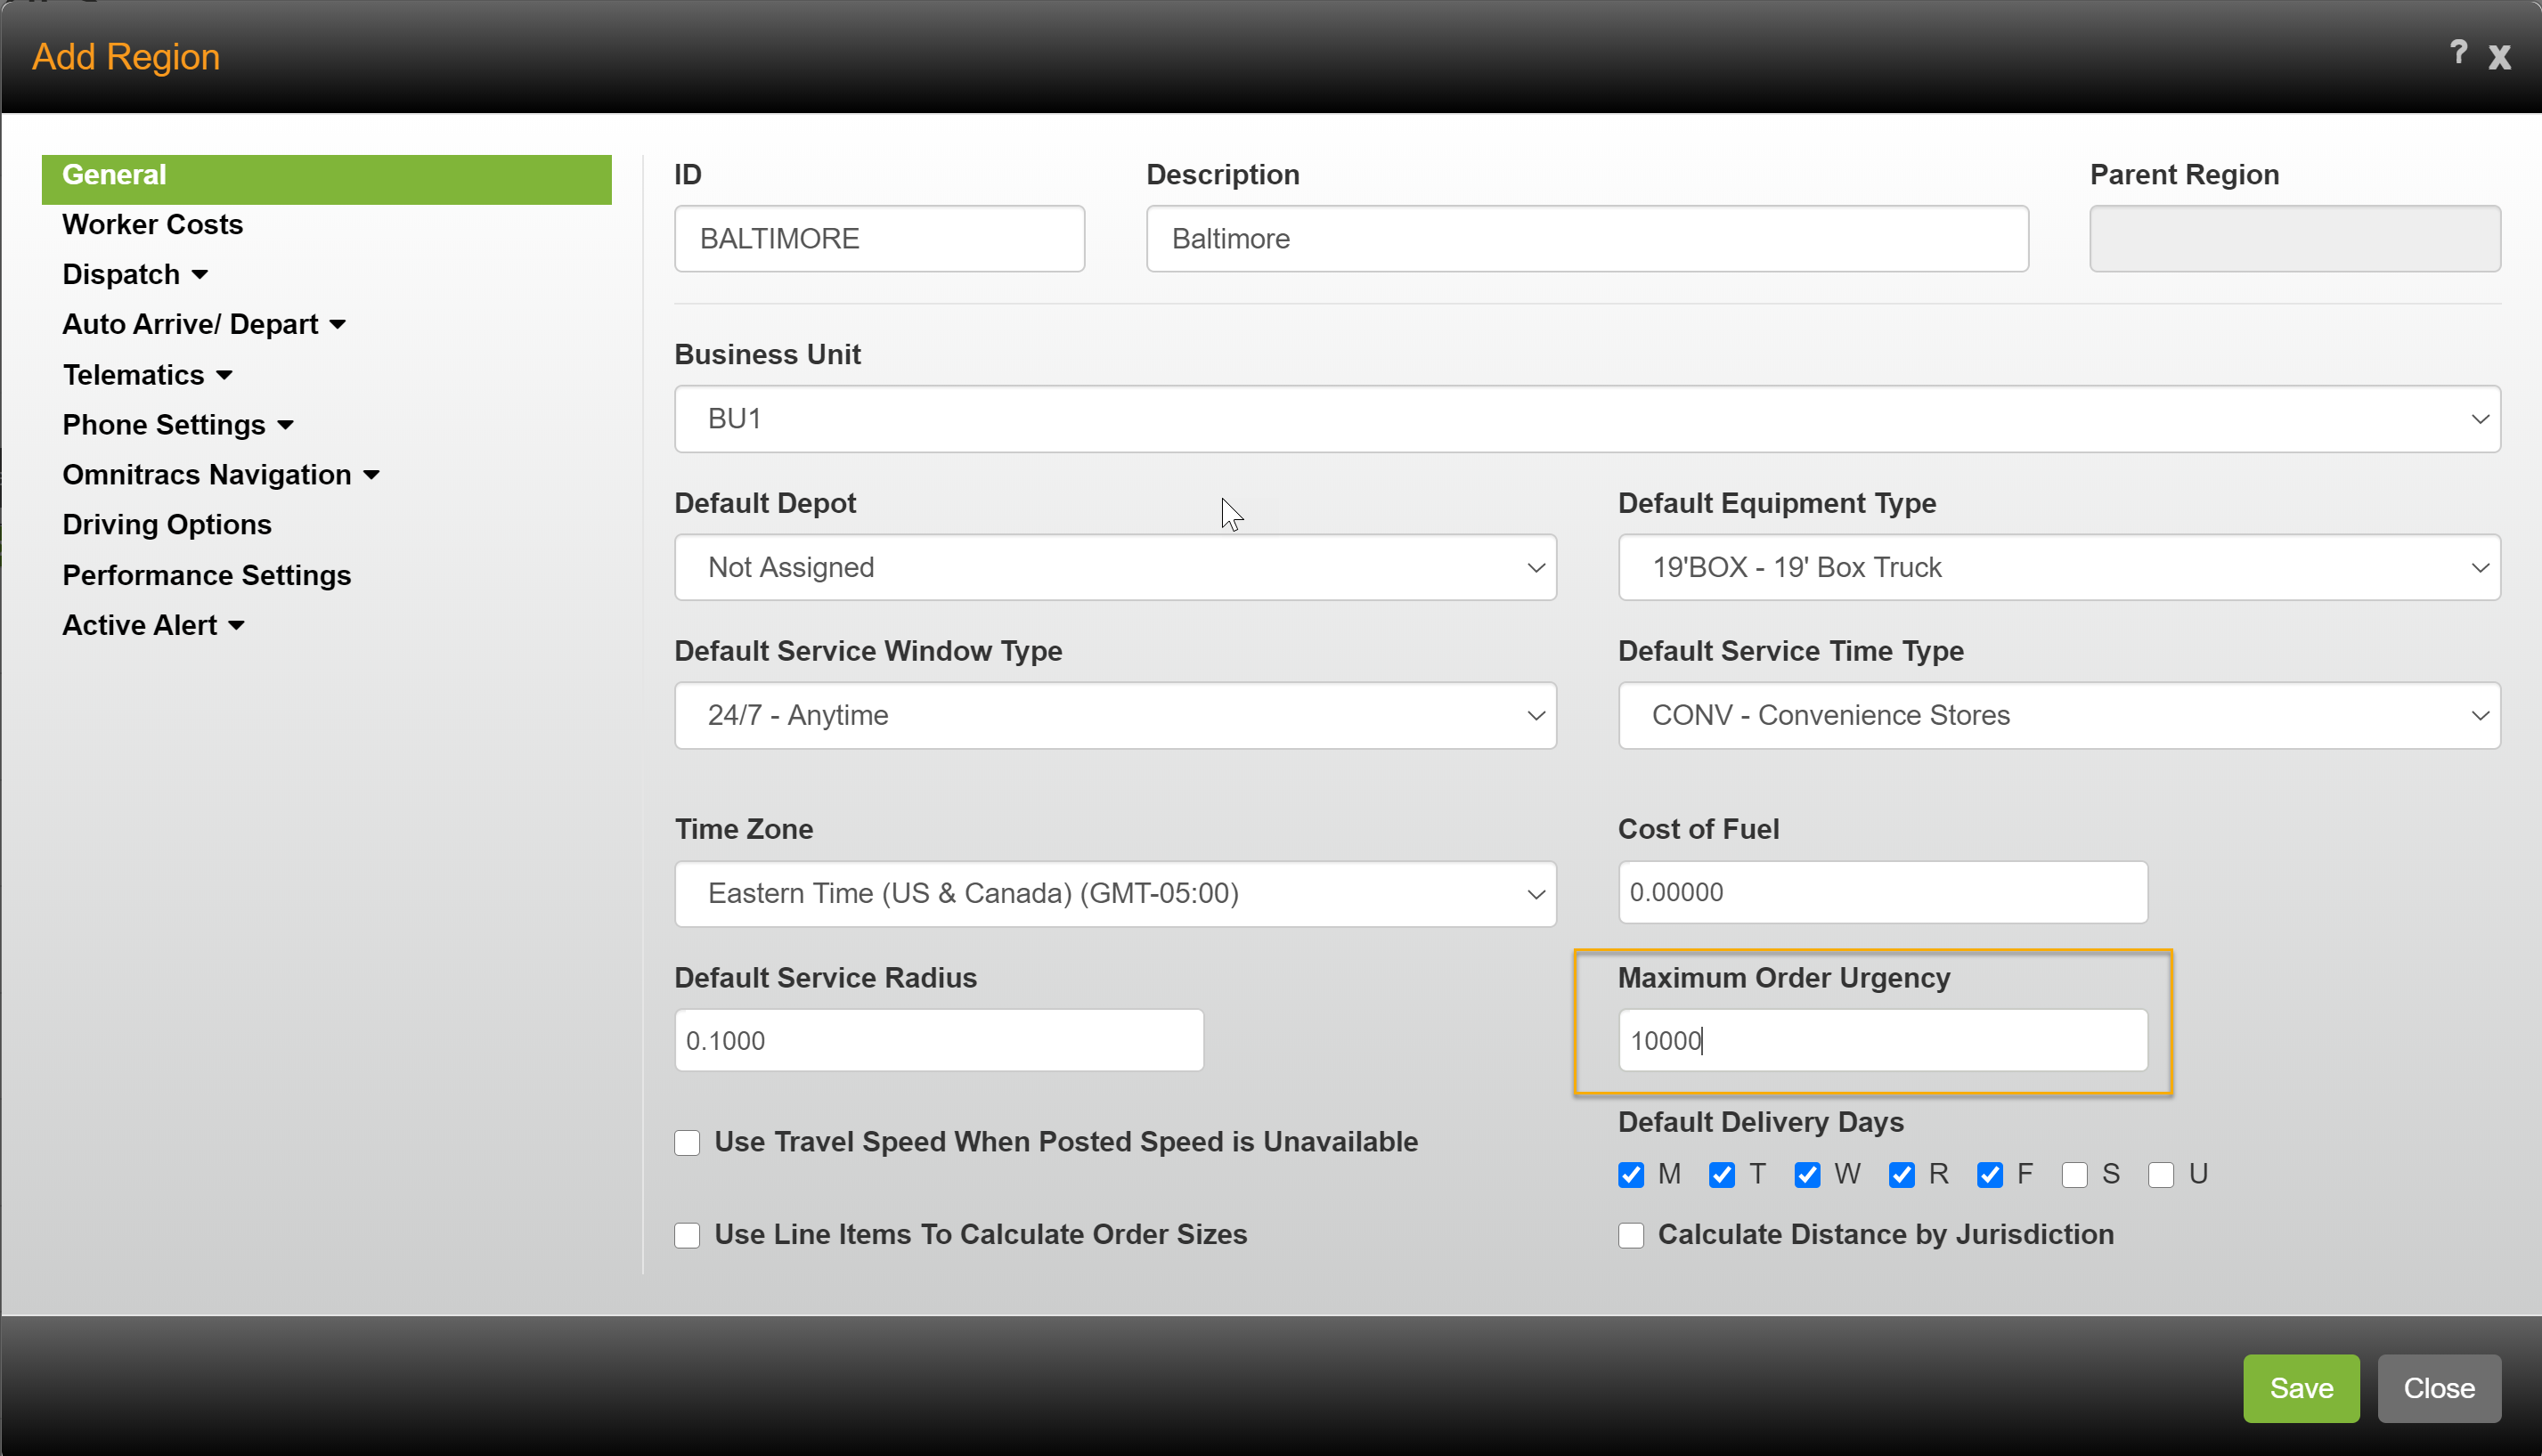
Increasing the Maximum Order Urgency
Order urgency alerts Routing that it is more important to ensure orders with a higher urgency are routed before orders with a lower urgency. In the past, the range for order urgency was from 0 to 100. But what if you needed even more differentiation in your urgency levels? Now, you can specify a higher maximum order urgency, up to 99,999, for each region.
Found in Omnitracs Client
- Click on the Administration menu and scroll to Regions. The Regions list opens.
- Add a new region or edit an existing region. The Regions window opens.
- On the Regions - Routing Options page, enter the maximum order urgency you want to allow.
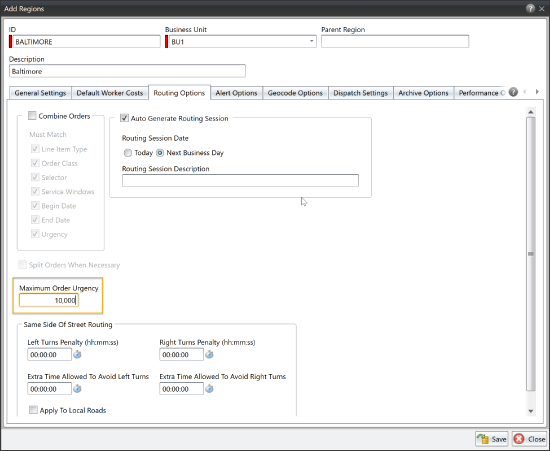
- Click [Save].
Found in Omnitracs Web
- Click on the Administration icon to open Administration.
- Click on the green button and select Regions; the Regions list opens.
- Add a new region, or edit an existing region; the Regions window opens.
- On the Regions - General page, enter the maximum order urgency you want to allow.
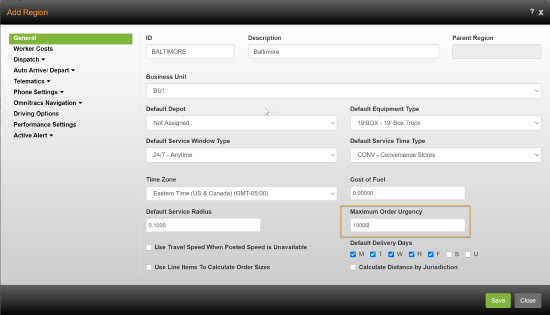
- Click [Save].
Dispatching
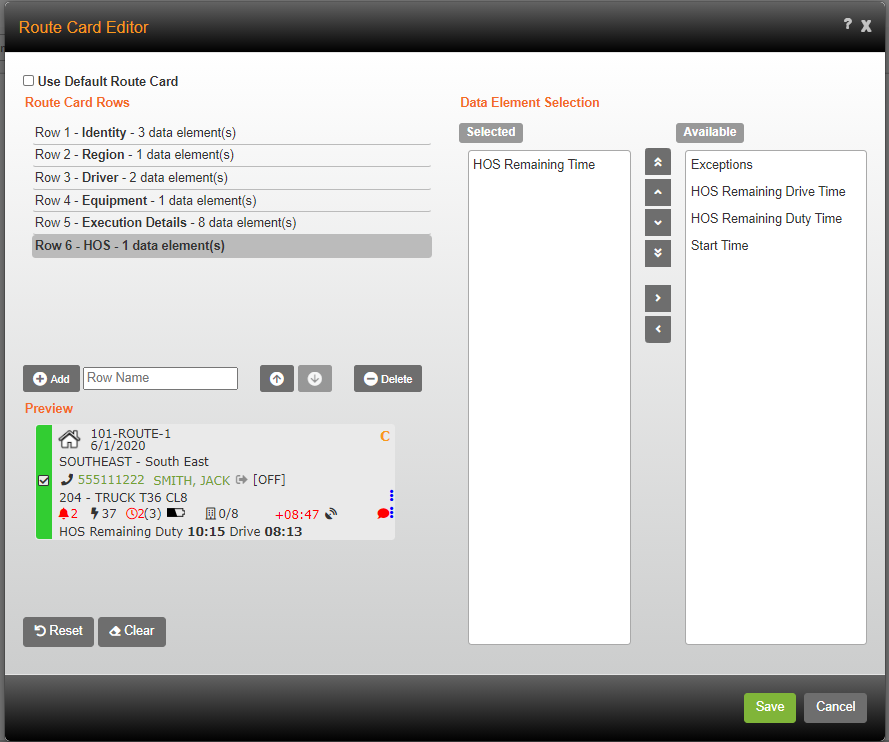
Configuring Route Cards
Found in Omnitracs Web
The route cards in FleetView provide a lot of information about the routes in a single place. But, not all the information shown may be important to you, or you may want it to be displayed slightly differently. Now you can choose the information that is displayed on the route cards, and where that information is displayed.
Note: FleetView starts with the default route card. You can create one configured route card that will be used for all your regions and users.
Setting the Permission
You need to be granted permission to create a configured route card.
In Administration, add or edit a role. On the Roles window, click Entity Permissions, then scroll down to Fleetview Route Configuration card. Check Can Save or Can Delete as appropriate, then click Save.

Configuring the Route Card
When configuring your route card, there are some things to remember:
- The default route card has 5 rows; you can add and delete rows as needed.
- You can name the rows that you add to help classify the information in the rows.
- The route card will automatically size based on the number of rows and elements in the rows.
- Click the FleetView icon to open FleetView.
- Click the Settings icon and choose Route Card Editor. The Route Card Editor opens.
- To configure the route card, uncheck Use Default Route Card. The configuration options become available.
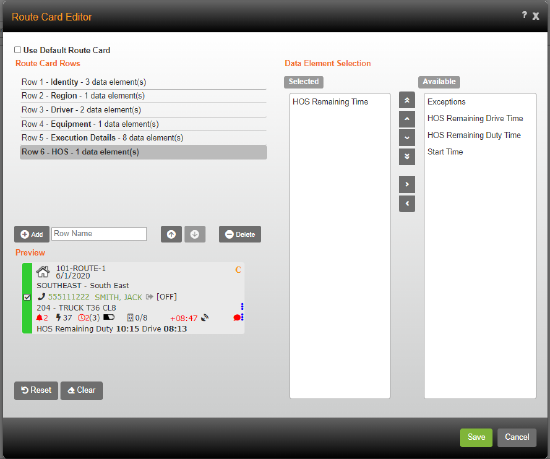
- Use the Route Card Editor to configure your route card.
To change the elements in an existing row, click on the row in the Route Card Rows list; the Data Element Selection updates with the information for that row. Use the arrows to move the elements between the Selected and Available lists to choose what will be displayed in that row.
To delete a row, select the row in the Route Card Rows list, then click [Delete].
To add a row, enter a name in the Row Name field, then click [Add]. The row is added to the Route Card Row list. In the Data Element Selection area, use the arrows to move the elements between the Selected and Available lists to choose what will be displayed in that row.
To change the order of the rows on the route card, select a row and use the arrows to move the row up or down in the list.
To remove all your changes and restore the default route card, click [Reset].
Note: As you make changes to the route card, the Preview is updated so you can see how the route card will look as you are designing it. - Click [Save].
More Information Added to the Optimizations tab
Found in Omnitracs Web
The following information from the Pending Route Optimization Suggestions window has been added to the Route Details Optimizations Tab, the Route grid, and the Optimizations grid so that you can quickly and easily see what changes have been made to the route.
- Previous Total Cost, New Total Cost, and Total Cost Percentage
- Previous Total Distance, New Total Distance, and Total Distance Percentage
- Previous Total Time, New Total Time, and Total Time Percentage
- Previous Missed Time Window Duration, New Missed Time Window Duration, and Missed Time Window Duration Percentage
- Previous Missed Time Window Count, New Missed Time Window Count, and Missed Time Window Count Percentage
Processed Time has also been added to the route and optimization grids.
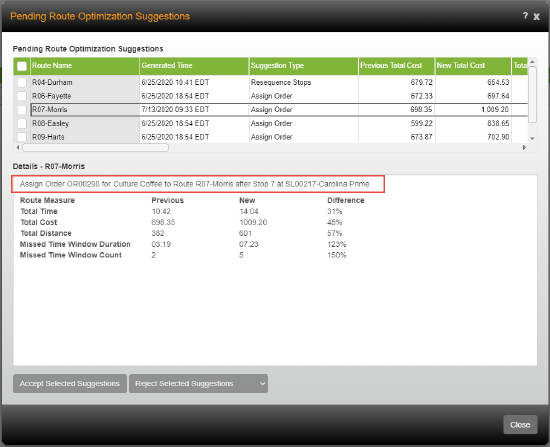
Understanding the Suggested Placement of An Order
Found in Omnitracs Web
When you use autonomous dispatch to place unassigned orders on a route, it is not immediately apparent as to where the order has been placed and how it affects the efficiency of the route. Now, a user friendly description has been added to the Details section of the Pending Route Optimization Suggestions window to help you easily understand the changes that will be made to the route, if the suggestion is accepted.
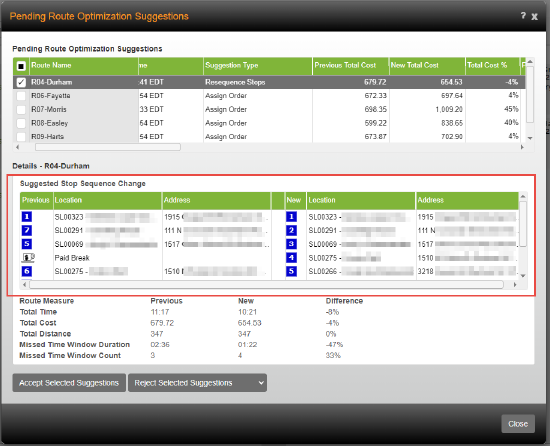
Understanding the Suggested Stop Sequence Change
Found in Omnitracs Web
When using autonomous dispatch and a route is automatically optimized by resequencing the stops, it is not immediately apparent as to how the stops have been moved around on the route. Now, the previous stop sequence and the suggested stop sequence are displayed in the Details section of the Pending Route Optimization Suggestions window. The Suggested Stop Sequence Change area shows you what changes will be made to the route, if the suggestion is accepted.
Critical Event Video
Overspeed and Excessive Overspeed Event Updates
Overspeed and Excessive Overspeed parameters have new default values.
Note: These thresholds are configured by the account manager when the account is set up, not by the customer.
| Overspeed | |
| Threshold | 65 MPH or metric equivalent |
| Minimum Duration Threshold | 30 seconds |
| Maximum Duration Threshold | 90 seconds |
| Data Frequency | 1 |
| Off Duration | 3 |
|
Excessive Overspeed |
|
| Threshold | 70 MPH |
| Minimum Duration | 5 seconds |
The Overspeed and Excessive Overspeed alerts now correctly show Average Speed and Maximum Speed.
In the Black Box Summary report, Overspeed and Excessive Overspeed events will only include second-by-second data for the duration of the event, not for the time immediately before and after the event.
Ad Hoc Video Requests
Users in companies that have CEV enabled can now retroactively request videos for critical events that are not set up to send video automatically.
In the Black Box Summary Report, users can select the grayed-out “play” icon next to the critical event they want to request video for. A window similar to the Request Video window opens, allowing users to manually request video for the date and time of the event.
Users can edit the Date and Time and select the prequel and sequel amount.
Note: This feature is not available in the CER Web Service.
Updates to Camera Health Status Report
Previously, when the Camera Status Report displayed “No Health Check Data Received from Camera” in the Summary column, it indicated that either the system never received a health check or that the last health check occurred more than a week ago. This status did not necessarily indicate a problem with the camera or the health check; it could simply mean that the vehicle was parked for an extended period of time.
Now if a health check event exists and is more than a week old, the Summary column displays “Last VH [Video Heartbeat] Received on <date/time>.” Including the date and time of the last health check helps users determine if there is a problem with the camera or if the status is the result of some other circumstance.
In addition, the vehicle ID is now only hyperlinked if detailed information exists. Previously, when the status in the Summary column was “No Health Check Data Received from Camera,” the vehicle ID was hyperlinked even though no detail was available; when users selected the link, nothing happened.
Reports
New Reports Filter
Found in Omnitracs Web
In order for you to quickly find reports that meet your needs, the Reporting module has been reformatted. Reports can now be filtered by the data that the report contains and by the application from which the data comes.
By default, when you open the Reporting module, each category displays, along with cards for the first three reports in the category. To filter the reports, simply check the box next to the categories or apps for which you want to see reports. The categories on the right side of the page are filtered to your selections and show cards for the reports that meet your criteria. If there are more than three reports in the category that meet your criteria, click the Show All # to the far right of the category name. The cards for all the reports that meet your criteria display under the category. You can click the Show Less # to close the expanded category.
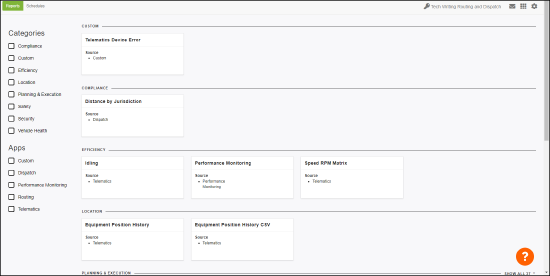
The card for each report provides you with the Name of the report and the application(s) from which the data came. Click the card for the report you want to work with and the report description and criteria display. From here, you an define your report criteria, set options that you want applied to the report, and choose your output format; just as you did previously.
To return to the report filter, click the Back to reports arrow.
Maintenance
Location Categories Added to Maintenance
Found in Omnitracs Web and Client
To prepare Omnitracs for future enhancements, a new option is now available under Maintenance called Location Categories. Location categories allow you to group your ocations by a common trait, such as restaurants, fuel stops, supermarkets, depots, or service locations that require COD payment. Your current location categories are a copy of your service location categories, but location categories can be used over a broader range of location types. Not only will they be used with service locations, they will be assigned to landmarks, depots, and other future location types. When you assign a category to a location, now you will see a Location Categories drop down, rather than Service Location Categories. All existing service location categories have been added to the new Location Categories list. New categories should be added as Location Categories, not Service Location Categories.
You can import location categories. Click Import and then browse to the file you want to import. Click Open and then, click Import. To download an import template, click Import and then click Download Import Template File. The template downloads to your computer.
To add or edit location categories in Omnitracs Web, do the following:
- Click Maintenance.
- Click the green button and scroll to Location Categories.
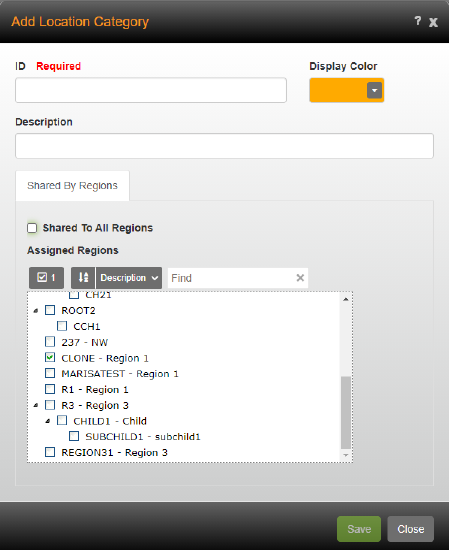
- To add a location category, click the {Add} button.
To change an existing location category, click on the Edit icon next to the service location category. - Enter an ID for the location category.
- Click the Display Color arrow and choose the color that will be associated with the location category.
- Enter a Description for the location category.
- Determine how you want to share the location category. On the Shared By Regions tab, select the regions that the location category can be shared with.
- Click the {Save} button.
To add or edit location categories in Omnitracs Client, do the following:
- Click the Maintenance menu and select Location Categories, or click the Location Categories icon.
- To add a location category, click the New item icon.
To edit an existing location category, click the Edit icon. - Enter the ID and Description for the service location category.
- Click on the arrow to select the Color to associate with the service location category.
- If this location category can be used by other regions, click the Shared by Regions tab. Select the regions the service location category can be shared with.
- Click the [Save] button to save the changes.
- When you are finished, click the [Close[ button to close the window.
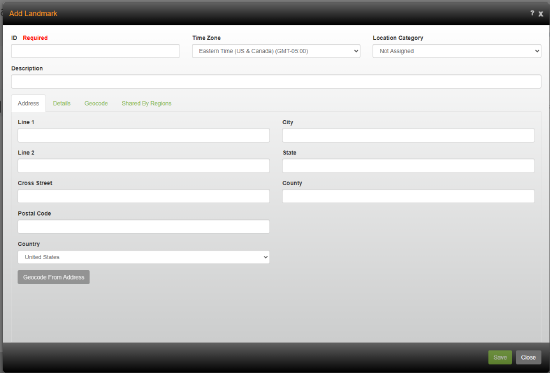
Adding Landmarks to Omnitracs
Found in Omnitracs Web and Client
Landmarks can be used in Omnitracs to help orient you on a map, making it easier to determine the proper geocode for a new service location or thebest route for an unassigned order. Currently, you can see landmarks on maps when viewing Route Details and when geocoding a service location. Omnitracs intends to expand the use of landmarks in the future.
Landmarks are added like service locations are added. Click Maintenance, click the green button and choose Landmarks from the list that displays. You can add new landmarks or edit existing ones. Click each tab to enter address and contact information for the landmark, add specific instructions, view the geocode, and share the landmark by regions.
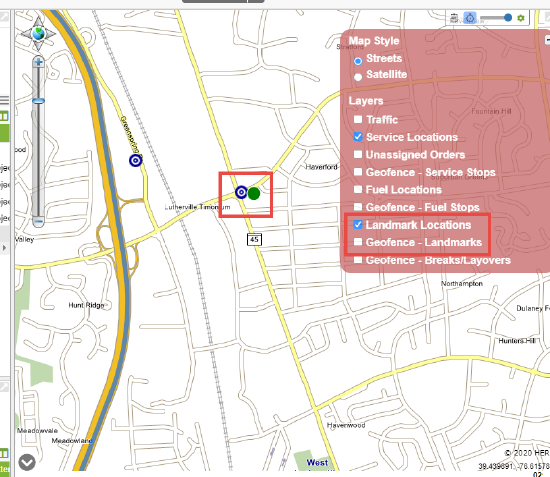
To see where a landmark is located when viewing route details in Fleetview, click the arrow button on the map and check Landmark Locations. Landmarks display as a green dot. You can also click Geofence - Landmarks and the geofence for the location shows as a gray circle around the landmark.
To see where a landmark is located when viewing a service location, click the Geocode tab for the service location and click the arrow on the map. Check Landmark Locations. Landmark Locations for Service Locations is only available in Omnitracs Web.
Compliance
More Detailed Inspection Points for Canadian DVIR
When drivers in Canada are performing inspections, they can now select specific defects under a given inspection category. For example, for a tire-related issue, you can specify that the defect is a flat tire, leak, or damaged tread, not simply a problem with the tires.
On the Canadian Vehicle Inspection Form, defects now include both a description and a number code that indicates the category of the defect and the specific issue. For example, a dripping fuel tank is listed as 12.3M—the 12 refers to the category (Fuel System) and the 3 indicates the specific defect (dripping fuel tank). The capital M after the number indicates that this is a major defect. If there is no M after the number, the defect is minor.
Note: This feature is not available in the DVIR Web Service.
New UVA Tool Filtering Options
The Distance filter in the UVA window now allows you to filter distance by greater than a specified distance as well as less than a specified distance. This option gives users more ways to narrow their search for UVA.
The Distance filter includes two sliders:
- The top slider allows you to limit your results to UVA events with a distance less than the distance selected in the filter. You can select a distance between 1 and 10 miles.
- The bottom slider allows you to limit your results to UVA with a distance greater than the selected distance. You can select the distance in 50-mile increments from 50 to 200 miles.
Both sliders are set to All by default and are editable until you move one of them. When you set the “less than” slider to any value other than All, the “greater than” slider is grayed out and cannot be edited. Similarly, if you set the “greater than” slider to any value other than All, the “less than” slider is grayed out.
Navigation
Viewing Health Advisories By County
Found in Omnitracs Navigation
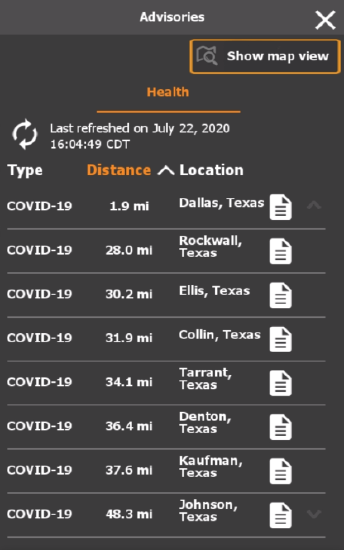
With the current health concerns, it is helpful for your workers to know what to expect when they pass through unfamiliar areas. Omnitracs Navigation now provides workers with COVID-19 health advisories, which list the known restrictions for an area, by county. The information is pulled daily from the Johns Hopkins Coronavirus Resource Center.
In Navigation, a yellow warning icon displays on the map when there is an advisory near the worker's current location or near the destination. When the worker clicks on the icon, a list of advisories displays, organized by type of advisory, with the distance the worker is from the location of the advisory. The worker clicks on the note icon next to a location and specific details display related to the county for which the location is a part.
The worker can click Distance and choose Nearby or Destination. This changes the location for which the information displays. Nearby is based on the worker's current location while Destination is based on the next stop on the trip.
The worker can see advisories on a map by clicking Show Map View.
Using the Vehicle Width to Enhance Your Path
Found in Omnitracs Navigation
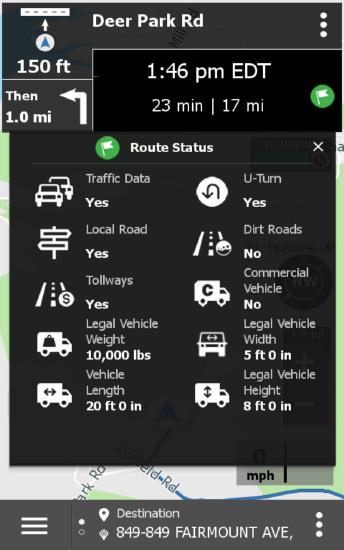
Currently, Omnitracs Navigation uses the vehicle length and height to determine the best path for a vehicle to travel in order to avoid an incident, such as a bridge strike. Omnitracs has added vehicle width to the calculation. If you are using version 2020.3 maps, Omnitracs will now take into account all dimensions of your vehicles when creating a path for your route. The width of a vehicle can be entered as part of the equipment type information in Omnitracs or entered by the driver in vehicle settings on the mobile device.
To enter the width in Omnitracs, follow these steps.
- Open Maintenance and click the green button.
- Scroll to Equipment Type and add a new equipment type or edit an existing one.
- Enter the width of the vehicle in the Width field. The value is in inches or centimeters.
- Save your changes.
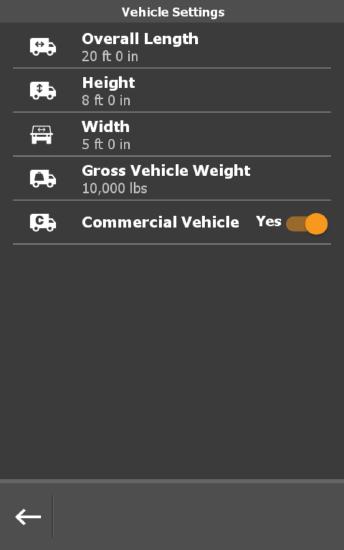
To enter the width in Omnitracs Navigation on the mobile device, follow these steps.
- Tap Menu.
- Tap Settings.
- Tap Vehicle Settings.
- Tap Width.
- Enter the width of the vehicle in the Width field. The value is in feet/meters and inches/centimeters.
- Tap th Back button to return to the previous screen.
On the mobile device, when running a route, the Route Status screen will indicate if the path adheres to the width setting.
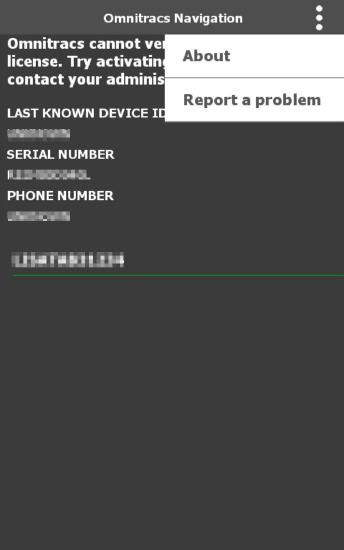
Enhancements to Manual Activation
Found in Omnitracs Navigation
To make the user experience easier, the ability to access the About screen and to report a problem have been added to the manual activation screen for Omnitracs Navigation. Simply tap the option menu and then tap About or Report a problem to open the appropriate screen.
Strategic Planner
Allowing Recurring Orders to Wrap to Another Week
Found in Omnitracs Client
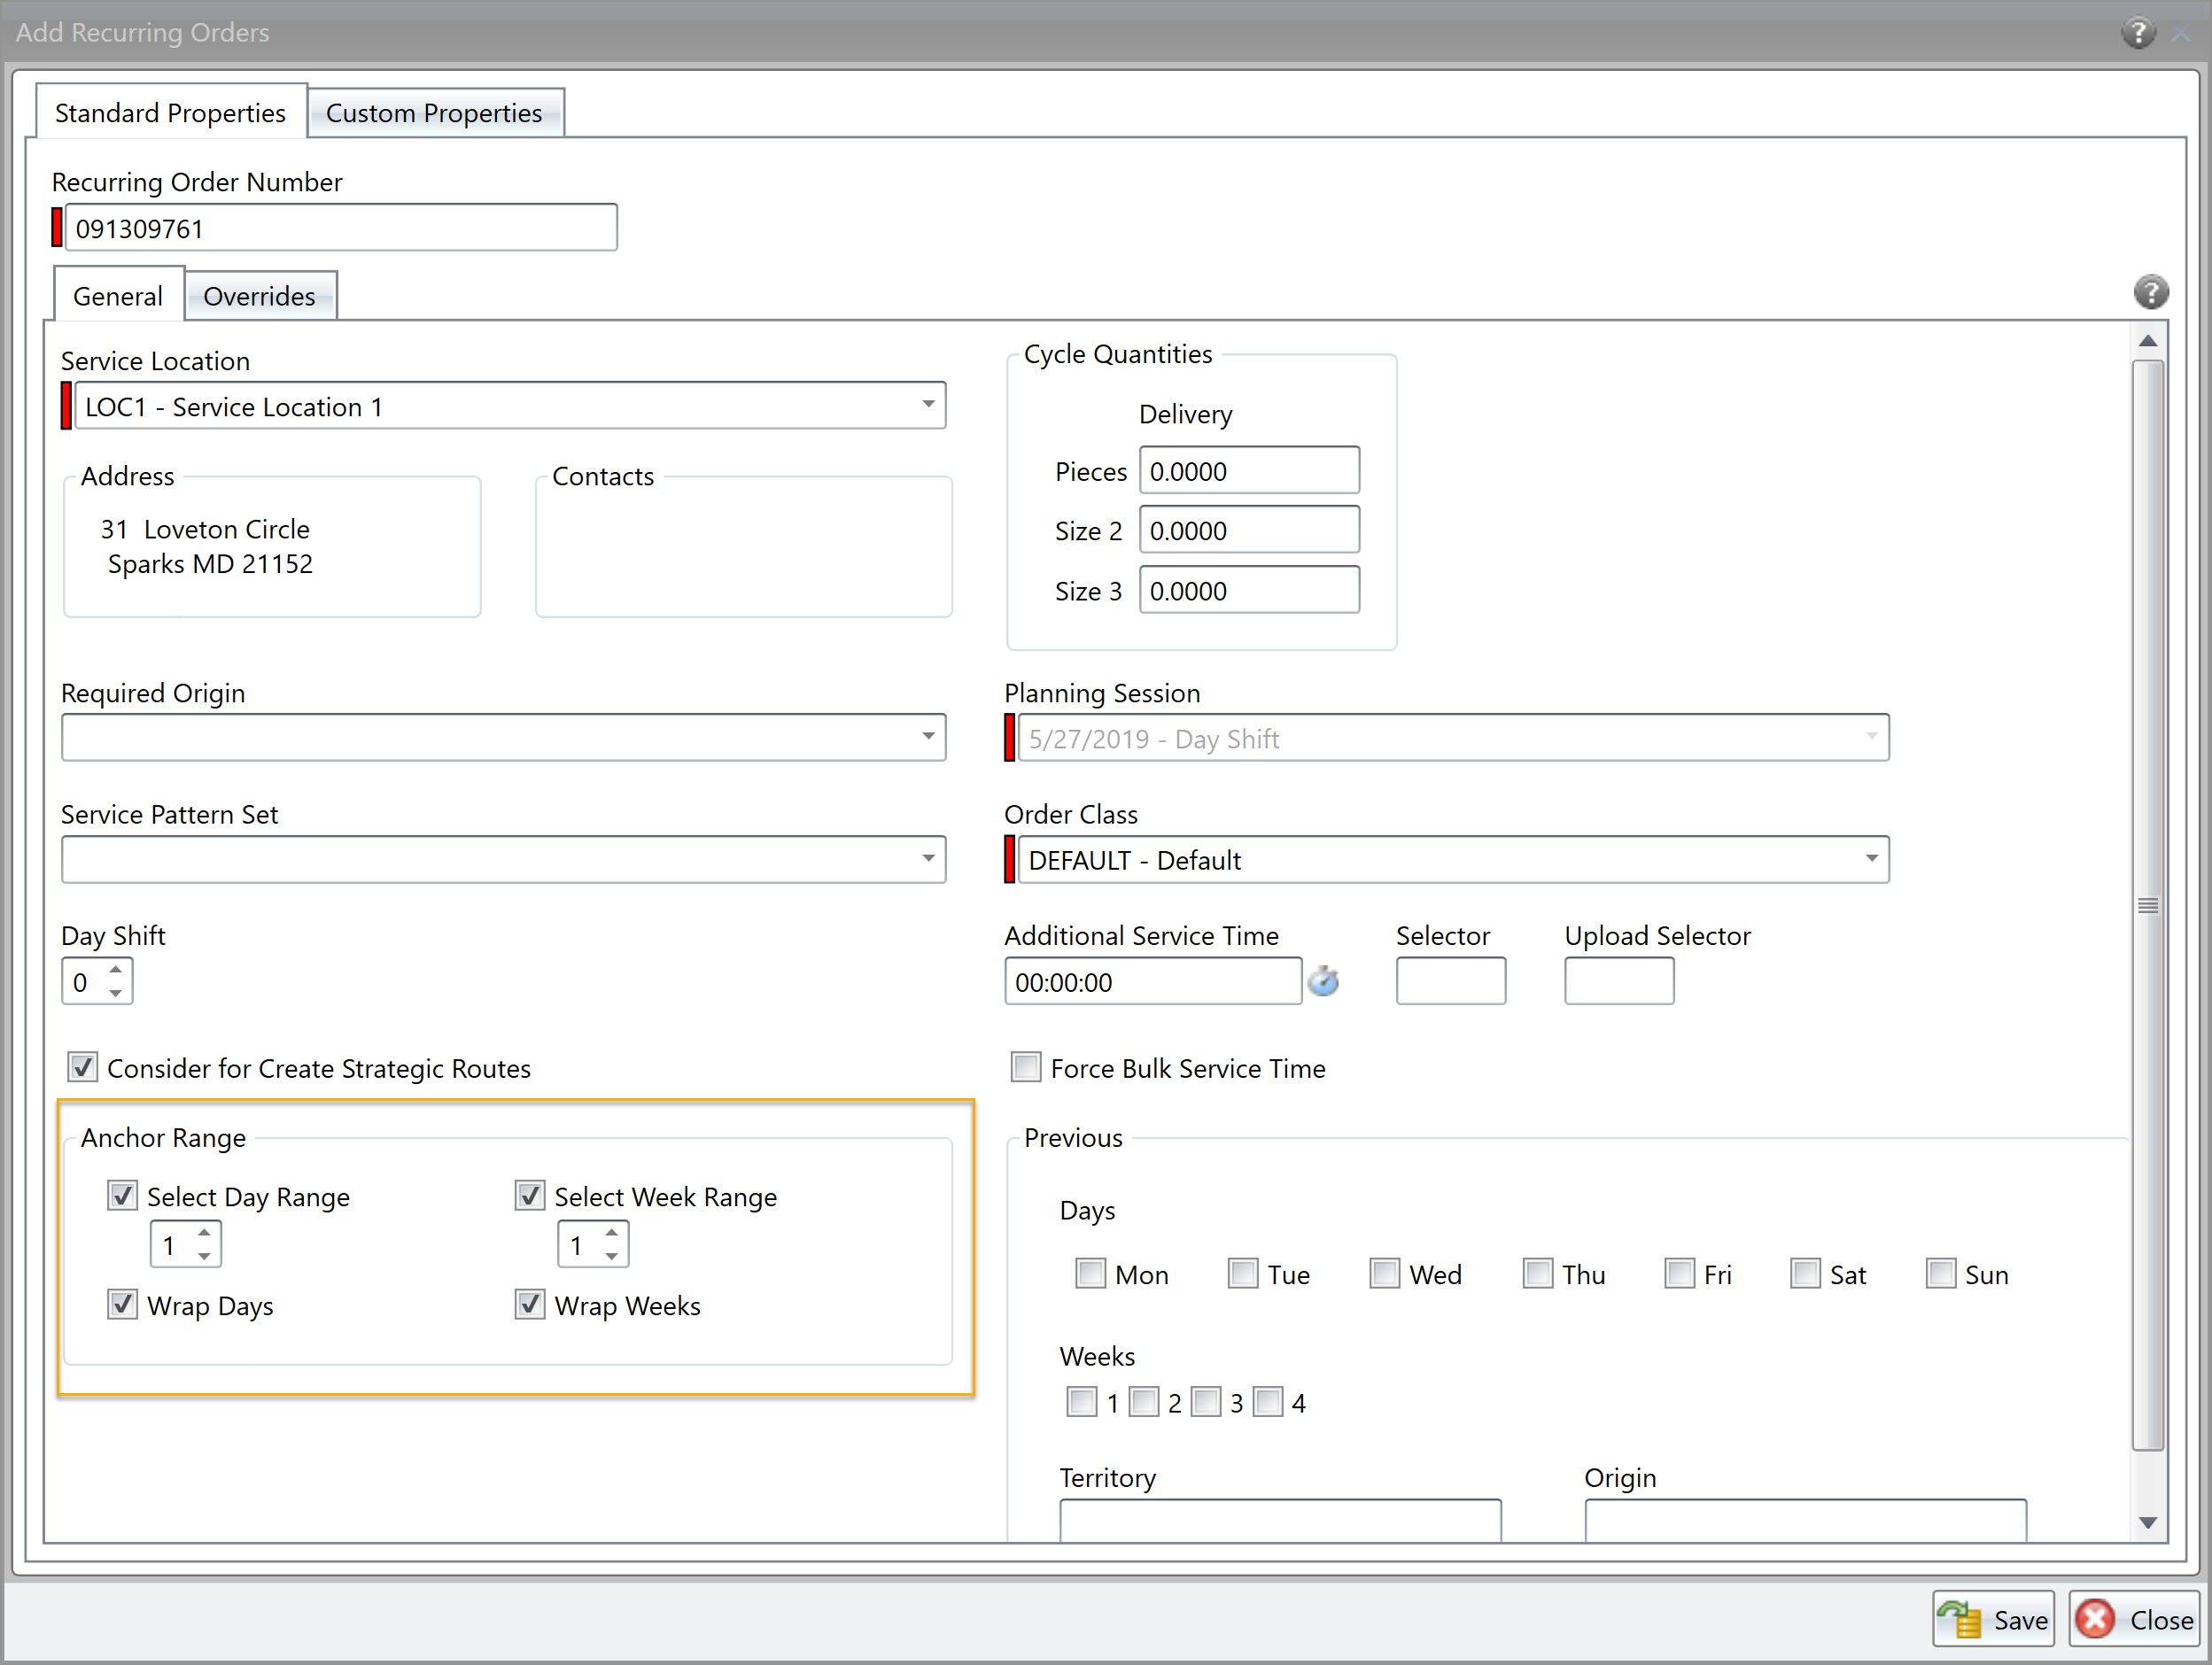
Anchoring allows you to keep a recurring order close to its previous delivery weeks and days when a re-route occurs. However, if the previous day is near the end of the work week, or the week is near the end of the cycle, you may want Strategic Planner to consider the next week when re-routing the order. For instance, if the order is delivered on a Friday, and the delivery week is Monday through Friday, and the Day Range is set to 1, if the order can not be wrapped the only available delivery options would be Thursday or Friday. However, if wrap is checked, the possible delivery days would be Thursday, Friday, or Monday.
To specify whether a recurring order should be able to wrap when it is re-routed, open the Recurring Order window. In the Anchor Range area, check Wrap under Select Day Range and/or Select Week Range. Click [Save].
If Select Day Range Wrap is selected, it lets the range of allowed delivery days wrap across non-delivery days into another delivery week. For example, if the recurring order is currently routed on Friday and has an anchor range of 1 day. If the 5 day business week is being used and wrap is allowed, the recurring could be scheduled on Thursday, Friday, or Monday when routes are created. If wrap is not checked, the recurring order could only be routed on Thursday or Friday. A recurring order will only be routed on a day that complies with both its service pattern set and its anchor range.
If Select Week Range Wrap is selected, it lets the range of allowed delivery weeks wrap into another delivery cycle. For example, if the recurring order is in a session that has an 8 week cycle, and is routed on week 8 and an anchor range of 1 week. If wrap is allowed, when routes are created the recurring order could be routed on week 7, week 8, or week 1 of the following cycle. If wrap is not selected, the recurring order could only be routed on week 7 or week 8. A recurring order can only be routed on a day that complies with both its service pattern set and its anchor range.
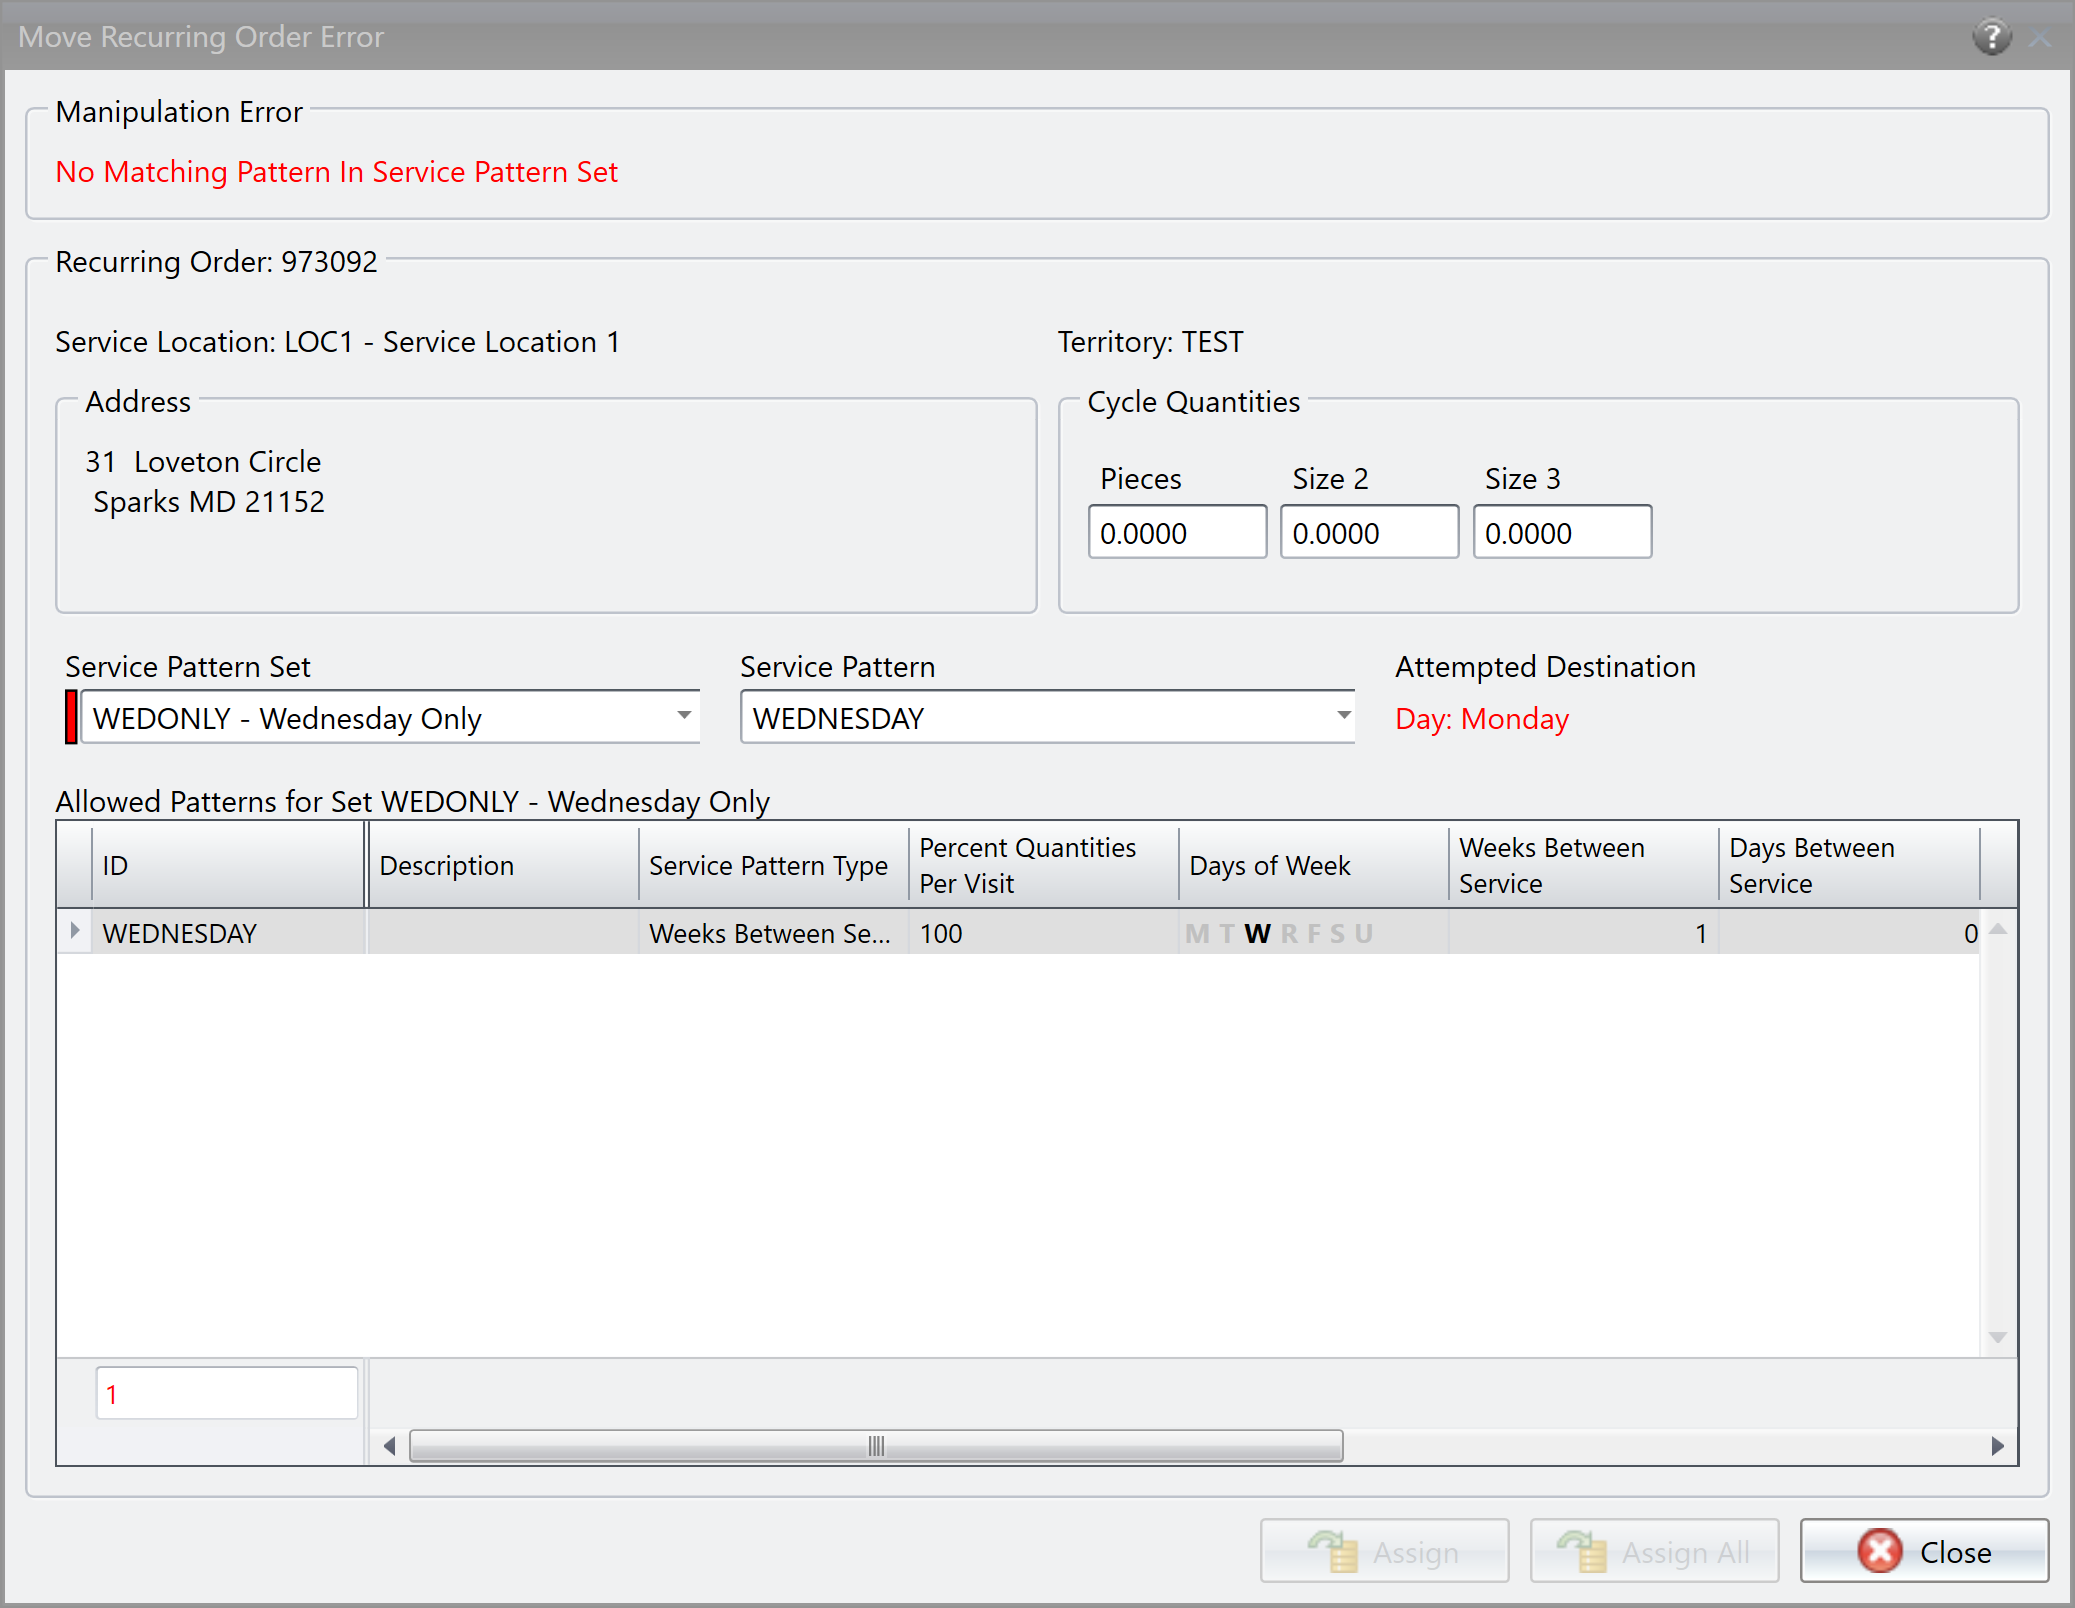
Choosing a Valid Service Pattern when Moving a Recurring Order
In the past, when you attempted to drag and drop a stop or recurring order onto a week or day that was not supported by the service pattern set, you received an error message telling you that the move could not be completed. To move the recurring order, you would have to go to the recurring order and change the service pattern set so that you could complete the move. Now, when you perform a drag and drop of an illegal move, the Move Recurring Order window opens so that you can make the change there and complete the action.
Telematics
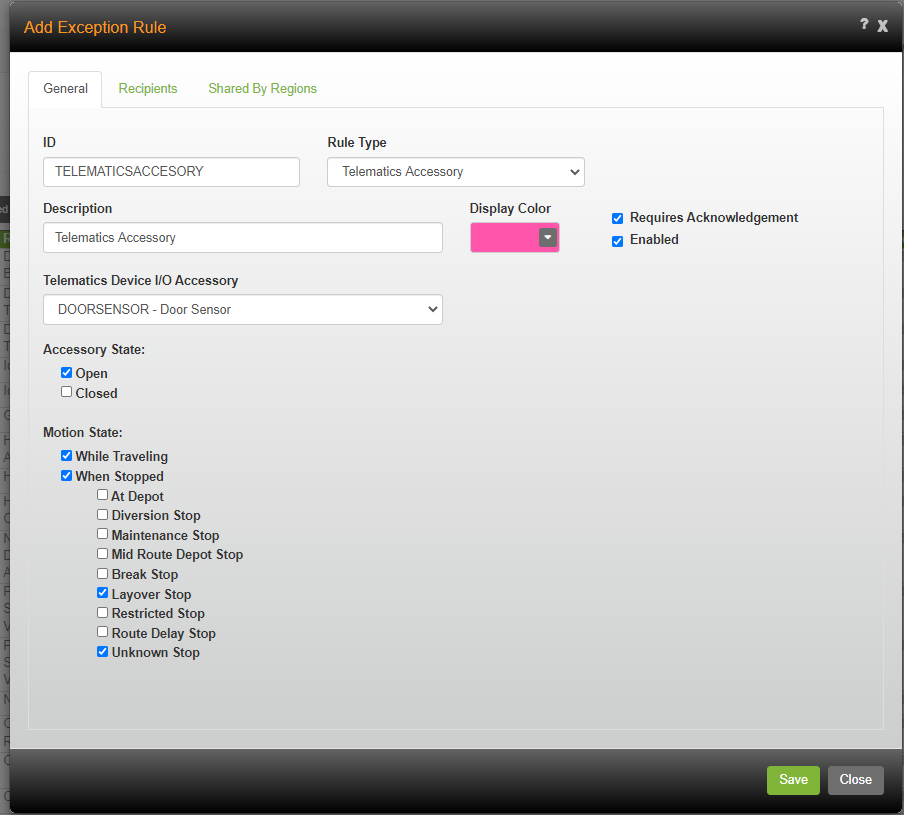
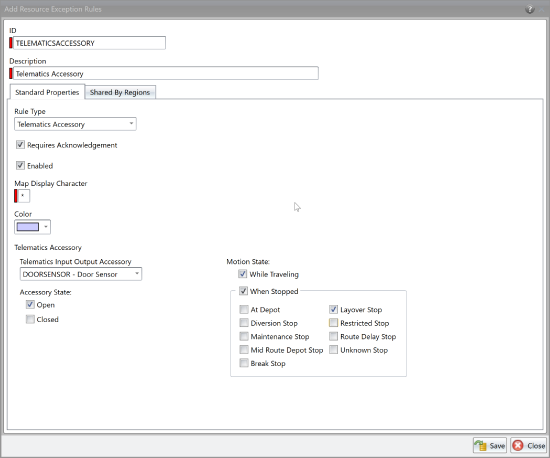
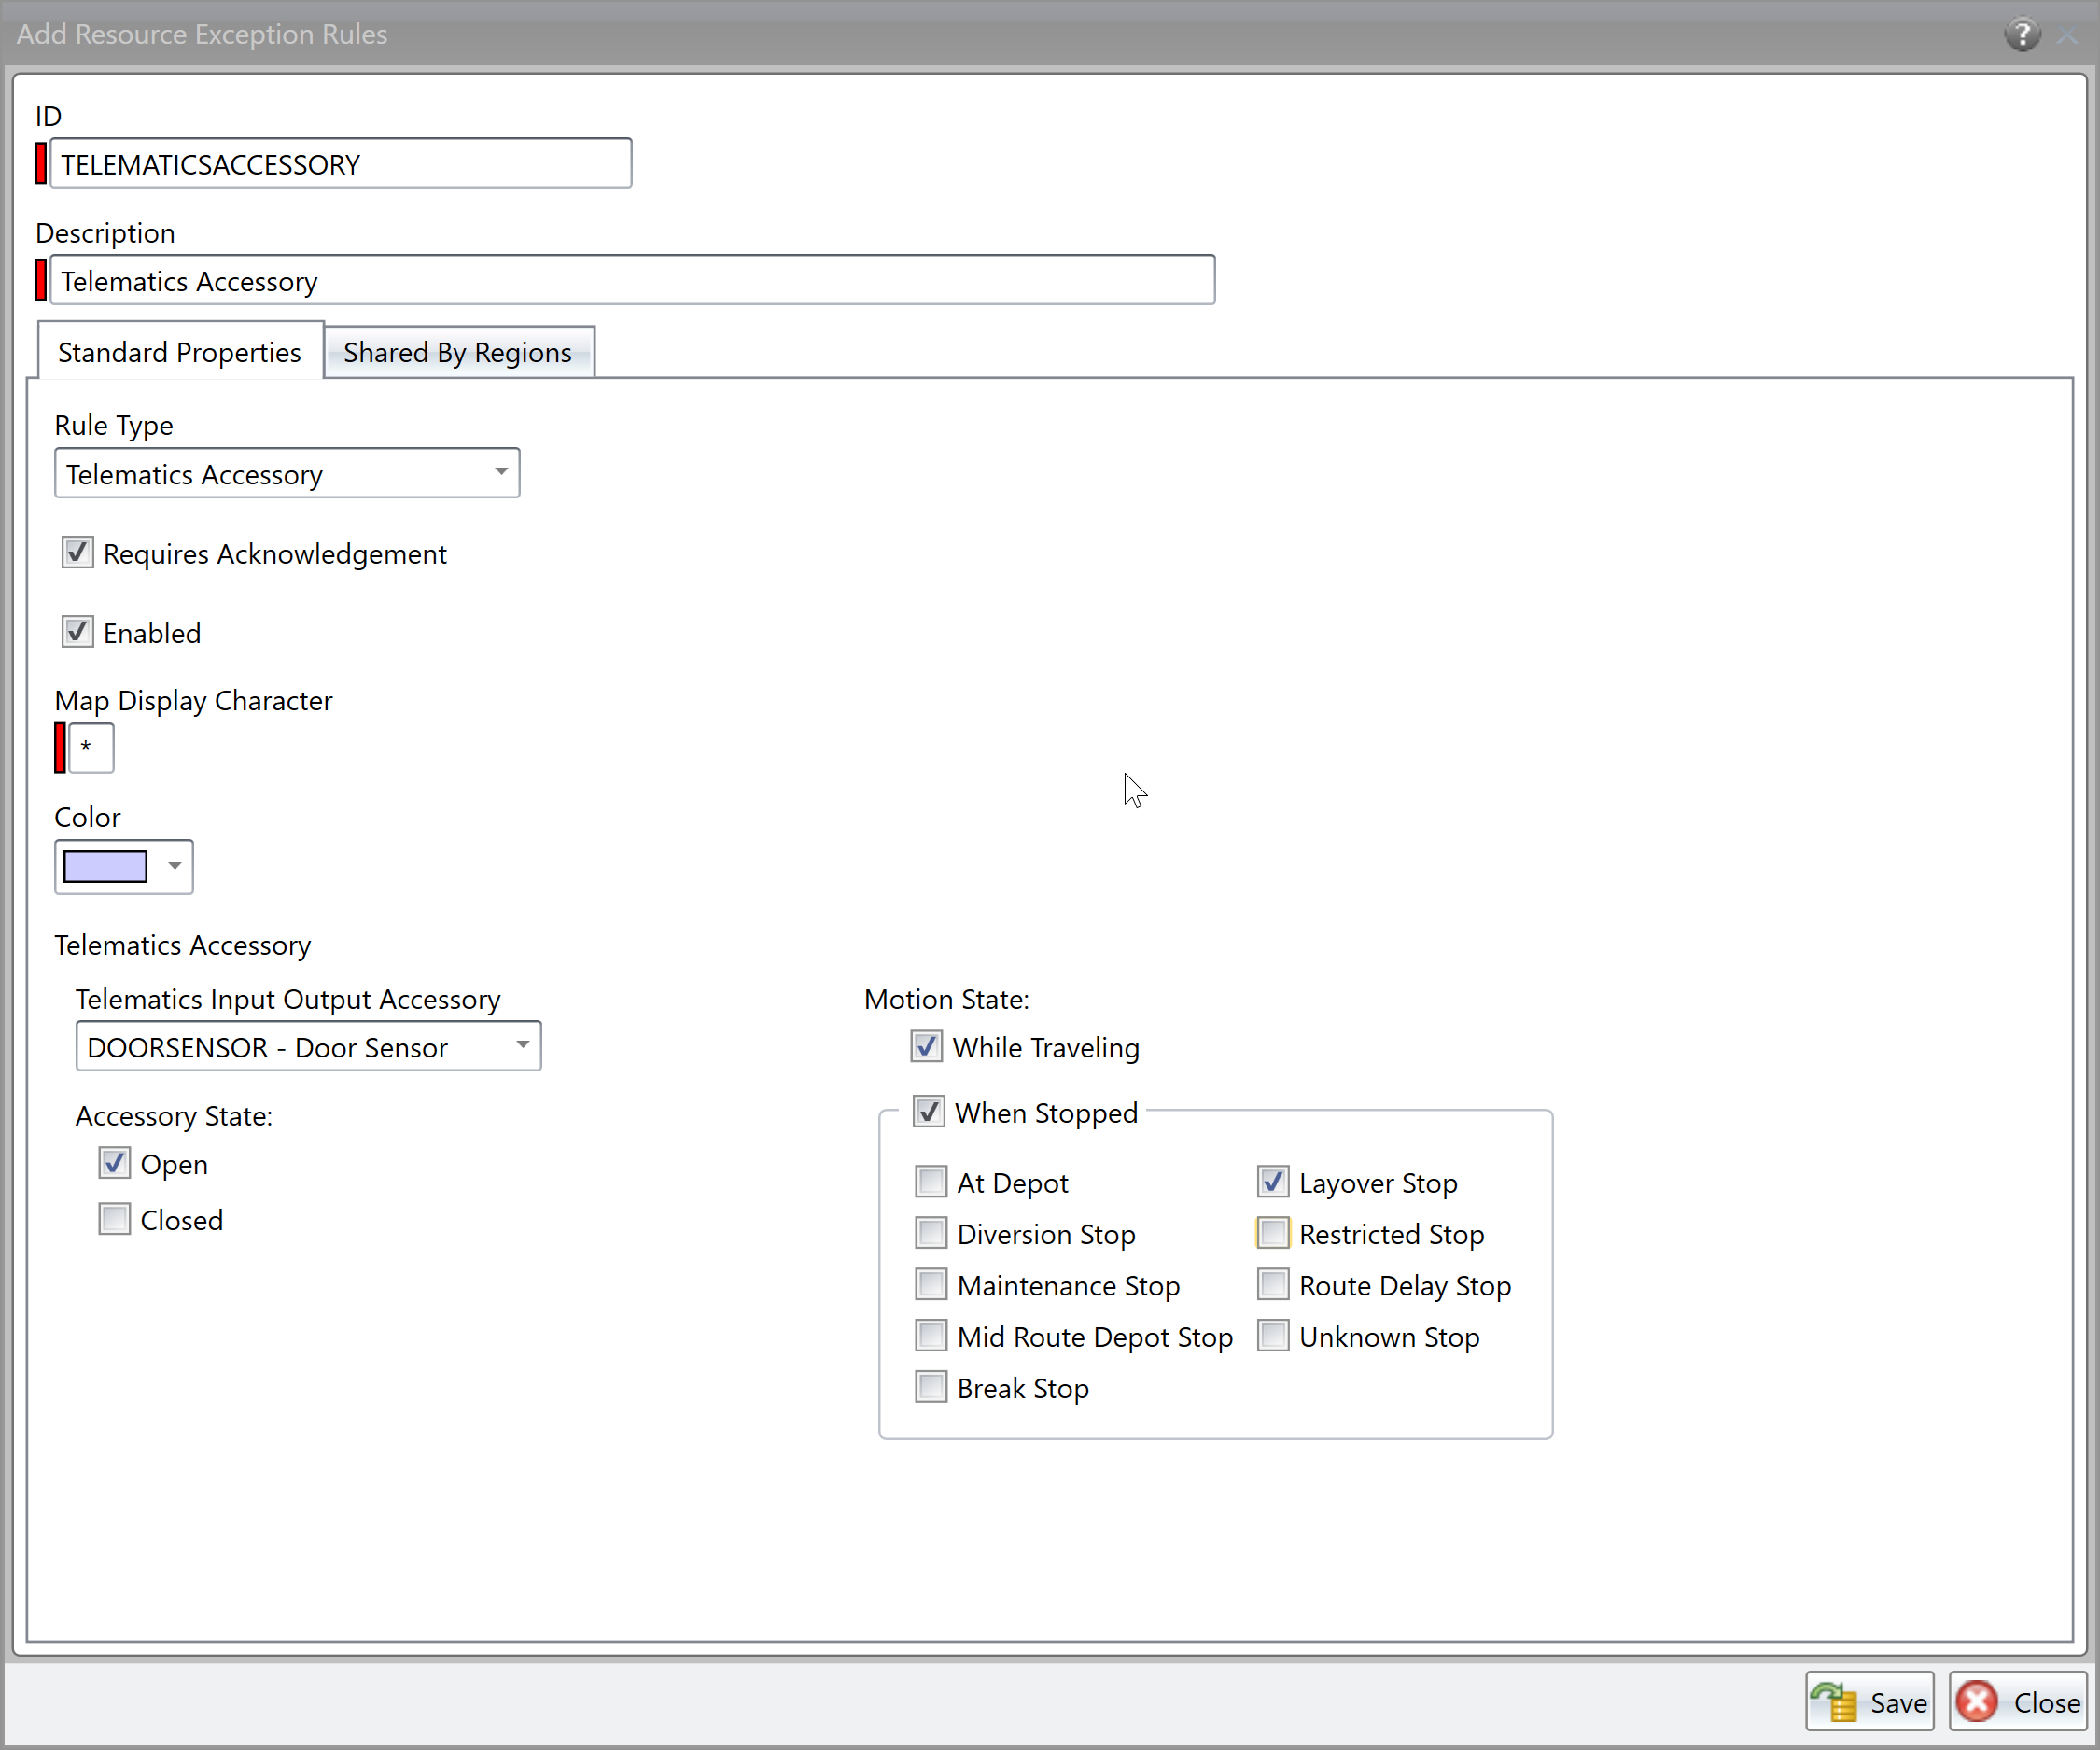
Creating Telematics Exceptions Rules
The Telematics device, and the Telematics accessories, installed in your vehicles can provide timely information about the vehicle's status. Now, you can create exceptions so that you are alerted to vehicle states that could be a concern for you. For instance, you may want to be alerted when the vehicle door is open, or when the vehicle is stopped at a layover location. You can even create an exception rule that combines vehicle motion and an accessory state; for instance you could create an exception rule to alert you when the vehicle is in motion and a door is open.
Once you have created your exception rules, when that condition occurs an exception, you can view it in FleetView on the appropriate Route Details page, or in the Exceptions Grid. Additionally, in Reporting, you can generate a Route Exceptions report showing the exceptions that occurred on specific routes. When setting up the exception rule, you can optionally specify recipients that will receive automatic email and/or text message notifications when the exception occurs.
In Omnitracs Web
- Click on the Maintenance icon to open Maintenance.
- Click the green button and scroll to Exception Rules; the Exception Rules list opens.
- Click [Add]. The Exception Rule window opens.

- Enter an ID and Description for the exception rule. You must enter an ID.
- Click the Rule Type arrow and choose Telematics Accessory.
- Choose a Display Color, and whether or not the exception will Require Acknowledgement and if it is Enabled.
- To create a rule that reads information from a Telematics accessory to generate an exception, click the arrow and choose the Telematics Device I/O accessory that will provide the Accessory State information. Under Accessory State, choose the state which should generate an exception.
Note: The names for the Accessory State options depend on the names defined for the selected Telematics Device Accessory. - To create a rule that generates an exception based on the whether or not the vehicle is moving, choose the proper Motion State options.
Note: If you create a rule that uses both Accessory State and Motion State options, an exception will be generate if both an Accessory State and Motion State selection are met, not if only one of the selections is met. - If you want email and/or text message alerts to be automatically sent when this exception rule is broken, click the Recipients tab.
- If you want to share this exception rule with other regions, click the Shared by Region tab.
- Click [Save].
In Omnitracs Client
- Click the Dispatching menu and scroll to Resources Exception Rules. The Resource Exceptions Rules list opens.
- Click the Add icon. The Resource Exceptions Rules window opens.
- Enter the ID and Description for the rule. You must enter an ID.
- Click the Rule Type arrow and choose Telematics Accessory.
- Choose a Display Color, Map Display Option, and whether or not the exception will Require Acknowledgement and if it is Enabled.
- To create a rule that reads information from a Telematics accessory to generate an exception, click the arrow and choose the Telematics Device I/O accessory that will provide the Accessory State information. Under Accessory State, choose the state which should generate an exception.
Note: The names for the Accessory State options depend on the names defined for the selected Telematics Device Accessory. - To create a rule that generates an exception based on the whether or not the vehicle is moving, choose the proper Motion State options.
Note: If you create a rule that uses both Accessory State and Motion State options, an exception will be generate if both an Accessory State and Motion State selection are met, not if only one of the selections is met. - If you want to share this exception rule with other regions, click the Shared by Region tab.
- Click [Save].
Active Alert
Communicating Why a Delivery Was Not Made
Found in Active Alert
Active Alert allows you to send emails and text notifications to your customers regarding the status of their service. If you've set up Active Alert to send emails and/or text messages to customers when a stop is marked unserviceable or has been cancelled, you can now include the reason why the service did not happen. When reason codes exist in Omnitracs for unserviceable stops and/or cancelled stops, and a stop is marked unserviceable or cancelled, the worker or dispatcher is required to assign one before the stop can be completed.
Note: Unserviceable Stop Reason Codes and Cancelled Stop Reason Code are added in Omnitracs > Maintenance.
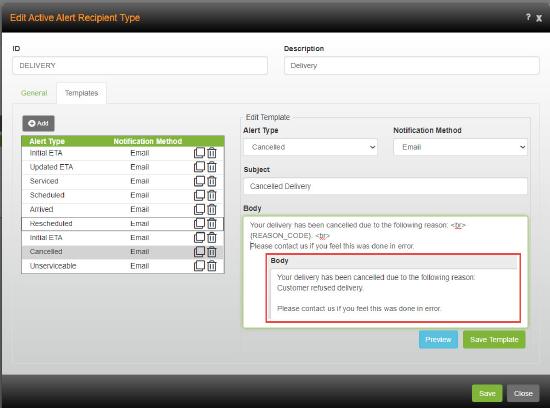
To include a reason code in an alert, you will add the template tag {REASON_CODE} to a new or existing Recipient Type template that has an Alert Type of Unserviceable or Cancelled.
Note: For more detailed information about adding new Recipient Type templates, see the online help.
- Open the Maintenance module and then click the green button.
- Choose Active Alert Recipient Type from the list.
- Add a new recipient type or edit an existing one.
- Complete any necessary changes to the General tab.
- Click the Templates tab.
- Add a new template or edit an existing one with an Alert Type of Unserviceable or Cancelled.
- Make any necessary changes to the Notification Method and Subject.
- In the body of the template, add your message and include the tag {REASON_CODE} where you want the reason code that the driver or dispatcher assigned to the stop to display.
- Click {Preview} to view the message and to see that you have added the tag correctly.
- Click {Save} to save your changes.
Note: The reason code will only display in emails and texts sent with the Alert Type of Unserviceable and/or Cancelled.
Viewing Proof of Delivery Image in Web Application
Found in Active Alert Web Application
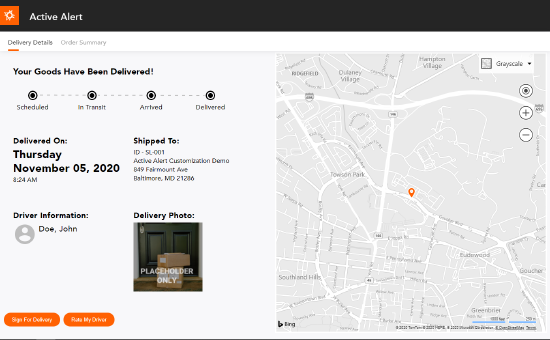
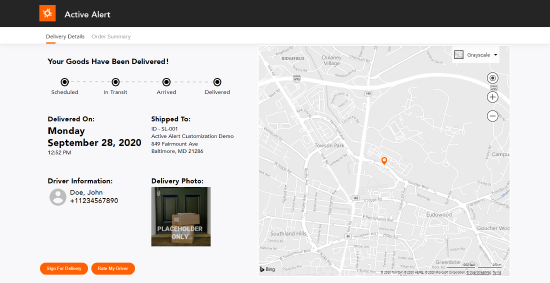
Contact-less delivery of packages is growing in popularity. But when the worker doesn't collect a signature on delivery, it is nice to have a picture of where the package was dropped, so that you have one more piece of information for proof of delivery. Roadnet Mobile has given the worker the ability to snap a proof of delivery photo at a stop for quite some time. When on the Signature screen, the worker simply taps the Photo icon and takes a picture. That picture is returned to Omnitracs where it can be viewed in Order Status. Now, it can also be seen by your customer in the Active Alert Web Application.
If a proof of delivery picture is available for a delivered stop, your customer can see it in the web application. When your customer views the web application for the order that has a status of Delivered, the Delivery Photo displays on the page.
Contactless Signature in Active Alert
Found in Active Alert Web Application and Omnitracs Web
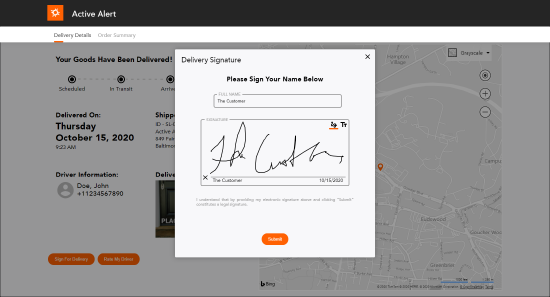
Whether it is a health reason or a personal preference, some of your customers may prefer to not interact with your delivery person. When a signature is required for an order, it can make your customer uncomfortable and put your worker in a difficult situation. To make both parties more comfortable, the Active Alert Web Application now allows your customers to sign for an order without any interaction with your worker. When your worker is running a route in Roadnet Mobile Android and arrives at a stop that is also using Active Alert, an Arrived alert can be sent to the customer that contains a link to the new Delivery Signature screen. The customer can quickly sign for the order and submit it. The worker receives a notification on the mobile device, which fulfills the signature requirement, and can continue running the route.
Note: Different tags can be used in your templates to include a link in an alert. The link that you provide opens the web application. When an order is in the Arrived status, customers will see the Sign For Delivery button.
To allow your Active Alert Web Application customers to provide contactless signatures, you will need to enable the new region setting. If you want to provide a direct link to the new Delivery Signature screen, you will include the {SIGNATURE} field in a recipient type template with an alert type of Arrived. You must then assign the Arrived alert type to a subscription for each service location that you would like to use contactless signature.
Enabling Contactless Signatures
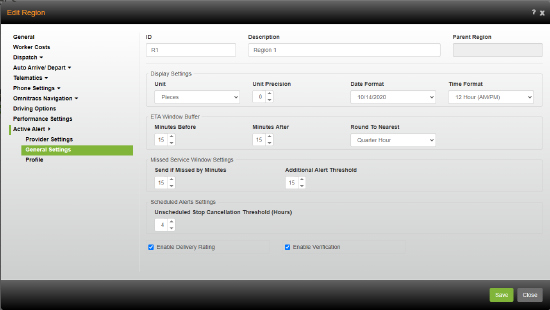
The first step to allowing your customers to provide a signature without any personal interaction with the worker is to turn it on. To allow for signatures using the Active Alert Web Application, turn on the Allow Contactless Signature region setting. Go to Administration > Region and add a new region or edit an existing region. On the Phone Settings > Smart Phone - General page check Allow Contactless Signature. Once checked, when the order is in the Arrived status, Active Alert provides a Delivery Signature screen on which your customer can leave a name and signature. When the signature has been received, the worker can continue running the route. If you want to require that the worker include a photo of the delivery when the customer provides a signature, check Require Delivery Image with Contactless Signature. When this option is selected, the worker cannot continue the route until the signature notification is received and a photo of the order is included.

Entering Legal Signature Text
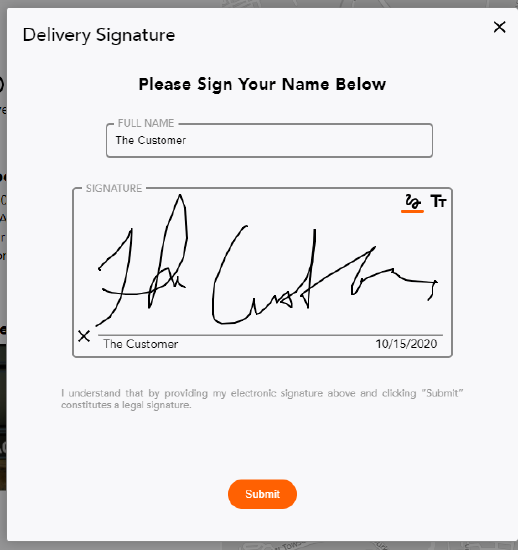
When your customer uses the Active Alert Web Application to sign for an order, the default legal text that they see states, "I understand that by providing my electronic signature above and clicking “Submit” constitutes a legal signature".
If you would prefer to use your own company approved text, it can be entered in the Customer Agreement field in Omnitracs. Go to Administration > Regions and add a new region or edit an existing region. On the Phone Settings > Smart Phone - Custom page, in the Customer Agreement field enter the text you wish to use and save your changes.
Including a Signature Link in an Alert
If you want to encourage your customers to sign for an order without interacting with the worker, you can include a link in the Arrived alert that they receive. When it is clicked, the customer is taken directly to the Delivery Signature screen. After the customer signs for the delivery the worker receives notification on the mobile device that the signature has been collected. If a signature is required, this notification allows the worker to continue the route. If a delivery image is required, the worker must take a picture before the route can continue.
Notes: The Delivery Signature screen only displays after the worker has arrived at the stop.
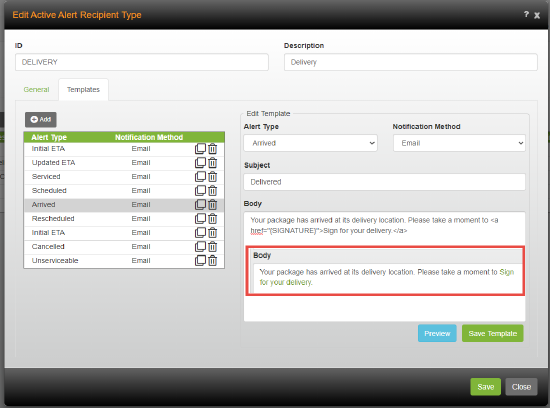
Include the {SIGNATURE} field in the template for an Arrived Alert Type to have the customer go directly to the Delivery Signature Screen when the link is clicked. If you do not include the {SIGNATURE} field in the Arrived alert, but you do include the {WEB_LINK} field, your customer can click the Sign For Delivery button on the Arrived screen in the Active Alert Web Application. Once a signature has been collected, the link displays the Your Signature screen.
To add a {SIGNATURE} field to a new or existing recipient type template, do the following:
- Click on Maintenance and then click the green button.
- Scroll to Active Alert Recipient Types.
- Add a new recipient type or edit an existing one.
- On the Template tab, click Add, to add a new template or click an existing template that you want to edit.
- Choose the Alert Type for this template and choose the Notification Method for this template.
Notes: The {SIGNATURE} field can be added to any alert type that occurs before an order reaches the Serviced/Delivered status which can include: Initial and Updated ETA, Minutes Before Service, Arrived, Scheduled, and Rescheduled. Since the Sign For Delivery button only appears on the Arrived page, Omnitracs suggests adding the field to the Arrived Alert Type. Your customer will receive the alert when the worker arrives at the location and will be prompted to complete the contactless signature.
You may want to use the {SIGNATURE} field in an earlier alert to help educate your customer on the process of how contactless signature works, such as the initial ETA or Minutes Before Delivery. In the email or SMS alert, explain what the link allows them to do. Explain that when they see that the driver has arrived, click the link to sign for the delivery. Explain that if the Delivery Signature screen does not display, to try again; there may be a delay between the worker arriving at the stop and the customer the seeing the signature screen. - Enter the Subject and Body of the message. To provide a link to the active alert web application in an SMS notification, include the field {SIGNATURE} in the body of your recipient type template. To include a web link in an email alert, you should include a tag and the field, <a href="{SIGNATURE}"> Sign for your delivery.</a>, in the body of your recipient type template.
- Click Preview to see what the alert will look like when sent to your customers.
To have the alert sent to your customer, it will need to be part of a subscription for a service location. This is done in Maintenance > Service Location on the Active Alert tab.
Contactless Signature in the Web Application
When your customer receives the email or SMS alert and clicks the signature link, the Delivery Signature screen displays in the Active Alert Web Application.
Your customer may or may not be required to enter their name in the Full Name field and then sign their name in the Signature box. They can choose to sign their name in the Signature box using their finger or cursor or type their name using a keyboard. When they click Submit the name and signature are sent to the worker, who is waiting to finish servicing that stop. After completing the signature request the customer is taken to the Arrived screen in the Active Alert Web Application. Once the signature is finalized, the customer can only view it by tapping the View Signature button. They cannot change the signature.
Note: The worker will receive a message in the Roadnet Mobile Inbox that the signature has been collected. As well, if only a signature is required, the Signature task will automatically be checked in the Task list. The worker can tap the Signature task and see the signer's name and that the signature was collected remotely.
Collecting Customer Ratings On Your Driver's Performance
Found in Active Alert
Customer service can make or break your business. When drivers are on the road, you have no knowledge of the quality of service they provide and how they are viewed by your customers. The ability for a customer to rate the driver and the service they receive is a great way to help drivers provide better customer service and for you to evaluate your drivers. Omnitracs Active Alert now lets your customers rate their delivery. Then, you can use Insight to analyze the ratings that are received.
To allow your customers to rate their delivery, you must perform a number of steps. Once setup is complete your customers will be able to click a link in an email or SMS alert or view the Delivered page of the web application to provide immediate feedback on their delivery experience.
Enabling Delivery Ratings
Before your customers can rate the drivers that deliver their orders, you will need to turn on delivery ratings for the region. When adding a new region or editing an existing region, go to Active Alert > General Settings and check Enable Delivery Rating. When you enable delivery ratings for a region the Rate My Driver button and the Driver Rating screen display in the Active Alert Web Application.
Note: If you do not check Enable Delivery Rating, your customers will not see the Driver Rating screen.
Creating a Recipient Type
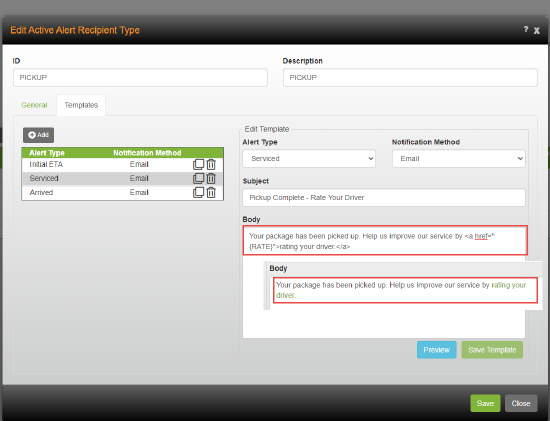
You may want to add a link in the email or SMS alerts that you send to your customers, so that they can click the link and open the web application to the driver ratings page in Active Alert. To include a direct link in the alert, you will need to add the new {RATE} field in the body of the Serviced recipient type template.
Notes: It is not required for an alert to include a link to the rating screen. As long as the Enable Delivery Rating region setting is checked, your customers will see the Rate My Driver button on the Delivered screen of the web application.
The rating page will only be seen by the customer if the status of an order is Delivered. So, the {RATE} field is part of the recipient template for a Serviced Alert Type; adding the field to a Scheduled or Arrived recipient type would not work.
To add a {RATE} field to a new or existing recipient type template, do the following:
- Click on Maintenance and then click the green button.
- Scroll to Active Alert Recipient Types.
- Add a new recipient type or edit an existing one.
- On the Template tab, click Add, to add a new template or click an existing template that you want to edit.
- If necessary, choose Serviced as the Alert Type for this template and choose the Notification Method for this template.
- Enter the Subject and Body of the message. To provide a link to the active alert web application in an SMS notification, include the field {RATE} in the body of your recipient type template. To include a web link in an email alert, you should include a tag and the field, <a href="{RATE}"> Rate your delivery.</a>, in the body of your recipient type template.
- Click Preview to see what the alert will look like when sent to your customer.
You can see what the Active Alert Web Application screen will look like for your customer when they click on the link. Go to Administration and click the green button. Scroll to Active Alert Profiles. From the Active Alert Profiles list, for the profile you want to preview, click the Preview Customization arrow and choose Delivered. Click the External Link icon and the web application opens, displaying the page with the Rate My Driver button.
Rating the Driver
You can use an alert to encourage your customers to rate their delivery experiences. By including the {RATE} field in your Serviced recipient type template, you are providing an easy way for your customers to rate the driver and delivery. When they click the link the Delivered screen displays in the Active Alert Web Application, along with the Rate My Driver button.
Note: If you do not include the {RATE} field, but the {WEB_PAGE} field is included in an alert, once an order has reached a Delivered status, if the customer views the web application, the customer will see the Rate My Driver button.
When they tap on the Rate My Driver button, the Driver Rating screen displays. Your customer can give the driver a rating from one to five stars, five being the most positive and one being the least positive. To send the rating, they simply tap Submit Rating.
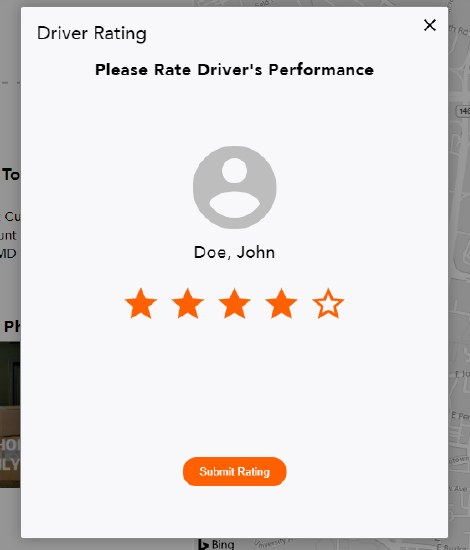
Once your customer has submitted the rating, they can change it by tapping Review Driver Rating, changing the number of stars selected, and then tapping Submit Change.
Analyzing Delivery Ratings in Insight
Finally, when you have received ratings from customers, you can analyze that feedback in Insight. Three new templates have been added to Insight to allow you to see the average rating by worker, the number of stops, the exact rating for a each stop, and the average rating by region. You can also see who is using delivery ratings and who is not.
The three new templates in Insight are:
Average Rating - Averages the delivery rating by the number of stops. Stops that have no ratings are filtered out of the report.
Average Rating by Region - Averages the delivery rating based on region. Stops that have no ratings are filtered out of the report.
Service Stops without Rating - Shows the stops that do not have any ratings.
Confirming Email and SMS Alert Recipients
Found in Active Alert
To adhere to state privacy laws and data protection regulations, Omnitracs has added a verification step when adding new recipients to a service location. This step requires your customers to consent to receiving emails and SMS messages before they are sent any additional alerts. As well, requiring a confirmation ensures that you are only sending alerts to individuals that want to receive the information.
Before Omnitracs will send verification requests to new service location recipients, you must enable the region setting on the Active Alert - General Settings page. To enable the setting, go to Administration > Regions. Add a new region or edit an existing one. Go to Active Alert > General Settings and check the Enable Verification box. Save your changes.
Note: The Enable Verification setting is unchecked by default.
After you have enabled verification requests, ensure that you have a Business Display Name entered as part of the Region > General settings. See Using a Business Name When Sending Alerts for more information.
When you have Enable Verification checked and you add a recipient to a service location subscription, Omnitracs automatically sends out an email or SMS verification request based on if you entered an email address or phone number.
The email message will look similar to the one below.
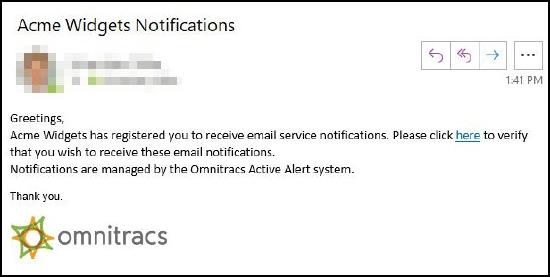
The SMS notification will say "Acme Widgets has registered you to receive service notifications. Please click this link to verify that you wish to receive these notifications: {LINK}."
For your company, the information entered in the Business Display Name field will replace Acme Widgets. For the SMS notification, the {LINK} will be an active link that the customer will click.
Notes: If you enable verification, but leave the Business Display Name empty, existing recipients will still receive alerts, but you will not be able to add new or modify the existing active alert recipients.
If a service location is shared to all regions, the Business Display Name on the primary region, typically the Created In or Parent region, will be used.
If you share service locations to multiple regions, Omnitracs recommends that the Enable Verification settings and Business Display Names be the same for all regions, otherwise results may not be consistant.
When your customer clicks the link, they are verifying that they want to receive communications from you. If your customer does not respond to the request, no further alerts will be sent to that recipient.
Note: All current recipients will be considered verified.
Using a Business Name When Sending Alerts
Found in Active Alert
The Business Display Name is a new region setting that is included in the initial verification alert sent to your customers. The business name you enter should be one that that your Active Alert customers will recognize when they opt in to receive alerts.
The new region setting, Business Display Name, is on the Region - General page. You will only see it if you use Active Alert.
The Business Display Name is included in the new Active Alert verification email messages and SMS notifications that are sent to new recipients. If you enable verification, but do not enter a Business Display Name, existing recipients will still receive alerts, but you will be unable to add new or modify the existing email addresses or phone numbers in a service location subscription.
Note: You must check Enable Verification on the Active Alert - General page to have verification requests sent to new recipients. This region setting is unchecked by default. See Confirming Email and SMS Alert Recipients for more information about Active Alert verification email messages and SMS notifications.
If a service location is shared to all regions, the Business Display Name on the primary region, typically the Created In or Parent region, will be used.
If you share service locations to multiple regions, Omnitracs recommends that the Enable Verification settings and Business Display Names be the same for all regions, otherwise results may not be consistent.
You can also include the Business Display Name in your templates. Adding {BUSINESS_NAME} to a recipient type template will insert the Business Display Name into the Email or SMS alert and ensure that your customers know who is sending the alert.
Minimizing the Number of Emails in the Spam Folder
Found in Active Alert
When you send email alerts to your customers, if your domain has a DMARC policy enabled, you may find that your messages end up in your customer's Junk or Spam folder. Omnitracs has enhanced the process behind adding an email sender so that once you perform a few set up steps your emails are no longer tagged as spam.
If the emails you send are not Domain-based Message Authentication, Reporting and Conformance (DMARC) compliant, they may be flagged as spoofed and your recipients may not get them or they may be added to the junk folder. Now, when you add an email sender to Omnitracs, that email address will receive a customized message with instructions on how to make emails sent from that email sender DMARC compliant. In order to comply with DMARC, messages must be authenticated through either Sender Policy Framework (SPF) or DomainKeys Identified Mail (DKIM). Using both methods is strongly recommended. The email that is sent to the email sender explains how to add DKIM and SPF Authentication. for your domain.
Once you complete the steps, your alerts will no longer be tagged as spam.
Roadnet Mobile
Manually Changing Location Permission
Found in Roadnet Mobile Android
For workers that use a mobile device with Android 10, when Roadnet Mobile is updated to the latest version, it may be necessary to manually change the Location permission setting. To change the Location permission for Roadnet Mobile, on the mobile device go to Settings > Apps & Notifications > App Info > Roadnet Mobile. Tap Permissions. If Location is listed under Denied or if it is under Allowed, but marked Allow only while using the app, tap Location and choose Allow all the time. Tap the back arrow and confirm that Location is listed under Allowed.
Note: The path you use to access application permissions may be different on your device.
Viewing Network Connection Status
Found in Roadnet Mobile
At the top of the screen, the Network icon displays the status of your current network connection. The number of lines that radiate from the dot indicate the strength of your network connection. The lower the number of lines; the weaker the connection.
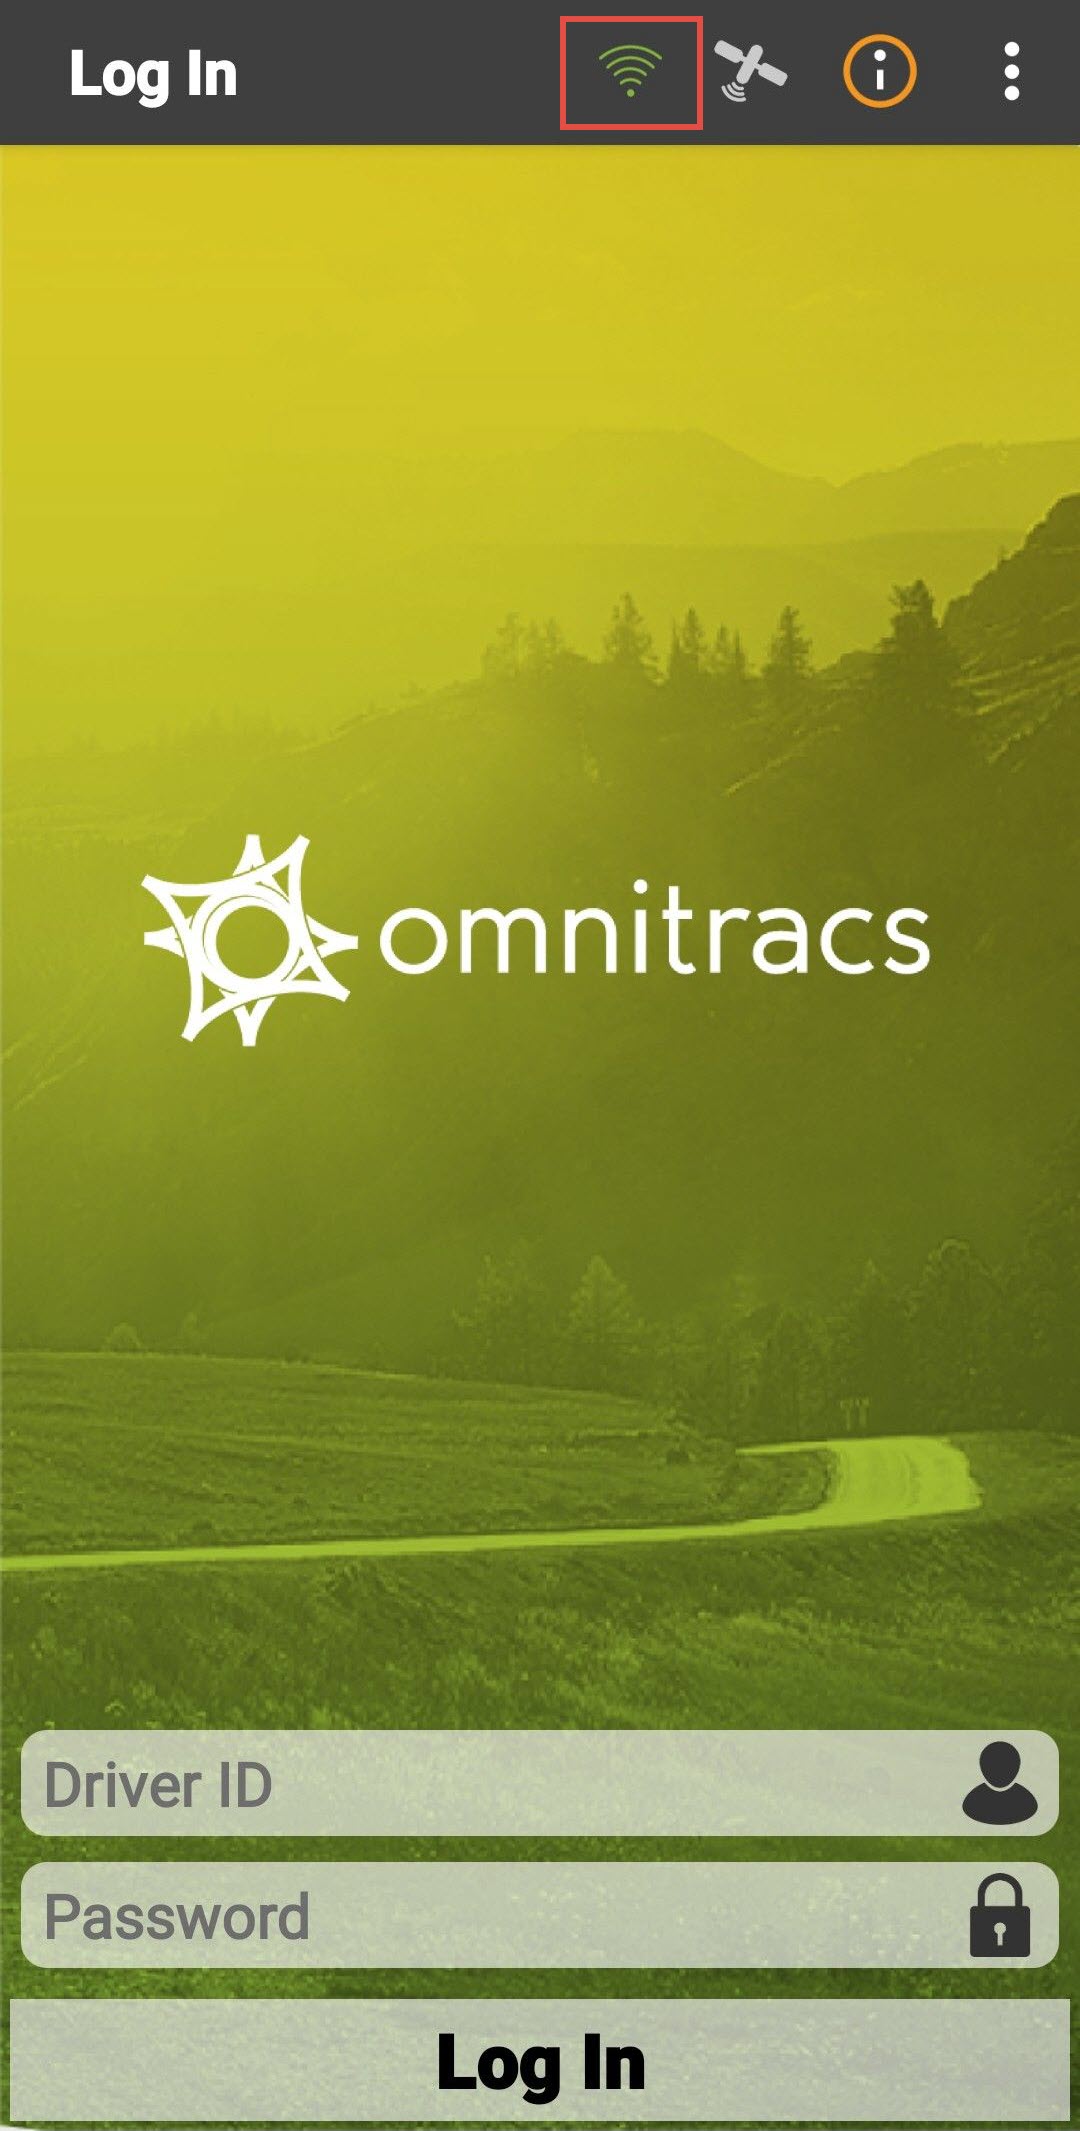
Note: When the icon indicates a weak connection, you may want to see if other networks are available.
Manually Refreshing the Inbox
Found in Roadnet Mobile for Android
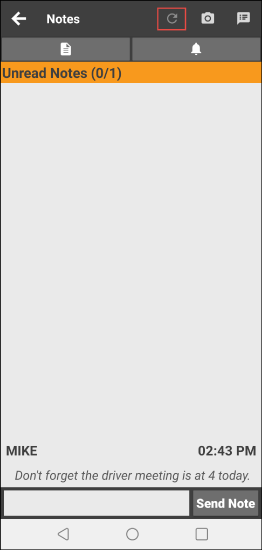
Workers can now manually refresh the Inbox, so that it is as up-to-date as possible. Typically, the Inbox is updated when an action is performed in Roadnet Mobile, such as sending a new note or arriving or departing a stop. Now, the worker can force an update. This will make it quicker for a worker to receive an expected message, such as when an Active Alert customer chooses to provide a contact-less signature.
Adding a Mid-Route Depot
Found in Roadnet Mobile for Android
If you already let your workers add unplanned stops to their routes in Roadnet Mobile, then they can now add mid-route depots as well. The ability to add depots has been added to the Add Stops region setting in Omnitracs. If your workers cannot already add unplanned stops to their routes and you would like them to have that ability, go to Administration > Region and add a new region or edit an existing region. Go to Phone Settings > Smart Phone - Allowed Worker Actions and check the Add Stops box. This will let your workers add both stops and depots to their routes.
On the mobile device, depending on settings, the worker may access this feature by pressing a Quick Action button at the top of the screen, pressing Menu and choosing it from the list that pops up, or pressing the Tasks arrow and finding it in the list. The worker taps Depot as the type of unplanned stop to add and then finds and taps the depot to add. Depending on settings, the depot is added as the next stop or to the end of the route.
Changing Regions on an iOS Device
Found in Roadnet Mobile for iOS and Tracking for iOS
If your drivers work in multiple regions, they need a way to change the region they are assigned to on the mobile device, so they can access all of the routes/trips available to them. Drivers are already able to do this on the Android devices. The ability for workers to change the region that they are working in has been added to iOS.
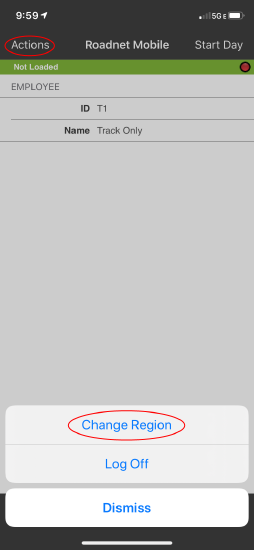
To change the region in Tracking for iOS, after logging in, the worker taps Actions and then taps Change Region from the menu that pops up. The Select Region screen displays with a list of regions with which the worker and mobile device are both shared. The worker taps the region to work in and the region is changed.
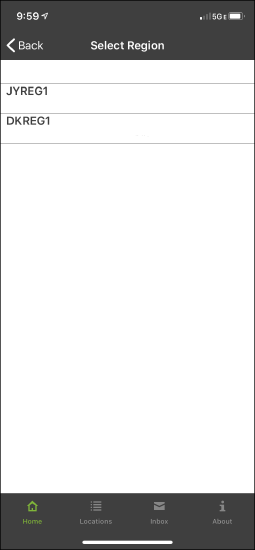
To change the region in Roadnet Mobile for iOS, after logging in, the worker taps Change Region. The Select Region screen displays with a list of regions with which the worker and mobile device are both shared. The worker taps the region to work in and the region is changed.

Mobile Manager
Updates to the Settings Page
Found in Mobile Manager
The Dashboard Settings screen and the options screen have been combined. The new Settings screen is accessed from the Overview screen and from the Change Region Context screen upon logging into Mobile Manager. This screen gives access to all the options and settings that were once available from both screens. From the Settings screen if you have permission, you will be able to change the business unit, region, and depot you are working in. You can also log out of Mobile Manager, report problems you have encountered back to Omnitracs, see the environment and server Mobile Manager is connected with, and access the Help files for the application.
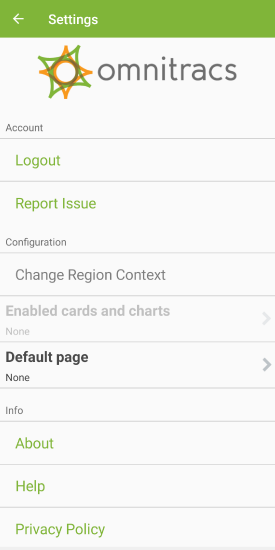
To personalize your Dashboard, you now tap the Enable cards and charts arrow on the new Settings screen. The screen that displays is the same screen that was once accessed from the overview options icon. Toggle the categories and/or specific information on or off, depending on which ones you want to see or do not want to see. Press Apply to update the Overview dashboard. Enable All will toggle all categories and all specific information on or off at the same time.
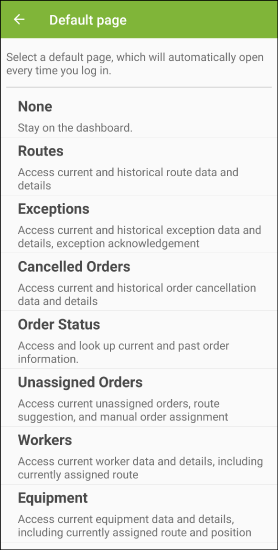
To change which screen displays immediately upon logging into Mobile Manager, tap Default page. On the Default page, tap the screen that you want to see each time the application opens. If you prefer seeing the dashboard with all the information, tap None. Tap the back icon to return to the Settings screen.
Note: You may need to log out of Mobile Manager and log back in for this change to occur.
Viewing HOS Information on the Worker Details screen
Found in Mobile Manager
A new screen has been added to Mobile Manager so that hours of service information can be shown with the current worker information. On the Workers screen, if you use Omnitracs Compliance, along with the Worker ID, Worker Name, Duty Status, Current Route State, Current Route, Current Equipment, and Motion State you will now see the worker's Duty Time Left. To see more details about a worker, press the worker for which you want to see information. Information about the worker, such as the Last HOS Update, Total Drive Time, Total Off-Duty Time, Drive Time Left, and Duty Time Left display.
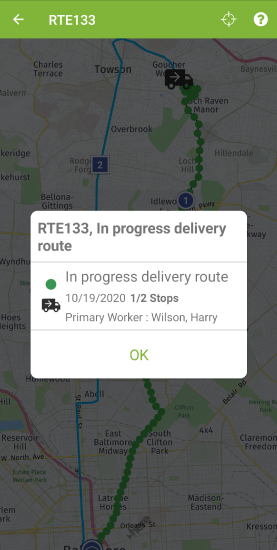
Map Updates in Mobile Manager
Found in Mobile Manager
To allow you to get information quickly, without leaving the map screen, information has been added as a pop-up over the map. Tap on a piece of equipment and see vehicle and worker information. Tap on a stop or depot and get specific stop information.
Drive
Declaration of Inspection
Found in Drive
In order to stay compliant with federal regulation, a declaration of inspection has been added to the DVIR, just before the driver signature. When signing the DVIR, drivers will see a statement that is appropriate for the asset type they are inspecting and the country where they are driving. They will se a statement similar to, "I declare that the vehicle shown above has been inspected in accordance with the D.O.T Federal Motor Safety Regulations." Signing the DVIR signifies that the driver performed the inspection.
Note: The declaration of inspection can be configured in Command, based on Asset Type.
Indicating a CTPAT Inspection is Complete
Found in Drive
If your company is part of the U.S. Customs and Border Protection voluntary supply-chain security program and requires that your driver's perform a Customs-Trade Partnership Against Terrorism (CTPAT) inspection prior to the vehicle being used, your drivers can now indicate that the inspection has taken place. By checking the appropriate box when completing a pre-, post-, and mid-trip DVIR, drivers can indicate that the CTPAT inspection has been completed.
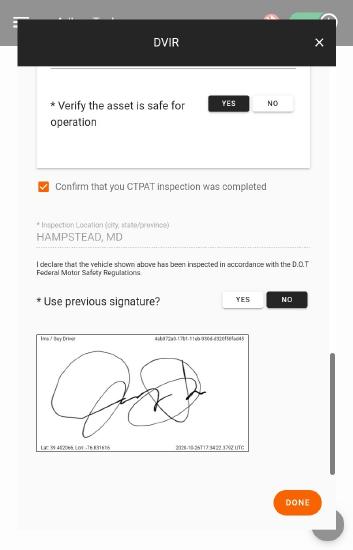
Note: Enable CTPAT Confirmation can be turned off or on in Command, on the DVIR task.
Basing Inspection Forms on Location
Found in Drive
Currently, the inspection form that loads when the driver opens a DVIR task is based on the asset type. If you have an asset type that is Vehicle USA, then the DVIR, also known as the inspection form, is the form created for USA vehicles. If your asset is Trailer Canada, the inspection form is the form created for Canada trailers. But, what if your driver takes a USA truck into Canada and the Canada inspection form is required? With the inspection form based on the asset type, there is no way for the driver to control which inspection form they complete.
So that the driver has control over which inspection form they complete, the inspection form is no longer tied to the asset type. The form that is loaded when the driver opens the DVIR task is now based on the actual location of the asset. If the asset is in Canada, the DVIR that is loaded is the Canada Inspection Form, even if the driver is in a USA_VEHICLE. The driver also has the option of changing the form that is being completed, based on what is required by the company. If the driver is in a USA_VEHICLE and the company wants a USA inspection, the driver can change the inspection form, even if the vehicle is in Canada.
- To change the Inspection Form type, tap Edit.
- For the asset type you want to change the form for, tap the Change Inspection Form arrow.
- Choose the inspection form you want to complete for the asset.
- Tap Continue to continue on to the DVIR.
.jpg?revision=1&size=bestfit&width=250&height=400)
Note: If you have more than one asset, you can choose the form for each asset type.
Completing Quebec DVIRs
Found in Drive/Command
Along with USA and Canada, Omnitracs has added Quebec to the list of inspection forms that can be completed for your vehicles and trailers. Asset types for QUEBEC_VEHICLE and QUEBEC_TRAILER are now available in Command, as well as inspection categories and inspection points specific to Quebec. When your drivers start a DVIR for a Quebec asset, the Quebec asset type displays at the top of the form, the Inspection Form type is for a Quebec vehicle, and as drivers move through the inspection, they will notice that the inspection points reflect the Quebec Inspection Form. Like USA and Canada DVIRs, the Quebec DVIRs are used with Omnitracs Compliance.
Note: All DVIRs display both the asset type and inspection form type at the top of the screen.
HOS Mobile
Canadian ELD Compliance
The introduction of changes to Omnitracs HOS Mobile in preparation for compliance with the Canadian ELD mandate provides for functionality in compliance with the Canadian ELD Technical Standards.
Over the next several releases, HOS Mobile will introduce additional Canadian ELD functionality that will culminate in the complete Canadian ELD application.
It is possible that HOS Mobile users will have complete Canadian ELD functionality before Omnitracs receives third-party certification.
Please note that the Canadian ELD mandate effectively replaces paper logs and requires federally regulated motor carriers to equip their vehicles with compliant, third-party-certified ELDs on or before June 12, 2021. Once the device is certified, the certification body will provide Omnitracs with a certification number. Omnitracs will embed this number in the ELD software in the appropriate data field.
Personal Conveyance Continues if Bluetooth Connection Lost
If a driver in an ELD vehicle is using Personal Conveyance and the Bluetooth connection is lost while the vehicle is in motion, the Personal Conveyance will continue automatically if the connection is restored while the vehicle is still in motion; the driver will no longer receive a prompt to continue PC.
If the vehicle is not in motion when the connection is lost, the driver will still be prompted to continue PC after the connection is restored.
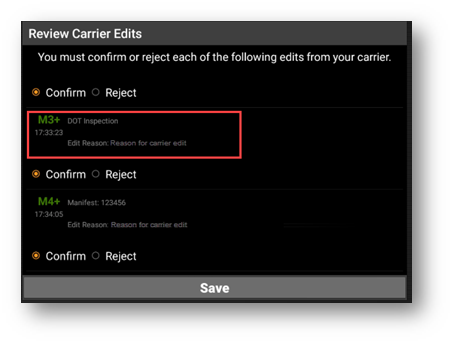
Carrier Edits Show Edit Reason and Comments
When logs are edited on the host and sent to the mobile as pending edits for the driver to review, the Edit Reason for each edit is now included on the Review Carrier Edits screen so drivers understand why the changes were made and can better determine if they should confirm or reject the change.
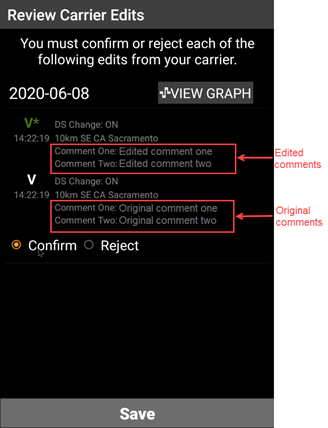
Similarly, when duty status comments are edited in the host, the screen displays both the original comment and the edited comment so the driver can see what changed.
If two comments were edited for the same duty status, they are displayed in separate rows.
Updates to Big Day Extension
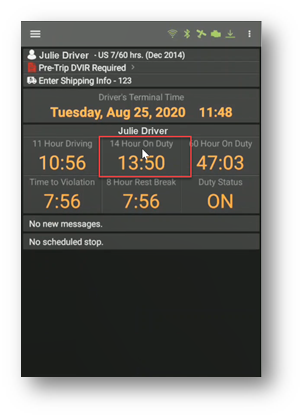
In order to give drivers greater flexibility, those who are eligible for the Big Day extension can now select Big Day at any point in their shift after they have gone on duty. They can also cancel it during the duty tour in which it was selected if they end up not needing it. Previously, once Big Day was selected, the driver could not cancel it.
When the driver cancels the selection, the Big Day event does not appear on the driver’s mobile log and the extension will still be available for the driver to use on subsequent days.
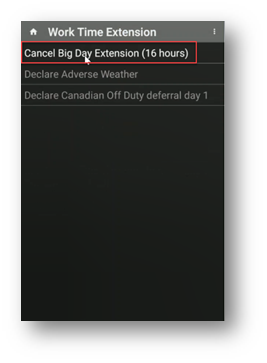
To cancel Big Day:
- From the HOS Log screen, select the kebab (three-dot) menu in the upper right corner of the screen, then select Options.
- From the Options menu, select Enter Work Time Extensions, then Cancel Big Day Extensions (16 Hours).
- When prompted, select Yes to cancel the extension.
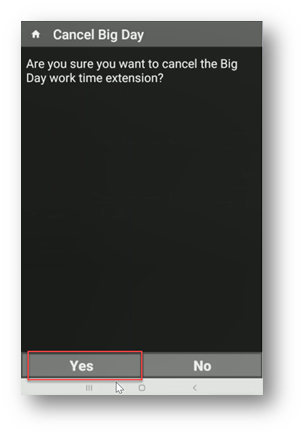
A new screen confirms the cancellation. - From the confirmation screen, select OK to return to the dashboard. The On Duty clock now correctly reflects 14 hours instead of 16.
Performance Monitoring
New Performance Monitoring Permission
Found in Omnitracs Web
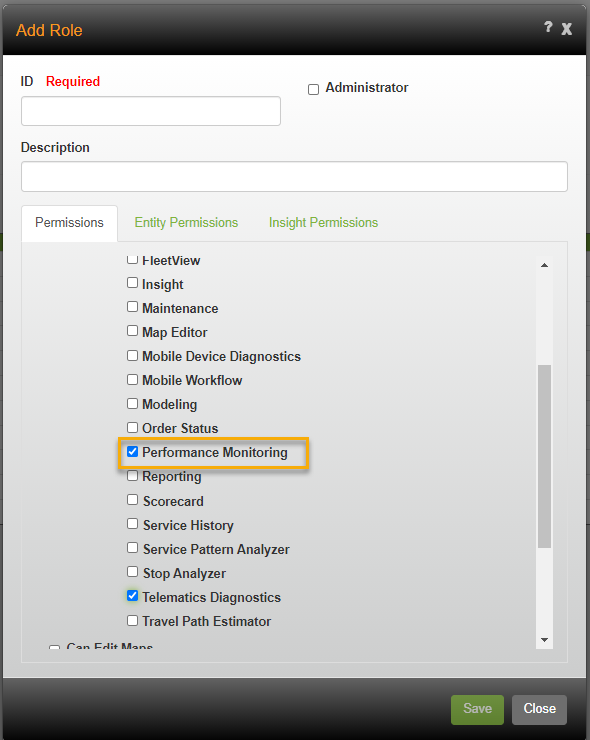
You may not want all your users to be able to view the data in the Performance Monitoring component. Now, you can specify whether a role has access to Performance Monitoring or not.
Click on the Administration icon to open Administration. Click the green button and select Roles; open the Roles window. On the Permission tab, check Can Use Omnitracs Web Portal, then select Can Use Selected RIC Web Components. Check Performance Monitoring. Complete the rest of the information for the role as necessary, then click [Save].
Web Services
Conditionally Requiring A Signature
Found in Web Services and Roadnet Mobile for Android
If you use web services along with Roadnet Mobile for Android, you can now specify which orders do or do not require signatures. A new field, DisallowSignature, has been added to the Task entity. You can set this field to true or false when an order is created. If you set it to true, the Signature task will not be available for that stop in Roadnet Mobile.
Note: If there are multiple orders for a stop, and at least one DisallowSignature is set to false, the worker will be required to collect a signature for the stop.
Centralized Messaging
Sharing Mailing Lists Across Regions
Found in Centralized Messaging
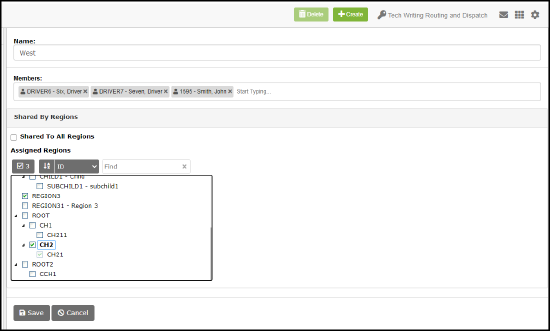
If you have more than one region and share other management tasks across those regions, it is likely that you will also send the same message to recipients across those regions. Rather than recreate the same message or similar mailing list in each region, Omnitracs now lets you share mailing lists across multiple regions. Like other items that are shared to multiple regions, when creating a mailing list, check the Shared to All Regions box. This will allow the mailing list to be seen and used in all of your regions. If you want to select specific regions to share the mailing list with, simply check the box for those regions.
Miscellaneous
Choosing the Path Calculation Method
In the past Omnitracs has calculated a vehicle's travel path using the shortest time between two points, allowing the driver to arrive at the destination as soon as possible. But, what if your business model pays the driver for the total distance driven, not the time spent driving? In this case, you want the driver taking the shortest distance between two points, even if it means the driver will arrive at the destination later. Now, you can choose whether you want the paths calculated using the shortest time or the shortest distance.
Notes: The Path Calculation Priority selected affects all paths calculated in the region, including when routes are created, driver directions are generated, or you choose a shortest path between two points on a map.
Changing the way your paths are calculated can create significant differences in the routes that are created.
- Click on the Administration menu and scroll to Region. The Regions list opens.
- Click the Add icon, or select a region and click the Edit icon. The Region window opens.
- Click the General tab, then Operational Settings. The Operational Settings window opens.
- In the Path Calculation Priority box, choose whether the paths should be calculated using the Shortest Time or the Shortest Distance.
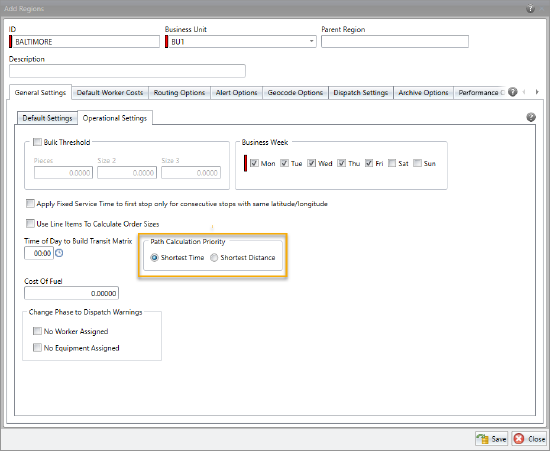
- Click [Save].
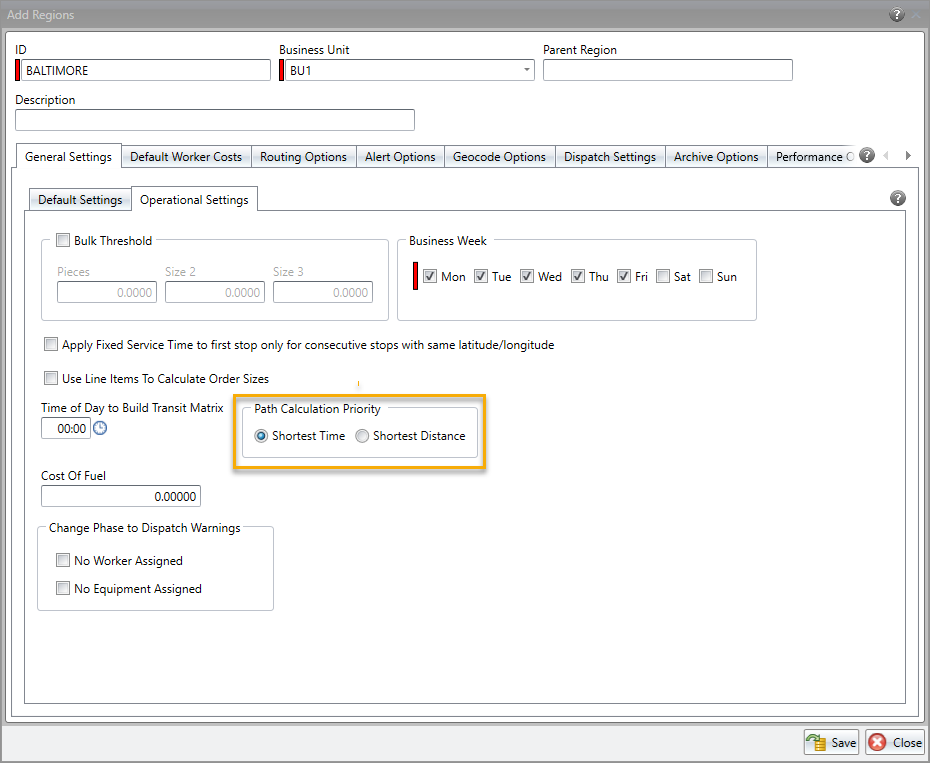
New, Built In Assistance Available
Omnitracs has implemented a digital adoption platform that allows us to provide announcements of upcoming release directly in the application, as well as providing guided tours to help you when setting up your system.
When there is an announcement about downtime or an upcoming release, a banner appears when you log in to Omnitracs.
To access the guided tours and help system, click the Need Assistance button at the top of the screen.
The help menu opens. From the Help menu you can access the online help system and other items you may find useful.
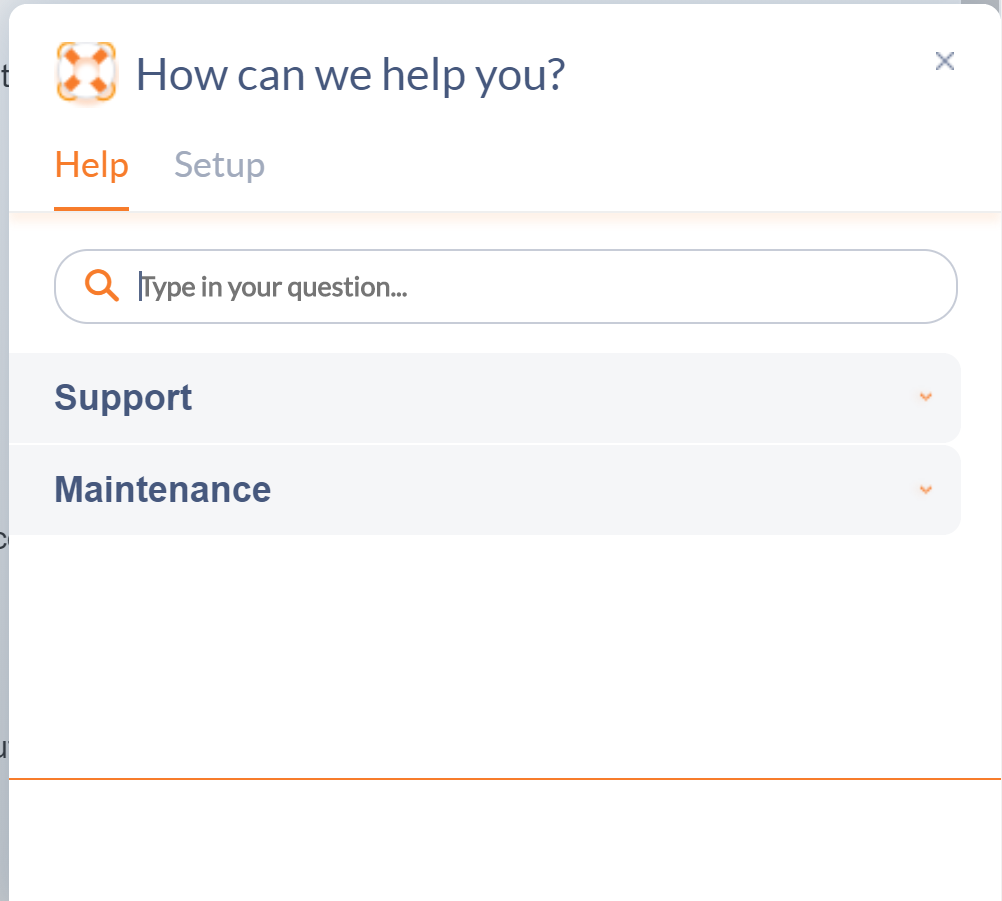
From the Setup menu, click an option to start a guided tour. You will be directed through the steps you need to take, as well as the required fields you need to complete.
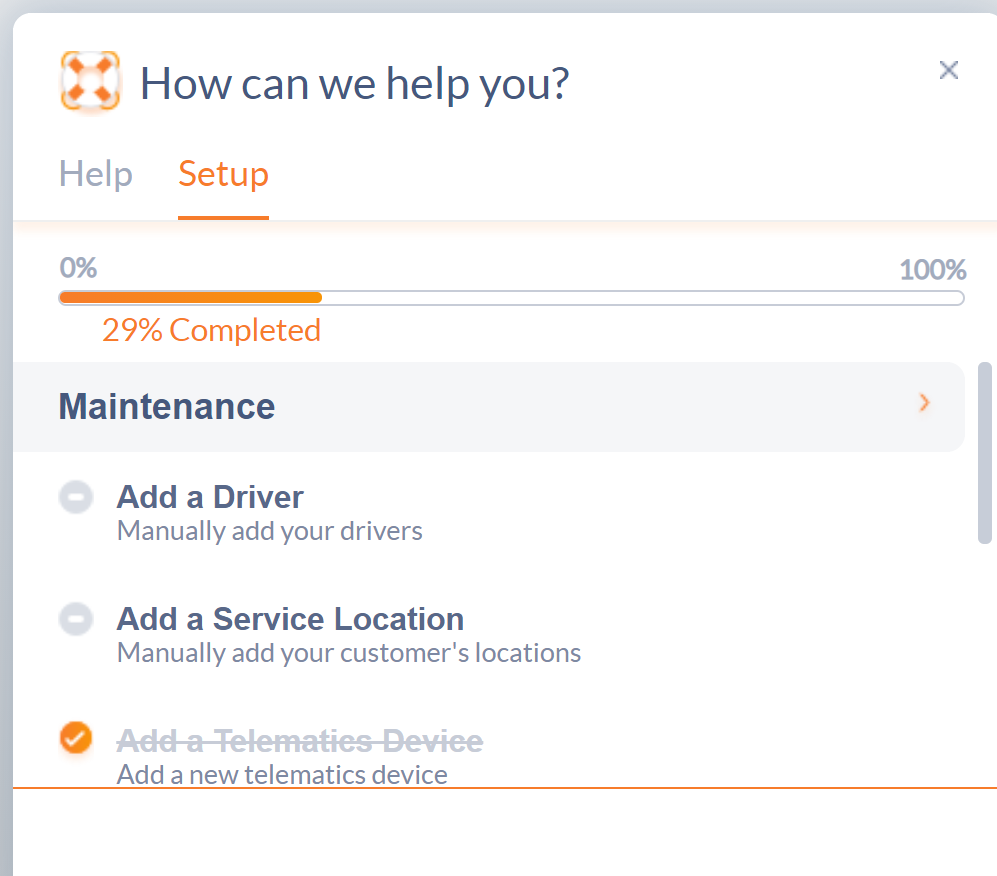
The guided tour walks you through how to set up needed items in Omnitracs, including what fields need to be completed.
Command
Removing Stop Rating from an End Task
In Drive, the driver is able to rate stops and trips when completing the end tasks. But, not all organizations want their drivers to rate stops. Now, you can select whether or not drivers have the option to include a rating when completing an end task.
- Click on the Workflow you want to change. The workflow opens.
- Click on Task Library, then End, End Day, or End Trip. Uncheck Show Stop rating; the stop rating will no longer appear as part of that task.
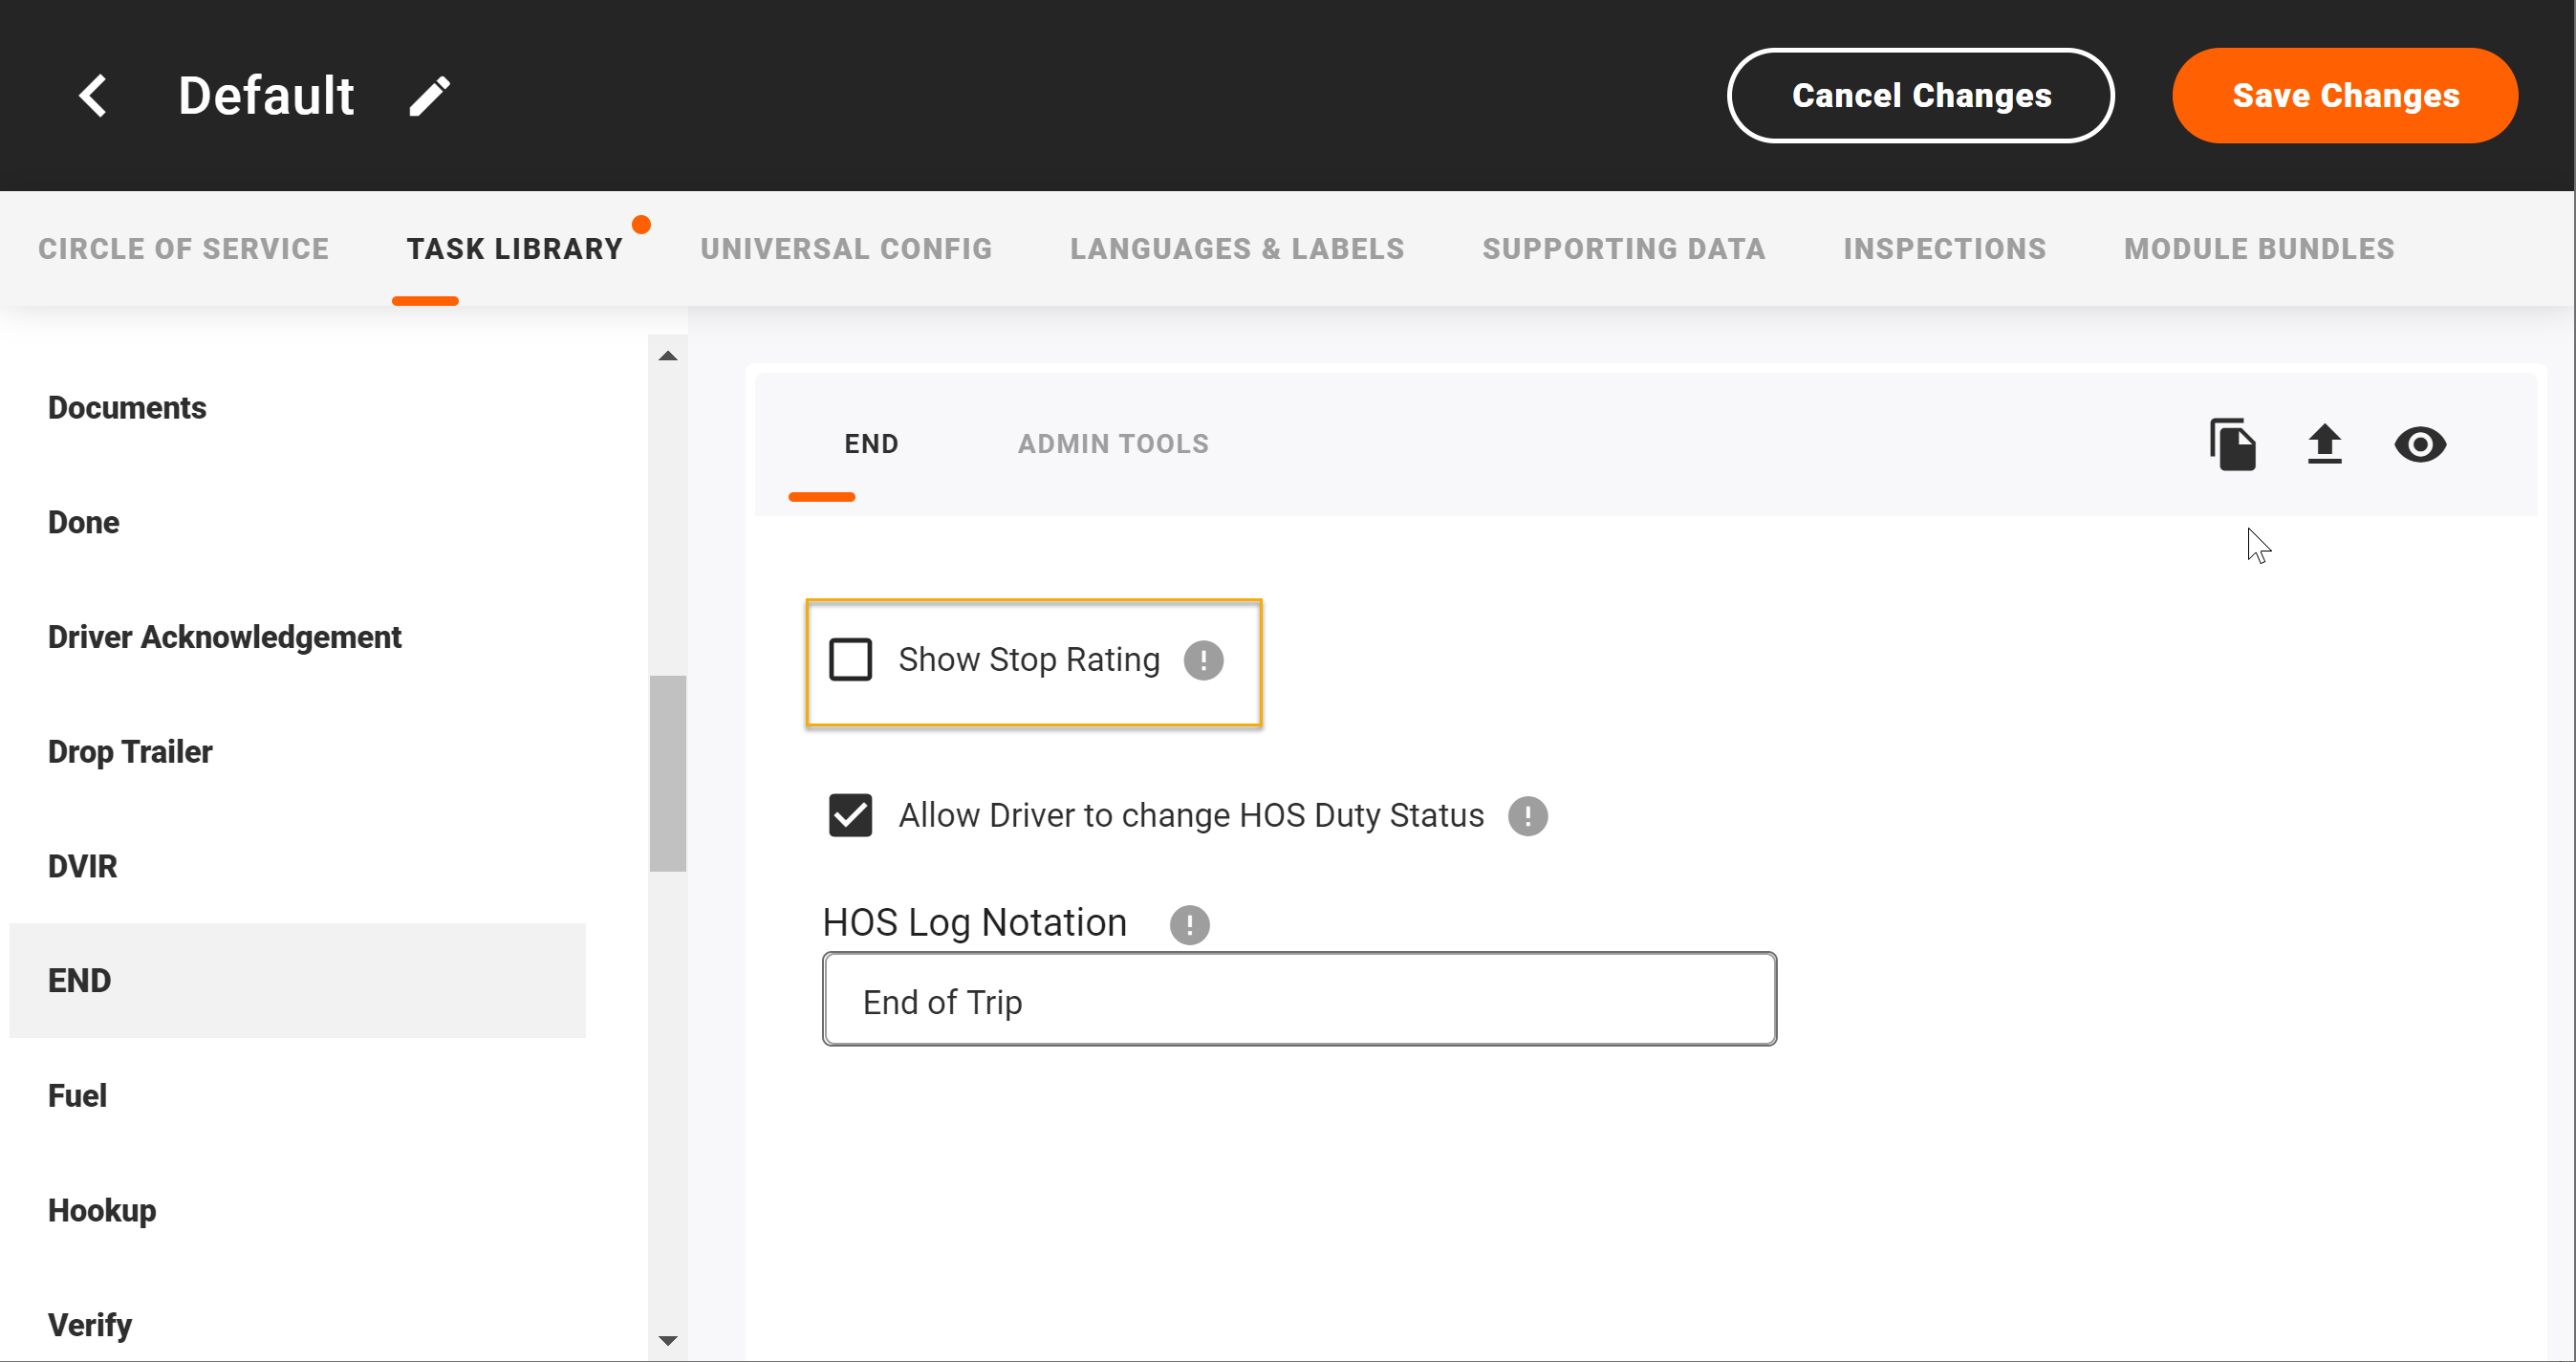
- Click [Save Changes].
Software Corrections
| Issue key | Release Notes | Components |
|---|---|---|
| RPE-12528 | There was an issue preventing the Home button in the widget from responding properly. This has been corrected. |
ActiveAlert |
| RPE-12526 | There was an issue that could prevent the map from opening properly in the widget. This has been corrected. | ActiveAlert |
| RPE-12437 | There was an issue that was causing some permissions for Compliance customers to disappear after an upgrade. This has been corrected. | Admin |
| RPE-13412 | The label for the Short Haul Exemption Air Radius Warning on the Region - HOS Settings Exmptions page has been updated to reflect the fact that the air radius is now 150 miles. | Admin |
| XRS-10 | When the Operation Summary Report was grouped by vehicle and included history, duplicate vehicle IDs sometimes appeared in the report. This issue has been resolved. | Compliance |
| XRS-1658 | The ELD Driver Log Report sometimes showed duplicate events (usually Engine Power Up or Engine Shut Down events). In addition, reports showed that some drivers were getting stuck in Drive status for extended periods even though they were off duty. Both issues have been resolved. | Compliance |
| XRS-4071 | On occasion, a state was included in the IFTA Official Report even though that state had no driving activity or fuel consumption data during the selected time period. This issue has been resolved. | Compliance |
| XRS-4154 | The ELD Driver Log Report was sometimes duplicating the ID in the Shipping ID field. This issue has been resolved. | Compliance |
| XRS-4168 | At times, when users recalculated a driver's log to correct a false violation, they received an "unhandled exception" error message and could not save the recalculated log. This issue has been resolved. | Compliance |
| XRS-4338 | When customers tried to upload a Comdata fuel file, the upload sometimes failed because the Comdata Card Number column included letters and the import tool only allowed numeric values in this column. The import tool has now been updated to allow letters in this column. | Compliance |
| XRS-4349 | TChek fuel files provided by the vendor sometimes include "WEBGEN" listed as a state or province. As a result, fuel file imports were failing because the import tool did not accept this value as a valid location. The fuel file import tool has now been updated to ignore rows that list “WEBGEN” as a location so users can successfully upload their fuel file data. | Compliance |
| XRS-4351 | An issue that sometimes caused the Starting and Ending Odometer values to double in the Fleet Report By Vehicle has been resolved. | Compliance |
| XRS-4352 | Previously, users were only able to save Scheduled Reports that had a Date Range of fixed. This issue has been resolved. | Compliance |
| CEV-1153 | At times, alert emails were being sent to users outside of the "Distribute to Users" list. This issue has been resolved. | Critical Event Video |
| CEV-275 | CER alert email messages now correctly include the name of the organization the vehicle belongs to. | Critical Event Video |
| RPE-10406 | An issue preventing Send Orders export files to list Line Items in sequence by identifier has been resolved. | DataTransfer |
| RPE-8126 | The import template for Telematics devices was missing some Navigation related fields. This has been corrected. | DataTransfer |
| RPE-12472 | An unexpected error was reported when viewing a specific route details in FleetView. This issue has been resolved. | Dispatching |
| RPE-13151 | There was an issue that caused an error when attempting to adjust a canceled stop by drag and drop to a stationary position. This has been corrected. | Dispatching |
| RPE-12981 | An issue was discovered where custom route exceptions that are triggered after a route's projected completion time were being deleted when the route was finally completed. This has been resolved. | Dispatching |
| RPE-10477 | The Centralized Messaging Mail List permissions text appears correctly and the Save, Delete and Create buttons are enabled or disabled accordingly. | Centralized Messaging |
| RPE-10422 | If the TripLens module is purchased without any TripLens add-ons, the functionality Order Cancel Reason Codes and Quantity Reason Codes will not be available in Web Maintenance. | Dispatching |
| RPE-12607 | Updated reset trip handling by using the new MA resetTrip endpoint. | Drive |
| DCMD-3963 | Users can now reset trips in Dispatching and the updated trip will be received in Drive. | Drive |
| DVIR-309 | The license plate state/province and number will now be displayed on post trip DVIRs if the driver previously inspected the equipment during the trip. | Drive |
| DCMD-4079 | There was an issue that could prevent a task from completing properly. This has been corrected. | Drive |
| DVIR-299 | Trailers added to trips during the pre trip DVIR were not appearing in the HOS header after the DVIR was completed. This has been corrected. | Drive |
| DVIR-298 | There was an issue that could prevent the license plate state/province and number from appearing on the Inspection Summary. This has been corrected. | Drive |
| DVIR-356 | Inspection asset types, categories, and points can now be localized and shown in the language selected by the driver on the device. | Drive |
| DCMD-3549 | Drive now supports the CoPilot 10.14.0.549 CPIK. | Drive |
| DCMD-3379 | There was an issue that was allowing the driver to click the Done button on the signature capture screen before the data was stored. This has been corrected and the Done button is not available until the signature is stored. | Drive |
| DCMD-3962 | The addTrailer API has a new licensePlate parameter. | Drive |
| DCMD-3953 | There was an issue preventing users from adding an unplanned stop in Drive if more than one trip was loaded on the tablet. This has been corrected. | Drive |
| DCMD-3951 | Drivers can now complete a stop that was added after the trip was completed. | Drive |
| DCMD-3946 | There was an issue that was causing trips to auto arrive and auto depart stops, even when the settings were turned off. This has been corrected. | Drive |
| DCMD-3933 | Drivers will no longer be allowed to enter dates and times that occur in the future when completing Arrive and Depart tasks. | Drive |
| DCMD-3889 | There was an issue that was causing an incorrect error message to be shown when the driver entered an invalid location on the bulk load screen. This has been corrected. | Drive |
| DCMD-3887 | There was an issue that was allowing the driver to move forward even when the net weight was 0 on the bulk load screen. This has been corrected. | Drive |
| DCMD-3882 | There was an issue where waypoints were being completed when the trip was started, rather than when the stop was arrived. This has been corrected. | Drive |
| DCMD-3845 | There was an issue preventing third party applications from launching properly. This has been corrected. | Drive |
| DCMD-3056 | In Edit Location, if you reset the location to what was detected, it will remove the custom location from the task data | Drive |
| DCMD-3055 | When editing locations, the map style setting was not being remembered properly. This has been corrected. | Drive |
| DCMD-3125 | There was an issue that could cause the wrong information to appear in the Stop Name on the End Task screen. This has been corrected. | Drive |
| DCMD-3907 | There was an issue where, if the trailers property was not set on a trip document, the resulting task data was an empty string. This was corrected so that the trailers property on task data returned will either be null or an object. | Drive |
| DCMD-2914 | There was a change to the lockout process when an incorrect password was entered trying to log into Command. Now, a locked out user can have an administrative user re-activate the account, or once the specified amount of time has passed the user will be able to log in. The default amount of time is 5 minutes. | Drive |
| DCMD-2050 | An line indicating if the CTPAT inspection was completed has been added to the Previous Inspection screen. | Drive |
| DCMD-3197 | The Display Time setting has been removed from the Workflow User Prefs in Command. The time setting from the Android device is now used in Drive. | Command |
| DCMD-3146 | The Enable Task Setting option on Documents in Comand no longer refers to photo editing. | Command |
| DCMD-2049 | Drivers can now indicate if the CTPAT inspection was completed as part of the DVIR task. | Drive |
| DCMD-1703 | There was an issue preventing the Product Bundle from showing properly in the About screen. This has been corrected. | Drive |
| DCMD-1184 | When adding an order, drivers can now scan a barcode to easily record the order number. | Drive |
| RPE-12026 | There was an issue that was causing users to get an error running some KPIs if their browser used a culture that listed the day before the month in a date. This has been corrected. | Insight |
| RPE-12970 | Times were not accurately reflecting Daylight Savings Time in Australia. This has been corrected. | Miscellaneous |
| XRS-1866 | If the mobile device could not establish a cellular or WiFi connection when it was powered up, when the driver opened HOS Mobile they received a message saying the device could not automatically get the phone number from the device. This has been corrected. | HOS Mobile |
| XRS-374 | At times a vehicle or trailer appeared on the ELD Driver Log report although the driver did not associate to that vehicle or trailer on the report date. This has been corrected. | HOS Mobile |
| XRS-3866 | DriveWyze alerts now correctly return users to the application from which they opened DriveWyze (such as Drive or Omnitracs Navigation). | HOS Mobile |
| RPE-11997 | There was an issue that would prevent a user from being able to unload a route if the route contained stops, or groups of stops, that had large amounts of data. This has been corrected. | Mobile |
| RPE-10064 | Omnitracs Mobile Manager will now display routes that have Maintenance stops. | OmnitracsMobileManager |
| RPE-10048 | "Default Page" section is added to the settings screen. Selecting a page there will make it open automatically upon next login. | OmnitracsMobileManager |
| RPE-11978 | The "session" context now matches the user's default perspective when user changes regions. If the user's perspective is set to 'Routing', then the latest routing session is active. | Planning |
| RPE-8621 | When there were selected recurring orders on the Strategic Planning manifest selected, hiding the unassigneds using the map options resulted in the map, picklist and manifest grids not properly syncing. This has been corrected. | Planning |
| RPE-11041 | In the Recurring Orders window, the total summation for fields, Total Cycle Quantity Size1, Size2 and Size3, is now computed and displayed correctly. | Planning |
| RPE-11312 | An issue with Create Territories whereby the process did not finish was identified as a divide by zero error because the available equipment type had size 1 capacity of 0 and the primary size selected for creating territories was size 1. Note that a valid capacity for available equipment type/s is required by Create Territories. | Planning |
| RPE-8313 | Previously, running Unplot All in strategic planning did not sync the map and grids properly. Unassigneds would be deselected on the map, but remain selected in the grids. This has been corrected. Unplot All no longer deselects the Unassigneds on the map. | Planning |
| RPE-12969 | There was an issue when trying to delete planning sessions. This has been corrected. | Planning |
| RPE-12521 | There was an issue that would cause the application to crash when trying to change a custom perspective. This has been corrected. | Routing |
| RPE-11318 | There was an issue that was causing the Total Distance for some routes to show as 0, although the route's stop list showed distances. This has been corrected. | Routing |
| RPE-11122 | An issue was discovered when dynamically routing a large number of orders in a multi-day routing session that already contained existing routes. Optimizations were made to the algorithm to do a better job of handling such a scenario and improve the performance of creating routes. | Routing |
| RPE-11059 | Saving worker's overtime hours begin from REST API will now convert from seconds and this will correct the display discrepancy after updating the worker's overtime hours begin with the same REST call. | Routing |
| RPE-9983 | Labeling on the Hazardous Materials classes on Shortest Path->Options->Load Attributes dialog in Fleetview has been updated. This was done to be consistent with US DOT/FMCSA categories for Hazardous Materials. | Routing |
| RPE-9329 | Labeling on the Hazardous Materials classes on Shortest Path->Options->Load Attributes dialog in Fleetview has been updated. This was done to be consistent with US DOT/FMCSA categories for Hazardous Materials. | Routing |
| RPE-9274 | Previously, running Update Passes from the Routing Pass Templates context menu was not working properly in some instances. This has been corrected. | Routing |
| RPE-8795 | Previously, lassoing a route templates mistakenly displayed related reloads and layover locations in the picklist. This has been corrected. Only the stops on the route template are displayed. | Routing |
| RPE-8461 | Previously, the service radius on service location could not be updated using Replace. This has been corrected. | Routing |
| RPE-10236 | REST Web Services now allows integrations to assign Open/Close and Service Window Overrides at the Task level of Orders for both DailyPlan/RoutePlan and DailyPlan/Orders. | WebServices |
| RPE-9667 | The ArrivalCoordinate has been added to the StopPropertyOptions class so that you can retrieve a stop's actual latitude and longitude. | WebServices |
| RPE-8730 | There was an issue that could prevent the equipment and equipment type from being properly identified when retrieving a stop event. This has been corrected. | WebServices |
| RPE-12803 | There was an issue that could cause users to receive an error when updating equipment using a Patch call. This has been resolved. | Web Services |
| RPE-12818 | A new equipment status API has been added to the REST services. | Web Services |
| RPE-12966 | There was an issue where a blank screen appeared when relaunching Omnitracs Navigation after a map download. This has been corrected. | Navigation |
| RPE-12826 | There was an issue that occasionally prevented Omnitracs Navigation from properly routing to a stop requested from another Omnitracs system. This has been corrected. | Navigation |
| RPE-12759 | In landscape orientation, when panning or tapping over the gray area of the table list of POI Search Result split page, then the map is panned | Navigation |
| RPE-12336 | When routing to a POI, the audible message did not say the location name while mentioning the destination address. This has been corrected. | Navigation |
| RPE-12327 | In the turn by turn audible message, Omnitracs Navigation was using abbreviations like ST instead of Street. This has been fixed. | Navigation |
| RPE-12283 | Fixed the defect where the Search and Drag to map select options were visible behind the route page. | Navigation |
| RPE-12267 | Fixed the issue of Omnitracs Navigation getting stuck in Loading please wait page. | Navigation |
| RPE-12244 | Fixed the issue where Omnitrac Navigation was not routing to the destination that was requested by other Omnitracs applications. | Navigation |
| RPE-12097 | The default view that opens when Omnitracs Navigation is launched from another Omnitracs application has been updated. Now, the default view is 3D heading and zoomed in. | Navigation |
| RPE-12021 | Some POI data was missing in the POI search results. Fixed with 2020.3 map data | Navigation |
| RPE-11933 | There were several map rendering performance and drawing changes to improve performance and reduce user distraction while maps were being drawn. | Navigation |
| RPE-11851 | Fixed the issue where there was a delay in showing the route (blue) line in Omnitracs Navigation. | Navigation |
| RPE-11806 | The zoom buttons have been removed the from the Destination preview page. | Navigation |
| RPE-11609 | After arriving at a location, Omnitracs Navigation closes the arrival notification ( in the dialog box), before Drive comes to the foreground | Navigation |
| RPE-11555 | There were changes made to improve performance when the user changed orientation. | Navigation |
| RPE-11553 | Changes were made to reduce the chances that users would need to wait when making quick changes to the screen orientation. | Navigation |
| RPE-11552 | Several changes were made to the performance and stability when users changed the screen orientation. | Navigation |
| RPE-11395 | There were times when the "Loading Orientation" message would not disappear when changing orientation. This has been corrected. | Navigation |
| RPE-9485 | The driver now receives an audible message when a route is calculated or recalculated. | Navigation |