Roadnet Anywhere 5.7 - New Features & Enhancements
Note: Some of the options described below are purchaseable and may not appear. Contact your Omnitracs sales representative for more information about acquiring additional features.
Common
- As Roadnet Anywhere Web has grown over the years, adding more and more components, the portal has become more crowded with icons. To make it easier to find specific components, the component icons have been organized into two sections: Administration and Applications. The Administration section has the components you would use to set up the system, including Administration, Maintenance, and Mobile Workflow. The Applications section contains the components you use on a day to day basis, such as FleetView and Order Status.
Routing
- You can now create routes that consider the different types of compartments on your equipment, and product that can be loaded into each type of compartment.
- You can include category information when importing a routed solution.
- You can set a priority for individual orders to indicate those orders need to be serviced earlier in a route.
- You can open multiple route maps simultaneously.
- You can now see the service location's service time type and service window type in the Stop list.
- You can manually split orders so that they are better able to fit on routes.
- You can set automatic order quantity and urgency increases for each day that an order is not serviced.
Dispatching
- Several enhancements were made to the timeline and stop list in FleetView to make it easier to track your routes.
Order Status
- You can now filter on regions in Order Status.
- You can export the Orders list to a .csv file.
Service History
- You can now filter on regions in Service History.
Active Alert
Telematics
- You can now have the driver alerted when the key fob is not activated.
Strategic Planner
- You can now have breaks, waits, and layovers transfer to a new session when you transfer a territory.
- You can temporarily regeocode a stop on a route.
- You can have Strategic Planner ignore the travel time and distance to the first stop when routes are created.
- There is a new Session Analysis report that lets you compare the results of re-routing a planning session.
Roadnet Mobile
- Messaging in Roadnet Mobile for Android now automatically marks new notes and new alerts as acknowledged and new messages as read when the worker views the tab.
- You can require the worker to confirm that the correct reason code is assigned when canceling a stop or order. This also allows the worker to change the reason code if it is not correct.
Roadnet Tracking
- Roadnet Anywhere Tracking routes without an Origin depot assigned to them use the first stop as the Origin depot.
- Roadnet Anywhere Tracking iOS workers can now add stops.
- The worker can take a picture to send with a message in Roadnet Anywhere Tracking for iOS.
Roadnet Mobile Manager
- You can now view information for more than one region at a time in Roadnet Mobile Manager.
- You can now see the status of your orders.
- Time window information for routes has been removed from the dashboard due to performance issues.
Insight
- You can now see Omnitracs Navigation events in Insight.
- You can now save a KPI even if it contains errors that prevent it from displaying information.
- You can use the Stop Sequence Score to determine if the worker deviated from a route's planned stop sequence.
Omnitracs Navigation
- You can now search for a city and street address from the same search screen.
- You can search online for a city or address, if Omnitracs Navigation cannot find it from within the application.
- Enhancements were made to improve your navigation experience.
- Several enhancements were made to the Mobile Device editor to make it easier to add a mobile device.
- Workers can view a simulation of the trip on their mobile device.
- The size of each map dataset is now displayed on the Region - Omnitracs Navigation - Map Dataset Regions page so that you can determine how much data will be downloaded and stored on the mobile device.
Compliance
- There have been some enhancements to the UVA window to make it easier to assign UVA to the proper driver.
Compartment Routing
The configuration of your equipment depends in part on what you are transporting. For instance, if you deliver food products, you likely have ice cream or other items that need to be kept frozen, but you don't want the fresh produce to be loaded in the same area of the truck. Now, using Roadnet Anywhere you can define compartments on your equipment, what type of product can go in each compartment, and use this information when your routes are created.
Some features of compartment routing:
- You can create product types and associate them with your SKUs.
- You can create compartment types and assign them to equipment types.
- The product type ID and/or description have been added to the Unassigneds and Line Item lists, so you can see what product types are on the line items or orders.
- You can have Roadnet Anywhere load your SKUs in compartments when creating routes.
- You can have Suggest Route ignore compartment capacity and matching when suggesting possible routes for orders.
- You can have Roadnet Anywhere ignore compartment capacity and matching when editing routes.
- You can have Roadnet Anywhere ignore compartment capacity and matching when importing orders and adding them to existing routes.
- You can choose to be alerted when a route breaks a compartment related routing rule.
- You can see the information about how much a compartment is loaded and what is is loaded in the Compartment Details view and Routes lists.
Working with Product Types
Product types let you organize your SKUs into groups that can be placed in the same compartment. For instance, you may have a product type of Frozen for items that need to be in a freezer compartment, and another product type of Dry that could go in any compartment. Once you have created your product types, you need to associate the SKU with the proper product type, and define which product types can go in each compartment type.
1. Click the Maintenance menu and scroll to Product Types. The Product Types list opens.
2. Click the Add icon to add a new product type, or select an existing product type and then click the Edit icon. The Product Type window opens.
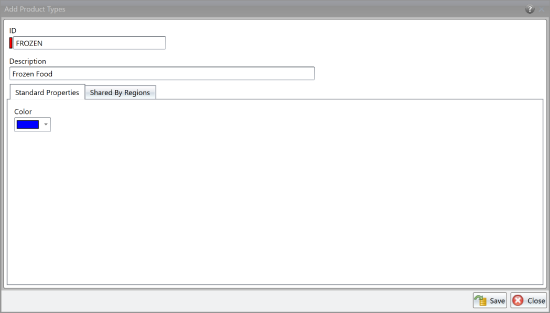
3. Enter an ID and Description for the product type. You must enter an ID.
4. On the Standard Properties tab, click the color arrow to open a color palette. Click on a color to associate with the product type.
5. If the product type can be shared with other regions, click the Region Sharing tab. Select the regions that can use the product type.
6. Click the [Save] button.
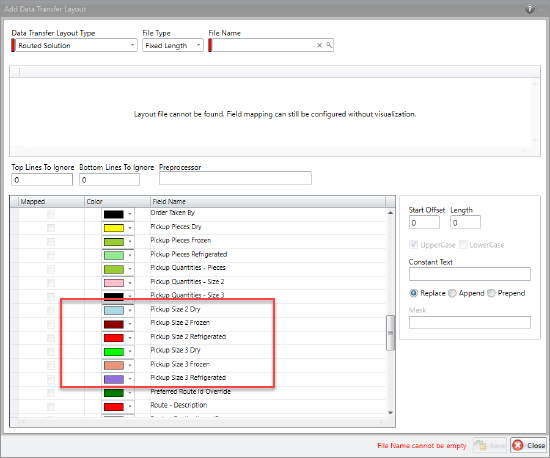
You can import your product types; simply create a product type data transfer layout that defines where the information is located in your import file. The possible fields are described in the table below.
| Field | Required | Max. Length/Range | Description |
|---|---|---|---|
| ID | Yes | 32 | Unique identifier for the product type. All letters must be in uppercase and there can be no spaces or special characters. |
| Description | No | 256 | A description of the product type. |
| Delete | No | N/A | Enter a T, True, Y, Yes, or 1 to delete the product type. Enter F, False, N, No, 0, or leave the field blank if you do not want to delete the product type. |
| Shared To All | No | N/A | Enter a T, True, Y, Yes, or 1 to indicate the product type is shared with all regions. Enter F, False, N, No, 0, or leave the field blank to indicate the product type is not shared with all regions |
Associating a SKU with a Product Type
Once you have created your product types, you need to associate SKUs to the product type so that they are placed in the proper compartment type when routes are created.
1. Click the Maintenance menu and scroll to SKUs. The SKUs list opens.
2. Click the Add icon to add a new SKU, or select an existing SKU and then click the Edit icon. The SKU window opens.
3. Enter the ID, Description, and other information for the SKU.
4. Click the Product Type arrow and choose the proper product type for the SKU.

5. Click the [Save] button.
| Field | Required | Max. Length | Description |
|---|---|---|---|
| Product Type ID | No | 32 | The identifier of the product type associated with the SKU. Product types are only needed if you are routing equipment with compartments. The product type must exist. |
If you need to make the same change on multiple product types, select the product types you want to change, then right-click and choose Replace from the menu that pops up. The Replace window opens. Make the proper changes, then click the [Save] button.
Working with Compartment Types
If you are going to use compartment routing, you need to create compartment types and specify which product type(s) can be loaded in each compartment type. You are able to select whether SKUs of different product types can be mixed in a compartment type.
Once you have created compartment types, you must add compartments to equipment types to indicate what compartments each equipment type contains. When adding compartments to equipment types you will be able to specify the size, or range of possible sizes (if the compartment is sizable), of each compartment.
1. Click on Maintenance and scroll to Compartment Types. The Compartment Types list opens.
2. Click on the Add icon to add a new compartment type, or select a compartment type and click on the Edit icon to change an existing compartment type. The Compartment Type window opens.
3. Enter an ID and Description for the compartment type. You must enter an ID.
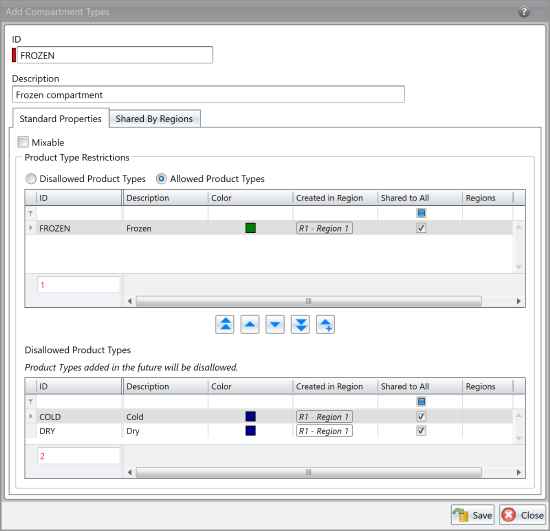
4. If this compartment type can have more than one product type loaded in it at a time, check the Mixable box.
5. In the Product Type restrictions area, indicate if you want to specify which product types can be loaded into the compartment type (Allowed Product Types) or which product types can't be loaded (Disallowed Product Types). Then, use the arrows to move the product types between the Allowed Product Types and Disallowed Product Types lists.
Note: Product types added in the future will either be allowed or disallowed in the compartment type, depending on the option you selected. For instance, if you selected to specify disallowed product types, all new product types would automatically be allowed in the compartment type until you updated the compartment type to indicate those new product types were not allowed.
6. If the product type can be shared with other regions, click the Region Sharing tab. Select the regions that can use the compartment type.
7. Click the [Save] button.
If you need to make the same change on multiple compartment types, select the compartment types you want to change, then right-click and choose Replace from the menu that pops up. The Replace window opens. Make the proper changes, then click the [Save] button.
Adding Compartments to Equipment Types
Once you have created your compartment types, you need to define the compartments on the equipment types. When adding compartments to the equipment type, you can indicate whether the size of the compartment can be adjusted or if it is a fixed size.
1. On the Equipment Type window, click the Compartments tab to open the Compartments page.
2. To add a new compartment to the equipment type, click the Add icon. To change a compartment already on the equipment type, click the Edit icon. The Compartment window opens.
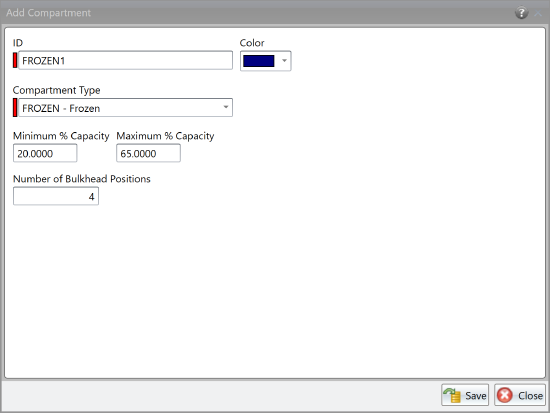
3. Enter an ID and Description for the compartment. You must enter an ID.
4. Click the Compartment Type arrow and choose the proper type for the compartment.
5. In the Minimum % of Equipment Type field, enter the smallest size the compartment can be, measured as a percent of the equipment type’s total capacity.
6. In the Maximum % of Equipment Type field, enter the largest size the compartment can be, measured as a percent of the equipment type’s total capacity.
Note: If the compartment is not sizable (does not have a movable bulkhead), the Minimum % of Equipment Type and Maximum % of Equipment Type should be the same.
7. In the Number of Bulkhead Positions field, enter the number of different places the bulkhead can be set to. If the compartment is not sizable, enter 0 or 1.
Note: Roadnet Anywhere only allows resizeable compartments to be sized in equal increments. For example, if a compartment can consume from 20 to 65 percent of the equipment type’s capacity and it has 4 possible bulkhead positions, the compartment will be allowed to be sized in increments of 15 percent of the equipment type’s capacity; it will be allowed to consume 20, 35, 50, or 65 percent of the equipment’s capacity] button.
8. Click the [Save] button to save the compartment.
9. Continue adding compartments or making other necessary changes to the equipment type, then click the [Save] button.
Creating Routes with Compartments
The final step in setting up Roadnet Anywhere to use compartment routing is to enable compartment routing on your pass templates so that Roadnet Anywhere will create routes using the compartment information.
1. Click the on the Routing menu and scroll to Routing Pass Templates. The Routing Pass Templates list opens.
2. Click the Add icon to add a pass template, or click on an existing pass template then the Edit icon to change a pass template. The Pass Template window opens.
3. On the General page, check Enable Compartment Routing.
4. Click the [Save] button.
Considering Compartments when Using Suggest Route
Suggest Route is a tool you can use to have Roadnet Anywhere suggest the best possible route for an unassigned order, or a routed order that needs to be moved to another route. When using Suggest Route, you have select the options Roadnet Anywhere should use, including which routing rules you want ignored. Now, you can choose to have Roadnet Anywhere place an order on a route even if it fills a compartment beyond capacity or if there is no compartment on the equipment allowed to take that product type.
In Roadnet Anywhere Client
Right-click on the unassigned order or stop that you want to move to another route and choose Suggest Route from the menu that pops up; the Suggest Route window opens. Click on the Options tab to open the Options. In Rules to Ignore check the routing rules that Roadnet Anywhere should ignore:
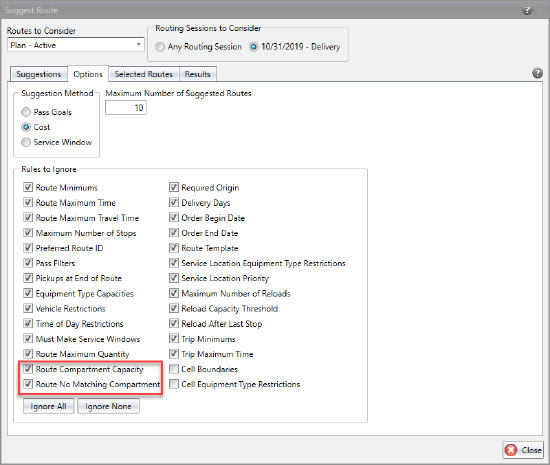
Route Compartment Capacity - check if an order can be added to a route even if it causes a compartment to be filled beyond its capacity.
Route No Matching Compartment - check if an order can be added to a route even if a product type on the order is not allowed in any compartment on the equipment.
Make any other necessary selections, then click [Suggest] on the Suggestions page.
In Roadnet Anywhere Web
Click the FleetView icon to open FleetView. From a Routes view, right-click on an unassigned order or a stop that has not been arrived and choose Suggest Routes from the menu that pops up. The Suggest Routes window opens. Click on the Options tab to open the Options. In the Rules to Ignore, check the routing rules you want Roadnet Anywhere to ignore.
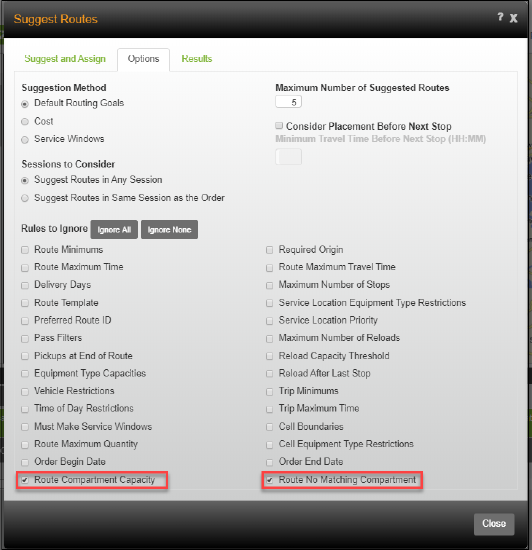
Route Compartment Capacity - check if an order can be added to a route even if it causes a compartment to be filled beyond its capacity.
Route No Matching Compartment - check if an order can be added to a route even if a product type on the order is not allowed in any compartment on the equipment.
Make any other necessary selections, then click [Suggest] on the Suggestions page.
Considering Compartments when Editing Routes
In Roadnet Anywhere Client
After you run Create Routes, you may evaluate your routes and make some changes, such as adding an unassigned to a route or moving a stop from one route to another. You can choose to have Roadnet Anywhere ignore some compartment rules when making these moves.
Click the Tools menu and choose Options; the Options notebook opens. Click the Routing Rules tab to open the Routing Rules page. "For each rule you want to ignore, check the situation in which it should be ignored.
Route Compartment Capacity - check if an order can be added to a route even if it causes a compartment to be filled beyond its capacity.
Route No Matching Compartment - check if an order can be added to a route even if a product type on the order is not allowed in any compartment on the equipment.
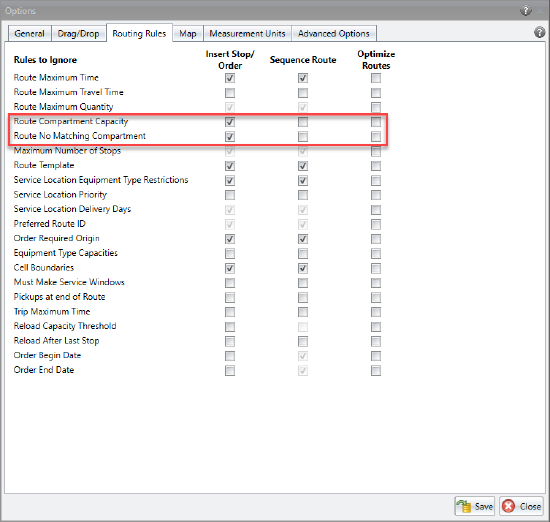
Click [OK] to save the changes.
Considering Compartments when Importing Orders
In Roadnet Anywhere Client
When you import your orders, you can have them added to existing planned routes. When this happens, Roadnet Anywhere considers the routing rules, unless you specify to ignore specific routing rules .Now, you can specify that Roadnet Anywhere ignore route capacity and compartment matching when determining whether to add a newly imported order to a route.
Click the Import menu and choose Import Orders; the Import Orders tab opens. Open the Order Import Options, then click on the Routing tab to open the Routing options page. Check the proper options.
Route Compartment Capacity - check if an order can be added to a route even if it causes a compartment to be filled beyond its capacity.
Route No Matching Compartment - check if an order can be added to a route even if a product type on the order is not allowed in any compartment on the equipment.
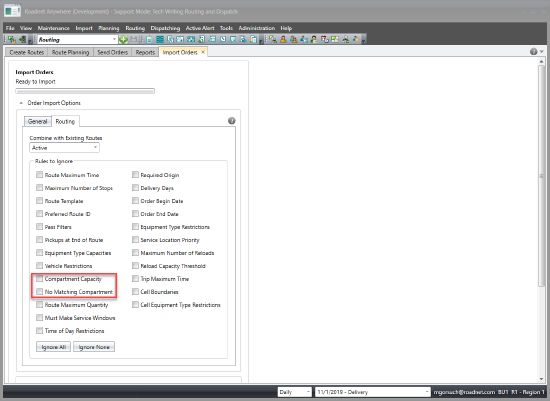
When all the options have been selected, click [Import] to import your orders and have them added to the appropriate routes.
Defining Route Alerts
In Roadnet Anywhere Client
You can choose to have a flag appear in the Route Alerts column of the Routes list when a route breaks a defined rule. Now, you can choose to have route alerts appear when a compartment related routing rule is broken.
Click the Administration menu and scroll to Regions; the Regions list opens. Click the Add icon to add a region, or select a region then the Edit icon to change an existing region; the Region window opens. Click the Alert Options tab to open the Alert Options page. In the Route Alert box, scroll down to find Compartment Capacity and No Matching Compartment. Check Enable for the options you want to be alerted to, and choose the color the flag will be.
Compartment Capacity - check if an order can be added to a route even if it causes a compartment to be filled beyond its capacity.
No Matching Compartment - check if an order can be added to a route even if a product type on the order is not allowed in any compartment on the equipment.

Click [Save].
When a route breaks the selected rule, a flag will appear in the Route Alerts column.
Viewing a Compartment's Capacity
Found in Roadnet Anywhere Client
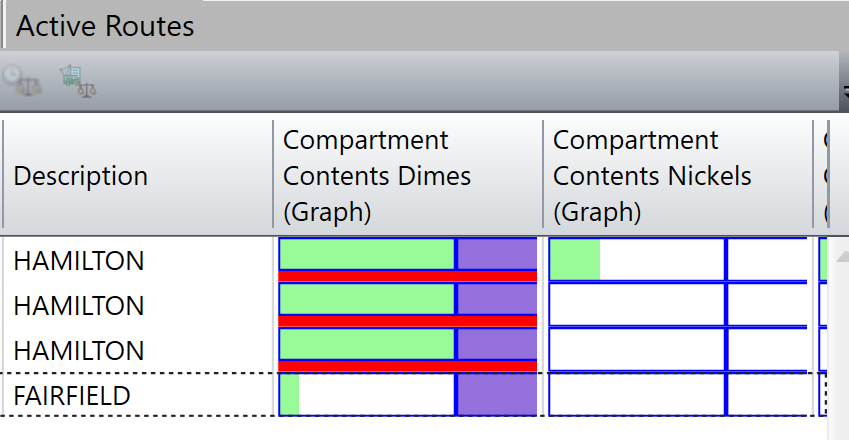
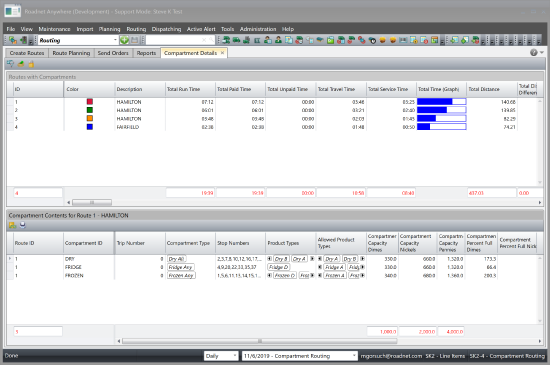
You can see how full each compartment on a route is, measured as each size, in the Routes lists. Some things to remember when viewing these graphs:
- Each compartment on the equipment type will be displayed as a blue border in the graph.
- The contents of the compartment are shown in the color selected when the compartment was assigned to the equipment type.
- Hover over a graph to see more specific information about each compartment.
- If there is product on the equipment that does not have an allowed compartment type, a red line will be shown below the graph.
- If a route has multiple trips, each trip will be shown separately.
If you want to see more detailed information about how the compartments are loaded, use the Compartment Details. The top of the Compartment Details lists all Routes with Compartments in the session; if you double click on one of these routes you can see details about the compartments on the route's equipment, including the loaded product types and the quantity loaded in each compartment.
To open the Compartment Details, click on the Routing menu and scroll to Compartment Details. The Compartment Details view opens.
To print a report about the compartment contents for the selected route(s), click the Print icon on the Compartment Contents list. The Print Preview window opens, letting you preview the report. Click the Print icon to print the report.
To export the compartment contents for the selected route(s), click the Export icon on the Compartment Contents list. The contents are exported to a .xlsx, which you can save and use to evaluate or manipulate the data as needed.
Importing Categories with a Routed Solution
Found in Roadnet Anywhere Client and Web
If you use categories to help differentiate the quantities on your orders, you probably want to be able to import that information instead of adding it manually. In the past you could import planned and delivery category quantity information with your orders; now you can also import that information when importing a routed solution.
Note: If you import categories, you do not need to include the quantity size in the import.
To import the quantity information you need to include the information in your import file, and specify its location in the data transfer layout.
Click on the Import menu and scroll to Data Transfer Sets. Open your import routed solution layout, or click Add to create a new layout. On the Data Transfer Layout window, click on the line for the category size you want to import, and specify where it can be found in the import file. Click the [Save] button. Now when you import your routed solution, the category quantities will be imported as well.
| Field | Required | Max. Length | Description |
|---|---|---|---|
| Planned Delivery Quantities Size 1, 2, 3 Category 1, 2, 3 | No | 0-999999999.9999 | The planned delivery quantity for each category and size. The category and size names may be replaced by aliases created for the business unit. Note: If you want the category quantity to be used to calculate to total order quantity, do not specify the location of the quantity information in the file when setting up the data transfer layout. |
| Planned Delivery Quantities Size 1, 2, 3 Category 1, 2, 3 | No | 0-999999999.9999 | The planned pickup quantity for each category and size. The category and size names may be replaced by aliases created for the business unit. Note: If you want the category quantity to be used to calculate to total order quantity, do not specify the location of the quantity information in the file when setting up the data transfer layout. |
Notes: If you are importing a routed solution into Roadnet Anywhere Web, you do not need to update the data transfer layout; simply make sure the category information is included on the import template.
You can now export the category quantities when using Send Orders.
Prioritizing Orders for Service
You probably have large or important customers that need to be serviced early in the day, before other customers. Roadnet Anywhere allows you to assign a priority to service locations that ensure those customers are delivered before locations with a lower priority. But, what if a special circumstance arises where one of these lower priority customers needs their delivery early in the day. Now, you can assign a priority to individual orders to help in these situations. If an order has a priority override, it will be used instead of the service location's priority for that stop only; when determining where to place the stop on the route, Roadnet Anywhere will use either the service location's priority or the order's priority, whichever is higher.
Note: An order with a priority of 10 will be serviced before a service location with a priority of 9. But, an order with a priority of 9 may or may not be serviced before the service location with a priority of 9; Roadnet Anywhere will determine which stop should be serviced first based on the other pass options and overall routing efficiency.
Some features of the order priority override:
- You can add a priority override to an order in Roadnet Anywhere Client and Roadnet Anywhere Web
- You can see the priority for an order in the Unassigned list, as well as in the stop list. If the priority is red, then the displayed priority comes from the highest order override that was encountered. If the entry is black, then the displayed priority comes from the service location.
- You can replace the priority override for several orders simultaneously in Roadnet Anywhere Client.
- If a stop has several orders that have priorities, the highest priority override will be used for all the orders. You can import the priority for an order using Import Orders or Import Routed Solution.
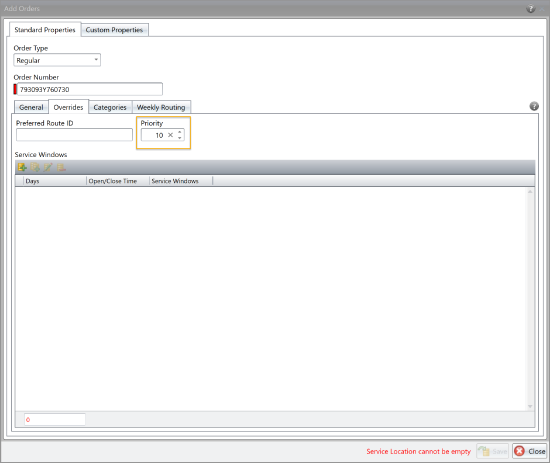
Adding a Priority Override to an Order
In Roadnet Anywhere Client
On the Order window, click the Overrides tab to open the Order Overrides page. Click the Priority arrows to set the order's priority. The order priority can be from 0 to 10, with 10 being the highest priority. Click the [Save] button to save the order.
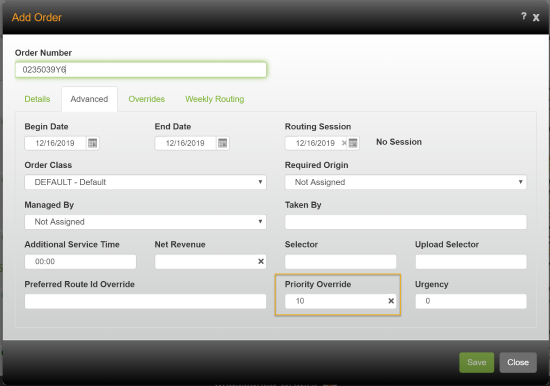
In Roadnet Anywhere Web
On the Order window, click the Advanced tab to open the Orders Advanced page. Enter a number between 0 and 10 in the Priority Override, with 10 being the highest priority. Click the [Save] button to save the order.
You can import the priority override with your orders or a routed solution by simply adding it to your import file.
| Field | Required | Range | Description |
|---|---|---|---|
| Priority | No | 0-10 | A number between 0 and 10 indicating how important it is that the order is sequenced early on the route. |
Displaying Routes on Multiple Maps
Found in Roadnet Anywhere Client
When reviewing and evaluating your routes, it can be helpful to see routes on separate maps, making it easier to move stops or add unassigneds to existing routes. Now, you can open up to three maps simultaneously in Roadnet Anywhere Client, and drag and drop stops and service locations between maps, as well as between stops lists and the maps, to update your routes as needed. You can open multiple maps in the following manifests:
- Route Planning
- Route Templates
- Route Dispatching
- My Route Plan
- My Route Dispatch
- Route Query
To display a route on a new map, right-click on the route(s) and choose Fit on New Map from the menu that pops up. A new map opens that you can move elsewhere on the screen, or even to another screen.
To display a route on an existing map, right-click on the route(s) and choose Fit on Existing Map, then the map you want to add the route(s) to.
Note: Once three maps have been opened, if you try to open another map you will be asked to either choose an existing map to add the route to, or close a map before opening a new map.
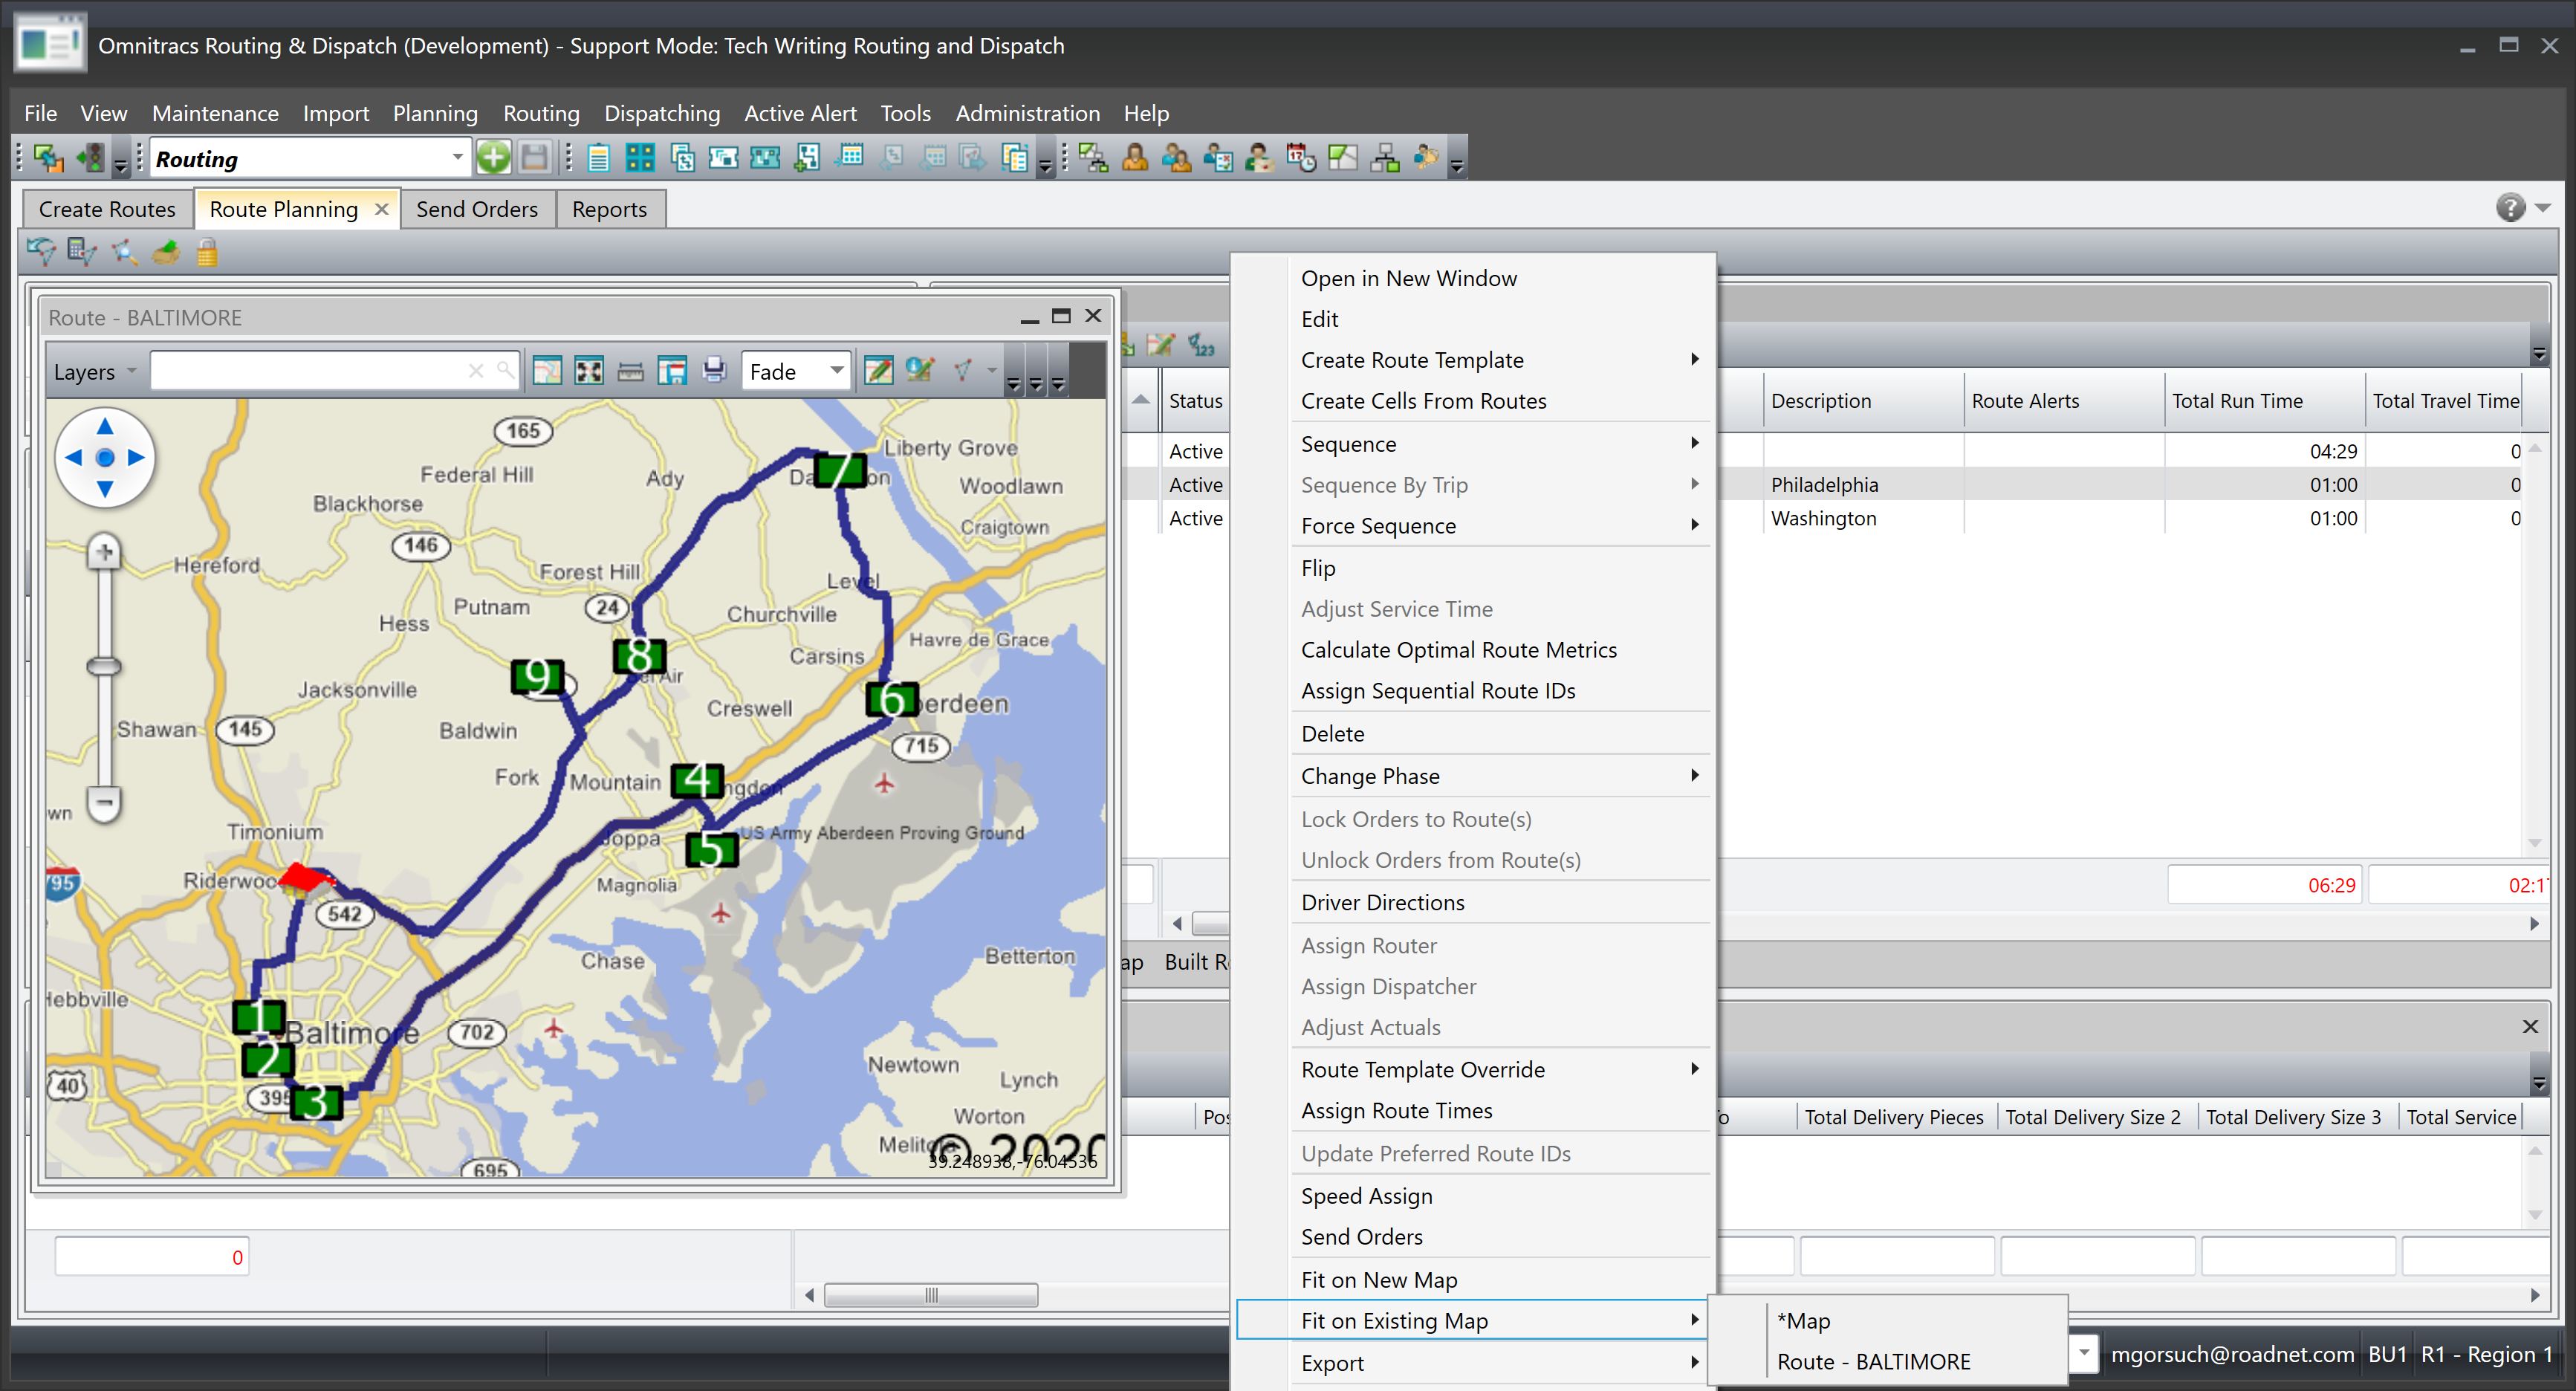
Note: You may need to add the Fit on New Map and Fit on Existing Map icons to the Routing toolbar. To add the icons, click on the arrow at the end of the toolbar, and select the icons you want to add.
New Columns in the Stop List
Found in Roadnet Anywhere Client
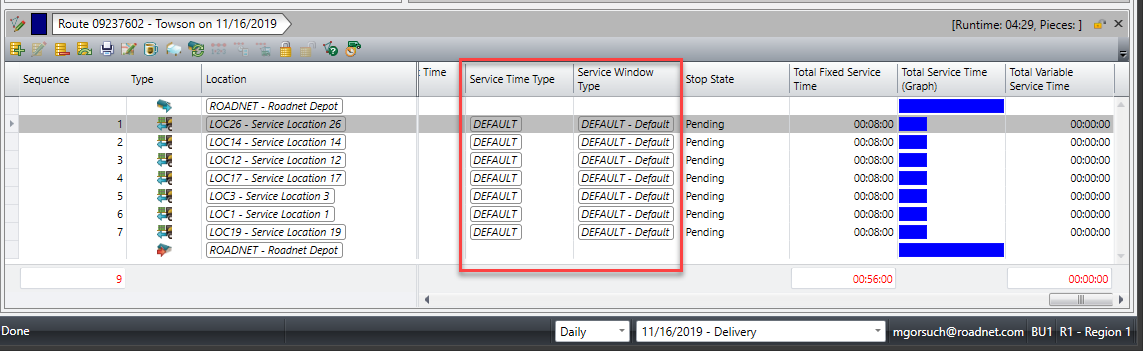
There may be times when reviewing a route's stops in the stop list that you want to know the service time type or service window type associated with the stop's service location. These columns have been added to the stop lists so that you can easily find this information without having to go directly to the service location.
Note: The service time type and service window type columns are hidden by default. To add the columns to the stop list so you can see them, right-click on a column header in the stop list and scroll to the view configuration name, click the arrow next to the name and choose the Edit icon to open the Edit View Configuration window. In the Hidden Columns list, find the column to want to see and move it to the Visible Columns list.
To see the service window type or service time type for the service location, double click on a route to open the Stop list for the route. Scroll across the Stop list to find the Service Window Type or Service Time Type column.
Manually Splitting Orders
Found in Roadnet Anywhere Client
When you are evaluating your routes, and trying to fit unassigned orders onto existing routes, you may find orders that are too large to fit onto an existing route, but there are two routes that both go near that location. In cases like these, you can now split an order, creating two orders that can placed on two separate routes.
- Once you manually split an order, the two orders are treated as separate, independent orders. There is no automatic method to regroup the orders into one, and if you use Send Orders the orders will be sent as separate orders.
- Only unassigned orders can be split.
- You can only split a single order, not an unassigned order group. If you want to split an order within an unassigned order group, open the order group so you can view the individual orders, then right-click on the single order.
- If you use line items, you can not manually split orders.
1. Right-click on an unassigned order and choose Split. The Split Orders window opens. The top of the Split Orders window shows information about the original order.
Note: You can only split a single order, not an unassigned order group. If you want to split an order within an unassigned order group, open the order group so you can view the individual orders, then right-click on the single order.
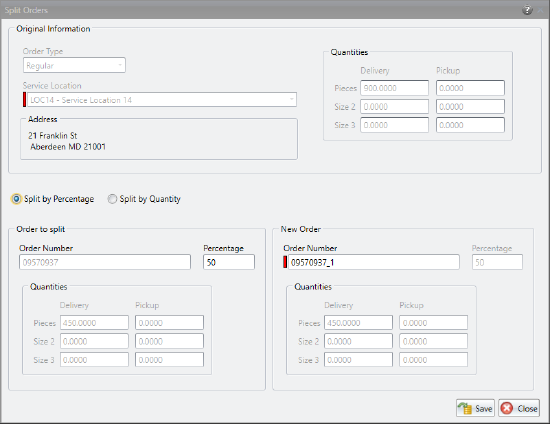
2. Choose whether you want to split the order by percentage (Split by Percentage) or by specific quantities (Split by Quantity).
3. If you choose Split by Percentage, enter the Percentage to retain as part of the original order in the Order to split area. The Percentage for the New Order will be automatically updated.
If you choose Split by Quantity, enter the Delivery and Pickup quantities you want to retain as part of the original order in the Order to split area. The Quantities for the New Order will be automatically updated.
4. Enter the Order Number for the New Order.
5. Click the [Save] button. The order will be split into two orders as requested.
Automatically Increasing an Order's Urgency and Quantity
Some organizations find that it works better for their business model to route for several days or an entire week at once, instead of routing each day individually. But, if you import orders for an entire week at once, does the order quantity need to change the later in the week the order is routed? For instance, if you are delivering home heating oil, the customer will likely need more oil to be delivered at the end of the week than they would have at the beginning of the week. In addition, later in the week it may become more important to deliver that heating oil now, before the customer runs out, than letting the order roll to another day. Now, you can specify how much an order's quantities should increase each day it is not serviced, and also how much the order's urgency should increase to indicate that it needs to be serviced today.
These enhancements include:
- You can define daily quantity increases and a daily urgency increase for an order.
- Any increases that are made are based on the order's begin date. For instance, if the order's begin date is January 13, 2020, and the order is routed on January 15, 2020, the urgency and the quantities will be updated twice - once for January 14th and once for January 15th.
- When you use Prepare for Next Day or Save Session As, the order's quantities and urgency will automatically increase appropriately when they are moved to the new routing session.
- If you are using transfer orders, the same increases apply to both the delivery and pickup portion of the order.
- You can see the daily quantity increase for each size, as well as the daily urgency increase, for the order in the Orders lists.
Defining the Quantity and Urgency Increases for Unassigned Orders
In Roadnet Anywhere Client
Note: You can also define the quantity and urgency increase for orders.
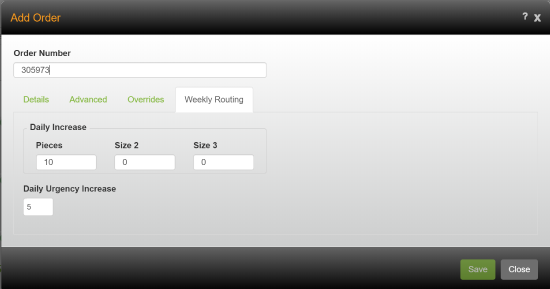
In the Route Planning manifest, click the Add icon in the Unassigned Orders panel; the Unassigned Orders window opens. Enter an ID and select a service location for the order. Click on the Weekly Routing tab; the Weekly Routing page opens.

In the Daily Increase area, enter how much the order quantity should increase each day the order is not serviced.
In the Daily Urgency Increase area, enter how the order's urgency should increase each day the order is not serviced.
Note: Once an order's urgency reaches 100, it will be considered among the first considered for that day's routes.
Click the [Save] button to save the order.
Note: If you want to change the Urgency Increase on multiple orders simultaneously, right-click on the selected unassigneds/orders and choose Replace. Update the Urgency Increase and click the [Save All] button.
In Roadnet Anywhere Web
Click on the FleetView icon to open FleetView. In the Unassigned Orders area, click the add button [+] button to add an unassigned order. Enter an ID for the order and select a service location. Click on the Weekly Routing tab to open the Weekly Routing page.
In the Daily Increase area, enter how much the order quantity should increase each day the order is not serviced.
In the Daily Urgency Increase area, enter how the order's urgency should increase each day the order is not serviced.
Note: Once an order's urgency reaches 100, it will be among the first considered for that day's routes.
Click the [Save] button to save the order.
You can import the daily quantity increase and urgency increase when you import orders or import a routed solution. Simply add the information to your import file and update your data transfer layout to import the information.
| Field | Required | Max. Length | Description |
|---|---|---|---|
| Daily Quantity Increase Size 1, 2, 3 | No | 0-999999999.9999 | The amount the order's quantity should increase each day it is not serviced. |
| Daily Urgency Increase | No | 0-100 | The amount the order's urgency should increase each day it is not serviced. |
Updates to FleetView
FleetView allows you to easily monitor your routes as they progress. Since different people like to see information in different ways, FleetView offers several different views so everyone can find the best view. Several enhancements have been made throughout FleetView to make it easier to monitor your routes and adjust to changes as they occur.
You may like to use the timeline in FleetView to easily gather the status of your route(s), and see if there is a delay or some other incident that you want to investigate more thoroughly. There have been several enhancements to the timeline that make it easier to use.
- The timeline in Route Details now shows the full duration of exceptions, instead of simply showing a marker when the exception started. In addition, when you hover over an exception on the timeline, there is more information about the exception, including the exception description, time, duration, and location of the exception.
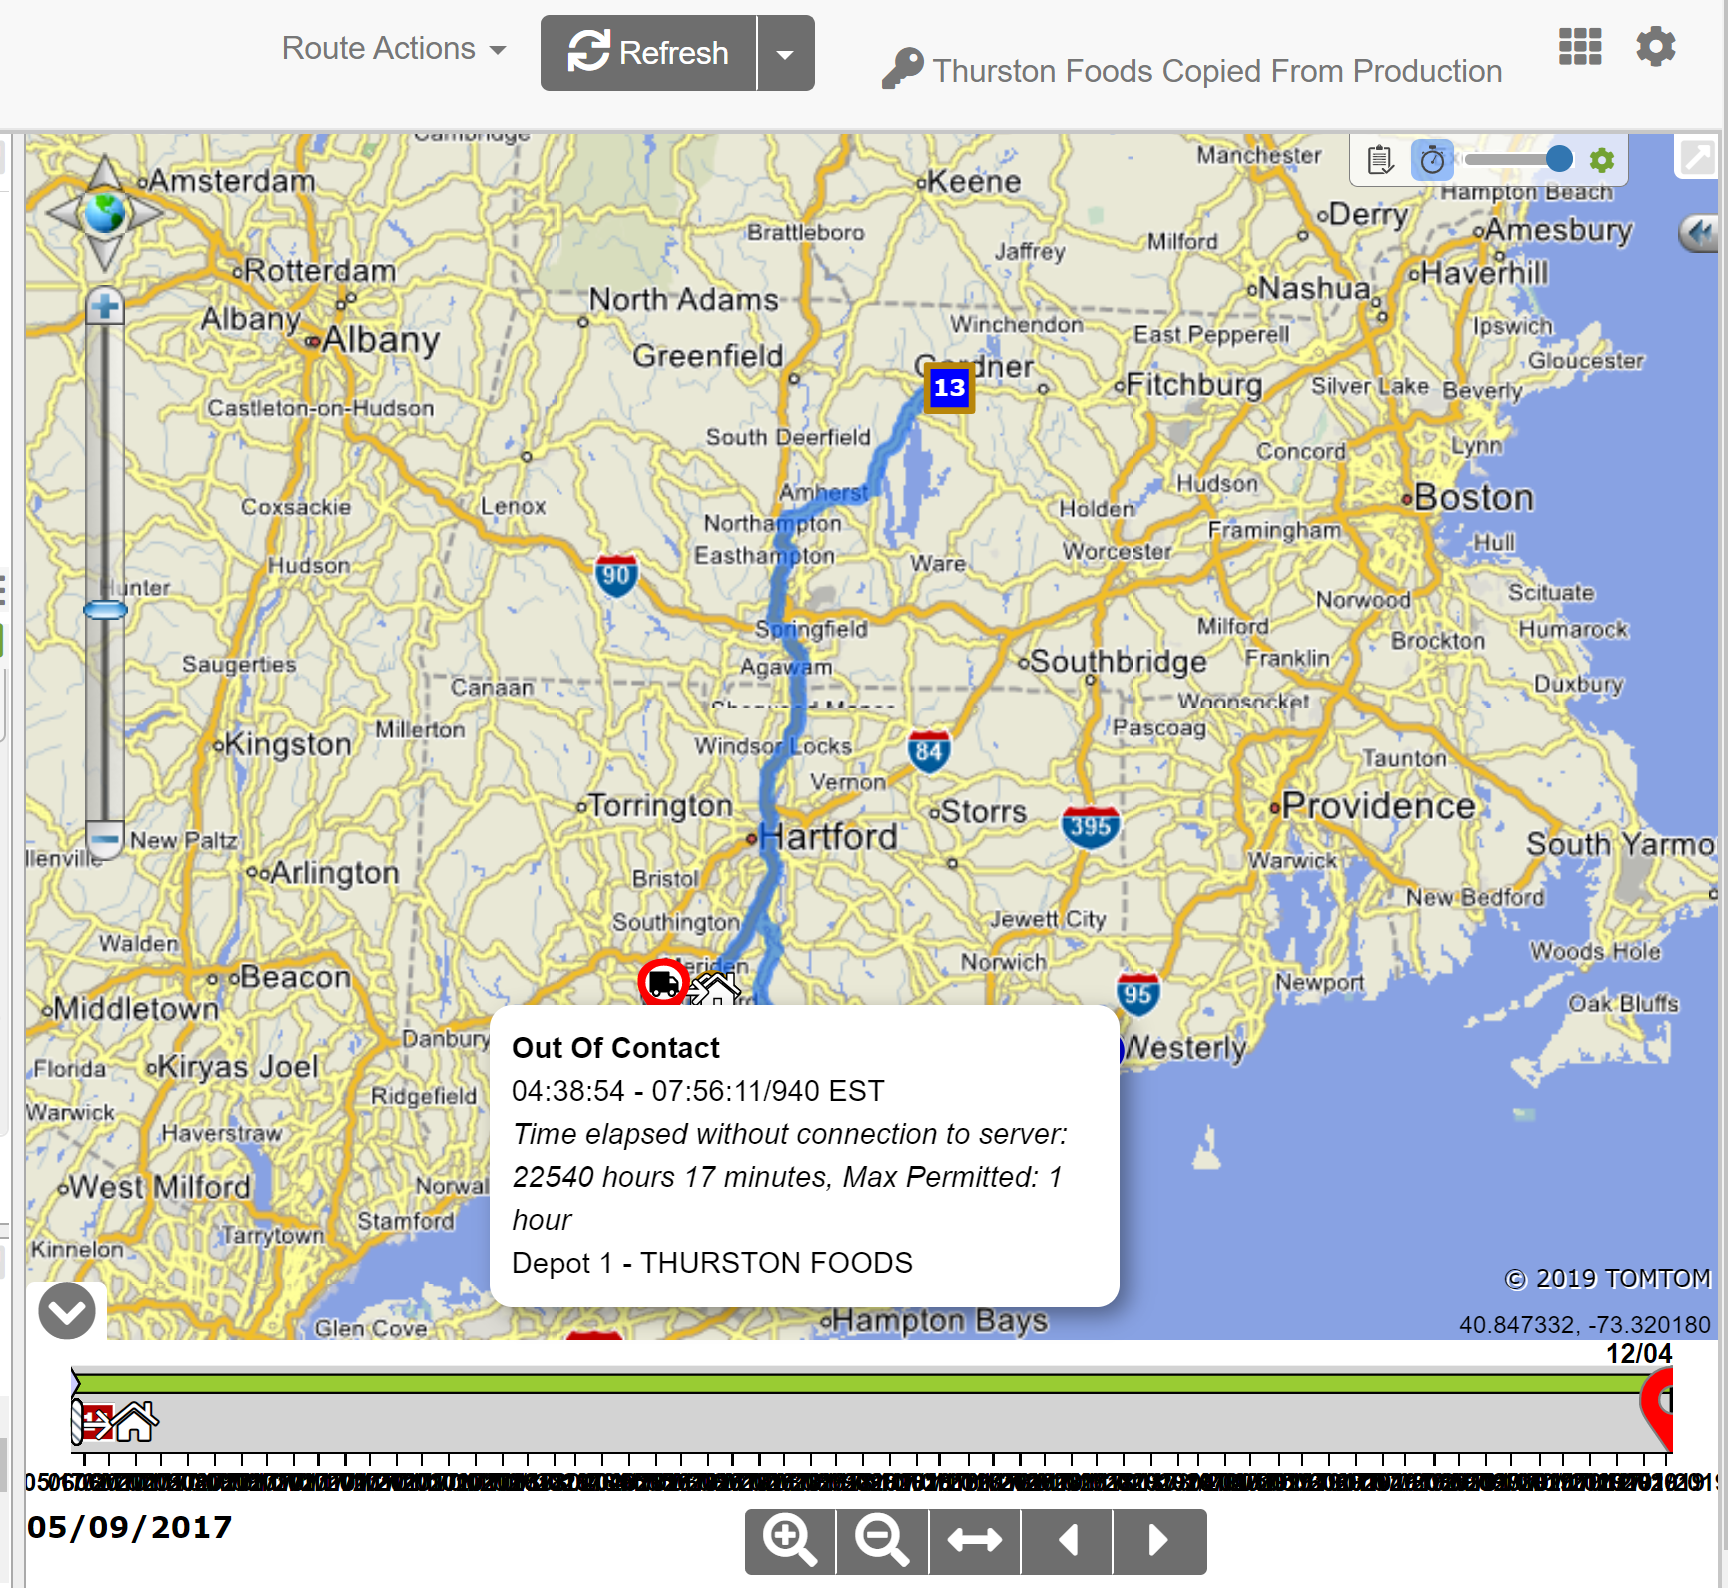
- If there is a delay on the route, you can now hover over the delay to see the reason code ID and description for the delay. You can see the delay reason code information in Route Maps, Routes Timeline, and in Route Details on the map, timeline, and stops grid.
The stop grid in Route Details provides detailed information about the stops on your routes. Since there are times when it is important to know when the stop was serviced, three new columns were added to the stop grid. The new columns are:
- Planned Start Service Time - the time the driver was expected to start servicing the stop
- Service Start Time - the time the driver actually started servicing the stop
- Service Start Time Quality - indicates how the service start time was captured. The options are:
- Projected - The estimated service start time, based on how the route is progressing.
- Assumed From Projection - The projected service start time was used as the actual service start time.
- Auto Captured - The time the driver manually started servicing the stop.
- Time Captured - The time when a defined duration has been met so the driver is considered servicing the stop.
- Geo Computed - The service start time that is set based on the time the GPS is received.
- Geo Computed Cluster - The service start time that is set based on the time the GPS is received from a cluster of stops that are co-arrived.
- Compliance System - The service start time that is set due to a change in the driver's status.
- Ignition Computed - The service start time is based on when the worker turned off the equipment's ignition. This quality can occur only if you have chosen to use the ignition state as a basis for stop arrivals and departures within the region.
- Computed - The service start time calculated by Roadnet Anywhere for a required field.
- Dispatcher Entered - The service start time entered by the dispatcher. For example, if the times and distances were modified using Adjust Actuals.
Order Status Enhancements
Order Status is a great tool for customer service or others who want to see if an order was delivered to a customer. Several enhancements have been added to Order Status to make it easier to find the order you want, as well as to provide more information about the order. These features include:
- When you plot a route, the region is shown as part of the map's title
- When viewing the stop list for the route, the region is shown as part of the grid's title
- When viewing a list of orders, there are now columns showing the region ID and Description for the region the order is from.
- The route's stop list now contains a column that displays the cancel stop reason code - so you can tell why the stop was cancelled.
- When searching for orders, you can now use a custom date range to search, as well as the defined ranges that already existed. When searching for orders you can now select regions you want to search in.
- You can export the order grid to a CSV file.
Viewing Region Information
When you are looking at a route on a map, or in a stop list, it is often helpful to know what region the route is in. The route's region is now displayed a part of the map's title, as well as part of the stop list's title. In addition, when looking at a list of orders, you can see what region each order is in.

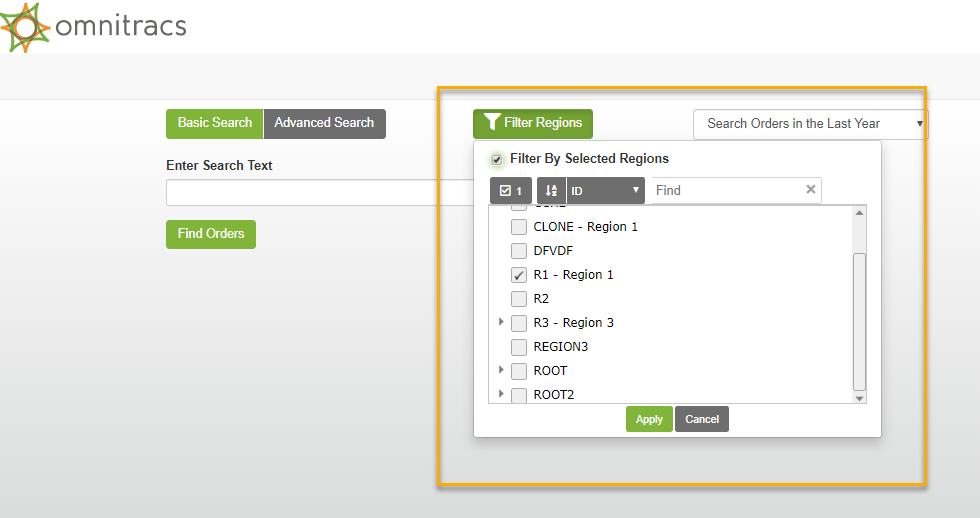
Searching for Orders
When you are searching for orders, the more information you can enter to help find the exact orders you are looking for, the quicker your search will be. Now, when using either the Basic Search or the Advanced Search, you can select the regions you want to search, as well as selecting a custom date range, instead of using one of the pre-determined date ranges.
To specify the region(s) you want to search, click the [Filter Regions] button; the region picker opens. To select specific regions, check Filter By Selected Regions, then select the regions from the list below. Click the [Apply] button. Only orders in the selected regions will be included in the Search results.
Note: If you are using region hierarchy and select a higher level region, all regions below that region will automatically be selected.
To use a custom date range when searching for orders, click Search Latest Orders arrow and choose Search in Custom Date Range. Choose the start and end date you want to search for.
Note: If an end date is not specified, the current date and time will be used as the end date.
Exporting the Search Results
There may be times you want to export the orders list so that you can analyze the date. Now, you can export the search results to a CSV file. Simply click the [Export] button and a CSV will be created and downloaded onto your computer.
Filtering the Service Locations by Region in Service History
The first step in finding the service history for a service location is to select the location. But, if you have a long list of service locations it can be cumbersome to find the right one. One way to limit the list of service locations is to only have service locations in selected regions appear in the list. Now you can limit the service locations that appear in the list to only those from selected regions.
1. In Service History, click the [Filter Regions] button. The region picker opens.
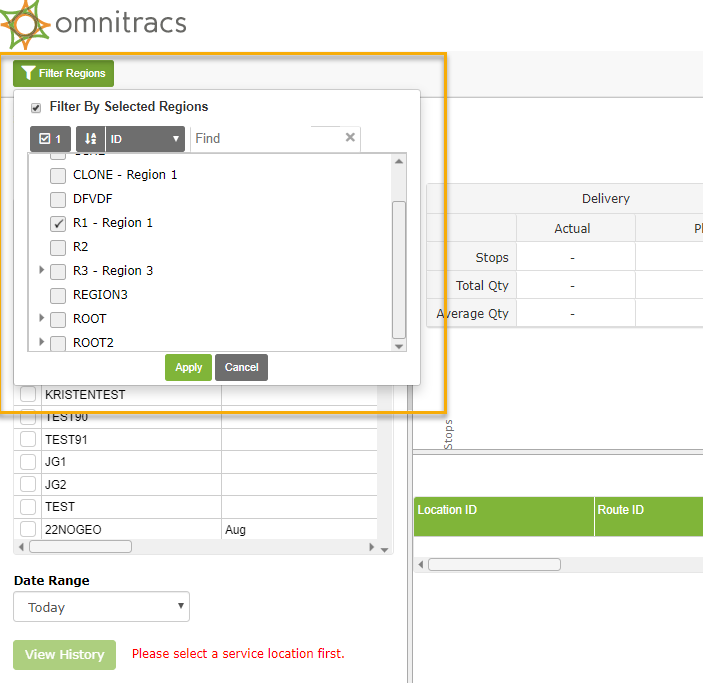
2. Select the regions you want to include.
Note: If you are using region hierarchy and select a higher level region, all of the lower level regions are automatically selected.
3. Click the [Apply] button. The service locations list is automatically updated.
Now you can continue searching for the service location as you normally would.
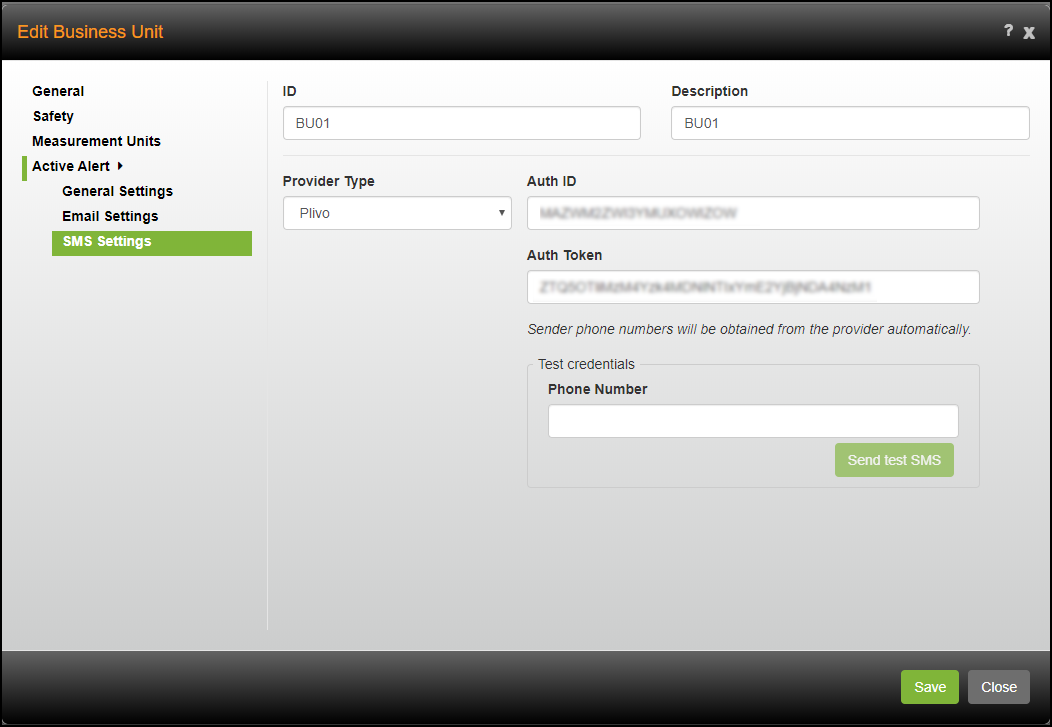
Defining Your SMS Settings for Active Alert
Found in Roadnet Anywhere Web
If you use Active Alert, and send text messages to your customers to update them about their orders, you can now send text messages using your existing SMS Gateway Provider rather than the default Omnitracs SMS provider. You will need to configure your provider on the SMS Settings page under Business Unit > Active Alert. You can define settings for the following SMS Gateway Providers: Twilio, Nexmo, and Plivo.
Note: If your company has purchased the default Omnitracs SMS provider, you will not see the SMS Settings page.
When a Provider Type other than Default is chosen, you must provide authentication information, such as an Auth ID and Auth Token. Once you enter the authentication information, you will want to enter a phone number and send a test message to ensure the system, with your new settings, is working properly.
Alerting the Driver when the Key Fob is not Activated
Note: This features is only available with Roadnet Telematics.
The key fob provides an easy way for drivers to identify themselves when getting into the vehicle, and this in turn allows Roadnet Anywhere to connect the driver to a route. If the driver forgets to connect the key fob to the vehicle, this connection is not made and you will not be able to effectively track the route in FleetView. Now. you can have a buzzer sound to alert the driver if the vehicle starts moving without the key fob being activated.
Setting the Buzzer for the Region
If you want your drivers alerted when the key fob has not been activated, you can enable the option for the region. Choosing the option on the region will ensure that all drivers in the region will be alerted if they forget to activate the key fob.
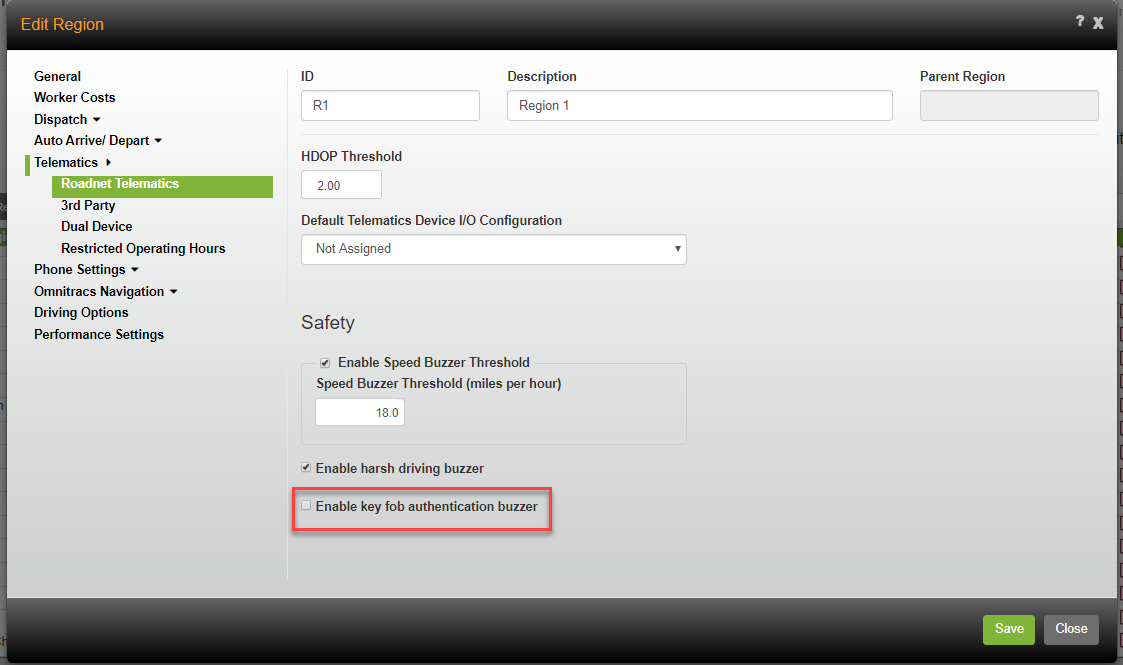
In Roadnet Anywhere Web
In Administration, open the Regions list. Click on [Add] or edit an existing region. On the Telematics - Roadnet Telematics page, check Enable key fob authentication buzzer.
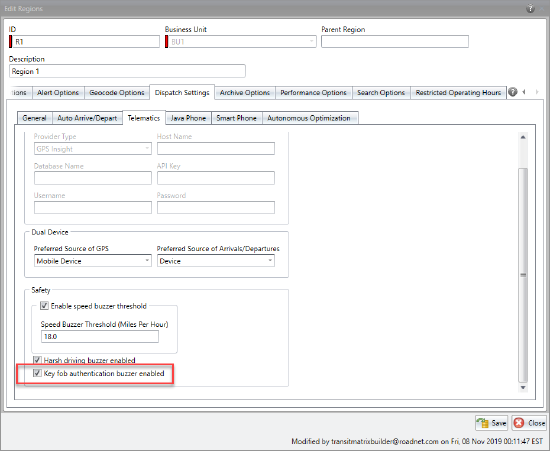
In Roadnet Anywhere Client
Click the Administration menu and select Regions to open the Regions list. Click the Add icon or the Edit icon to change an existing region. Click Dispatch Settings, then Telematics to open the Telematics page. Check Key fob authentication buzzer enabled.
Setting the Buzzer for Equipment
When you enable the key fob buzzer for the region, it affects all equipment in the region. But, you may have some vehicles in your region that you don't want to follow that setting. You can change the buzzer setting for individual pieces of equipment.
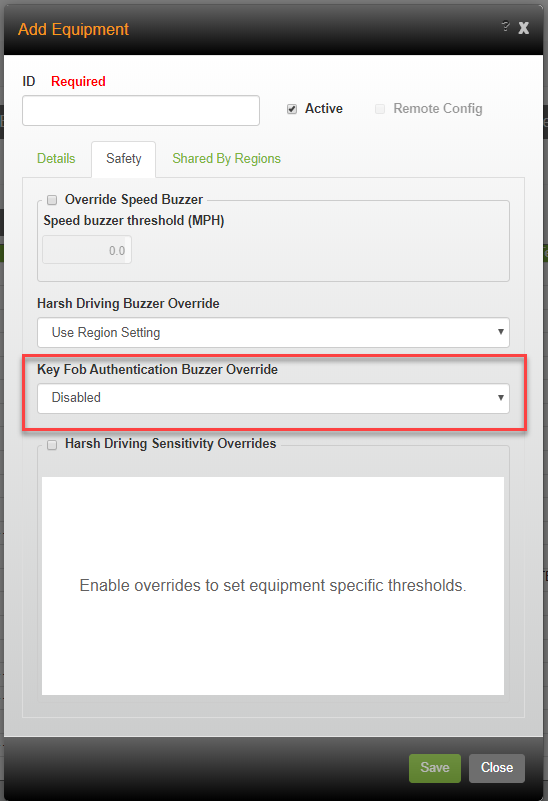
In Roadnet Anywhere Web
In Maintenance, open the Equipment list. Click on [Add] or edit an existing piece of equipment. On the Safety page, click the Key Fob Autthentication Buzzer Override and choose the proper option. The choices are:
Use Region Setting - the equipment will use the region buzzer setting
Disabled - do not use the buzzer for this equipment, regardless of the setting selected for the region.
Enabled - use the buzzer for this equipment, regardless of the setting selected for the region.
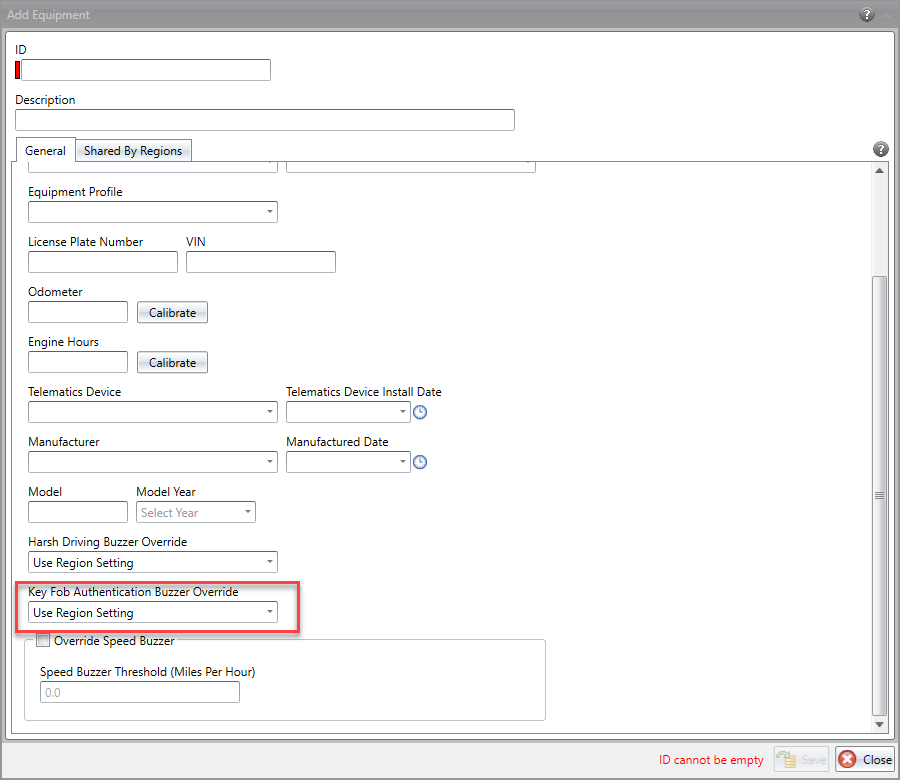
In Roadnet Anywhere Client
Click the Maintenance menu and scroll to Equipment to open the Equipment list. Click the Add icon or the Edit icon to change an existing piece of equipment. On the General page, click the Key Fob Authentication Buzzer Override arrow and choose the proper setting. The options are:
Use Region Setting - the equipment will use the region buzzer setting.
Disabled - do not use the buzzer for this equipment, regardless of the setting selected for the region.
Enabled - use the buzzer for this equipment, regardless of the setting selected for the region.
Strategic Planner Enhancements
Updates to Transfer Sessions
Found in Roadnet Anywhere Client
You can use Transfer Session to copy or move selected recurring orders to a new planning session so that you can make changes and try different scenarios without destroying the original session. However, when you transferred the recurring orders, the breaks, layovers, and reloads were not transferred, so you had to -recreate them to get an accurate picture. Now, when you transfer all the recurring orders in a planning session, or in selected territories, the associated breaks, layovers, and reloads are transferred as well. Additionally, you can now choose territories you want to transfer from the main Transfer Session window, without having to create an advanced filter.
1. Click on the Planning menu and scroll to Transfer Session; the Transfer Session window opens.
2. Select the territories, or recurring orders you want to transfer. To select territories you want to transfer, click the Territories button, then click on the territory(ies) you want to transfer. If you want to include unassigned orders, check Include Unassigned Orders.
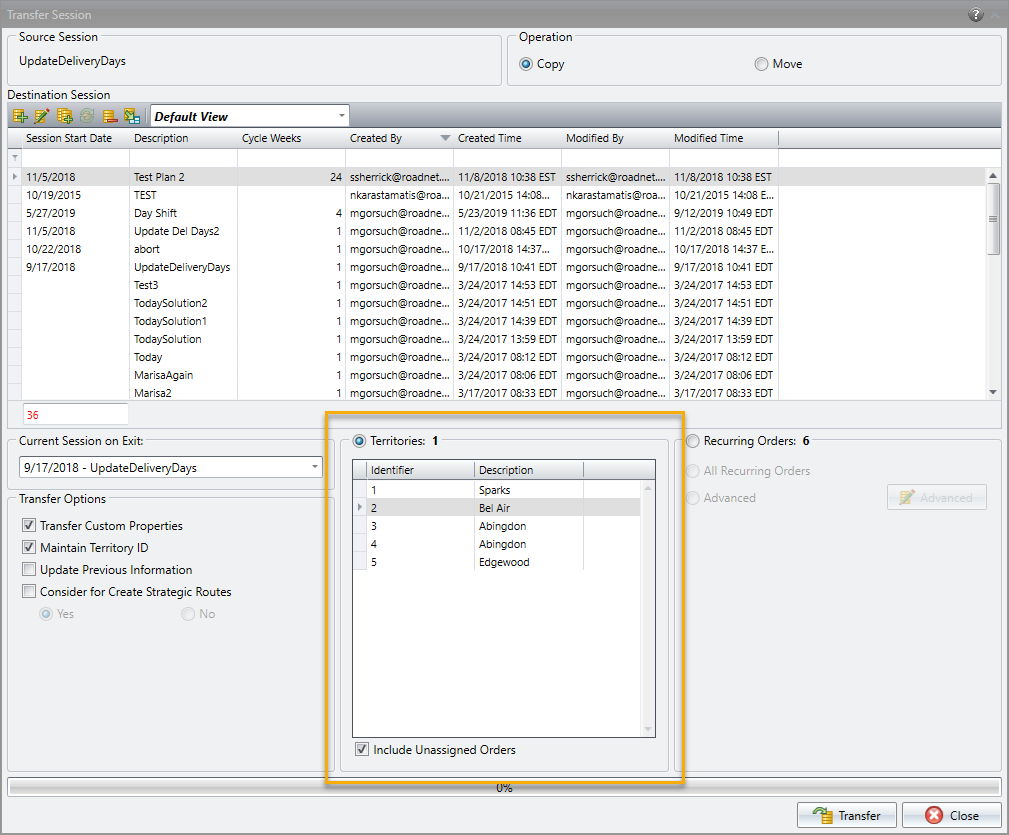
3. Choose the remaining options, as appropriate.
4. Click the [Transfer] button. The recurring orders are transferred to the new session.
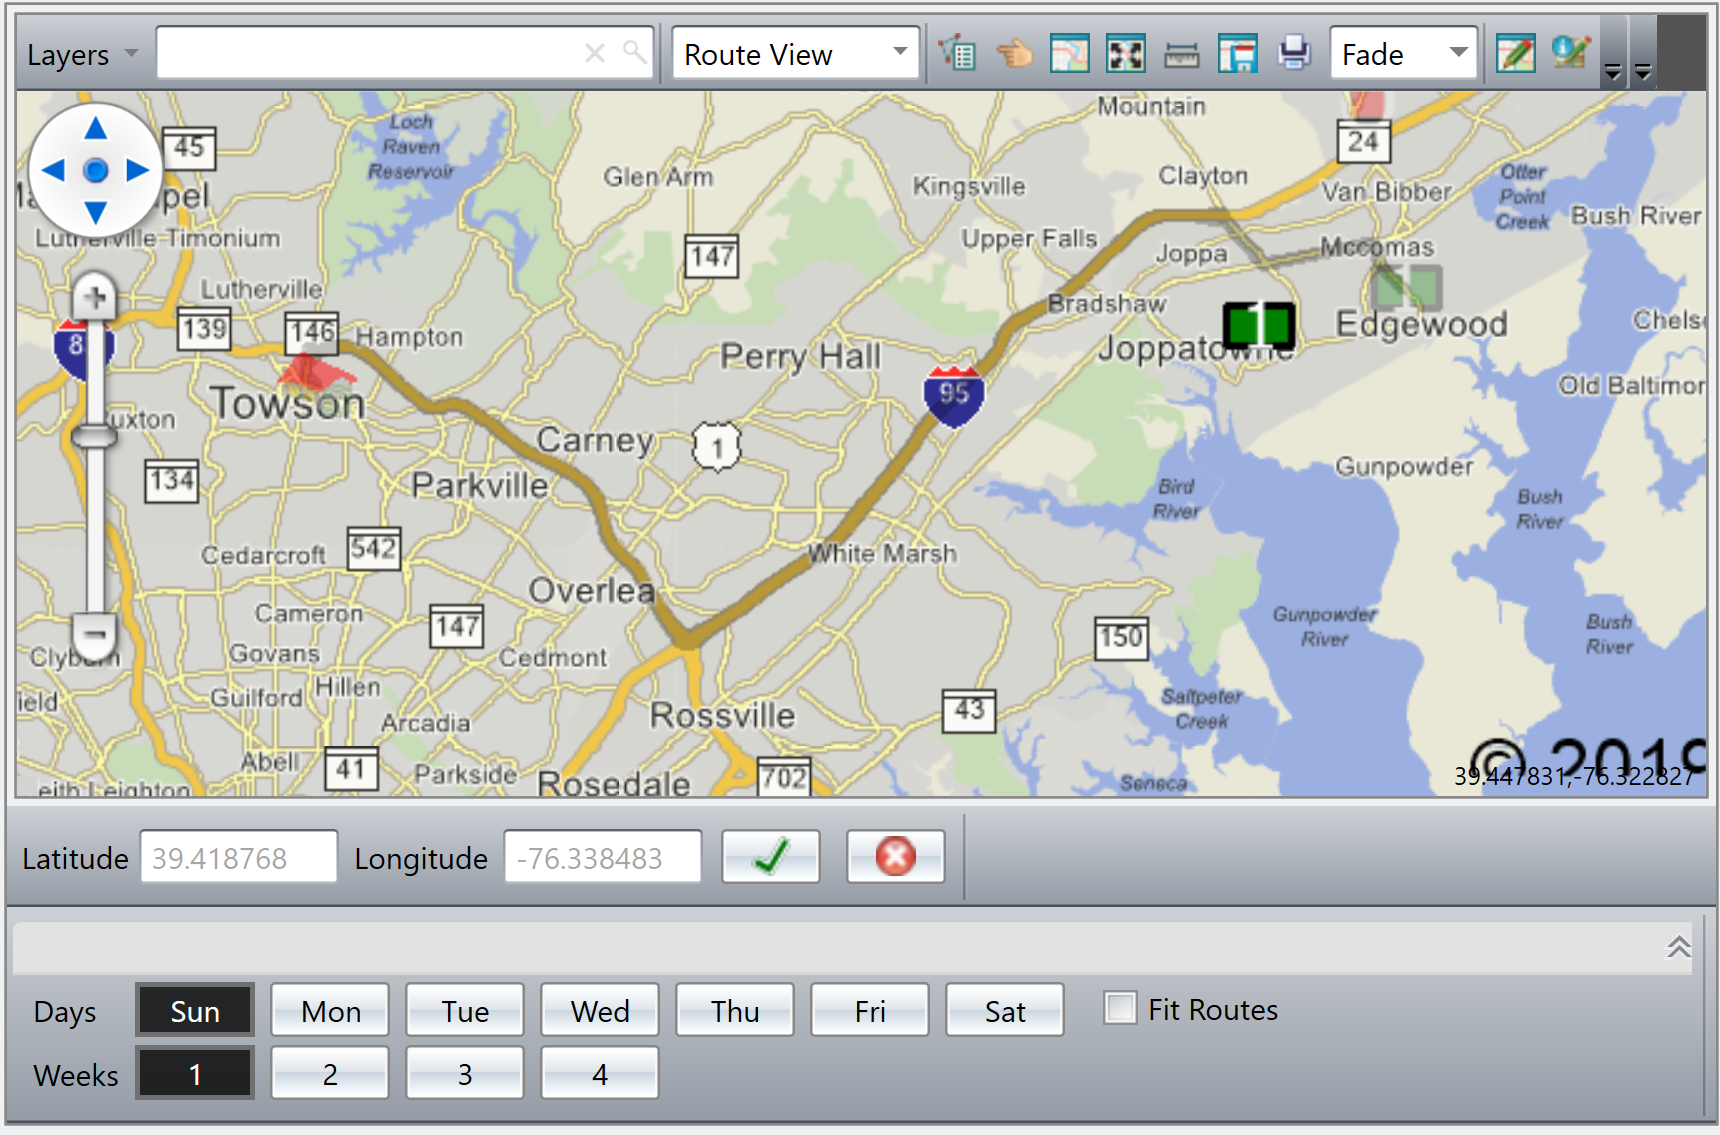
Temporarily Geocoding a Stop in Strategic Planner
You may have smaller customers that you use a third party company to handle, rather than going there yourself. In these instances, you want to make sure that the product is delivered to that third party company, rather than .directly to the customer. Now, you can temporarily geocode those recurring orders or stops to the third party location, ensuring that the product is delivered to the proper location, without changing the geocode of the service location itself.
Notes: If you Update Routing or Dispatching, the temporary geocode for the stop is transferred as well.
You can temporaraily geocode stops, as well as unassigned and unrouted recurring orders.
1. On the Strategic Planner manifest, right-click on the stop/unassigned you want to regeocode on the map and select Temporary Geocode from the menu that pops up.
2. When you move your cursor over the map, it will change to indicate you are ready to regeocode the stop/unassigned. Click the spot on the map where you want to assign the temporary geocode. The stop will move to that spot, and the latitude and longitude of the new coordinate will be displayed at the bottom of the map.
Hints: While placing the temporary geocode, you can still navigate the map using the zoom slide bar or the directional palette.
If you do not place the stop exactly where you want it the first time, you can click on the map again to reassign it. You can do this as many times as you need to before proceeding.
3. To accept the temporary geocode, click the Apply icon at the bottom of the map.
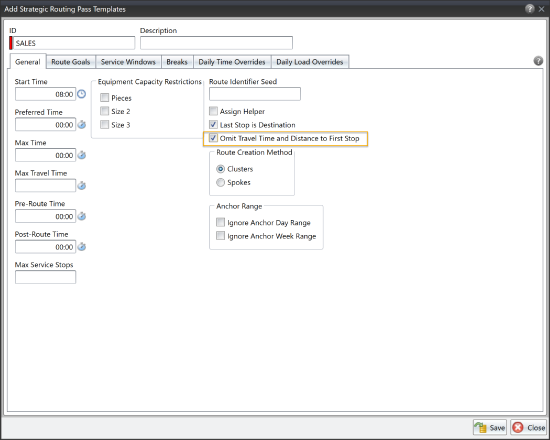
Ignoring the Travel Time and Distance to the First Stop
When creating routes in Strategic Planner, you may have salespeople who start the day at their house so you don't want to include the travel time and distance to the first stop as part of the route. Now, you can have Strategic Planner ignore this time and distance when creating the routes, so it won't be counted again the route's preferred and maximum run time and travel time.
Note: The time and distance to the first stop will also not be included in the stop list for the route.
Click on the Planning menu and scroll to Strategic Routing Pass Templates; the Strategic Routing Pass Template list opens. To create a new template, click on the Add icon, or click on the Edit icon to change an existing template. The Strategic Routing Pass Template window opens. On the General page, check Omit Travel Time and Distance to First Stop. Make any other necessary changes, then click the [Save] button. Now, when routes are created using this pass, the travel time and distance to the first stop is not considered.
Viewing the Session Analysis Report

Found in Roadnet Anywhere Client
If you use Strategic Planner and want to compare your first routed session for a territory with a second or third re-route of that session, you can run the Session Analysis report to see the changes that the re-route brought about. You can compare up to five sessions at a time.
For each session, the report shows the session, territory number, number of routes, stops, and locations in the session, cost of the session, delivery, pickup, and percent capacity for sizes 1, 2, and 3, total run time, travel time, service time, break time, wait time, and layover time, and the distance, missed service windows, and missed service window time.
Once you define the date range from which to choose the Strategic Planner sessions, highlight the available sessions you want to work with and move them to the selected sessions area. Run the report and save or view it as needed.

Enhancements to Roadnet Mobile
Automatically Mark Correspondence As Read
Found in Roadnet Mobile for Android
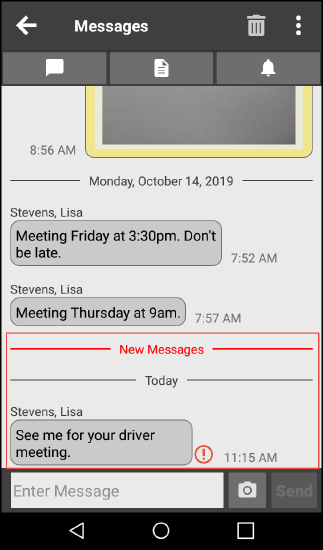
Previously, when the worker viewed the Inbox on the mobile device, unread or unacknowledged correspondence appeared in bold on the screen. To improve the workers experience, when a tab is viewed, all the correspondence in the list are marked as read or acknowledged and the bold highlight is removed. This makes it easier and quicker for the worker, because it is not necessary for the worker to forward through each message, note, or alert on the screen to have it marked as read or acknowledged.
Other updates to the Inbox include that the screen now scrolls directly to new messages, notes, or alerts. The worker will see that newer correspondence are categorized as Today and Yesterday, while older ones are shown with the date they were received. As well, when the worker sends a new correspondence, the screen scrolls to the bottom so that the sent correspondence can be easily seen.
Confirming the Reason Code When Canceling a Stop or Order
Found in Roadnet Anywhere Web
When a worker cancels a stop or an order, and reason codes exist, they are required to choose one before they can continue the route. If they choose the wrong reason code, the purpose of assigning that reason code is defeated. You can now require that the worker confirm that the reason code being assigned is correct and if it is not, let the worker change the reason code.
To have the worker confirm the reason code, you must turn on the region setting.
In Roadnet Anywhere Web
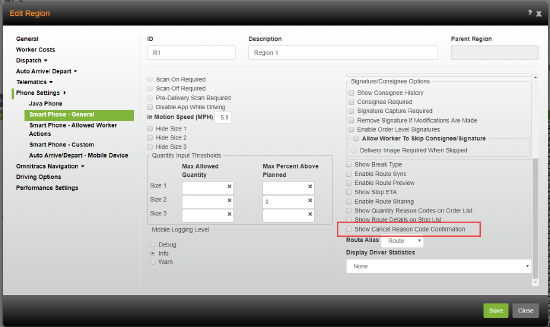
Click on the Administration icon to open Administration. Click on the green button and scroll to Region. The Region list displays. To add a region, click the [Add] button or to edit an existing region, click the Edit icon. The Add/Edit Region window opens. Click Phone Settings and then click the Smart Phone - General tab. Check Show Cancel Reason Code Confirmation to require the worker confirm that the selected reason code is correct, when canceling a stop or order. If it is not correct, the worker can change the selected reason code before the stop or order is canceled. If this option is not checked, the worker is not given the option to change the reason code that is assigned.
In Roadnet Mobile for Android
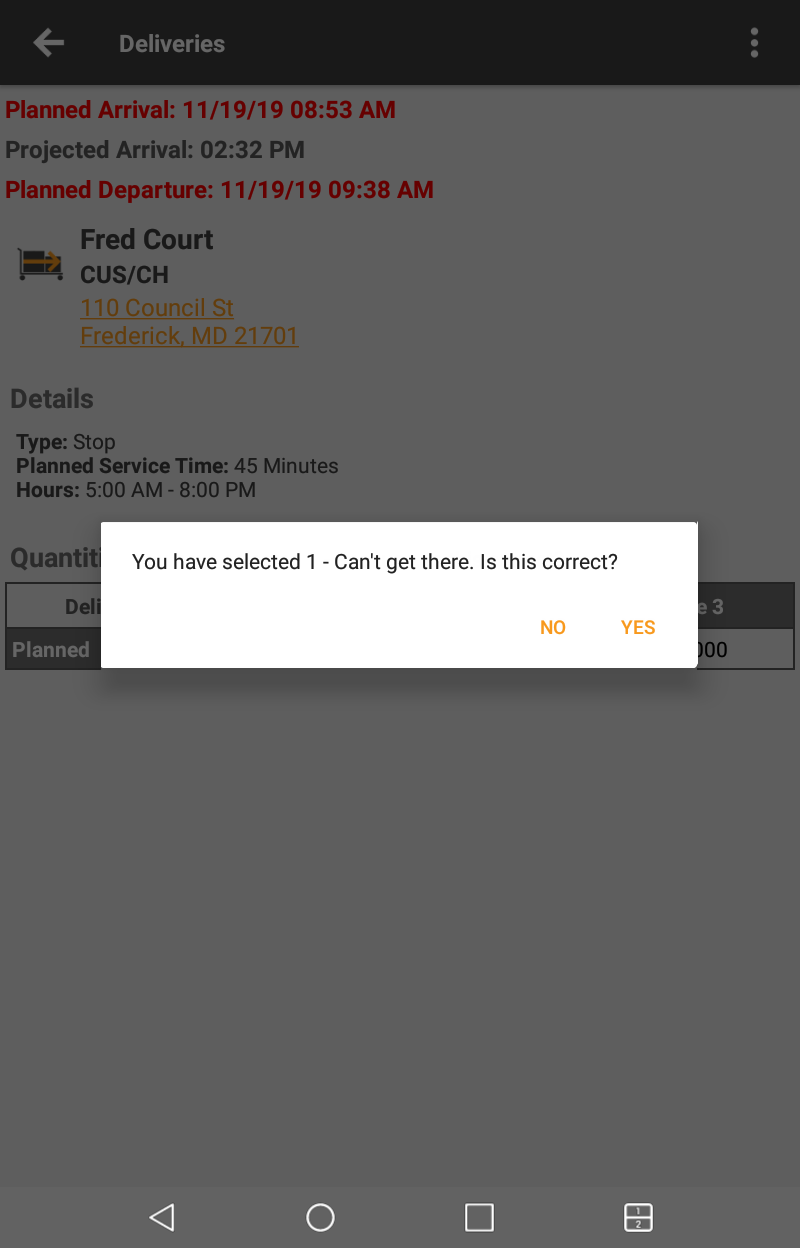
On the mobile device, when the worker cancels a stop or order, and reason codes exist, the worker must choose a reason code for the cancellation. When asked if the ID and description are correct, the worker answers Yes or No. If the worker answers Yes, the route can be continued. If the worker answers No, the worker is given the opportunity to change the reason code that was chosen.
Roadnet Tracking Enhancements
Routes Without An Origin Depot Use the First Stop
Found in Roadnet Anywhere Tracking
Previously, when a Roadnet Anywhere Tracking route did not have an Origin, the Destination of the last route completed on the device was used as the Origin. If there was no Destination on the last route, it used a depot in the region. To simplify how an Origin is assigned if the route is not created with one, the first stop is now assigned as Origin. An unknown stop will be created for the point at which the route started.
Note: The Create Unplanned Origin when Route is Loaded region setting has no effect on Roadnet Anywhere Tracking routes.
Workers Can Add Stops
Found in Roadnet Anywhere Tracking for iOS
Currently Roadnet Anywhere Tracking for Android users are able to manually add stops to their trips. Now, iOS users can also add stops. When a stop needs to be added to a route, the worker can choose to arrive at a location in the location list or search for a specific location.
Note: The Allow Tracking Worker to Add Stops region setting found at Phone Settings>Smart Phone - Allowed Worker Actions must be enabled for the worker to be able to add stops.
Sending Pictures With Messages
Found in Roadnet Anywhere Tracking for iOS
Currently, Roadnet Anywhere Tracking for Android users are able to attach a picture to a message to prove where a package was left or to show that a product was damaged while on the truck. Now, iOS users have the same capability. Workers who use iOS mobile devices can now take a picture or include an existing photo when sending a message in Roadnet Anywhere Tracking.
To take a picture and send it with a message, the worker simply presses the Camera icon and then Take Photo.
To include a photo that already exists on the mobile device, the worker presses the Camera icon, presses Choose Existing, and then finds the photo on the mobile device.
After a photo is taken or an existing photo is chosen, the worker presses Use Photo and a thumbnail of the picture displays at the bottom of the screen. The worker enters text for the message and then presses Send.
![]()
![]()
Roadnet Mobile Manager Enhancements
Viewing Information for Multiple Regions
Found in Roadnet Mobile Manager
Previously, when viewing information in Roadnet Mobile Manger, you could only see information for one region at a time. If you wanted to see another region, you needed to return to the Change Region Context window and change the region setting. Now, you can see information for more than one region at a time.
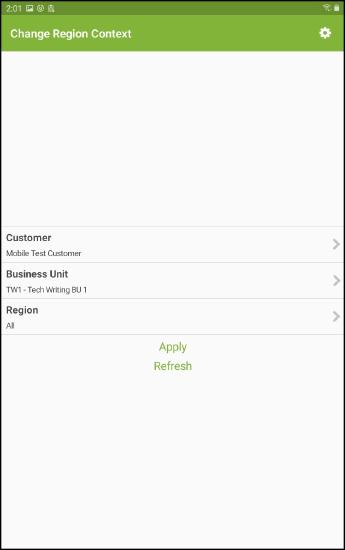
When you log in and confirm the business unit and region, if you want to change the region for which information is displaying, simply tap the Region field and choose the regions you want to see. Tap Apply to return to the Change Region Context screen. The Region field reflects the regions you chose.
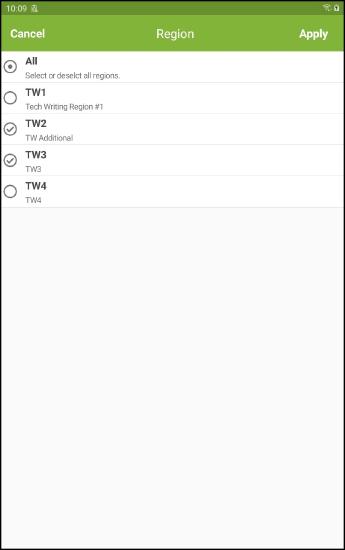
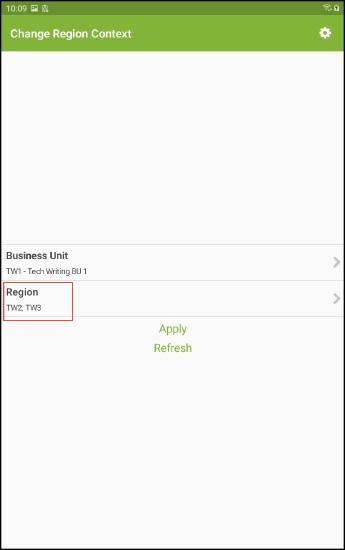
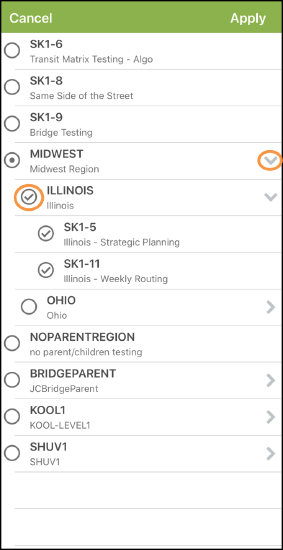
If your company uses region hierarchy, tap the arrow to the right of a level to see the levels below it. Tap the circle to the left of a level to place a check in the circle. Any levels below it are also checked. Tap Apply and information for that level and all the levels below it display in Roadnet Mobile Manager.
Tap Apply on the Change Region Context screen to save the Business Unit and Region(s). The Overview screen displays with information for all the regions that you chose.
Note: You can also access the Change Region Context screen while using Roadnet Mobile Manager. Tap the Options icon and then tap Change Region Context.
Viewing Order Status
Found in Roadnet Mobile Manager
The purpose of Roadnet Mobile Manager is to help you make informed decisions and answer questions, even while you are away from your desk. In a continued effort to add helpful features, an Order Status look up has been added to it.
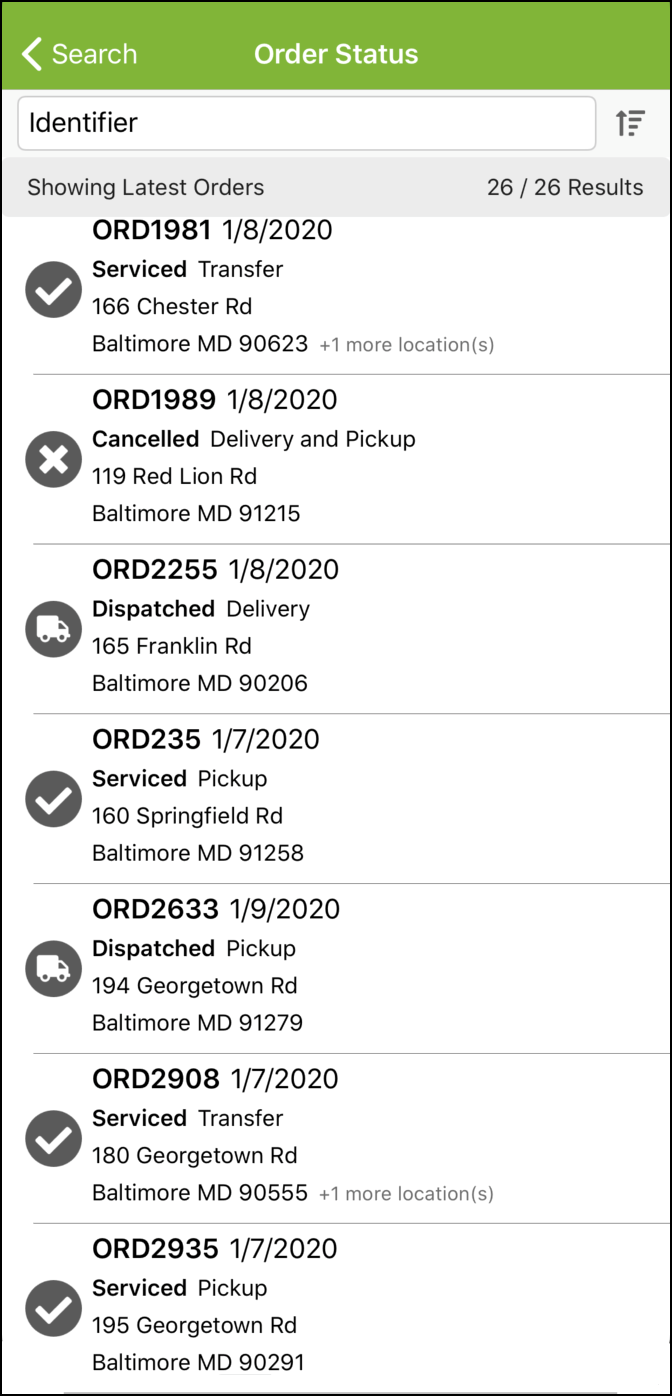
Now, when you log into Roadnet Mobile Manager, the Overview screen contains a section with Order Status information. The Order Status card shows the number of orders that have a status of dispatched, serviced, or other and what type of orders they are: pickup, delivery, pickup and delivery, or transfer orders.
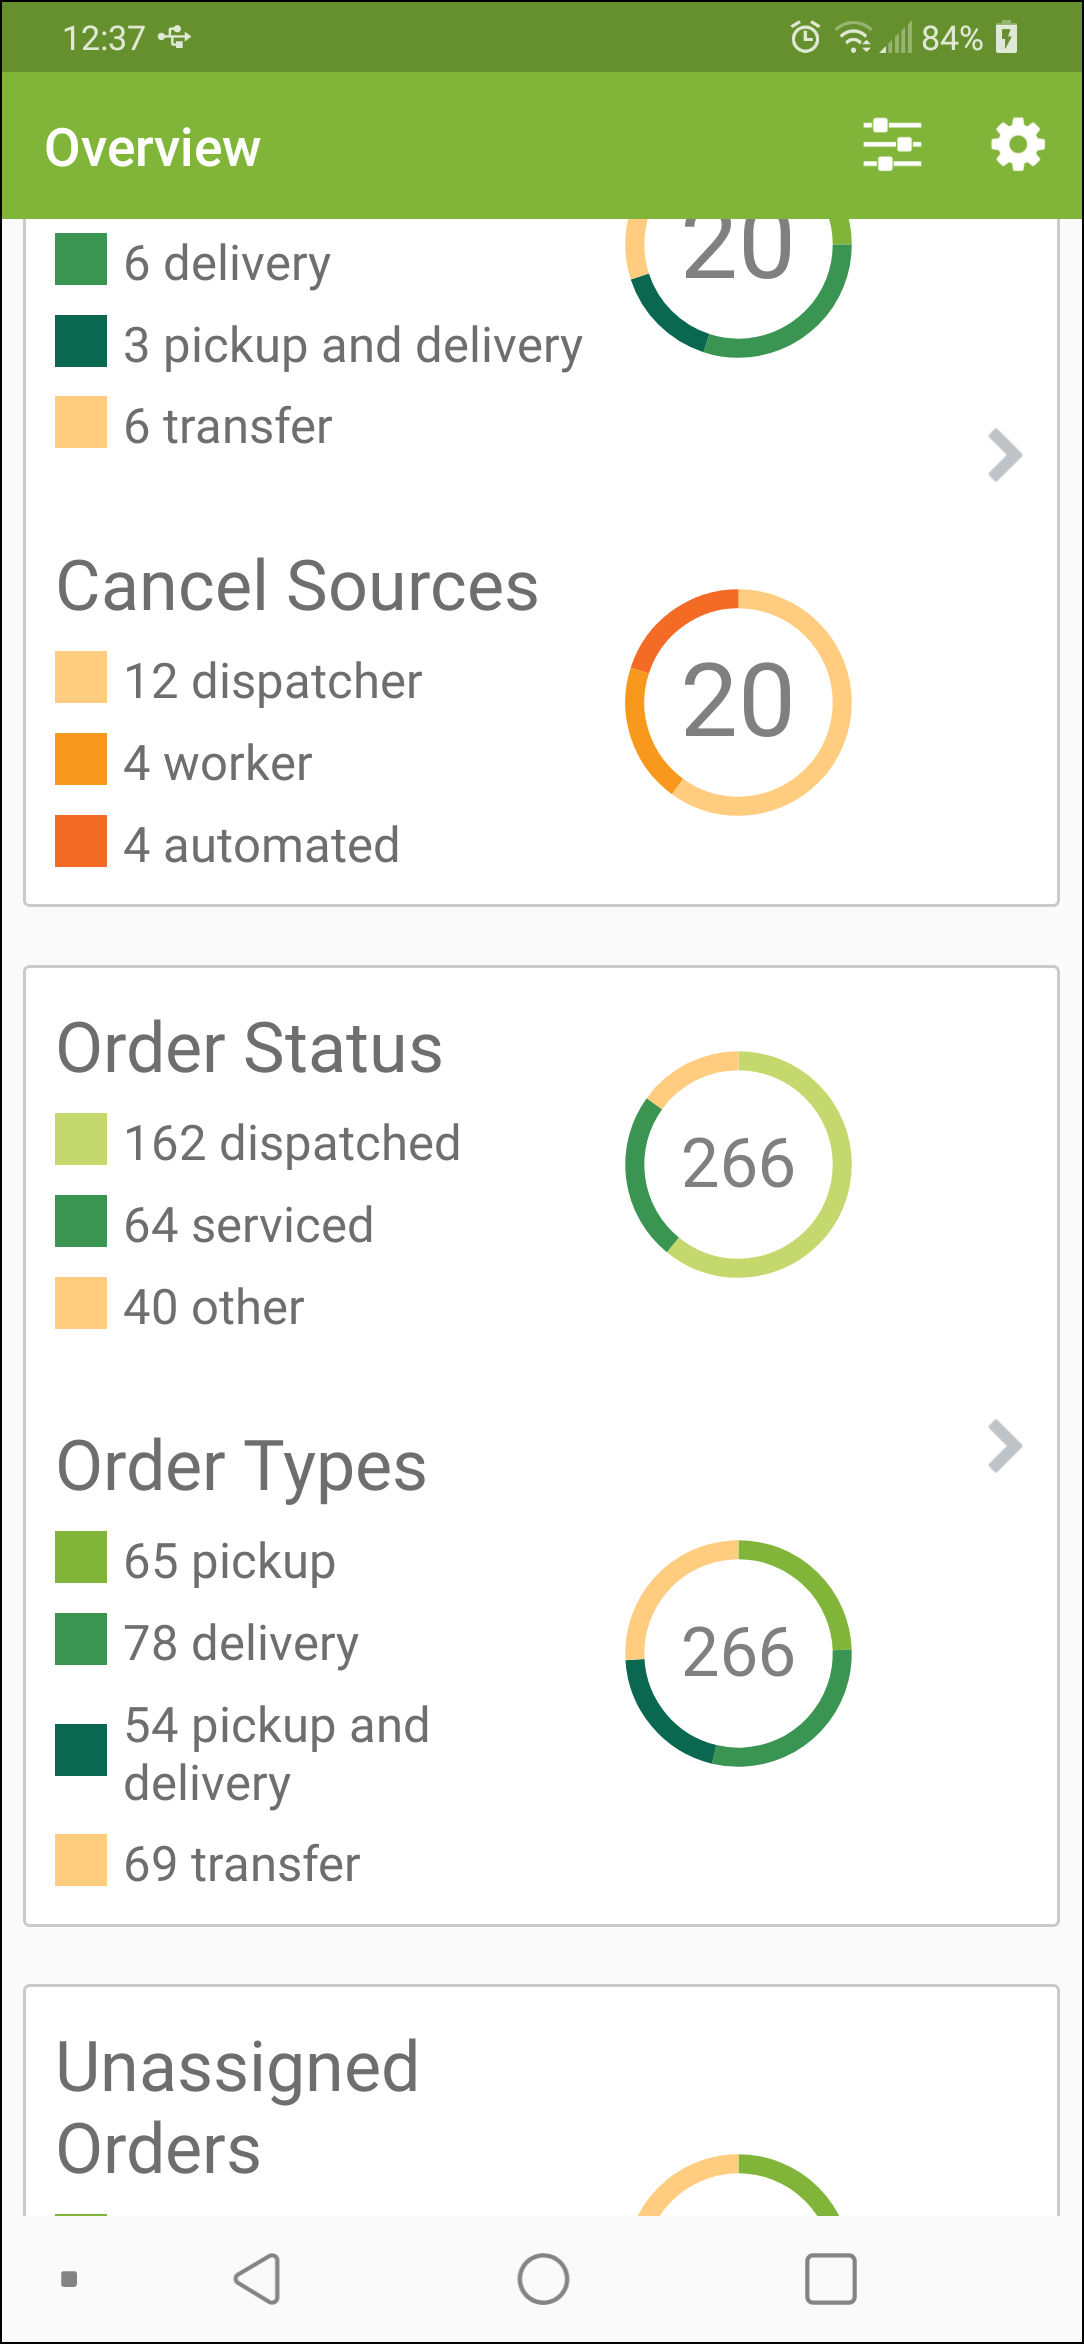
Tap the Order Status card to go to the Order Status screen.
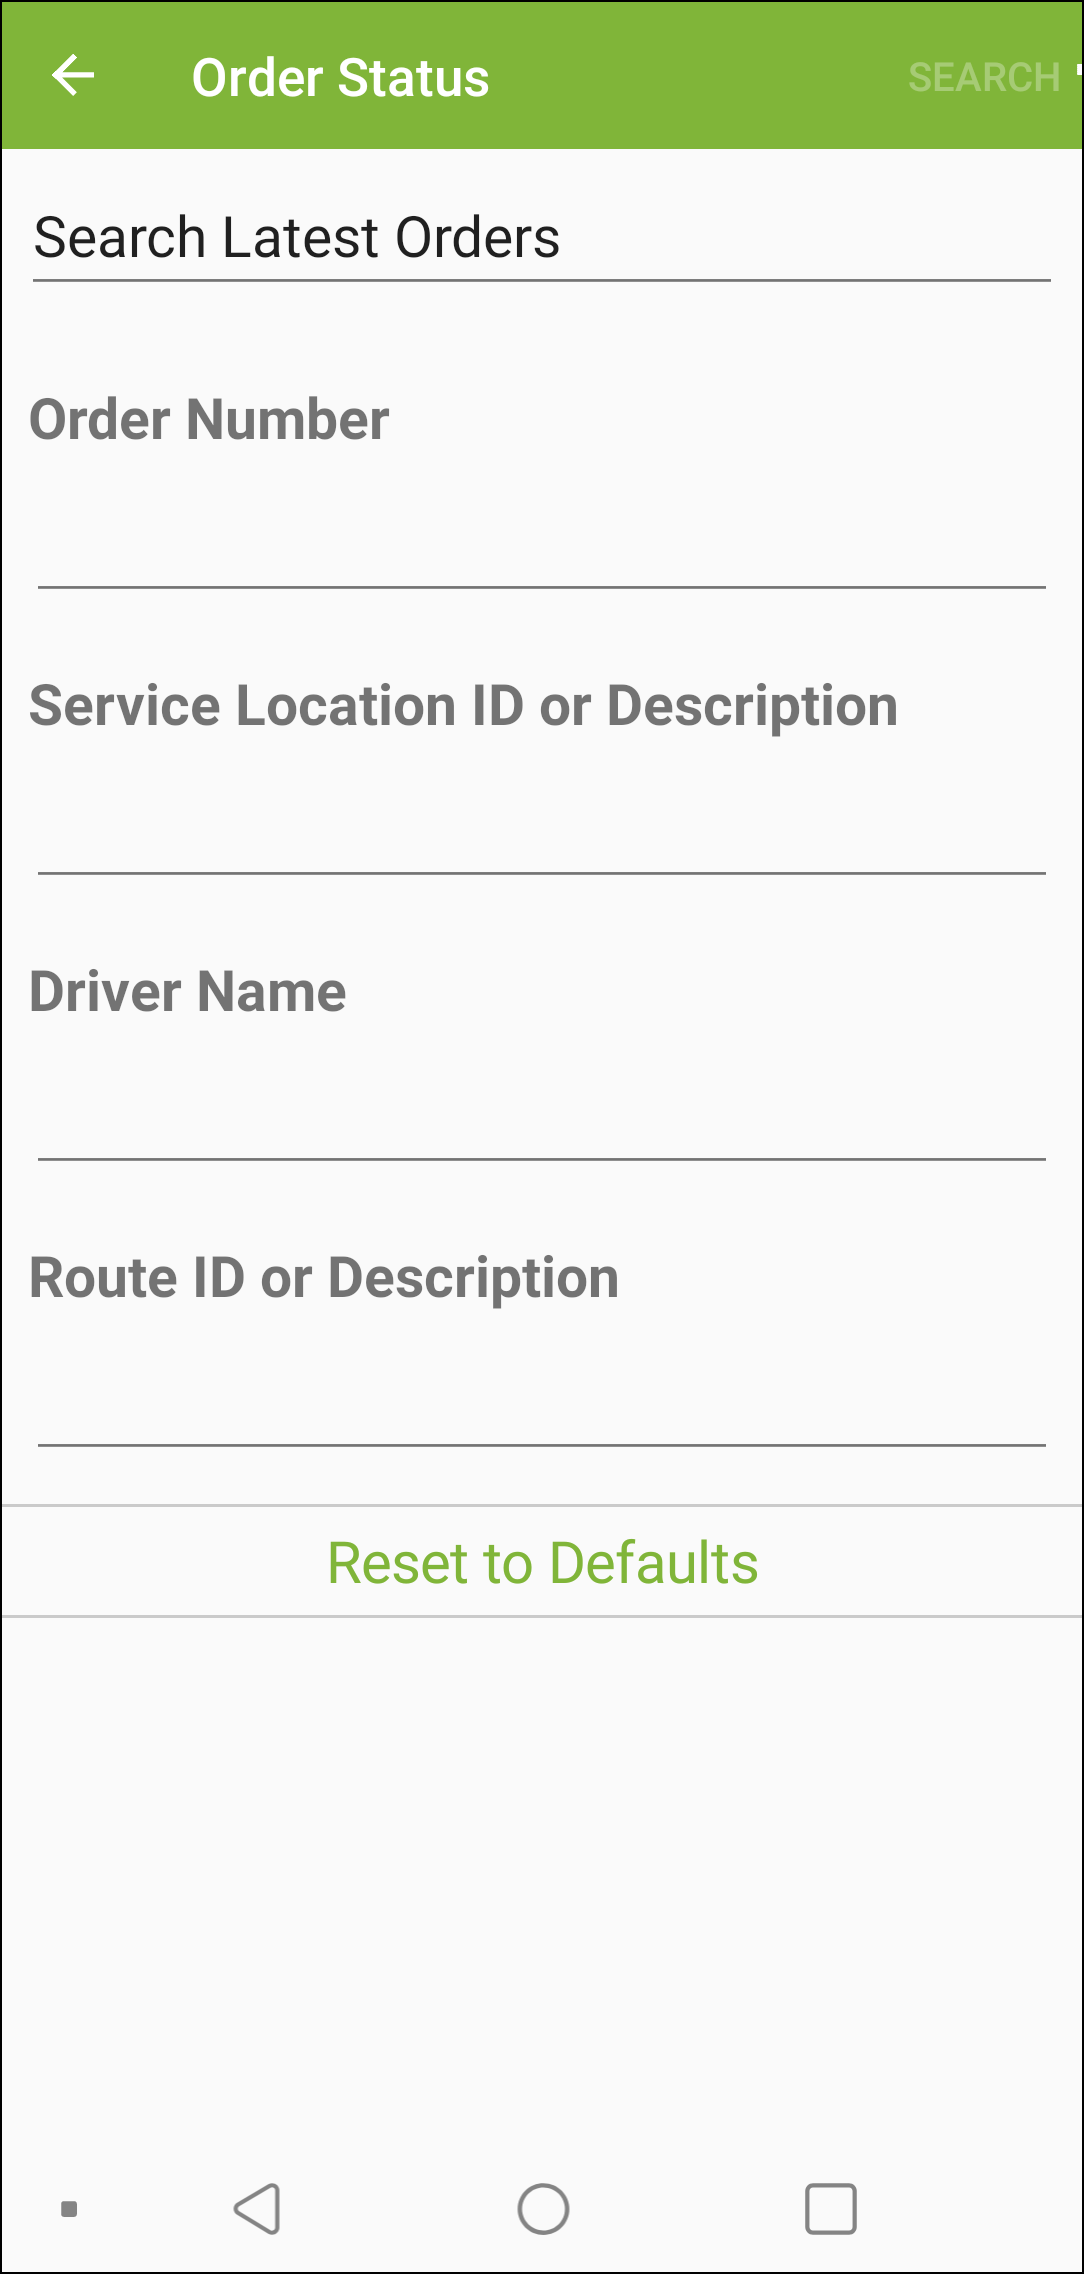
The Order Status screen allows you to search for orders and see live and historical information about them. After searching for your order you can view details about the order, including delivery information. This can be very handy if you want to determine if an order has been serviced, or when it is predicted to be serviced.
The first step in checking on an order status is searching for the order you want to review. Choose your Order Date Range and then enter your search criteria. When you tap Search a list of orders displays that matches your search.
The Order Status List screen shows you a list of all the orders that meet the criteria that you searched for on the Order Status screen. You can choose from the list the order you want to see in more detail. To see more details about an order, tap the order you want to see.
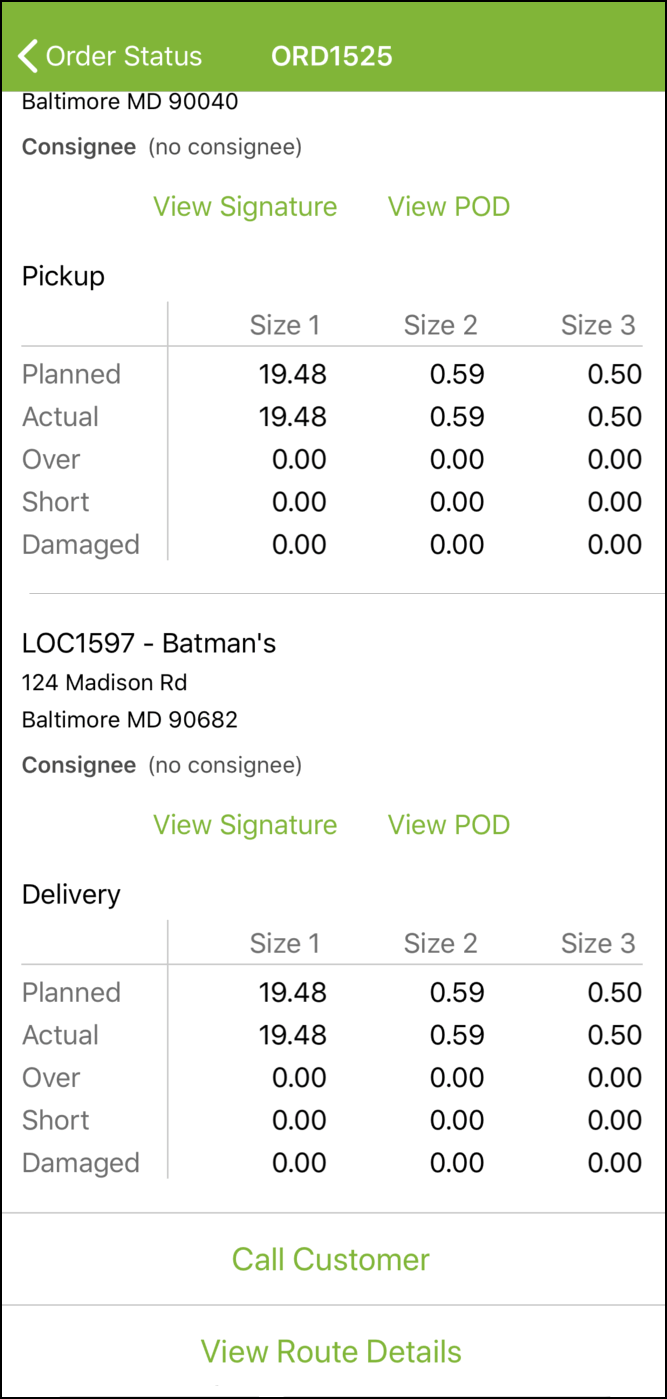
The Order Details screen displays showing you detailed information about an order, based on the order's status: Cancelled, Delivered/Serviced, Unassigned, Unserviceable/Undeliverable, In Progress/Dispatched/Assigned, or Unknown.
If the order was serviced and a Consignee is available, the Consignee name displays. If a signature is available, you can tap View Signature to see the signature that was collected. If a proof of delivery image is available, you can tap View POD to see the picture that was collected.
Note: Non-transfer orders display the single service location followed by the delivery quantities and pickup quantities. A transfer order displays the pickup service location followed by the pickup quantities and then the delivery service location followed by the delivery quantities.
Quantities for Planned, Actual, Over, Short, and Damaged are available for Sizes 1, 2, and 3 for any pickups and/or deliveries on the order. If you use line items, you will not see them in the order details. Line item quantities are rolled up into the order quantity.
From the order details screen, you can also call the customer and go to the details screen for the route that the order is assigned to.
Insight Enhancements
Viewing Omnitracs Navigation Information
Found in Insight
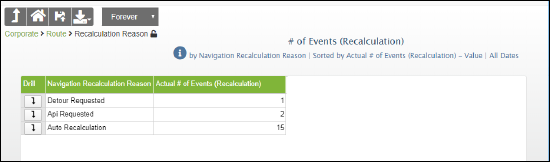
If you want to analyze your navigation information to see how many times workers deviate from a path or how many times a route path was recalculated, Insight can now show you that information. Omnitracs Navigation information is now available in Insight.
Use the # of Events (Recalculation) template to analyze your navigation information and group your report by navigation events based on Mobile Device, Telematics Device, or Recalculation Reason. To see more specific navigation information, you can add the new navigation Measures to this or any other appropriate template. Measures that have been added to Insight include # of Events (Recalculation), Miles (Remaining after Recalculation), and Time (Remaining after Recalculation).
When grouping by Mobile Device or Telematics Device, the default is to show the description, but you can change it to show just the ID or both ID and Description. To change what you see, click on the Settings menu and then click Preferences. Check ID and/or Description for Mobile Device and/or Telematics Device to define what information you want to see.
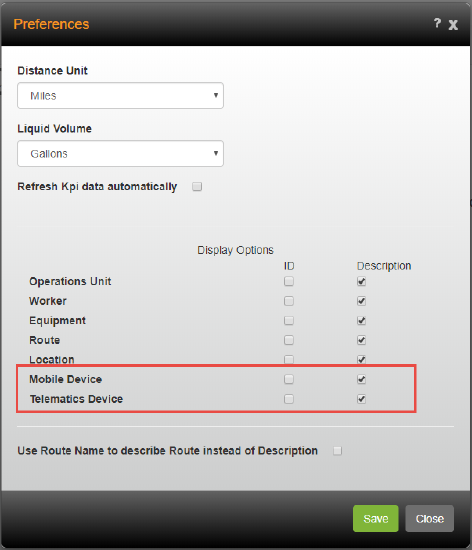
Note: If you use Telematics devices, you will also see the Provider for the Telematics device.
Saving KPIs with Errors
Found in Insight
Previously, when you created or changed a KPI, before you could save it, the KPI had to be free from errors. Now, so that you can come back to a KPI that you are working on that may not be error free yet, you are able to save your KPI, even if it contains errors.
Note: You cannot save your KPI as a pdf or export an image if there is an error in your KPI.
Checking Your Stop Sequence Score
Found in Insight
You can have Insight determine how closely a worker stuck to the planned stop sequence on a route.
Using a simple sorting calculation, Insight can take a route's planned stop sequence and compare it to the actual stop sequence. The resulting percentage defines how much the worker deviated from the planned route.
Use the Stop Sequence Score template to show the Actual Stop Sequence Score for a route. By looking at the stop summary, you can determine which parts of the route were or were not followed by the worker.
The Stop Sequence Score measure has been added to Insight and can be added to any appropriate KPI.
Omnitracs Navigation
Improving Your Navigation Experience
Found in Omnitracs Navigation
- A number of small changes have been made to Omnitracs Navigation to enhance your experience while navigating through your trip.
- Windows and menus that pop up on the screen will automatically close after 15 to 30 seconds of inactivity.
- The map will recenter on the vehicle's position after the worker moves the map and then there is no activity for 15-30 seconds.
- The map will automatically return to the default zoom level when the worker begins traveling.
- If you use Compliance, an audible notification is received when the HOS Clock changes to yellow or red.
- An audible notification is received when there is a change to turn-by-turn directions when the worker is approaching or arriving at a destination.
- The worker will notice that the Alerts settings page has a new look.
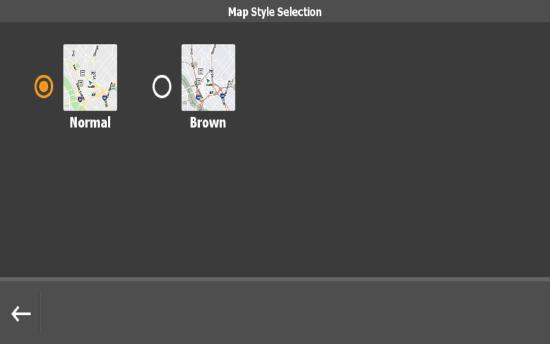
- You can change the color of the roads on the map you are viewing so that roads are easier to distinguish when other features are enabled and cluttering the map. To change road colors press Menu > Settings > Map Settings > Map Style. Choose the map style you want to see.
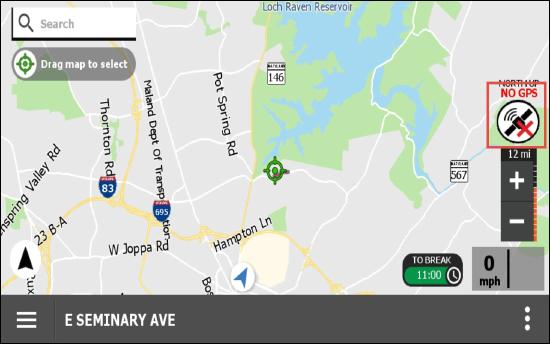
- If the device's Location setting is turned off or not set to High Accuracy, the No GPS icon displays on the map to indicate poor or no GPS available for the navigation application.
Updates to the Search Feature
Found in Omnitracs Navigation
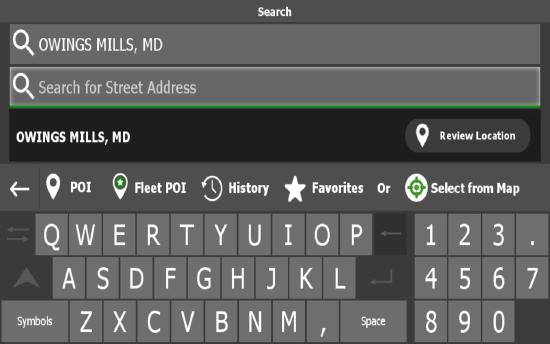
Previously, in Omnitracs Navigation, the city center and street address searches were on different screens. To move from a city center search to a street address, you had to return to the Map or Menu and start a new search. Now, the two search options are on the same screen, making it easier and quicker to go from a city center search to a street address search.
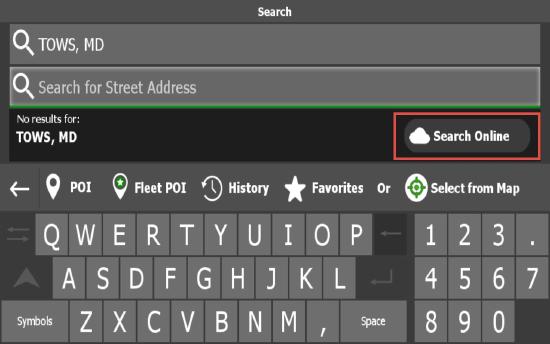
In addition, when you search for an address or city and Omnitracs Navigation is unable to find it, you can now use the Search Online option. Omnitracs Navigation will use Roadnet Anywhere's search capabilities to find the location. Simply press Search Online.
Simulating A Trip
If your workers want to see the roads and turns that Omnitracs Navigation will direct them to when they run a trip, they can use the new simulation mode to visualize a trip. The simulation mode allows your workers to start a trip and view a simulation of it. The simulation uses the vehicle and path settings that are defined in Omnitracs Navigation to show the worker which roads will be traveled in order to reach the destination.
Before using simulation mode, the driver should plan a trip or select one from their list of trips. To start simulation mode, press Menu and then press Enable Simulation Mode. Omnitracs Navigation will quickly run through the trip on the map, simultaneously speaking each turn that is part of the path.
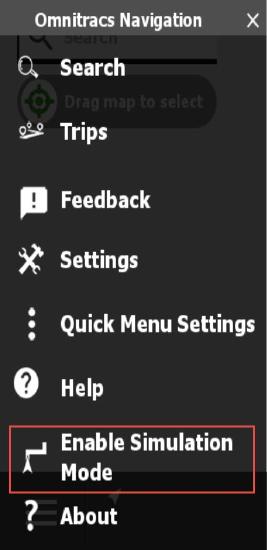
Warning: Workers should not use simulation mode while the vehicle is in motion.
To end simulation mode, press Menu and then press Disable Simulation Mode.
Updates to Mobile Devices for Omnitracs Navigation
Found in Roadnet Anywhere Web
The mobile device you use with Omitracs Navigation needs to be authenticated on the host before the application can be used. One of the ways to do this is to have an authentication code sent from the host system, which the driver tehnnenters on the device. If you were using this option, this code was previously visible in Roadnet Anywhere, but not on the same page where the other Omnitracs Navigation setup was done. Now, this information has been moved to the Applications page so that all information dealing specifically with Omnitracs Navigation can be seen at once. In addition, you can now see whether Omnitracs Navigation has been activated on the mobile device.
The following changes were made:
- The Activation Code was moved from the Details page to the Applications page
- You can see when the activation code will expire
- You can request a new activation code if the existing code has expired
- You can see if Omnitracs Navigation has been activated on the mobile device
Click on the Maintenance icon to open Maintenance. Click the green button and scroll to Mobile Devices; the Mobile Devices list opens. Click the Edit icon to update an existing device. The Mobile Devices window opens. Click on the Applications tab to see the Omnitracs Navigation information.
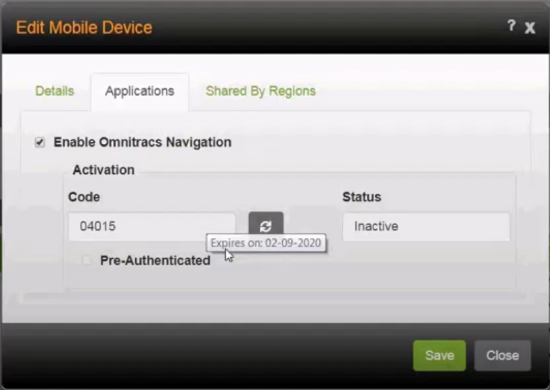
If your organization is using activation codes, once the device has been saved, the Code will be displayed. To see when the code expires, hover over the code; a tool tip appears showing the device's expiration date. To request a new activation code, click the Refresh icon. The driver will need to enter the activation code on the mobile device before using the application.
If your organization is using the mobile device's phone number or serial number to connect with the system, Pre-Authenticated will be checked. You will not need to use an activation code.
To see whether Omnitracs Navigation has been started on the mobile device, check the Status. Once the application has been installed and started, the Status will change from Inactive to Active.
Click the [Save] button to save any changes.
Enhancements to UVA Window
Several enhancements have been made to the UVA window:
- Two new filters, Distance and Drive Time, enable users to narrow the search list and more easily reclassify multiple UVA events at once.

The Distance filter allows users to limit results to UVA events where the distance is less than the value selected from the filter. They can choose a value between 1 and 10 miles.
The Drive Time filter allows users to limit results to UVA events with a total drive time that is less than the value selected from the filter. They can choose a value between 1 and 5 minutes. - Users can now expand the UVA window to fill the browser by selecting the full screen button in the top right corner of the window.

- The Export button now exports all rows loaded.
- The UVA window now loads up to 1,000 rows per page. A vertical scroll bar allows you to move up and down through the rows.

Roadnet Anywhere 5.7 Software Corrections
| Key | Read Me Notes | Component/s |
|---|---|---|
| RA-40171 | Cancel/Uncancel is now allowed on a route in progress as long as there is at least one valid stop associated with the task on the route. | Dispatching |
| RA-38825 | Tracking routes run on an iOS device now allow route note photos. | iOS Mobile |
| RA-34850 | Added cities in Hawaii to be used for position text that is formatted as "2.1 mi N of Makaha, HI" which is used for things like Equipment Position History map tooltips. | Latitude |
| RA-41426 | The "Back" button has been renamed "Done" and will close the signature capture screen when pressed on iOS devices. | Roadnet Mobile - iOS |
| RA-42502 | Double tapping is now prevented in Region and Business Unit selection lists. | Roadnet Mobile Manager |
| RA-43403 | The Motion Icon will now display the correct colors for active route equipment. | Roadnet Mobile Manager |
| RA-43523 | Roadnet Mobile Manager Overview values for Equipment Motion State now match the values displayed when applying Equipment filters. | Roadnet Mobile Manager |
| RACS-4102 | Mobile Manager now handles errors when retrieving dashboard metrics to allow the app to still be used | Roadnet Mobile Manager |
| RA-44121 | There is now a field to enter a value for the Order's Integer custom property. | Routing |
| RA-43431 | Previously, the Guaranteed End Date option on a Routing Pass did not work properly when used with Multi-Day Routing or in routing sessions that spanned more than one day. This has been corrected, and Guaranteed End Date works properly in these situations. | Routing |
| RA-44398 | There was a problem that when Prepare for Next Day is executed the routes that are copied to the new session had their start dates incremented by one. Route start dates now remain the same as in the original session. | Routing |
| RA-44490 | During the Save Session As operation there is an option to change the session date for the newly created copy. If the date is changed the route start dates are also automatically adjusted. However, this causes some calculated values to be stale, like stop arrival dates. To update these values the routes had to be manually recalculated after the copy operation is finished. This change does the calculation automatically after the Save Session As operation so all calculated values are up to date right after the new copy is created. | Routing |
| RACS-3694 | There was an issue where users trying to move a region within a region hierarchy caused an error. This has been corrected. | Admin |
| RACS-3854 | There was an issue that was preventing new Compliance customers from being able to access Regions in Roadnet Anywhere Web. This has been corrected. | Admin |
| RACS-3835 | There was an issue that was preventing Compliance customers from enabling region hierarchy. This has been corrected. | Admin |
| RACS-3981 | Users now have the option to choose the Atlantic Time Canada (AST) time zone without checking Display International Timezones. | Admin |
| RACS-3418 | The Import Routed Solution data transfer layout did not include the route custom properties. This has been corrected, and the route properties are now listed. | Data Transfer |
| RACS-3917 | There was an issue that was causing a fatal error when trying to import equipment manufacturers in Roadnet Anywhere Client. This has been corrected. | Data Transfer |
| RA-44526 | There was an issue that caused an error when the user tried to delete a mobile device through the import process, and the device was not deleted. This has been corrected. | Data Transfer |
| RACS-4029 | The Route State column has been removed from the route list in Stop Analyzer. All routes in Stop Analyzer are completed, so the column contains extraneous information. | Dispatching |
| RACS-4015 | There was an issue that was preventing suspended routes from opening properly in FleetView. This has been corrected. | Dispatching |
| RACS-3811 | There was an issue that was causing some users to receive an error when adjusting speicifc types of actual delivery information on completed routes. This has been corrected. | Dispatching |
| RACS-3920 | There was an issue that was preventing users from using Cease Dispatch in some situations. This has been corrected. | Dispatching |
| RACS-4001 | There was an issue where the user could not cancel a stop after it was transferred from an in-progress route. This has been corrected. | Dispatching |
| RA-44529 | There was an issue that was preventing GPS pings for routes with a large number of orders and line items from appearing in FleetView. This has been corrected. | Dispatching |
| RACS-3916 | There was an issue where is two depots existed with the same ID - one from the Roadnet Transportation Suite and one from Roadnet Anywhere - Insight was not able to properly process data for those depots. This has been corrected, and now if a Roadnet Anywhere depot is renamed to match the ID of a Roadnet Transportation Suite depot, all routes will use the Roadnet Anywhere depot in Insight. | Insight |
| RACS-3852 | There was an issue that was preventing actual stop data from being displayed properly for some routes in Insight. This has been corrected. | Insight |
| RACS-3719 | Insight will now properly change from single-level region mode to multi-level region mode when business units are added or deleted. | Insight |
| RA-44532 | There was an issue that prevented some idling data from being properly calculated in Insight, causing Insight and the Idling report to report different results. The data is now properly calculated in Insight, and it should match the Idling report. | Insight |
| RACS-3827 | A defect in the Equipment VIN validation causing the application to close when attempting to edit an equipment has been identified and resolved. | Maintenance |
| RACS-3898 | A defect in the Equipment VIN validation causing valid VIN values to be reported as invalid, has been identified and resolved. | Maintenance |
| RACS-3849 | Customers who are now filtering by depots will now see a more explicit message when trying to edit items that are not assigned to that depot. | Maintenance |
| RACS-3809 | There was an issue where, if the tabs in a perspective were minimized, the tab names disappeared. To prevent this issue, the auto-hide docking hints that permitted minimizing tabs to the side of the window in Route Planning were removed. | Miscellaneous |
| RACS-3844 | There was an issue that caused the user to receive an error when entering the application if the region context was set to a deleted region. This has been corrected. | Miscellaneous |
| RACS-3783 | There was an issue that was causing the vertical scroll bar to disappear in lists in Roadnet Anywhere Web. This has been corrected. | Miscellaneous |
| RACS-3505 | Customers who were using a newer version of Roadnet Anywhere Client were being prompted to "upgrade" to an older version. This has been corrected and users are no longer prompted to "upgrade" to an older version of the application. | Miscellaneous |
| RACS-3948 | There was an issue that was preventing the Last Contact information from exporting properly when using Device Diagnostics. This has been corrected. | Miscellaneous |
| RACS-3863 | There was an issue that was preventing Active Alert messages from being sent if an attachment was included with the message. This has been corrected. | Miscellaneous |
| RACS-3865 | Changes were made so that time using the Brazil time zone will not longer reflect Daylight Savings Time, as Brazil no longer uses it. | Miscellaneous |
| RACS-3932 | The region filter for Centralized Messaging has changed from saying "Filter by Selected Regions" to "Filter Inbox by Selected Regions" to make it clear that the region filter only applies to the Inbox. You can not filter on the other lists. | Miscellaneous |
| RACS-3906 | Search results in Roadnet Anywhere Web were not being save properly. This has been corrected. | Miscellaneous |
| RACS-3877 | The copyright on the Roadnet Anywhere Client Help About screen has been updated to show the proper information. | Miscellaneous |
| RACS-3986 | There was an issue that was preventing users from adding event subscriptions. This has been corrected. | Miscellaneous |
| RACS-3728 | There was an issue where, if a break existed at a layover location, breaks were being auto arrived instead of arriving at the layover location. This has been corrected. | Mobile |
| RA-44528 | An issue causing Roadnet Mobile to stop sending GPS has been resolved. | Mobile |
| RA-44503 | There was an issue that was causing a route to auto complete and cancel all the stops when the driver logged in on the mobile device. This has been resolved. | Mobile |
| RACS-3771 | There was an issue that was preventing the Omnitracs Navigation version from being displayed in Mobile Device Diagnostics. This has been corrected. | Mobile |
| RACS-3793 | There was an issue where Roadnet Tracking routes were getting auto completed pre-maturely if Last Stop is Destination was used, and there was a break at the last stop. This has been corrected. | Mobile |
| RACS-3846 | There was an issue that prevented the Consec. Time Off times in the HOS and Delivery mobile applications from matching. This has been corrected. | Mobile |
| RACS-3945 | There was an issue preventing mobile forms from being shown as done when the required fields were completed. This has been corrected. | Mobile |
| RA-44613 | There was an issue that was preventing routes from unloading from the mobile device. This has been corrected. | Mobile |
| RA-44581 | There was an issue where the mobile device was not properly refreshing when the driver added stops to a route. This has been corrected. | Mobile |
| RACS-3760 | There was an issue that was preventing the link that allowed the drivers to load Omnitracs Navigation onto their device from being sent. This has been resolved. | Navigation |
| RA-44468 | There was an issue that was preventing some state's maps from being downloaded to the mobile devices. This has been corrected. | Navigation |
| RACS-3436 | There was an issue that was causing users to receive an error message when activating Navigation on the mobile device. This has been corrected. | Navigation |
| OTNAV-11184 | The notification message says the map version and the default map set changed even though only version changed. The message has been corrected. | Navigation |
| OTNAV-11297 | There was an issue where the vehicle length and height on the mobile device did not match the settings in Roadnet Anywhere. This has been corrected. | Navigation |
| OTNAV-11072 | Users were able to open the Search and search for addresses and POI's while the vehicle was in motion. For safety reasons, this has been changed and the Search window is locked while the vehicle is in motion. | Navigation |
| OTNAV-11065 | On some screens, if there was a long street address, the Notes icon was overlapping the address. This has been corrected. | Navigation |
| OTNAV-10628 | A change was made which will improve the performance for route calculations. | Navigation |
| OTNAV-11018 | There was an issue that was causing POI searches to freeze or produce no results. This issue has been corrected. | Navigation |
| RACS-3940 | Completed outes unload successfully for Android devices where options "Associate Unknown Stops" is enabled and "Auto Arrive Destination" is disabled. | Roadnet Mobile - Android |
| RACS-4032 | The routes displayed for loading on an iOS device now honor the the "Allow Worker to Select Route" - "Smart Phone" settings. | Roadnet Mobile - iOS |
| RACS-3939 | There was an issue that was preventing drivers from being able to call a customer from Roadnet Mobile if the phone number contained parantheses "( )". This has been corrected. | Roadnet Mobile - iOS |
| RACS-3892 | There was an issue that was preventing the Modeling component in Roadnet Anywhere Web from opening properly. This has been corrected. | Routing |
| RACS-3911 | There was an issue that was causing the route color to change when a route was changed in Route Planning. This issue, which only affected customers using Strategic Planning and Routing, has been corrected. | Routing |
| RACS-3765 | There were some issues that were causing inaccurate travel times on long distance routes. These have been corrected. | Routing |
| RACS-3826 | There was an issue that was causing Compliance customers to receive an error message when deleting Telematics devices that were not XRS devices. This has been corrected. | Telematics |
| RACS-3658 | There was an issue where a lack of ignition data from the Telematics device was causing the route to complete at the wrong location. This has been corrected. | Telematics |
| XRS-16712 | An issue that caused some ELD Mode companies to include active AOBRD vehicles has been resolved. | Compliance |
| XRS-16277 | Some UVA events were not being removed from the UVA window after they were assigned. This issue has been resolved. | Compliance |