Omnitracs One (Roadnet Anywhere) 6.1 New Features and Enhancements
Common
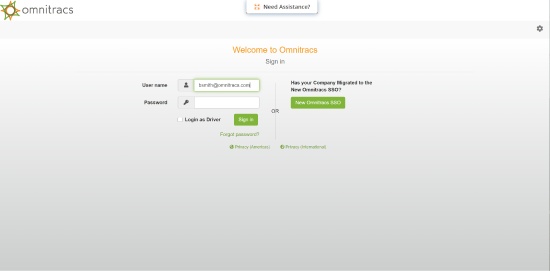
- The Login screen now has two login options. The process to login remains the same.
- The localizations for Spanish, Portuguese and French have been updated throughout Omnitracs One, with the exception of Compliance.
- You can now choose specific cultures for Canadian English and Canadian French.
- There are new guides tours in the Need Help menu for editing a business unit, adding a region, adding a role, and adding a user.
Routing
- If you are using compartment routing, you can have line items split so that they can be loaded in multiple compartments if needed.
- You can create a fleet of specific equipment that is available for an individual routing session.
- You can specify which SKUs are available at each depot, and use that information when creating routes and reloads.
- You can now see the service location's delivery days in the Stop Template list to help assure you are assigning the stop template to a route template with a valid delivery day.
- You can choose to have the map stop marker show the order selector with the stop number.
- If you are holding down the [Ctrl] key while using the lasso to select items on the map, selected items will be retained as you lasso more items until the [Ctrl] key is released.
Dispatching
- You can now monitor your trailers in FleetView to see where they are located.
- You can search for equipment within a specified distance of a location or address.
Equipment History
- You can now search for equipment that was near a specific location or address at a defined date to create a report.
- You can see GPS pings for Omnitracs Trailer Tracking devices, as well as SkyBitz devices.
- GPS pings that were sent via satellite are indicated by a satellite icon on the card.
Telematics
- You can have an exception generated when a Telematics device is unplugged from the equipment.
- You can see the device's current battery voltage in Telematics Diagnostics.
- There is enhanced logic for determining the region for an unplanned route.
- BlackBerry and Samara devices are now supported.
Strategic Planner
- When viewing a territory's routes on a map, when you hover over a stop the tooltip information now includes the stop week.
- A set of public APIs has been created, allowing you to create integrations with Strategic Planner.
Drive/Command
- You can select the default home page that will appear in Drive.
- You can choose whether drivers can rate stops/trips when completing an End task.
- You can choose to have ad hoc tasks show on a tab in Drive.
- The option to Show HOS as Tab has been removed from Command; the HOS tab will now always appear in Drive.
- Drive Mobile bundle customers who don't use trips have the option to remove the My Day Planner tab from Drive.
- You can now create tasks so the driver can complete a drop/hook.
- You can specify that selected stop types not be included in the Completed counter in My Day Planner.
- The Workflow - Universal Config - Map and Workflow - Universal Config - Navigation pages have been combined into a single page for ease of use.
- New choices on the stop Options Menu allow the driver to quickly see adhoc tasks.
- Drivers can access and preview a previous inspection under Adhoc Tasks.
- Drivers can add a roadside inspection stop to the trip, from the map.
- Drivers may see Bump Dock, Drop Trailer, and Hook Trailer tasks in their workflow.
- The header for a trip on the My Day Planner screen now includes a completed stop count that is based on a configuration you define in Command.
- Hazmat flags, included with Omnitracs trips, are now passed to Omnitracs Navigation.
Mobile Manager
- A new stop details screen shows more details about a stop
- Standard instructions entered for a service location are displayed on the stop details screen.
- If you want to move a stop that is on a current route, you can have Omnitracs suggest the most efficient routes to move it to.
- If you want to remove a stop from a current route, you can choose to unassign orders or leave them with the vehicle.
- You can turn Analytics tracking on or off, based on your personal preference.
Active Alert
- A new field on the Business Unit General tab, Default Active Alert Recipient Region is used for the Primary Region when adding an Active Alert Recipient.
- Active Alert Recipients are now added and managed independently of the service location.
- An Active Alert Recipient can be quickly assigned to a service location subscription.
Critical Event Video
-
To more accurately reflect the status of a video, the Camera Status report now displays a Summary status of “Expired” if the video you are looking for is too old and is no longer on the camera’s SD card. A video is considered expired if the date of the video you are requesting is earlier than the date of the oldest video on the SD card.
If the video the user requested is expired, the user receives a message with this information.
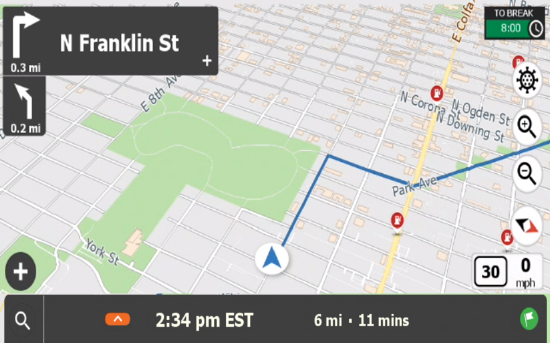
- Changes to the interface simplify the driver experience and expose more map space on the screen.
- The top banner has been removed. The ETA information has been moved to the bottom banner, which shows estimated time of arrival, remaining miles, and remaining time.
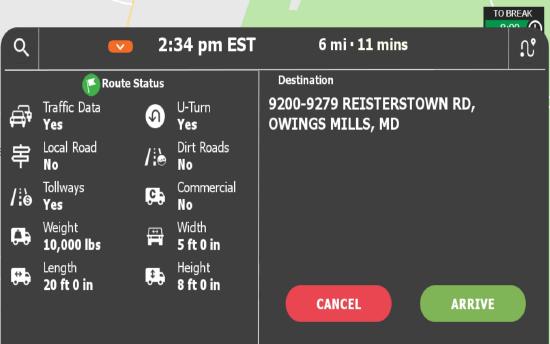
- A new expand arrow opens a window to show route status and destination address. It allows access to trips and lets you Cancel and Arrive the destination.
- The Detour option has been removed.
- The compass has been simplified. The text above it has been removed and the icon reduced in size. When selected, the compass changes the map orientation between 3D and 2D views.
- The Quick Menu has been replaced with the FAB icon for instant access to Day/Night mode, Report a Problem, and Volume on/off. When running a trip, the driver also has access to the route overview from the icon.
- Vehicle and Path Settings have moved to the top layer of the Main Menu.
Roadnet Mobile
- Drivers using Roadnet Mobile for iOS can now skip a signature when the signer is not available, as well as complete forms related to orders and line items.
Common
New Login Screen
In Omnitracs Web
In preparation for upcoming functionality and enhancements, the Login screen has been modified. However, there is no change to the login process at this time; simply enter your user name and password as normal.
Choosing Canadian Cultures
In Omnitracs Client
In order for dates to show correctly for Canada, you can now choose to have Omnitracs use French (Canada) or English (Canada) as the culture.
Note: Omnitracs Web determines the culture based on the browser settings.
- Click the Admin menu and scroll to Business Unit. The Business Units list opens.
- To update an existing business unit, click the Edit icon. The Business Unit window opens.
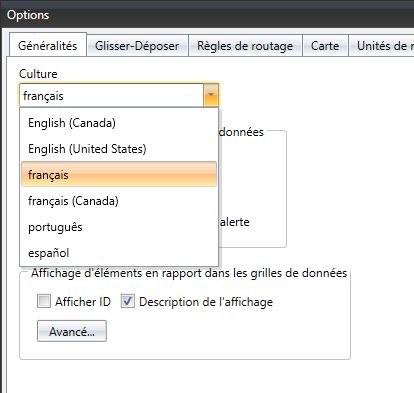
- On the General page, click Culture. Choose either English(Canada) or French (Canada).
- Click [Save].

Routing
Splitting Line Items when Creating Routes
If you use compartment routing, there may be times when you have orders that contain large quantities of specific items. Now, you can have those line items automatically split and placed in different compartments when routes are created so that they can fit on the truck. Omnitracs will use the size selected as the Equipment Capacity Restrictions on the pass to determine which line items need to be split, but you need to choose the size that should be displayed as a whole number. For instance, if you are restricting capacity on size 1 which is measured in gallons, but size 2 is barrels, you may want the split on size 2 because a barrel can not be split between compartments.
In Omnitracs Client
- Click the Administration menu and scroll to Regions. The Regions list opens.
- Click the Add icon, or select a region and click the Edit icon. The Regions window opens.
- Click the Routing Options tab. The Routing Options page opens.
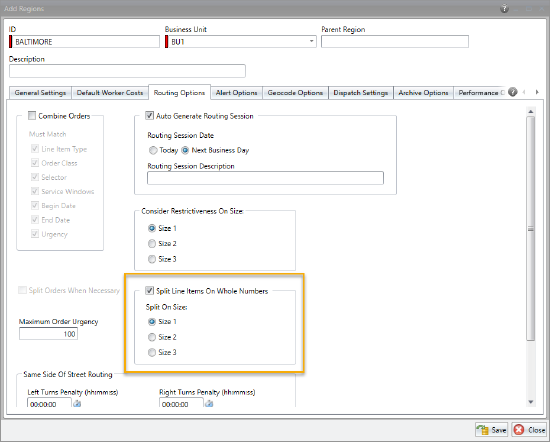
- Check Split on Whole Numbers. Then, choose the size that will be displayed as the whole numbers.
- Click [Save].
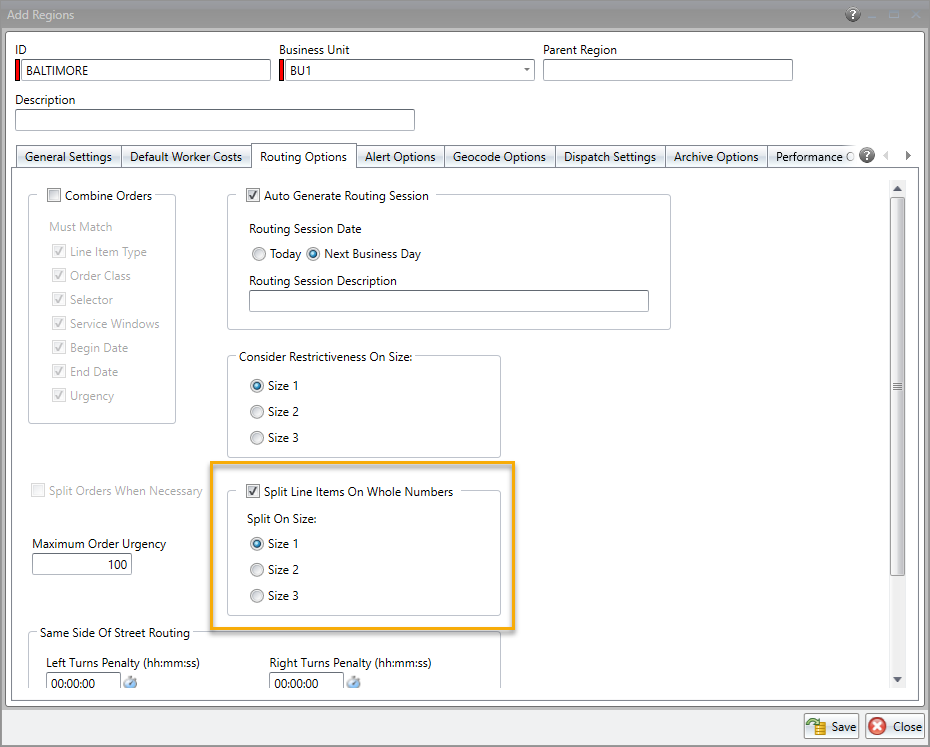
In Omnitracs Web
- Click on the Administration icon to open Administration.
- Click on the green button and scroll to Regions. The regions list opens.
- Click [Add] to add a new region or the edit icon to change an existing region. The Region window opens.

- On the General page, check Split Line Items on Whole Numbers.
- Click the Split on Size arrow and choose the proper size that will be displayed as the whole numbers.
- Click [Save].
Using a Daily Fleet when Creating Routes
If you are using compartment routing, it can be important to know specifically which pieces of equipment are available at each depot for that day's routes, instead of relying on the equipment types specified for the routing pass. Now, you can create a fleet of equipment that specifies which pieces of equipment are available for each session at each depot.
If you create a session fleet, Omnitracs has a slightly different process for creating routes. Since product types are restricted as to what compartments they can be loaded into, the restrictiveness of each order is calculated, and the most restricted order is considered first when routes are created. This should help reduce unassigned orders that would be difficult to manually load, since acceptable compartments would likely be filled.
There are several pieces to using a session fleet when routing:
- You need to choose the size that will be used to calculate the orders' restrictiveness.
- You need to create your session fleet.
- You have the option to ignore restrictiveness when running Create Routes.
- You can see the each order's restrictiveness value in the Unassigned and Orders grids.
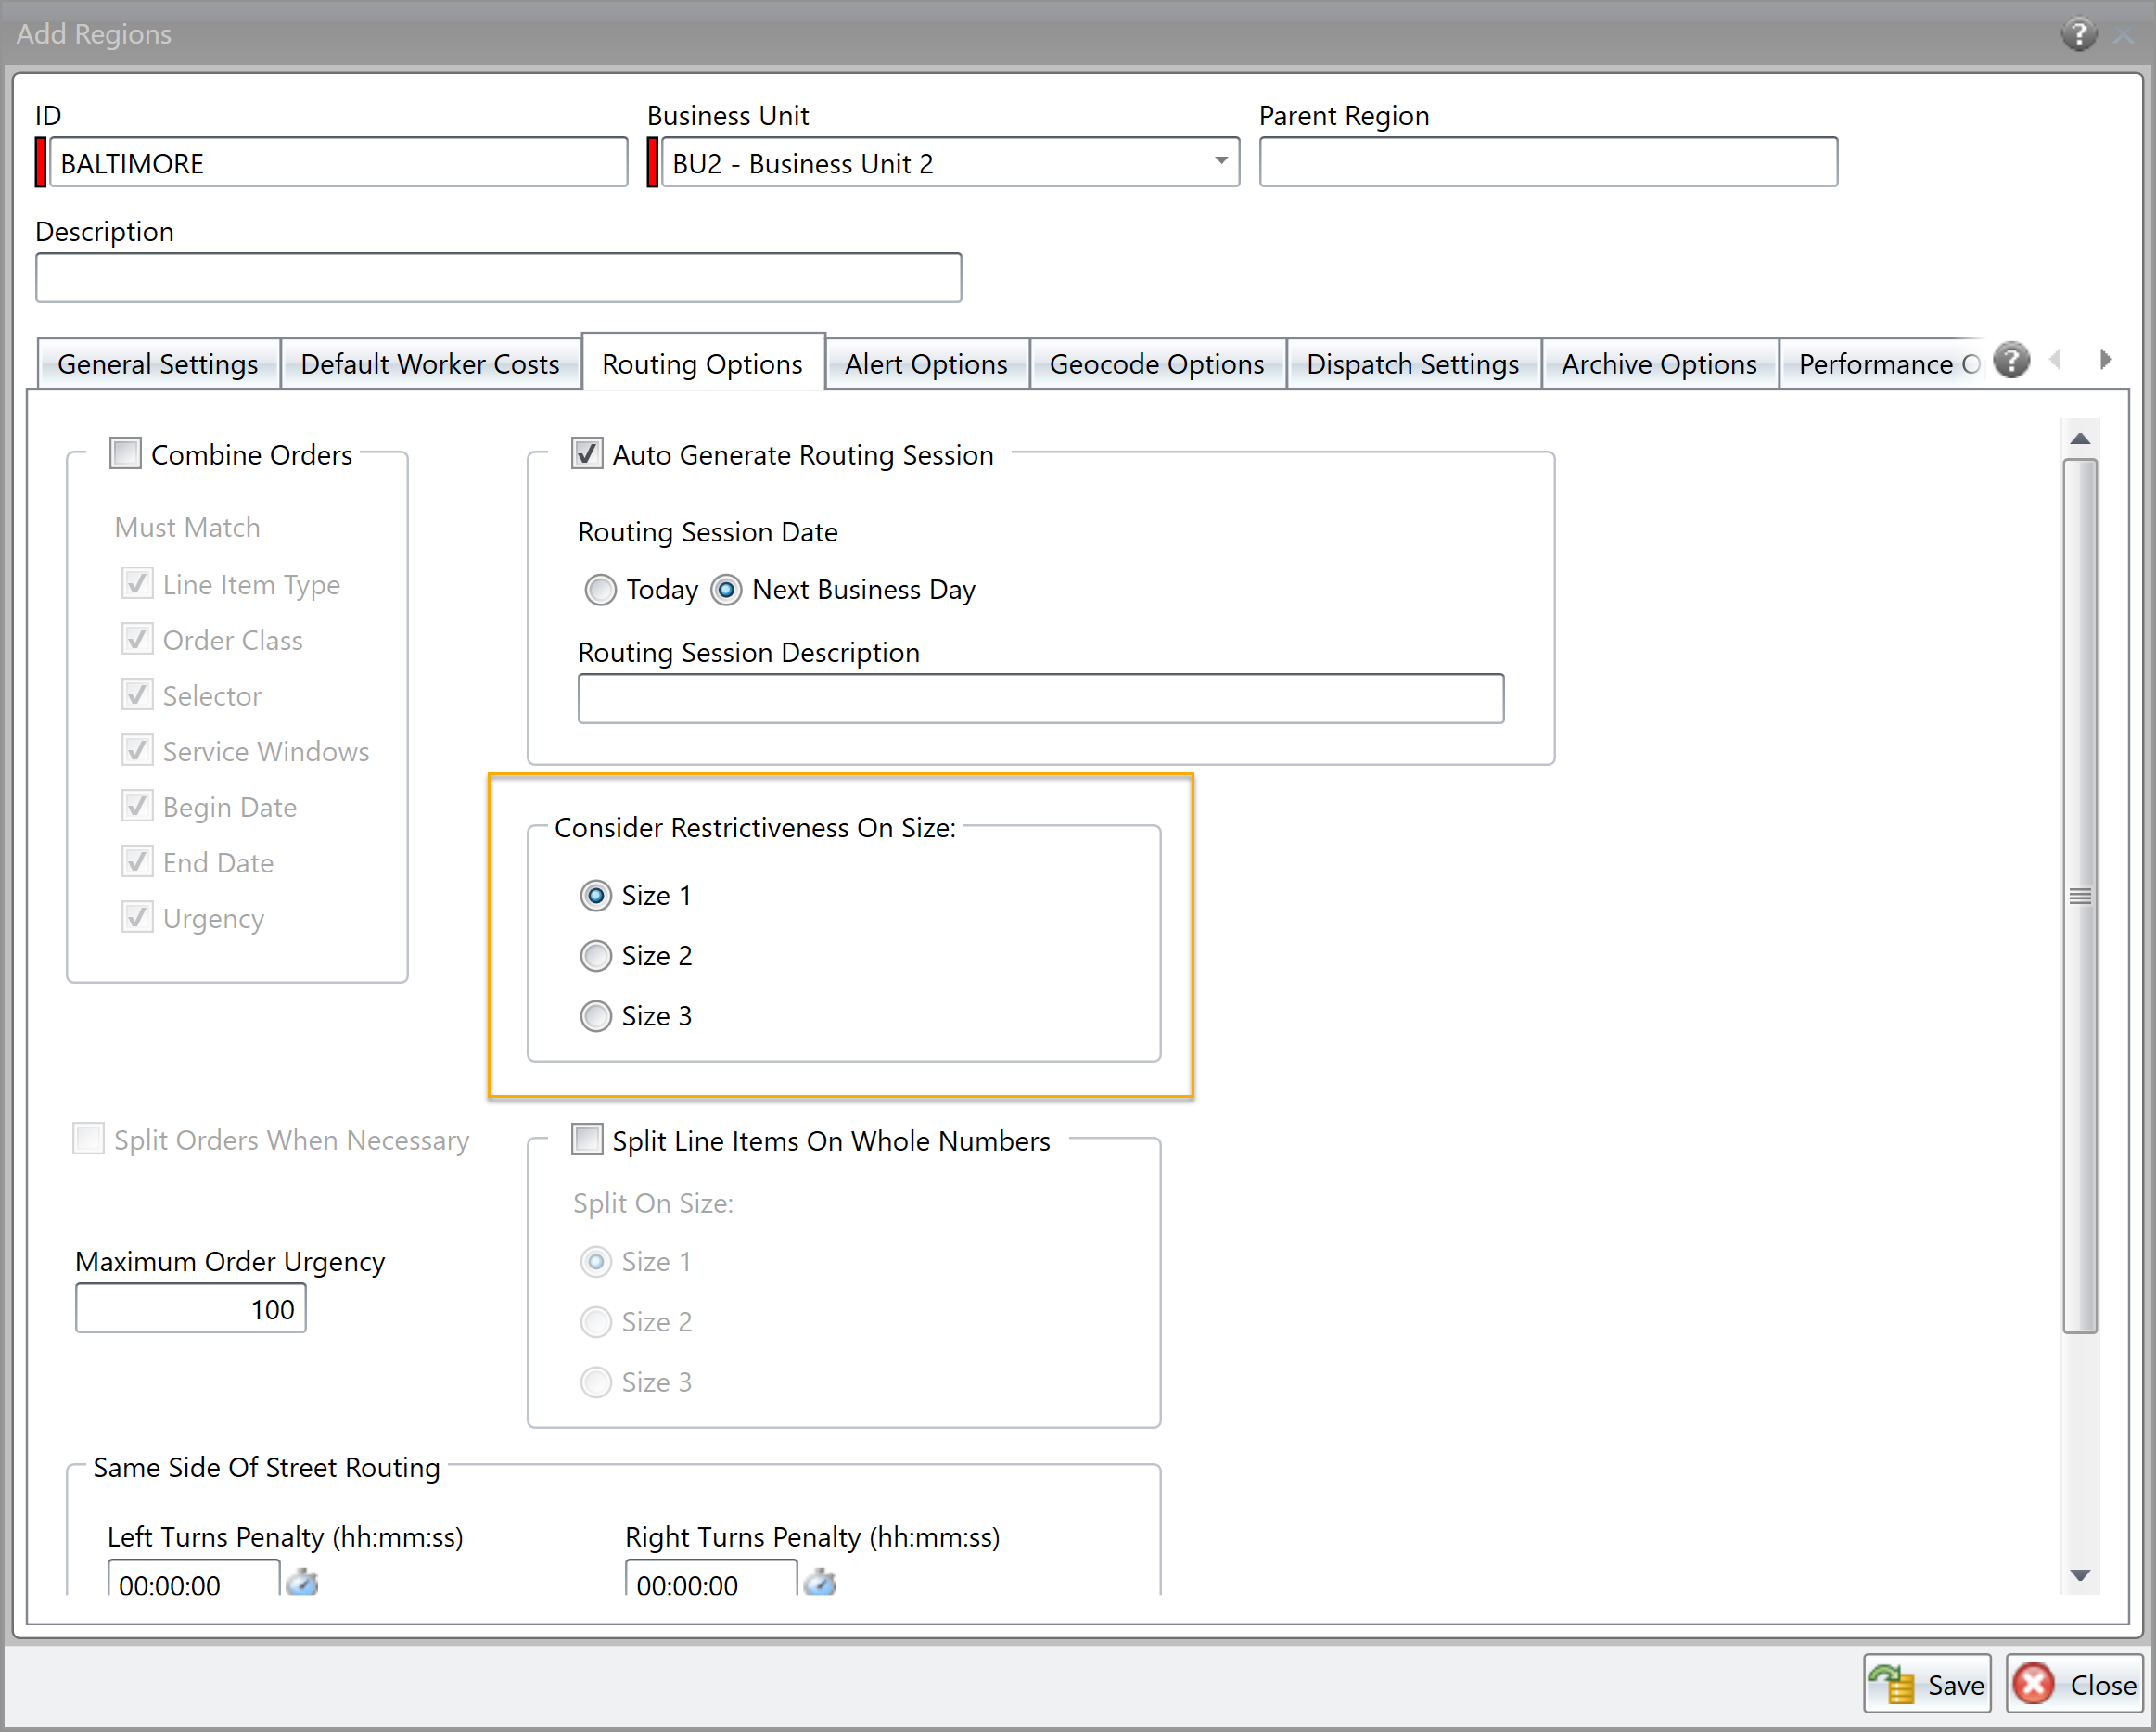
Choosing the Size Used to Calculate Restrictiveness
In Omnitracs Client
You can choose which size is used to consider how restricted each order is in the Region window.
- Click the Administration menu and scroll to Regions. The Regions list opens.
- Click the add icon to add a region, or the edit icon to update an existing region. The Region window opens.
- Click on the Routing Options tab to open the Routing Options page.
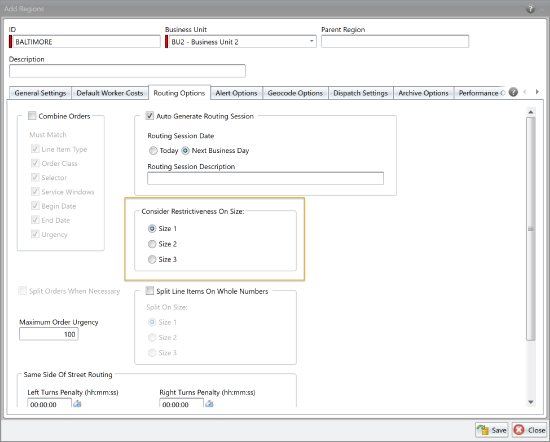
- In the Calculate Restrictiveness on Size box, choose the proper size.
- Click [Save].
Creating a Session Fleet
Found in Omnitracs Client
If you are using compartment routing, it can be important to know specifically which pieces of equipment are available at each depot for that day's routes, instead of relying on the equipment types specified for the routing pass. Now, you can create a fleet of equipment that specifies which pieces of equipment are available each session at each depot.
- Click the Routing menu and scroll to Routing Sessions. The Routing Sessions list opens.
- Open the routing session you want to create fleet for. The Routing Session window opens.
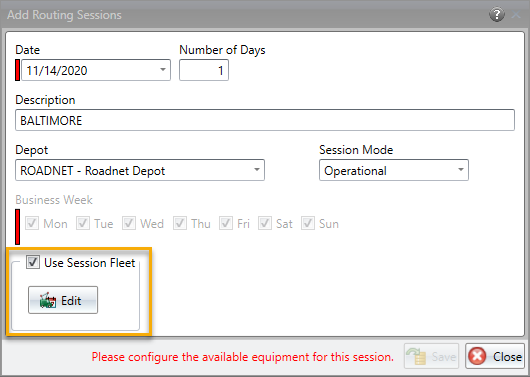
- Check Use Session Fleet.
- Click the [Edit] button. The Routing Session Resources window opens.
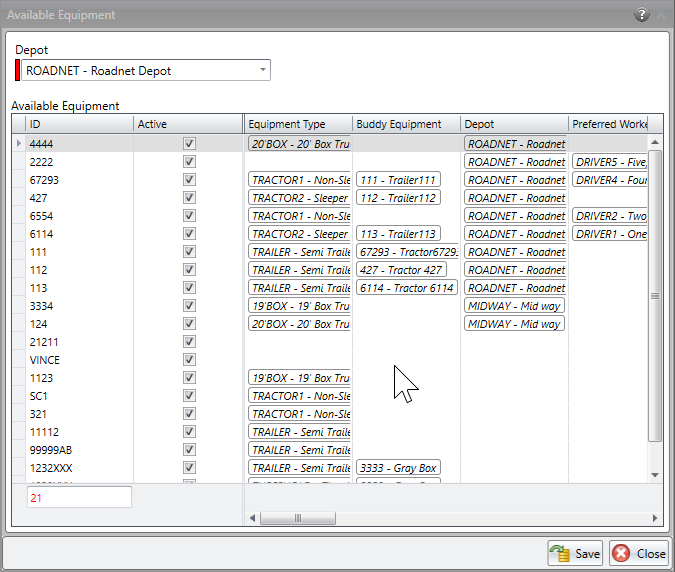
- Click the Add icon. The Available Equipment window opens.
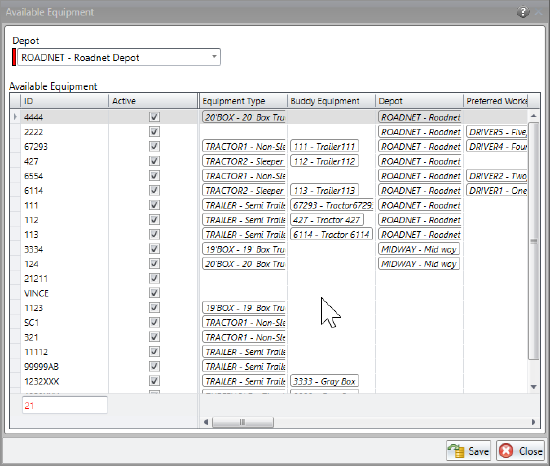
- Click the Depot arrow and select the depot you are creating a fleet for.
- In the Available Equipment list, select the equipment that is available at that depot for this routing session.
- Click [Save].
- Continue creating a fleet for each depot.
- When all depots have their fleet created, click [Save] on the Routing Session Resources window.
- Click [Save] on the Routing Sessions window.

When routes are created for this session, Omnitracs will use the defined session fleet, instead of any resources defined on the routing pass. Any depots that do not have a fleet defined will not have any routes created.
Creating Routes without Restrictiveness
In Omnitracs Client
If your routing session has a session fleet created, Create Routes will automatically use the orders' restrictiveness. If you do not want this routing session to use restrictiveness when creating the routes, you need to explicitly tell the software to ignore restrictiveness.
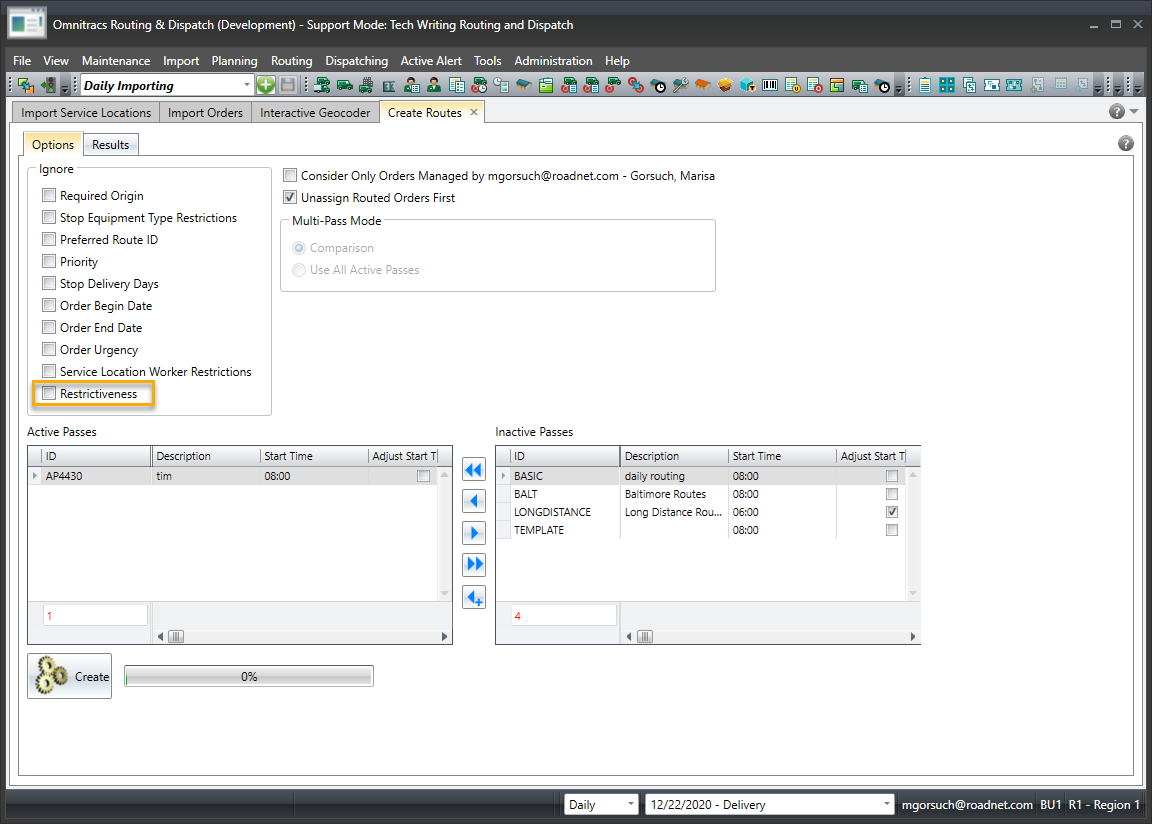
- Click on the Routing menu and scroll to Create Routes. The Create Routes tab opens.
- To have restrictiveness ignored when routes are created, check Restrictiveness in the Ignore box.
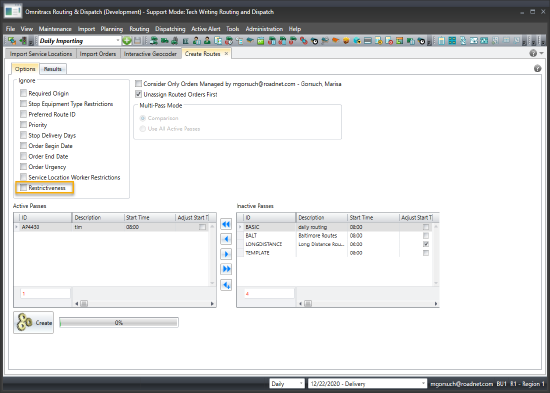
- Choose the other options, then click [Create]. The routes are created.
Viewing an Order's Restrictiveness
You may need to see an order's or line item's restrictiveness to determine how difficult it will be to find a compartment within the session fleet for that item. Each order and line item has two separate restrictiveness values, unassigned restrictiveness and restrictiveness. The restrictiveness value ranges between 0 and 1, with 1 being the most restricted product type. These columns appear in the unassigned list, the orders list for the stop, and the line item list for the order.
Restrictiveness - uses the entire fleet capacity that can accommodate that line item's product and it doesn't change based on what is currently routed.
Unassigned Restrictiveness - uses fleet capacity that is still available to accommodate this line item. Unassigned restrictiveness changes and goes up as orders are routed and fleet capacity is used up.
Considering Depot SKUs when Routing
Found in Omnitracs Client
If you are using line items when routing, you may encounter circumstances where specific SKUs are only available at certain depots, but not at others. For instance, if you transport fuels, one depot may have dyed diesel but you need to go to another depot for USLD diesel. Now, you can specify what SKUs are available at each depot, the cost at each depot, and even how much of the SKU must be on the route. When routes are created, Omnitracs looks at the depot SKU's minimum SKU quantity, and if the route does not meet the minimum, those orders will not be routed from that depot. You can also choose to have the depot SKUs considered when reloads are created.
Here are some points about using depot SKUs when routing:
- You need to add the depot SKU information to the depots. You add add depots SKUs manually or import them with your depots.
- There is a minimum SKU quantity that must be met for a trip in order for those orders to be routed.
- You can replace the Minimum Depot SKU for multiple depots simultaneously.
- If you are using reloads, you can choose to have the depot SKU restrictions apply to the reload.
- If you are using reloads, you can choose whether to include the depot costs and transportation costs when choosing a depot for the reload.
- You can have the depot SKU restrictions ignored when importing orders, inserting/sequencing/optimizing routes, or suggesting routes.
Adding the Depot SKUs
The first step in using depot SKUs is to add the SKUs to each of your depots.
- Click on the Maintenance menu and scroll to Depots. The Depots list opens.
- To add a new depot, click the Add icon; to change an existing depot, select the depot and then click the Edit icon. The Depot window opens.
- Click the SKU tab. The Depot SKU page opens.
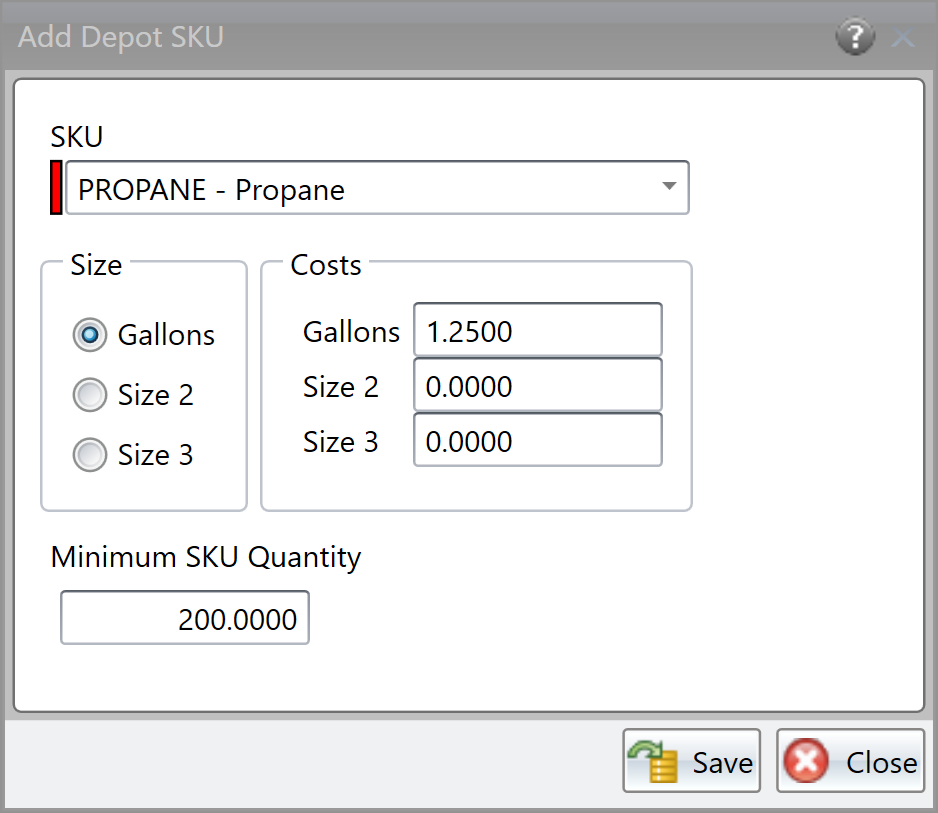
The Depot SKU page lists all SKUs set up for the depot, including the cost and minimum information about the depot SKU. - Click the Add icon to add a new SKU for the depot. The Add Depot SKU window opens.
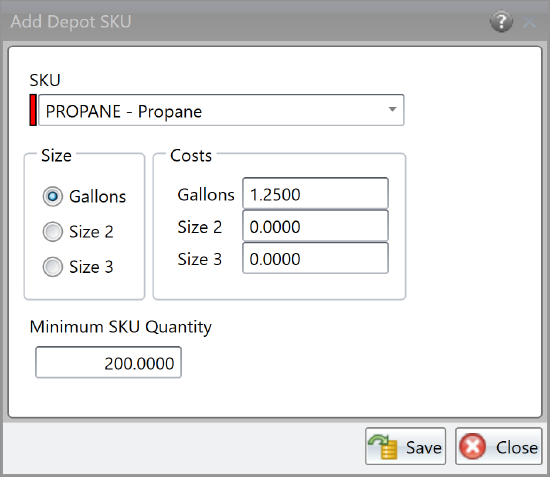
- Click the SKU arrow and choose the proper SKU.
- In the Size area, choose the proper size that will be used to determine the minimum threshold for the SKU. Enter the threshold minimum as the Minimum SKU Quantity. A route/trip must meet this minimum for the orders to be routed.
Note: Only delivery orders are affected by the Minimum SKU Quantity. - Enter the cost for each size. The costs are only considered for reloads, and the depot SKU cost is added to the overall depot cost to determine the most cost-effective depot for the reload.
- Click [Save].
You can also import your depot SKUs with your depots. Before starting the import process, make sure you create your depot SKU file. you can import the following items with your depot SKUs:
| Field | Max Length | Description |
|---|---|---|
| Depot ID | 32 | The depot's unique ID. This field is required. |
| SKU ID | 32 | The SKU's unique ID. This field is required. |
| Cost Size 1, 2, 3 | 0-9,999,999.9999 | The cost of reloading with this SKU at the depot for each size. |
| Delete | N/A | Enter T, True, Y, or 1 if the depot SKU should be deleted. |
| Minimum SKU Quantity | 0-999999999.9999 | The minimum quantity that must be on the trip for the SKUs to be included. The minimum SKU quantity is based on the size specified by the Minimum SKU Quantity Size 1,2,3. |
| Minimum SKU Quantity Size 1,2, 3 | N/A | The size that should be used to determine if the route/trip meets the Minimum SKU Quantity. Enter T, True, Y, or 1 if that is the size that should be used; enter F, False, N, 0, or leave blank if that size should not be used. If no Minimum SKU Quantity size is specified, size 1 will be used. If multiple Minimum SKU Quantity Sizes are specified that last size will be used. |
Once you have created your import file, you need to set up the file transfer layout for the Depot SKU. Then you are ready to import the depot SKUs. The depot SKUs are imported at the same time as the depot.
- Click the Import menu and scroll to Maintenance Items, then Depots. The Import Depots window opens.
- Click the Depot Options arrow to open the depot options.
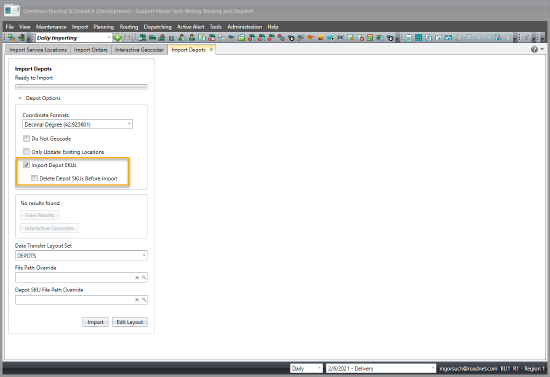
- Check Import Depot SKUs.
- If you want to delete the existing depot SKUs before importing the new depots SKUs, check Delete Depot SKUs Before Import.
- Make sure the proper Data Transfer Set is selected, and any other options you need.
- Click [Import]. The depots, and depot SKUs are imported.
Considering Depot SKUs for Reloads
When reloads are created for the routes, you can have depot SKUs included as part of the criteria for choosing a depot. You can also choose to have depot and transportation costs considered.
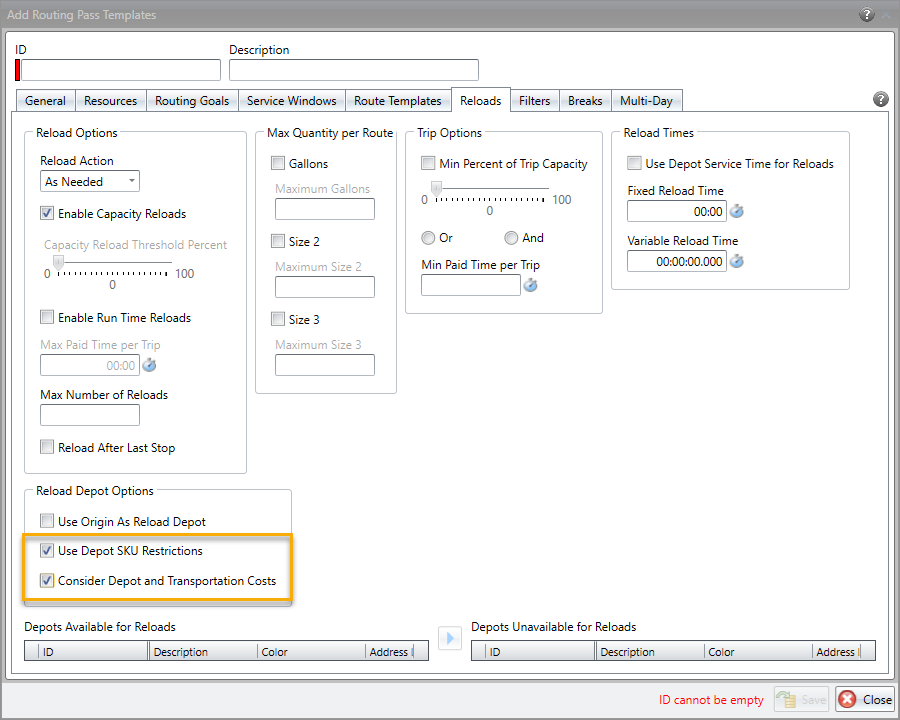
- Click Routing, then Routing Pass Templates. The Routing Pass Templates list opens.
- To add a new routing pass template, click the Add icon; to change an existing pass template select the template, then the Edit icon. The Routing Pass Templates window opens.
- Click the Reloads tab.
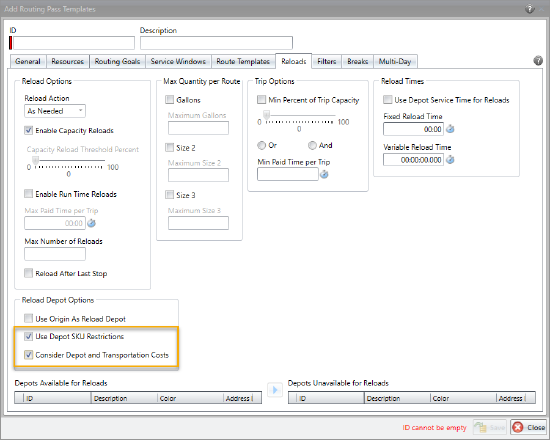
- Check either Enable Capacity Reloads or Enable Run Time Reloads.
- In the Reload Depot Options area, check Use Depot SKU Restrictions. If this option is selected, Omnitracs will consider the depot SKU's minimum SKU quantity and will not create the reload at that depot if the minimum can not be met.
- Check Consider Depot and Transportation Costs to have Omnitracs consider costs, as well as travel time, when determining the best depot for the reload. These costs include the depot fees, depot SKU costs, and equipment type costs.
- Click [Save].
Ignoring the Depot SKU Restrictions
Once you have all your depot SKUs set up, they will automatically be considered when routes are created or optimized. You can choose to have the depot SKU restrictions ignored when select actions are performed by simply checking Depot SKU Restrictions under the Rules to Ignore in the proper window.
Import Orders
If you check Depot SKU Restriction on the Import Orders Options - Routing, orders will be able to be combined even if it violates a Depot SKU setup.

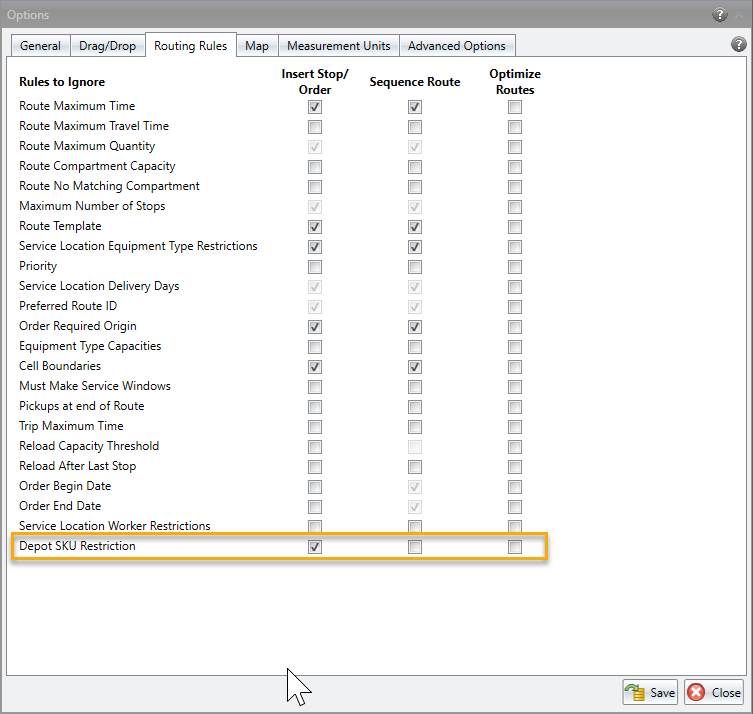
Routing Rules
You can choose to have the depot SKU restrictions ignored when inserting a stop or order onto a route, when sequencing a route, or when optimizing routes, by checking the appropriate option on the Routing Rules page of the Tools Option notebook.
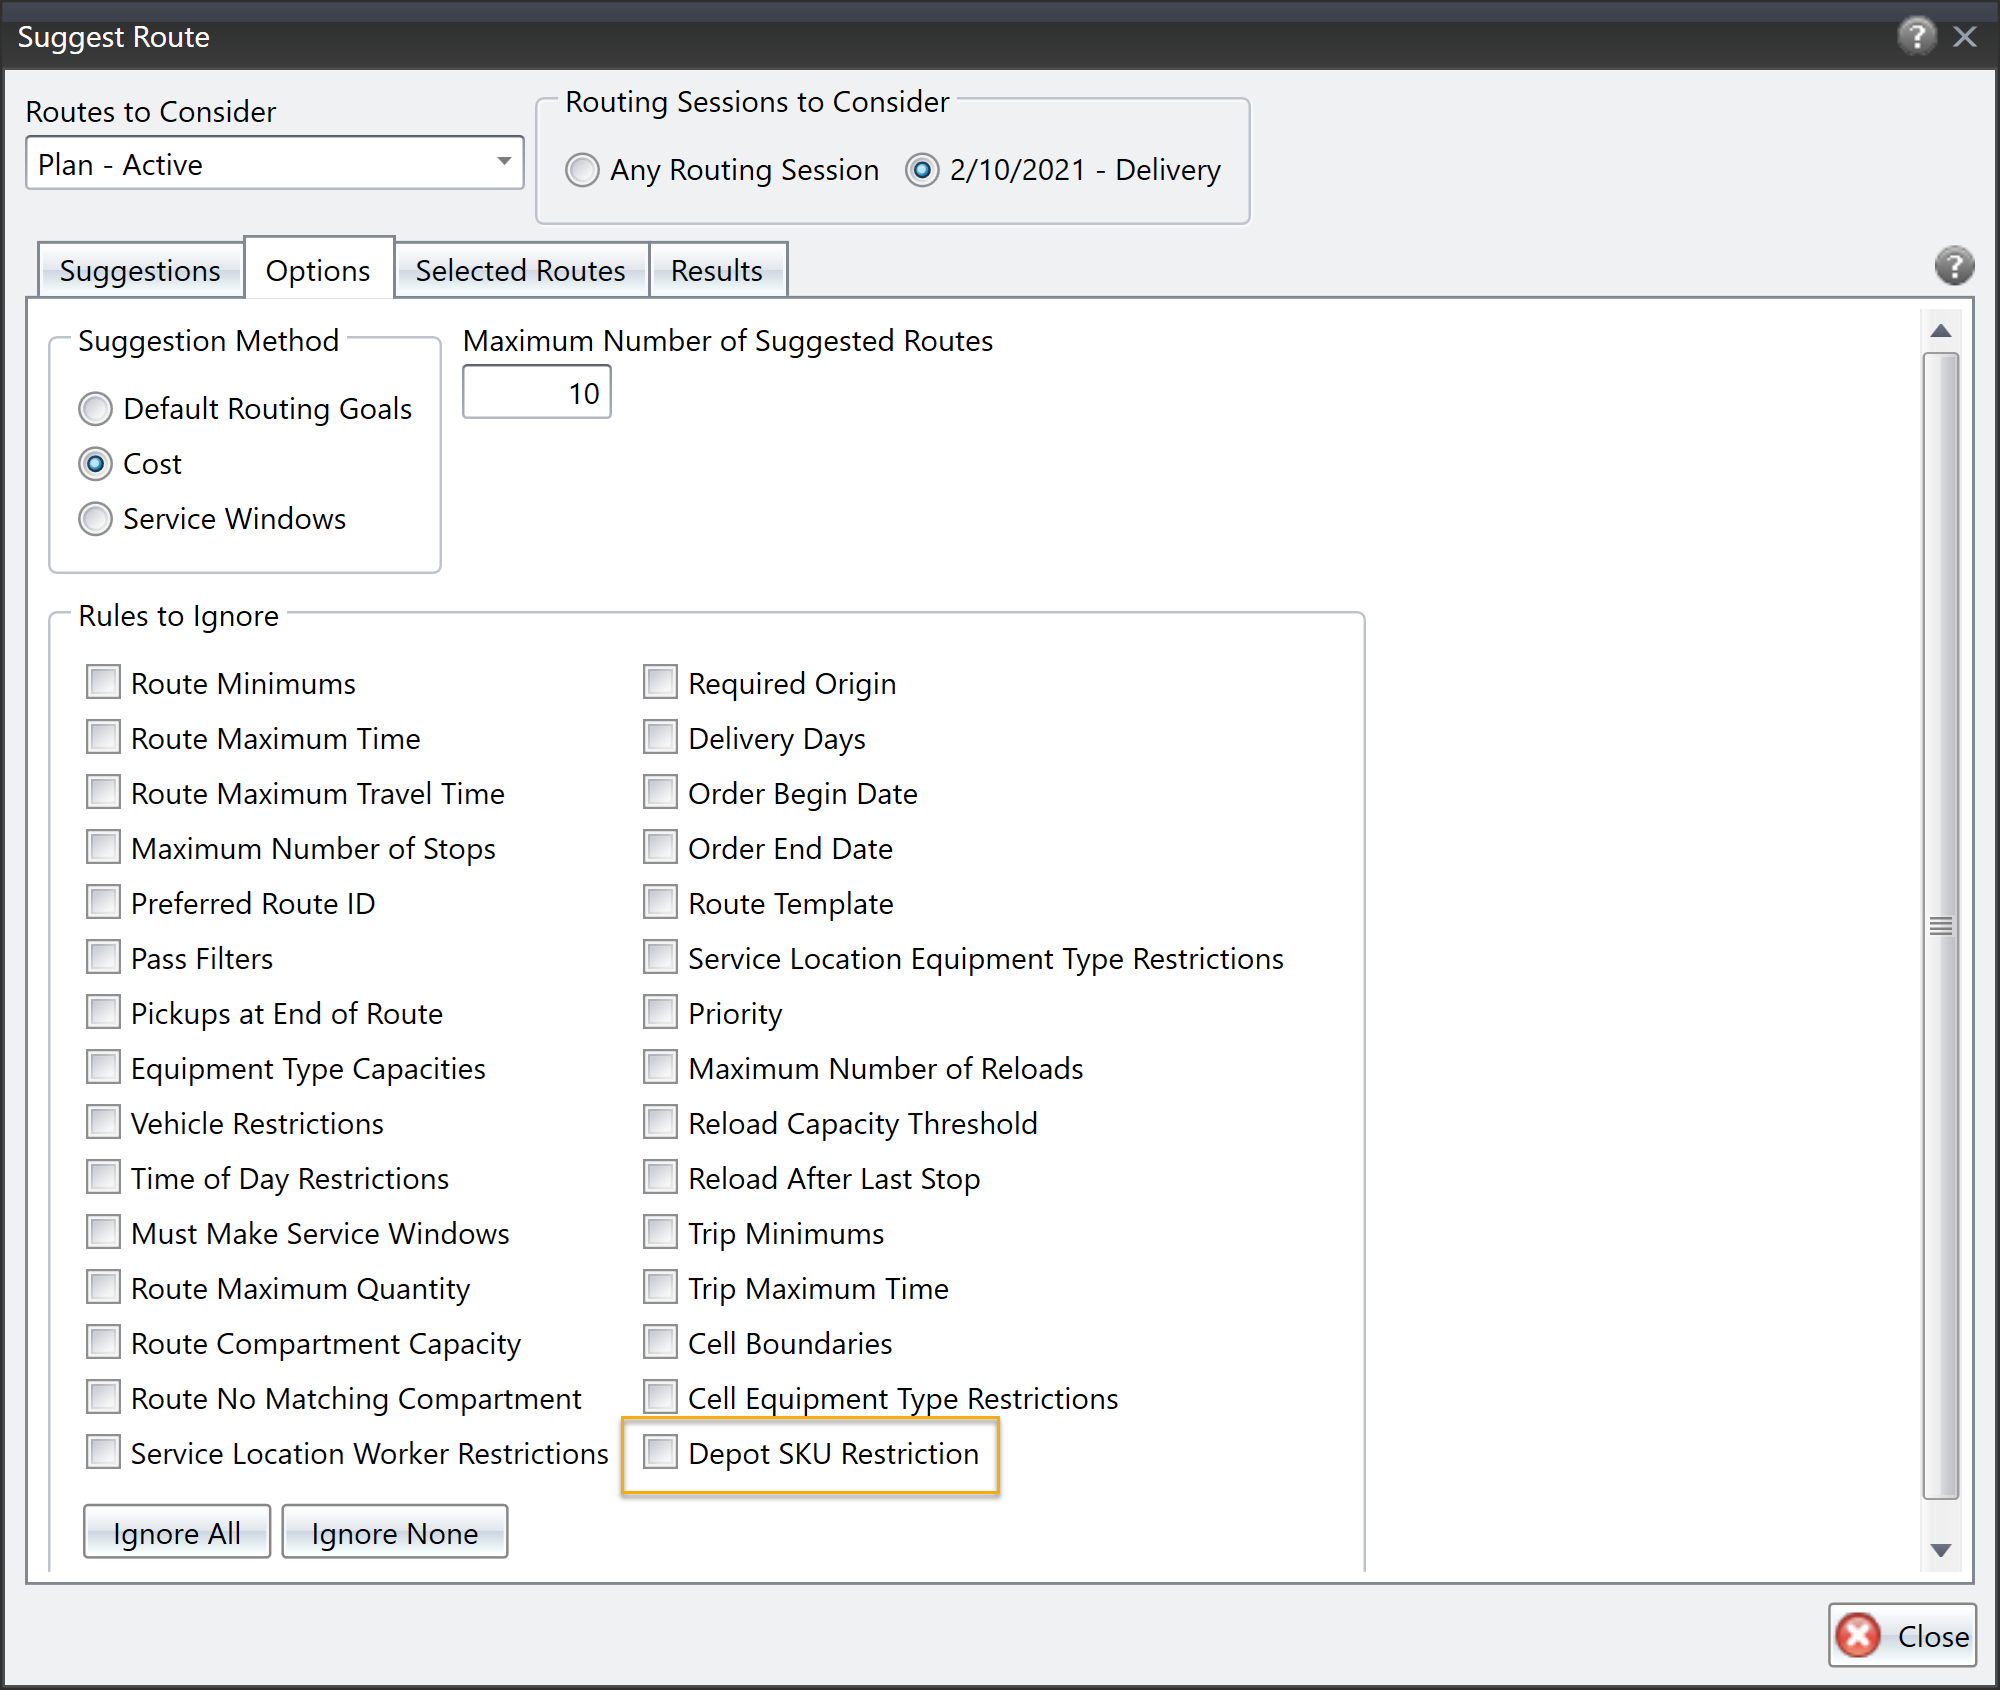
Suggest Route
If you want to have the depot SKU restrictions ignored when Omnitracs suggests a route for an unassigned or an order, check Depot SKU Restrictions on the Options page of the Suggest Routes window.
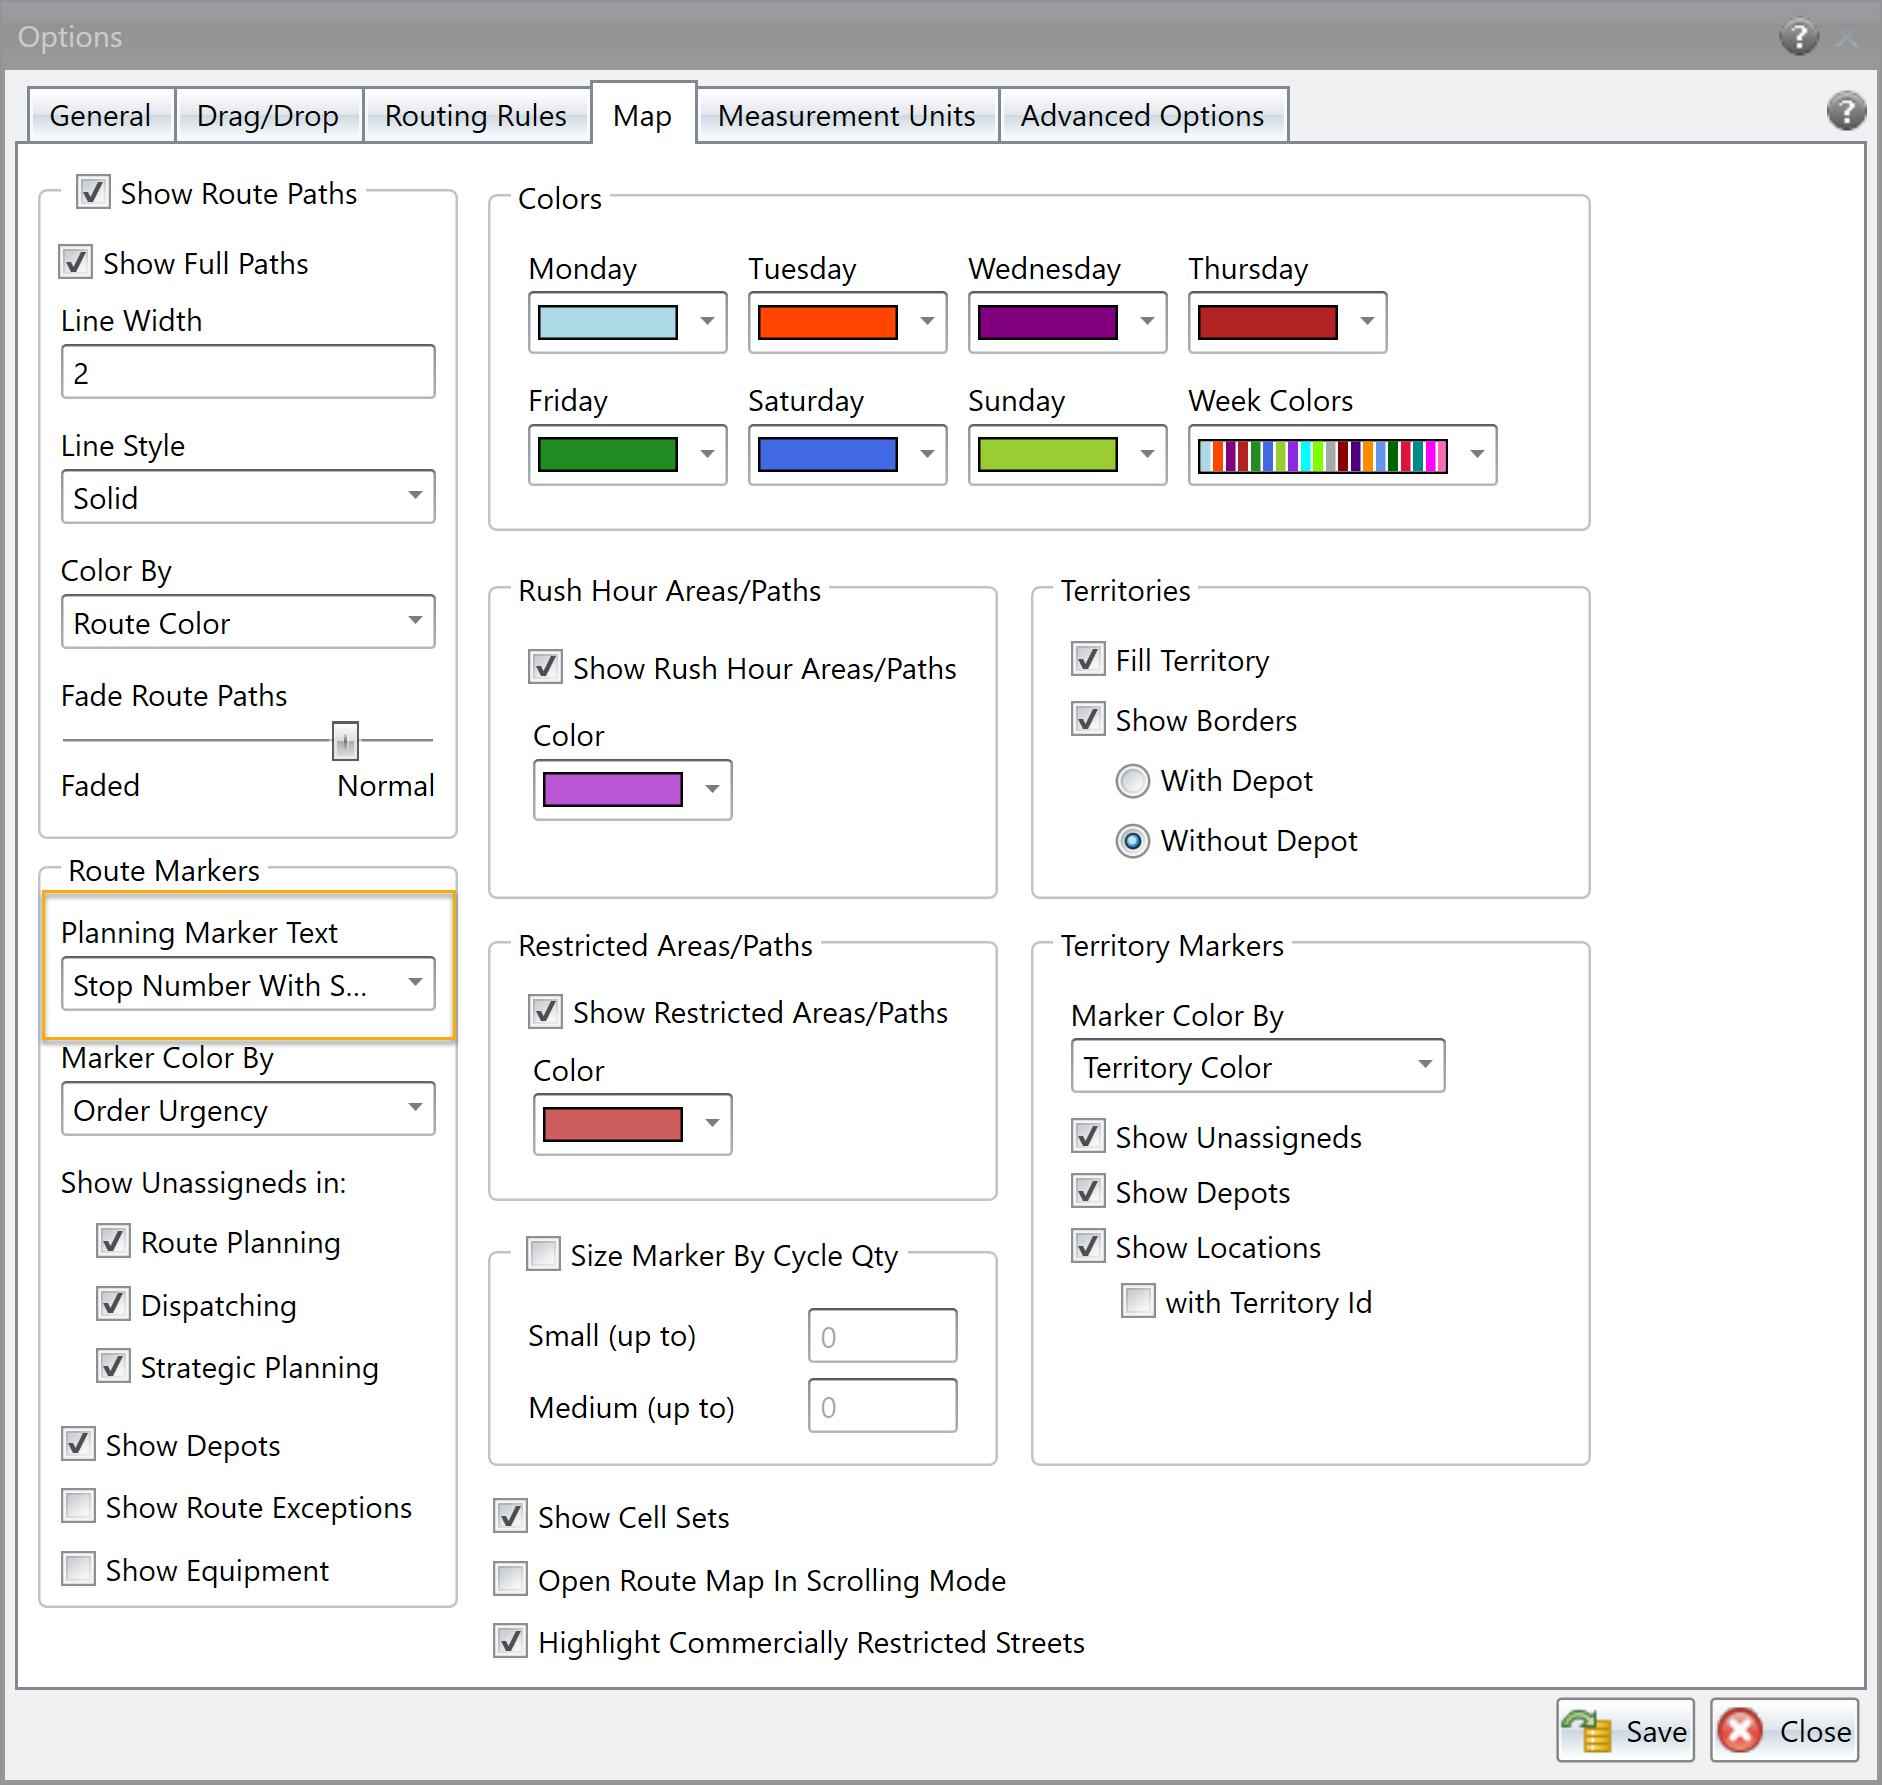
Showing the Order Selector and Stop Number on the Map
In Omnitracs Client
If you use order selectors to classify your types of orders, you can now choose to have the stop marker on the map display the order selector, along with the stop number, to easily distinguish the type of order.
- Click the Tools menu and scroll to Options. The Options notebook opens.
- Click the Map tab. The Map page opens.

- In Route Markers, click the Planning Marker Text arrow and choose Stop Number with Selector.
Note: If a stop has multiple orders, the order selectors will all be listed on the marker. - Click [Save].
Dispatching
Tracking your Trailers in FleetView
It is important to know where all your equipment is, not just the tractors. Now, if you have installed selected Omnitracs tracking devices in your trailers, you can see where you trailers are located in FleetView. In order to track your trailers, first you need to set up the devices and assign them to the trailers.
Some features of this enhancement:
- You can create trailer tracking Telematics devices and assign them to your equipment.
- All references to "vehicles" on the FleetView Overview have been changed to "equipment".
- The Show Power Unit Vehicles Only filter in FleetView Overview has been replaced with filter options: Show Power Unit Equipment and Show Non-Power Unit Equipment.
- You can see GPS pings for Omnitracs Trailer Tracking devices.
- You can see the equipment associated with the tractor in several places in FleetView.
- The option to Display Equipment Labels on Map has been moved to the General section of the FleetView settings so that it applies throughout FleetView, not just on the Overview. In addition, you can choose to have the equipment icons displayed on the map as well.
- You can choose to have the associated equipment displayed on the route cards.
Adding Tracking Devices
In Omnitracs Web
- Click on the Maintenance icon to open Maintenance.
- Click the green arrow and scroll to Telematics devices. The Telematics Device list opens.
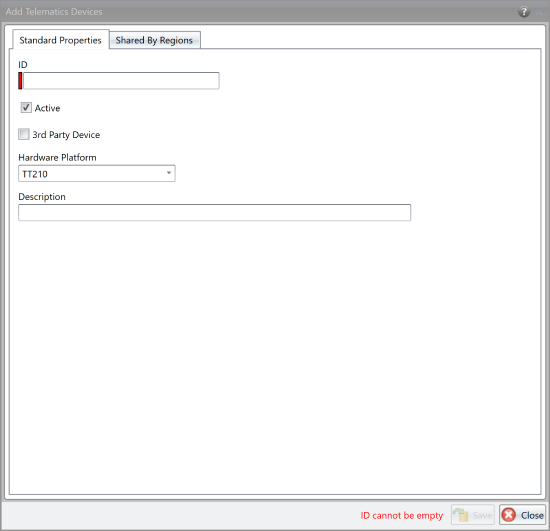
- Click [Add]. The Add Telematics Device window opens.
- Click the Hardware Platform arrow and choose the proper device from the list.
- Enter an ID for the device.
Note: If you are adding an Omnitracs TT device, enter the device's UA as the ID. - Enter a Description for the device.
- Click [Save].
You can also import the tracking devices; if importing the devices enter the following as the Hardware Platform:
TT150
TT100
TT210
TTID
TT200
In Omnitracs Client
- Click on the Dispatching menu and scroll to Telematics Devices. The Telematics Devices list opens.
- Click on the add icon to add a new device. The Telematics Devices window opens.
- Click the Hardware Platform arrow and choose the proper device from the list.
- Enter an ID for the device.
Note: If you are adding an Omnitracs TT device, enter the device's UA as the ID. - Enter a Description for the device.
- Click [Save].
You can also import the tracking devices; if importing the devices enter the following as the Hardware Platform:
TT150
TT100
TT210
TTID
TT200
Assigning the Device to a Trailer
Once you have added the tracking device, you need to assign it to the proper trailer.
In Omnitracs Web
- Click on the Maintenance icon to open Maintenance.
- Click the green arrow and scroll to Equipment. The Equipment list opens.
- Select the trailer you want to update and click the Edit icon, or click [Add] to add a new trailer. The Equipment window opens.
- In the Telematics Device field, start typing the ID of the device to be assigned; a list of devices that match what you type appears. Click on the proper device.
- Click the Telematics Device Install Date calendar icon to open a calendar; select the date the device was installed in the trailer.
- Click [Save].
In Omnitracs Client
- Click on the Maintenance menu and scroll to Equipment. The Equipment list opens.
- Select the trailer you want to update and click the Edit icon, or click [Add] to add a new trailer. The Equipment window opens.
- Click the Telematics Device arrow to open a list of Telematics Devices. Click on the proper device to associate it with the equipment.
- Click the Telematics Device Install Date to open a caledar; select the date the device was installed in the trailer.
- Click [Save].
Setting the Equipment Display Options for the Map
In Omnitracs Web
You can choose to have the equipment information displayed on the equipment labels on the map. These options are set in the FleetView Settings.
Note: The Display Equipment Labels on Map option previously only applied to the FleetView Overview; it has been moved to the General options and now applies to all maps in FleetView.
- Click the Settings icon and scroll to FleetView Settings. The FleetView Settings window opens.
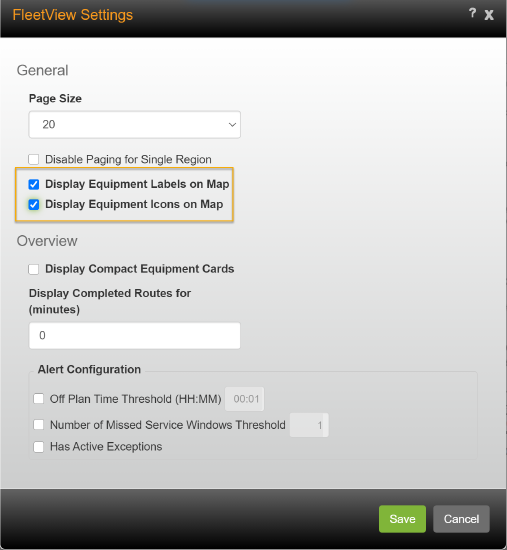
- Check the proper options to have the equipment information displayed on the hover on the map.
Display Equipment Labels on Map - check to have the equipment ID displayed on equipment marker on the map.
Display Equipment Icons on Map - check to have the tractor and trailer icons displayed on the equipment marker on the map. - Click [Save].

Displaying Associated Equipment on Route Cards
You can choose to have the trailers and other associated equipment displayed on the route cards in the Route Card Editor.
- Click the Settings icon and choose Route Card Editor. The Route Card Editor opens.
- Click on the row where you want the associated equipment displayed.
- In the Available list, select Associated Equipment and move it to the Selected list.
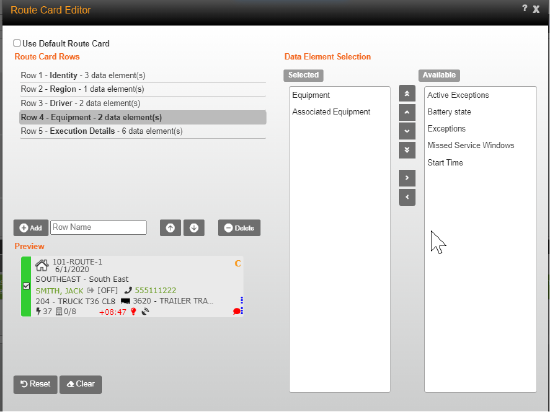
- Drag the items in the Selected list so they appear in the order you want them displayed.
- When the route card is properly defined, click the close box to close the Route Card Editor.
Viewing the Tractor and Trailer in FleetView
Note: This feature is only available if you are using an Omnitracs TTID with an Omnitracs AMG-C.
There are several places in FleetView where you can view the trailer(s) associated with the equipment.
In FleetView Overview
- Click the FleetView icon to open FleetView.
- Click the left most button and choose Overview. The Overview opens.
- In the Equipment list, the equipment card shows both the tractor and one trailer. If there are multiple trailers associated with the tractor, a plus icon appears; hover over the icon to see the equipment associated with the tractor.

On the map, hover over the equipment's circle and you will see the ID for the tractor and one trailer. If there are multiple trailers associated with the tractor, a plus icon appears; hover over the icon to see the remaining equipment associated with the tractor.
You can filter the equipment shown in the FleetView Overview so that list only shows power units (tractors) or non-power units (such as trailers).
Note: The Show Power Unit Vehicles Only option that previously existed in the filter has been removed and replaced with these new options.
- Click the Filter button. The Filters window opens.
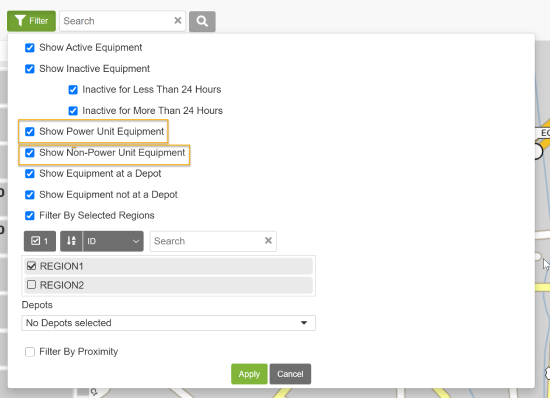
- To have the tractors shown in the Overview, check Show Power Unit Equipment.
To have trailers shown in the Overview, check Show Non-Power Unit Equipment. - Choose other filters as necessary, then click [Apply] The equipment displayed in the Overview is updated based on the filter selections.
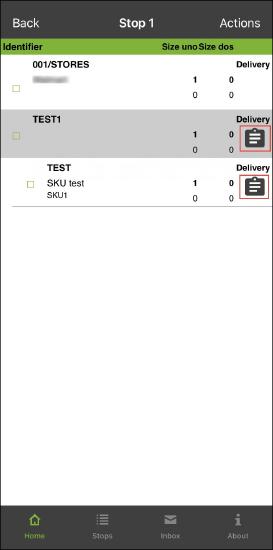
In FleetView Route Views
If the route card is set up to show associated equipment, you can see the trailer associated with a tractor on the route cards in the Route Cards, Route Map, and Route Details views.
![]()
In addition, the associated trailers are shown on the map for the route.
![]()
When looking at the Route Details, the associated trailer will be listed on the Route Summary.
In FleetView Grids
The Routes, Workers, Exceptions, and Equipment grids have new columns that will display up to five pieces of equipment associated with the tractor.
Searching for Equipment Near a Location
When looking at the Overview in FleetView, you may only want to see equipment that is close to a specific location, type of location, or address. For instance, you may want to see all equipment that is at a truck stop, or see which equipment is nearest a depot that has product that needs to be picked up. Now, you can filter the equipment that is shown in the Overview to only the equipment you want to see in a given situation.
Note: This functionality is only available on the Overview in FleetView, not on the other views.
If you also filter by specific regions, only equipment that is assigned to the selected region will be displayed.
In the FleetView Overiew:
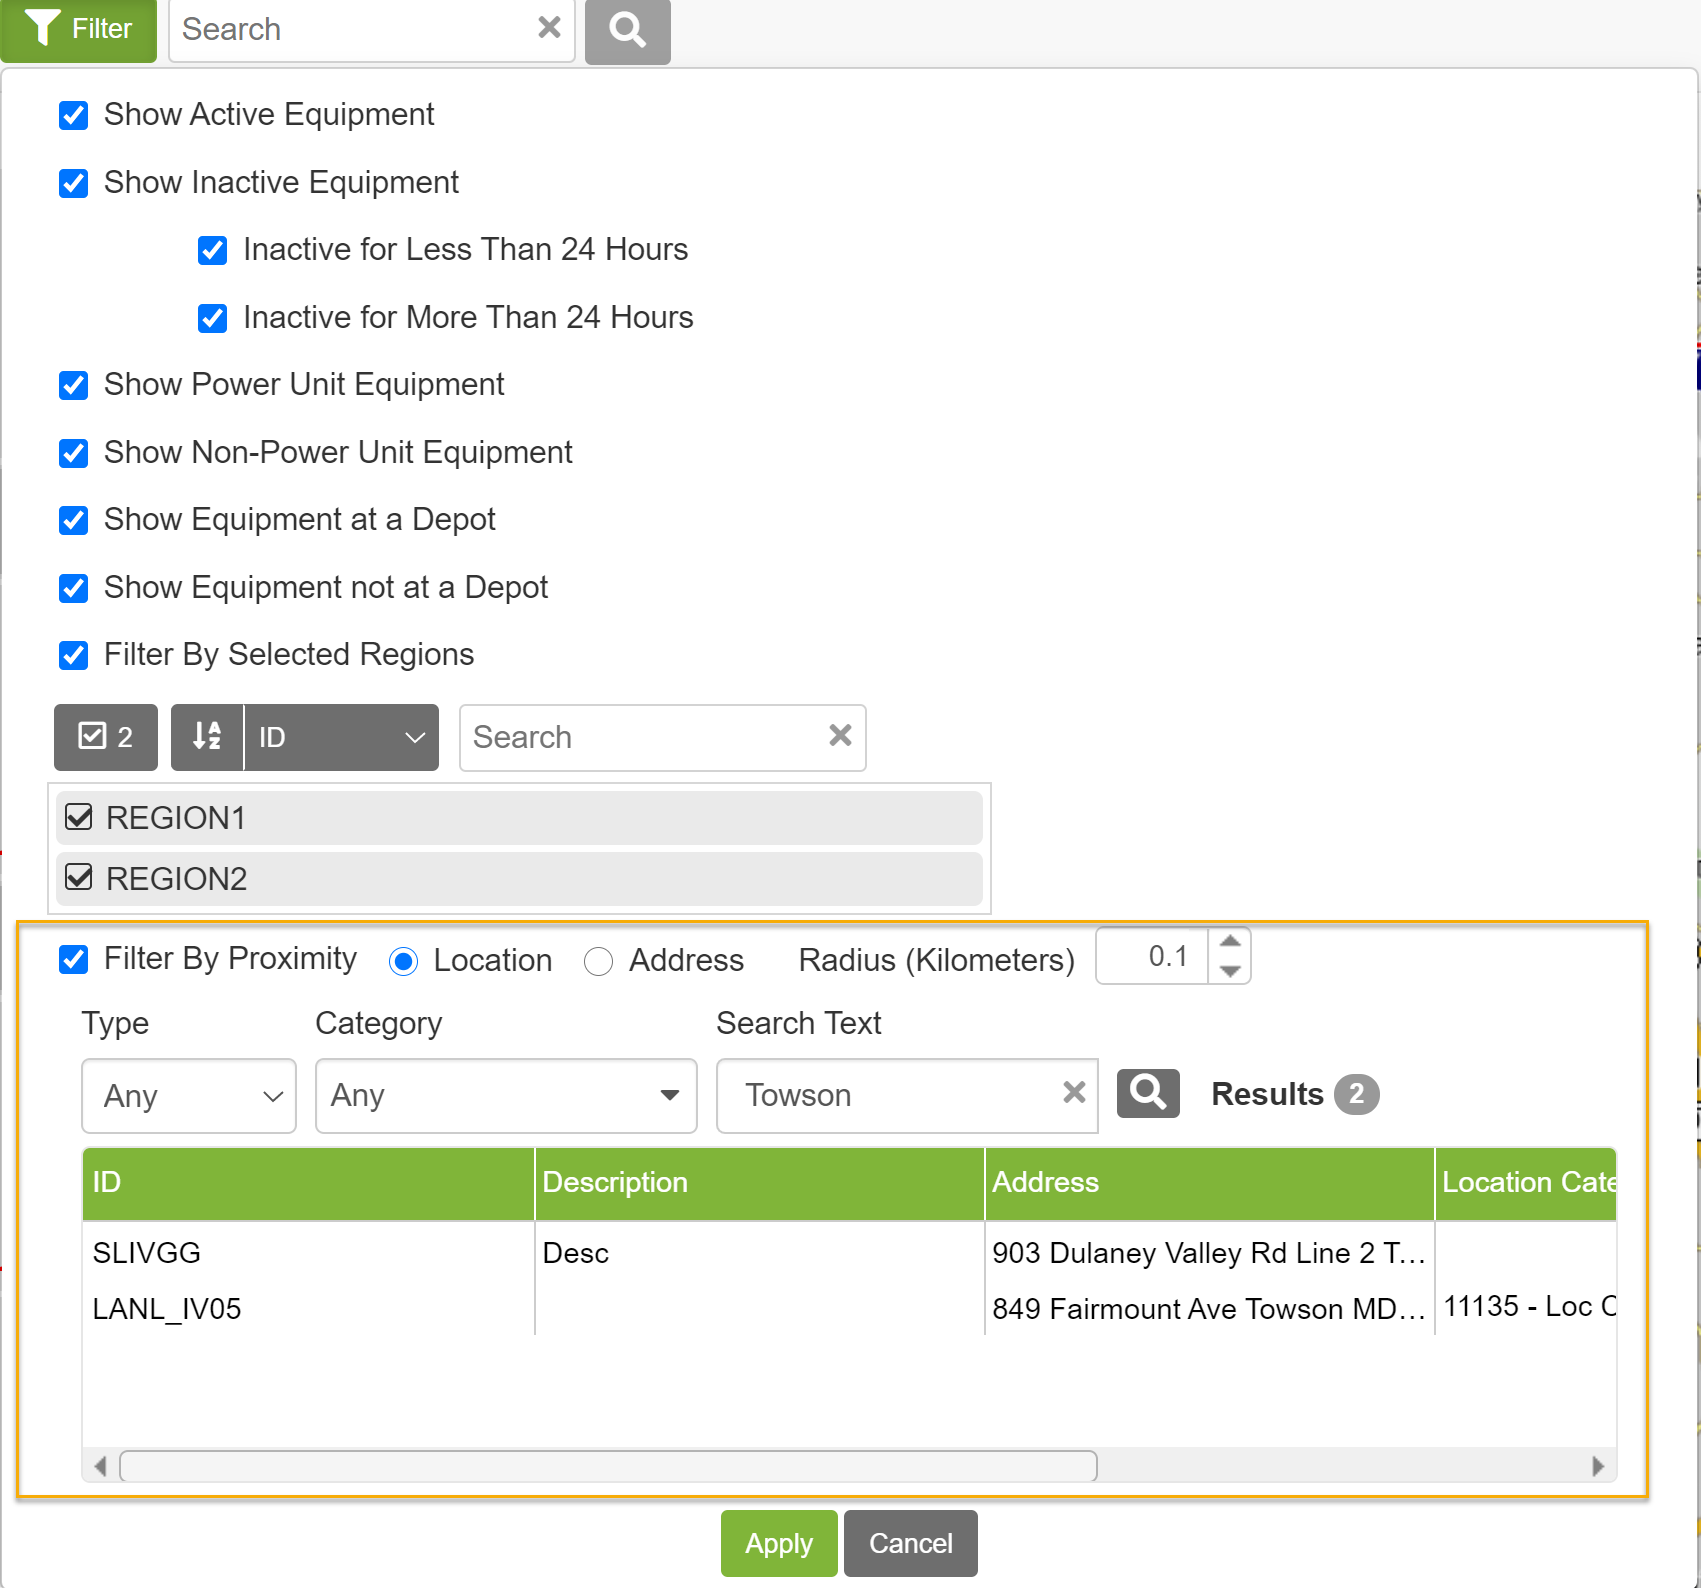
- To filter the equipment click the Filter button to open the filter options, then check Filter By Proximity. The location filter options appear.

- Select whether to filter by location or by an address.
If filtering by location, choose Location. You can filter by the type of location, location category, or by a specific location.
Note: If you select multiple filters, a location must meet all the selections.
To filter by location type, click the Type arrow and choose the type you want to filter by. To filter by all types, choose Any.
To filter by location category, click the arrow and choose the category(ies) you want to filter by. To filter by all categories, choose Any.
To search for a specific location, enter identifying information in the Search Text field. You can search by the location's ID, description, or any portion of the address.
Note: You can use the Search Text to search all locations in an area. For instance, to see all fuel locations in the 21286 zip code you would choose Fuel as the Type and enter 21286 as the Search Text.
If filtering by address, choose Address. Enter the specific address, or a portion of the address. For instance, you could filter so that locations with the radius of 849 Fairmount Ave, Towson, MD were shown, or just enter Towson to see all equipment near Towson. - Enter the maximum radius around the selected location; all equipment within this radius will be selected.
- Complete any other filter selections, as necessary. Once all the filters are set, click [Apply]. The vehicle list only display those vehicles that meet the selected filters.
Searching for Locations near Equipment
There may be times when you need to find locations that are surrounding a piece of equipment, such as if the equipment needs to pick up a load or simply needs to find the best place to stop. Now, in FleetView Overview you can select a piece of equipment, then search for all locations that meet your criteria near that equipment.
- Click on the FleetView icon to open FleetView.
- Click the arrow and choose Overview. The Overview opens, listing all the equipment.
- Click the kabob icon and choose Nearby Locations on the equipment's card or hover tip on the map. The Locations Near panel opens.
- To filter by location type, click the Type arrow and choose the type you want to filter by. To filter by all types, choose Any.
To filter by location category, click the arrow and choose the category(ies) you want to filter by. To filter by all categories, choose Any.
Note: Locations must meet all selected criteria to be included in the results. - Click the Search icon. A list of results appears in the panel, and the locations are displayed on the map as blue circles. The equipment is indicated on the map by a red pushpin icon. The number of locations that meet the defined criteria is shown in the panel header.
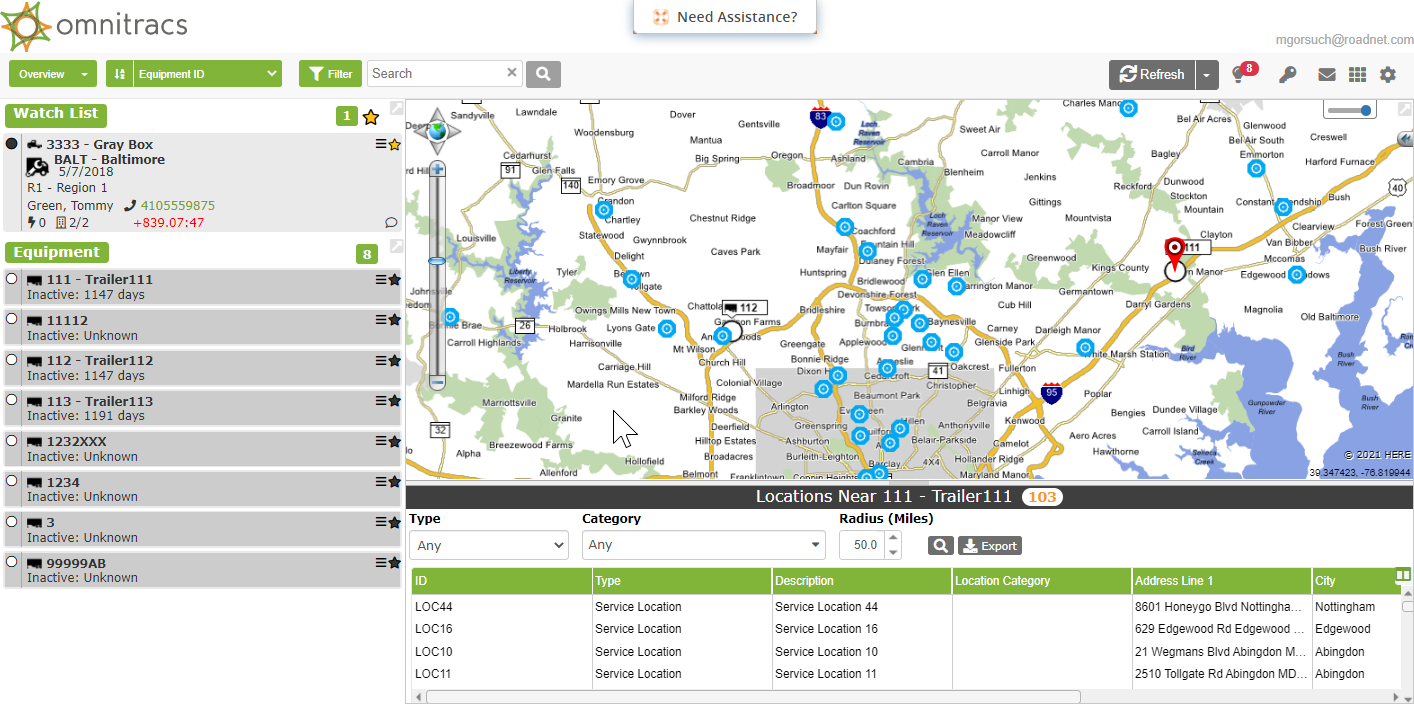
Note: To export the results to a .csv, click the [Export] button.
You can hover over the location circle to see identifying information for the location.
To search for locations near a different piece of equipment, click the kabob icon for that equipment and choose Nearby Locations. The results are updated to show the locations for the newly selected equipment.
Equipment History
Searching for Equipment near a Selected Location
There may be occasions when you need to look back and see if a piece of equipment was near a specific location on an individual date, or conversely what equipment was near a location on a date. Now, you can create a Historical Proximity Report in Equipment History to see what equipment was in an area during a defined date range.
- Click on the Equipment History icon; Equipment History opens.
- Click on the Historical Proximity Report tab to open the options.
- Enter the start date/time and end date/time you want to include in the report in the Time Span. Click the Time Zone arrow and select the proper time zone that should be used when determining the dates and times.
- Select whether to filter by location or by an address.
If filtering by location, choose Location. Enter identifying information in the search field. You can search by the location's ID, description, or any portion of the address.
If filtering by address, choose Address. Enter the specific address, or a portion of the address. For instance, you could filter so that locations with the radius of 849 Fairmount Ave, Towson, MD were shown, or just enter Towson to see all equipment near Towson. - Enter the maximum radius around the selected location; all equipment within this radius will be selected.
- Click [Search] to have all locations meeting the criteria will be listed, or click [Export] to have the information exported to a .csv file.
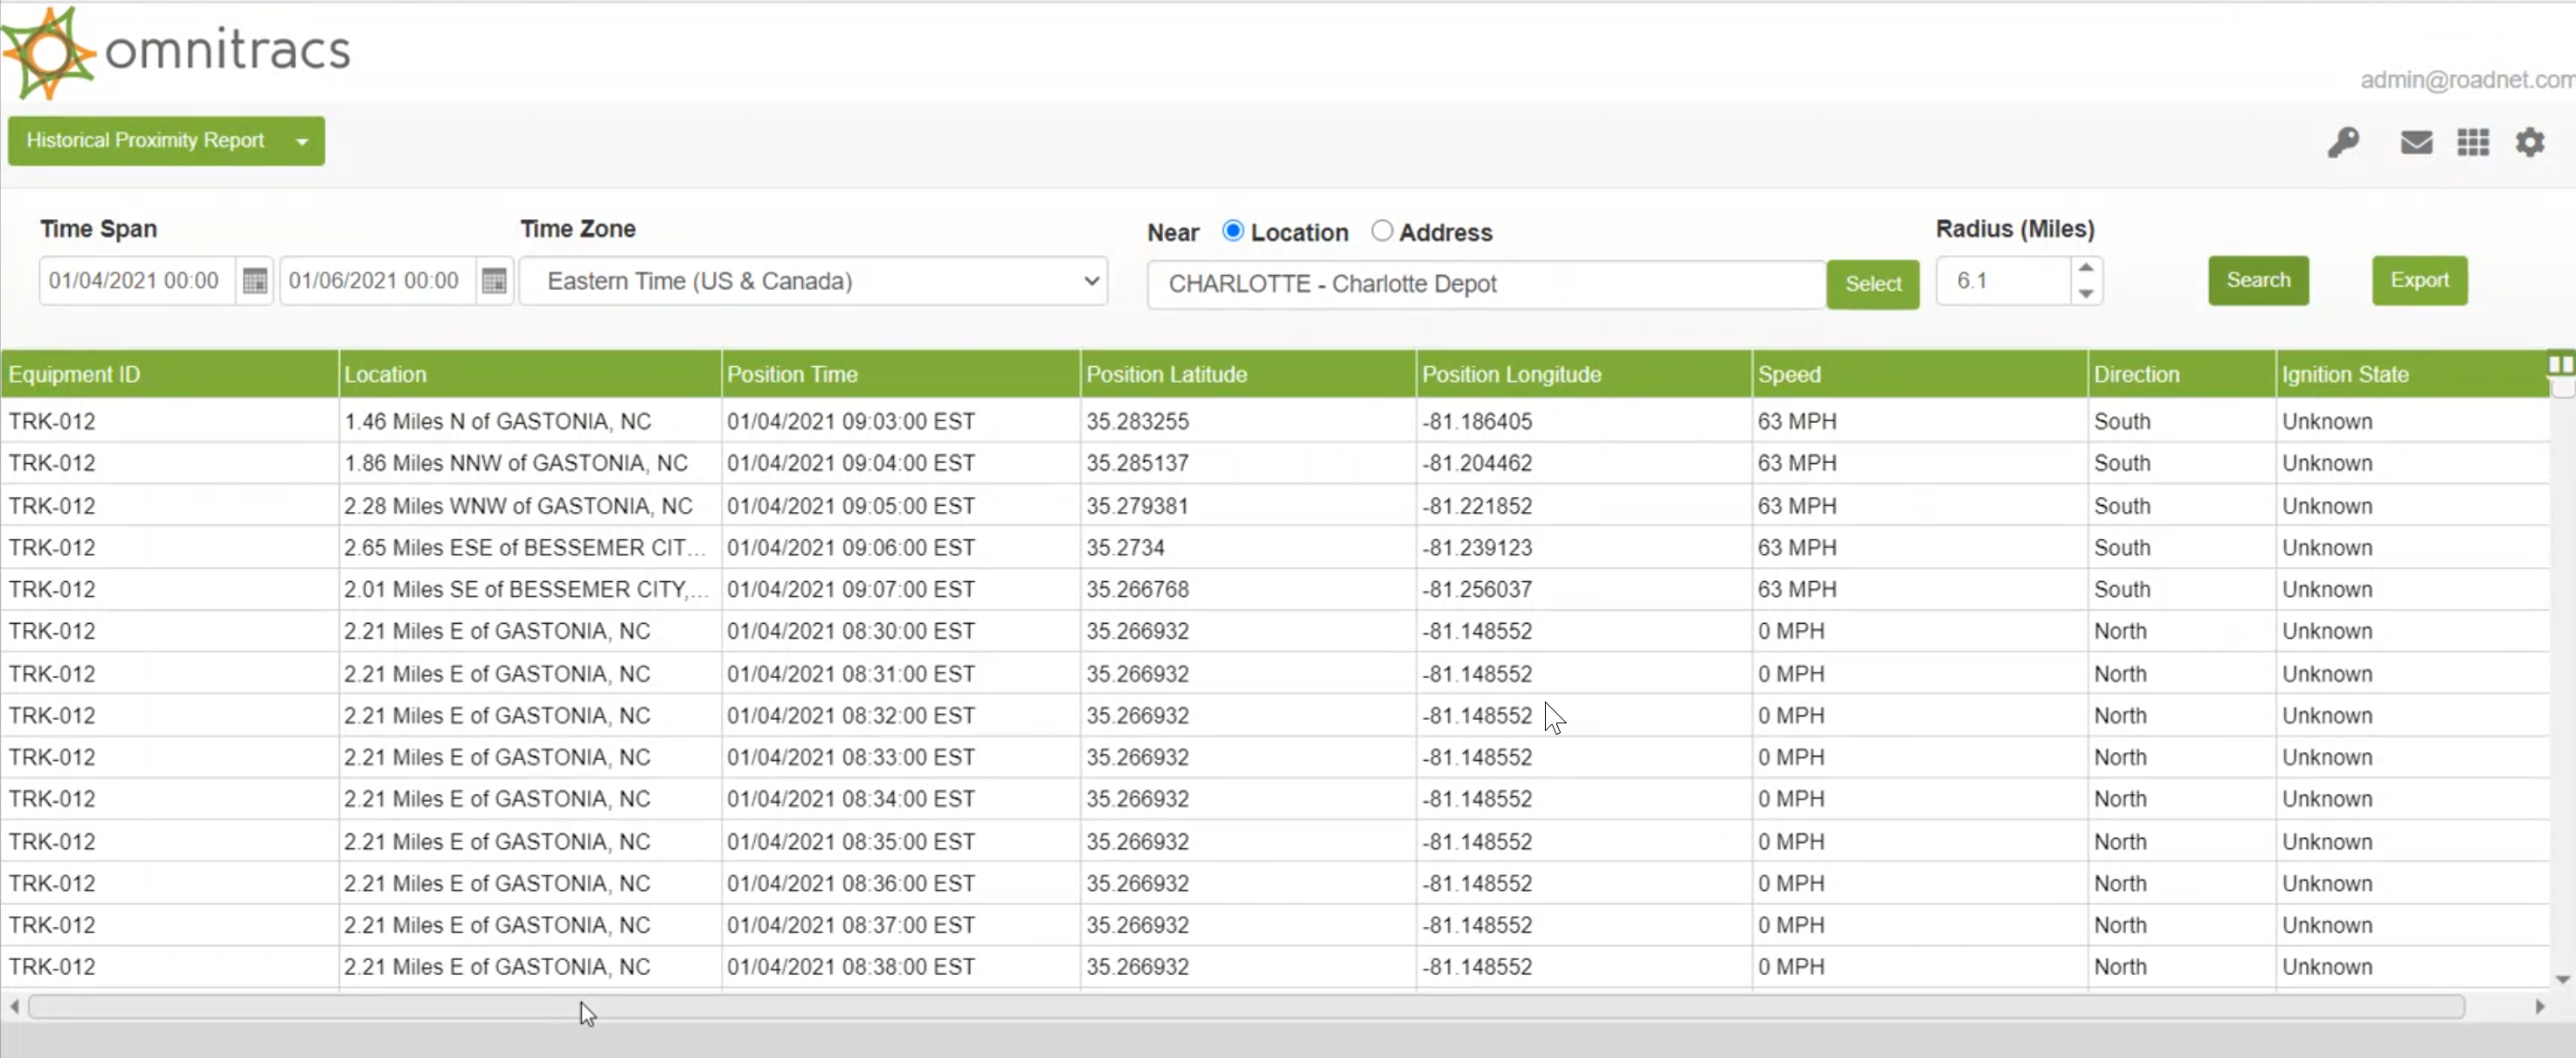
The following information is included in the Historical Proximity Report.
| Name | Description |
|---|---|
| Equipment ID | The unique identifier of the equipment. |
| Location | The equipment's lost known location, like 2.5 miles north of Baltimore, MD. |
| Position Time | The date and time that the equipment's position was recorded. |
| Position Latitude | The latitude of the equipment's position. |
| Position Longitude | The longitude of the equipment's position. |
| Speed | The speed the equipment was moving. |
| Direction | The direction the equipment was moving in. |
| Ignition State | The equipment's ignition state, if known. |
Telematics
Monitoring Telematics Device Battery Usage
Since the Telematics device is so vital is gathering operational and safety information from your equipment, it is important to know that the device has power to operate, particularly that there is sufficient battery power if needed. There are two new enhancements to help you monitor the battery state for your Telematics devices:
- there is a new device unplugged exception, which will alert you when the Telematics device is unplugged from the equipment. Once the Device Unplugged exception rule is created, exceptions will be generated each time the device is unplugged from the equipment. This option is only available if you are using Omnitracs Fleet Telematics.
- you can see the current battery voltage for a device in Telematics Diagnostics. The new Battery Voltage column shows the current voltage for the device's battery.
Setting up the Exception
In order to have the Device Unplugged exception generated, you need to set up the exception.
In Omnitracs Client
- Click on the Maintenance icon to open Maintenance.
- Click the green arrow and scroll to Exception Rules. The Exception Rules list opens.
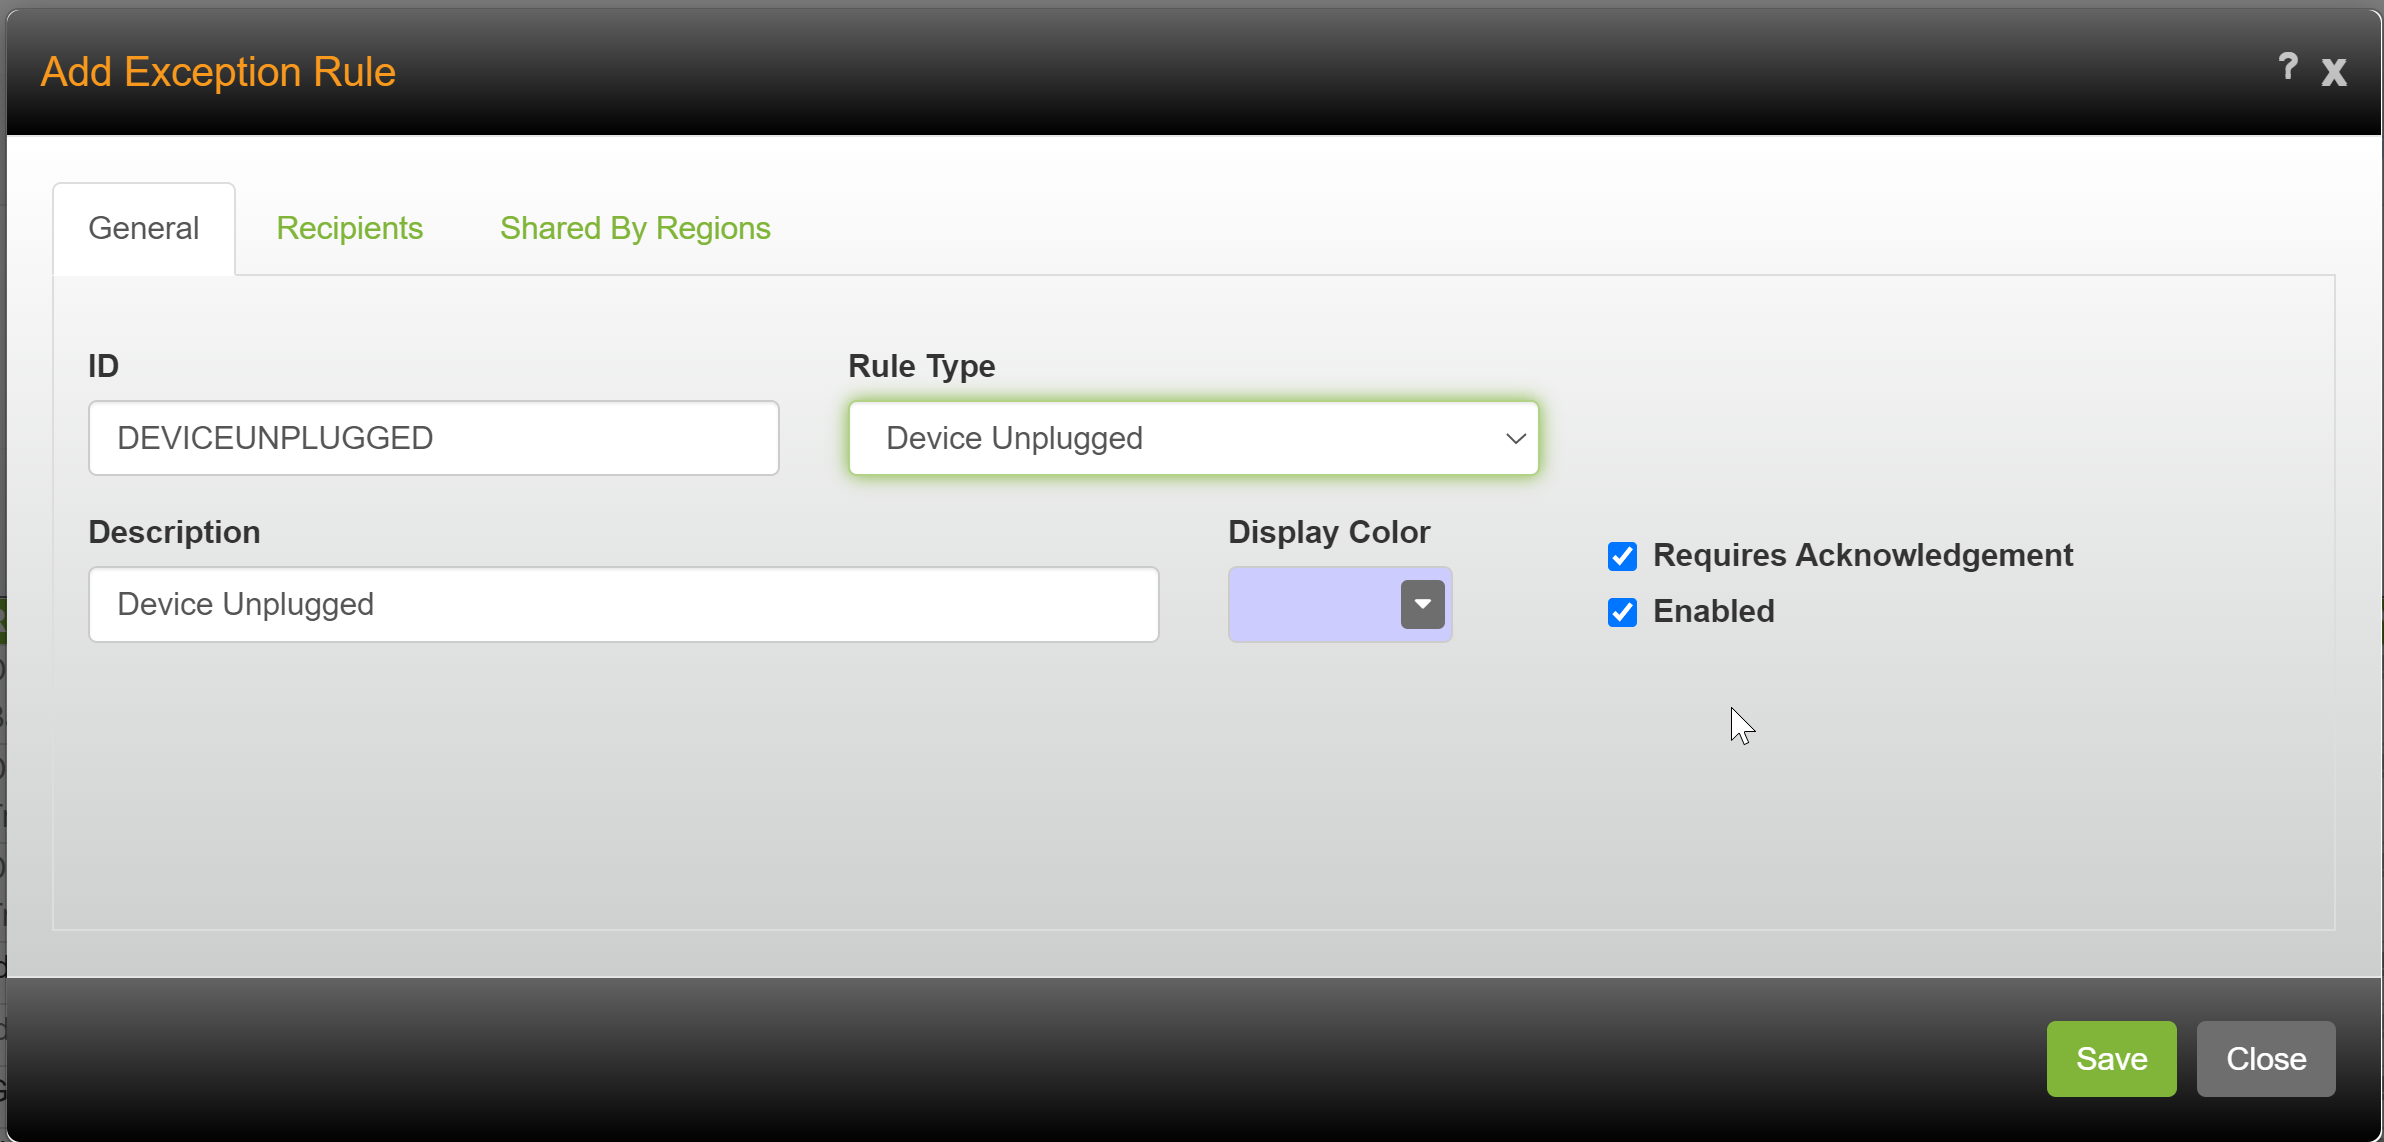
- Click [Add]. The Add Exception Rule window opens.
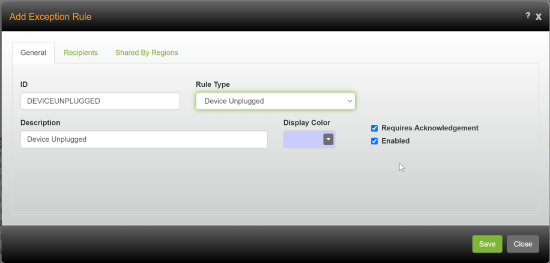
- Enter an ID for the exception rule.
- Click the Rule Type arrow and scroll to Device Unplugged.
- Enter a Description for the new exception.
- Click the Display Color arrow and choose the color to associate with the exception.
- If the dispatcher will be required to acknowledge the exception, check Requires Acknowledgement.
- Check Enabled to have the exception rule turned on.
- To have people alerted when the exception is generated, click the Exceptions tab to open the Exceptions page.
- Check Enable Email and Text Message Recipients, then enter the email and/or phone numbers for those who should receive the alert.
- To share the rule with other regions, click on the Shared to Region tab. Choose the regions that will be able to use the rule.
- Click [Save].
In Omnitracs Client
- Click Dispatching, the Resource Exception Rules. The Resource Exceptions Rules list opens.
- Click the Add icon. The Add Resources Exception Rule window opens.
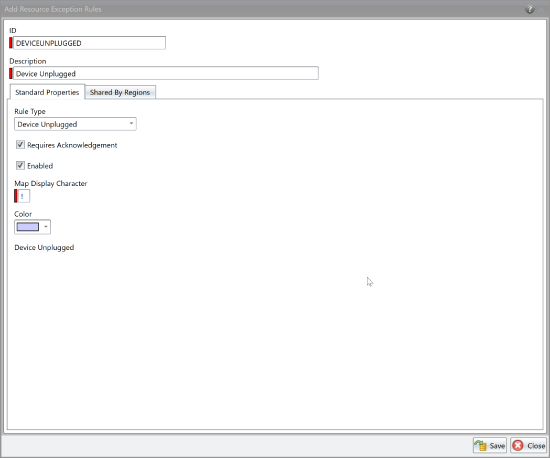
- Enter an ID for the exception rule.
- Click the Rule Type arrow and scroll to Device Unplugged.
- Enter a Description for the new exception.
- Click the Display Color arrow and choose the color to associate with the exception.
- If the dispatcher will be required to acknowledge the exception, check Requires Acknowledgement.
- Check Enabled to have the exception rule turned on.
- To have people alerted when the exception is generated, click the Exceptions tab to open the Exceptions page.
- To share the rule with other regions, click on the Shared to Region tab. Choose the regions that will be able to use the rule.
- Click [Save].

Once you have the Device Unplugged exception rule set up and enabled, when a device is unplugged an exception will be generated and will appear in the Exceptions grid and on Route Details for the route in FleetView.
Assigning a Region to an Unplanned Route
If you do not have a planned route, Omnitracs creates an unplanned route when the equipment starts. Currently the unplanned route starts at the location the equipment departed from, and the route is displayed in the equipment’s region. However, if the route’s origin and the equipment are not in the same region, this can cause some unexpected situations. For instance, a route that departs a depot in Baltimore may show up in the Pittsburgh region, because the equipment is in the Pittsburgh region. Now, new logic has been added that intelligently picks which region to use based on the location/depot that the unplanned route is starting from.
Using Blackberry or Samsara Devices
You can now use Blackberry or Samsara Telematics devices with Omnitracs, and see a GPS trail from the devices. To use either of these devices, you need to set up them in the system.
Setting up the Region
In order for Omnitracs to receive the GPS information from the Telematics device, you need to set up your provider information for the region.
In Omnitracs Web
- Click the Administration icon to open Administration.
- Click the green button and scroll to Regions. The Regions list opens.
- Click the [Add] button to add a region, or the Edit icon to update a region. The Region window opens.
- Click Telematics, then Third Party. The Third Party window opens.
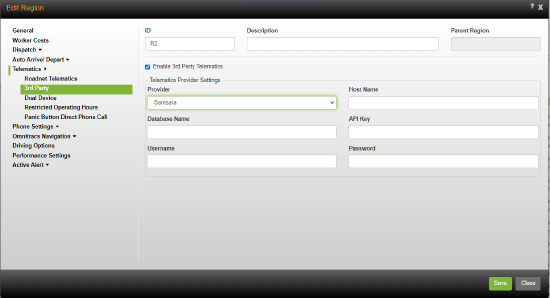
- Check Enable Third Party Telematics.
- Click the Provider arrow and select Blackberry or Samsara from the list.
- If using Blackberry, enter a user name in the Username field.
If using a Samsara, enter your Samsara token as the API Key.
Note: You will need to generate the Samsara token from your Samsara dashboard. - Click [Save].
In Omnitracs Client
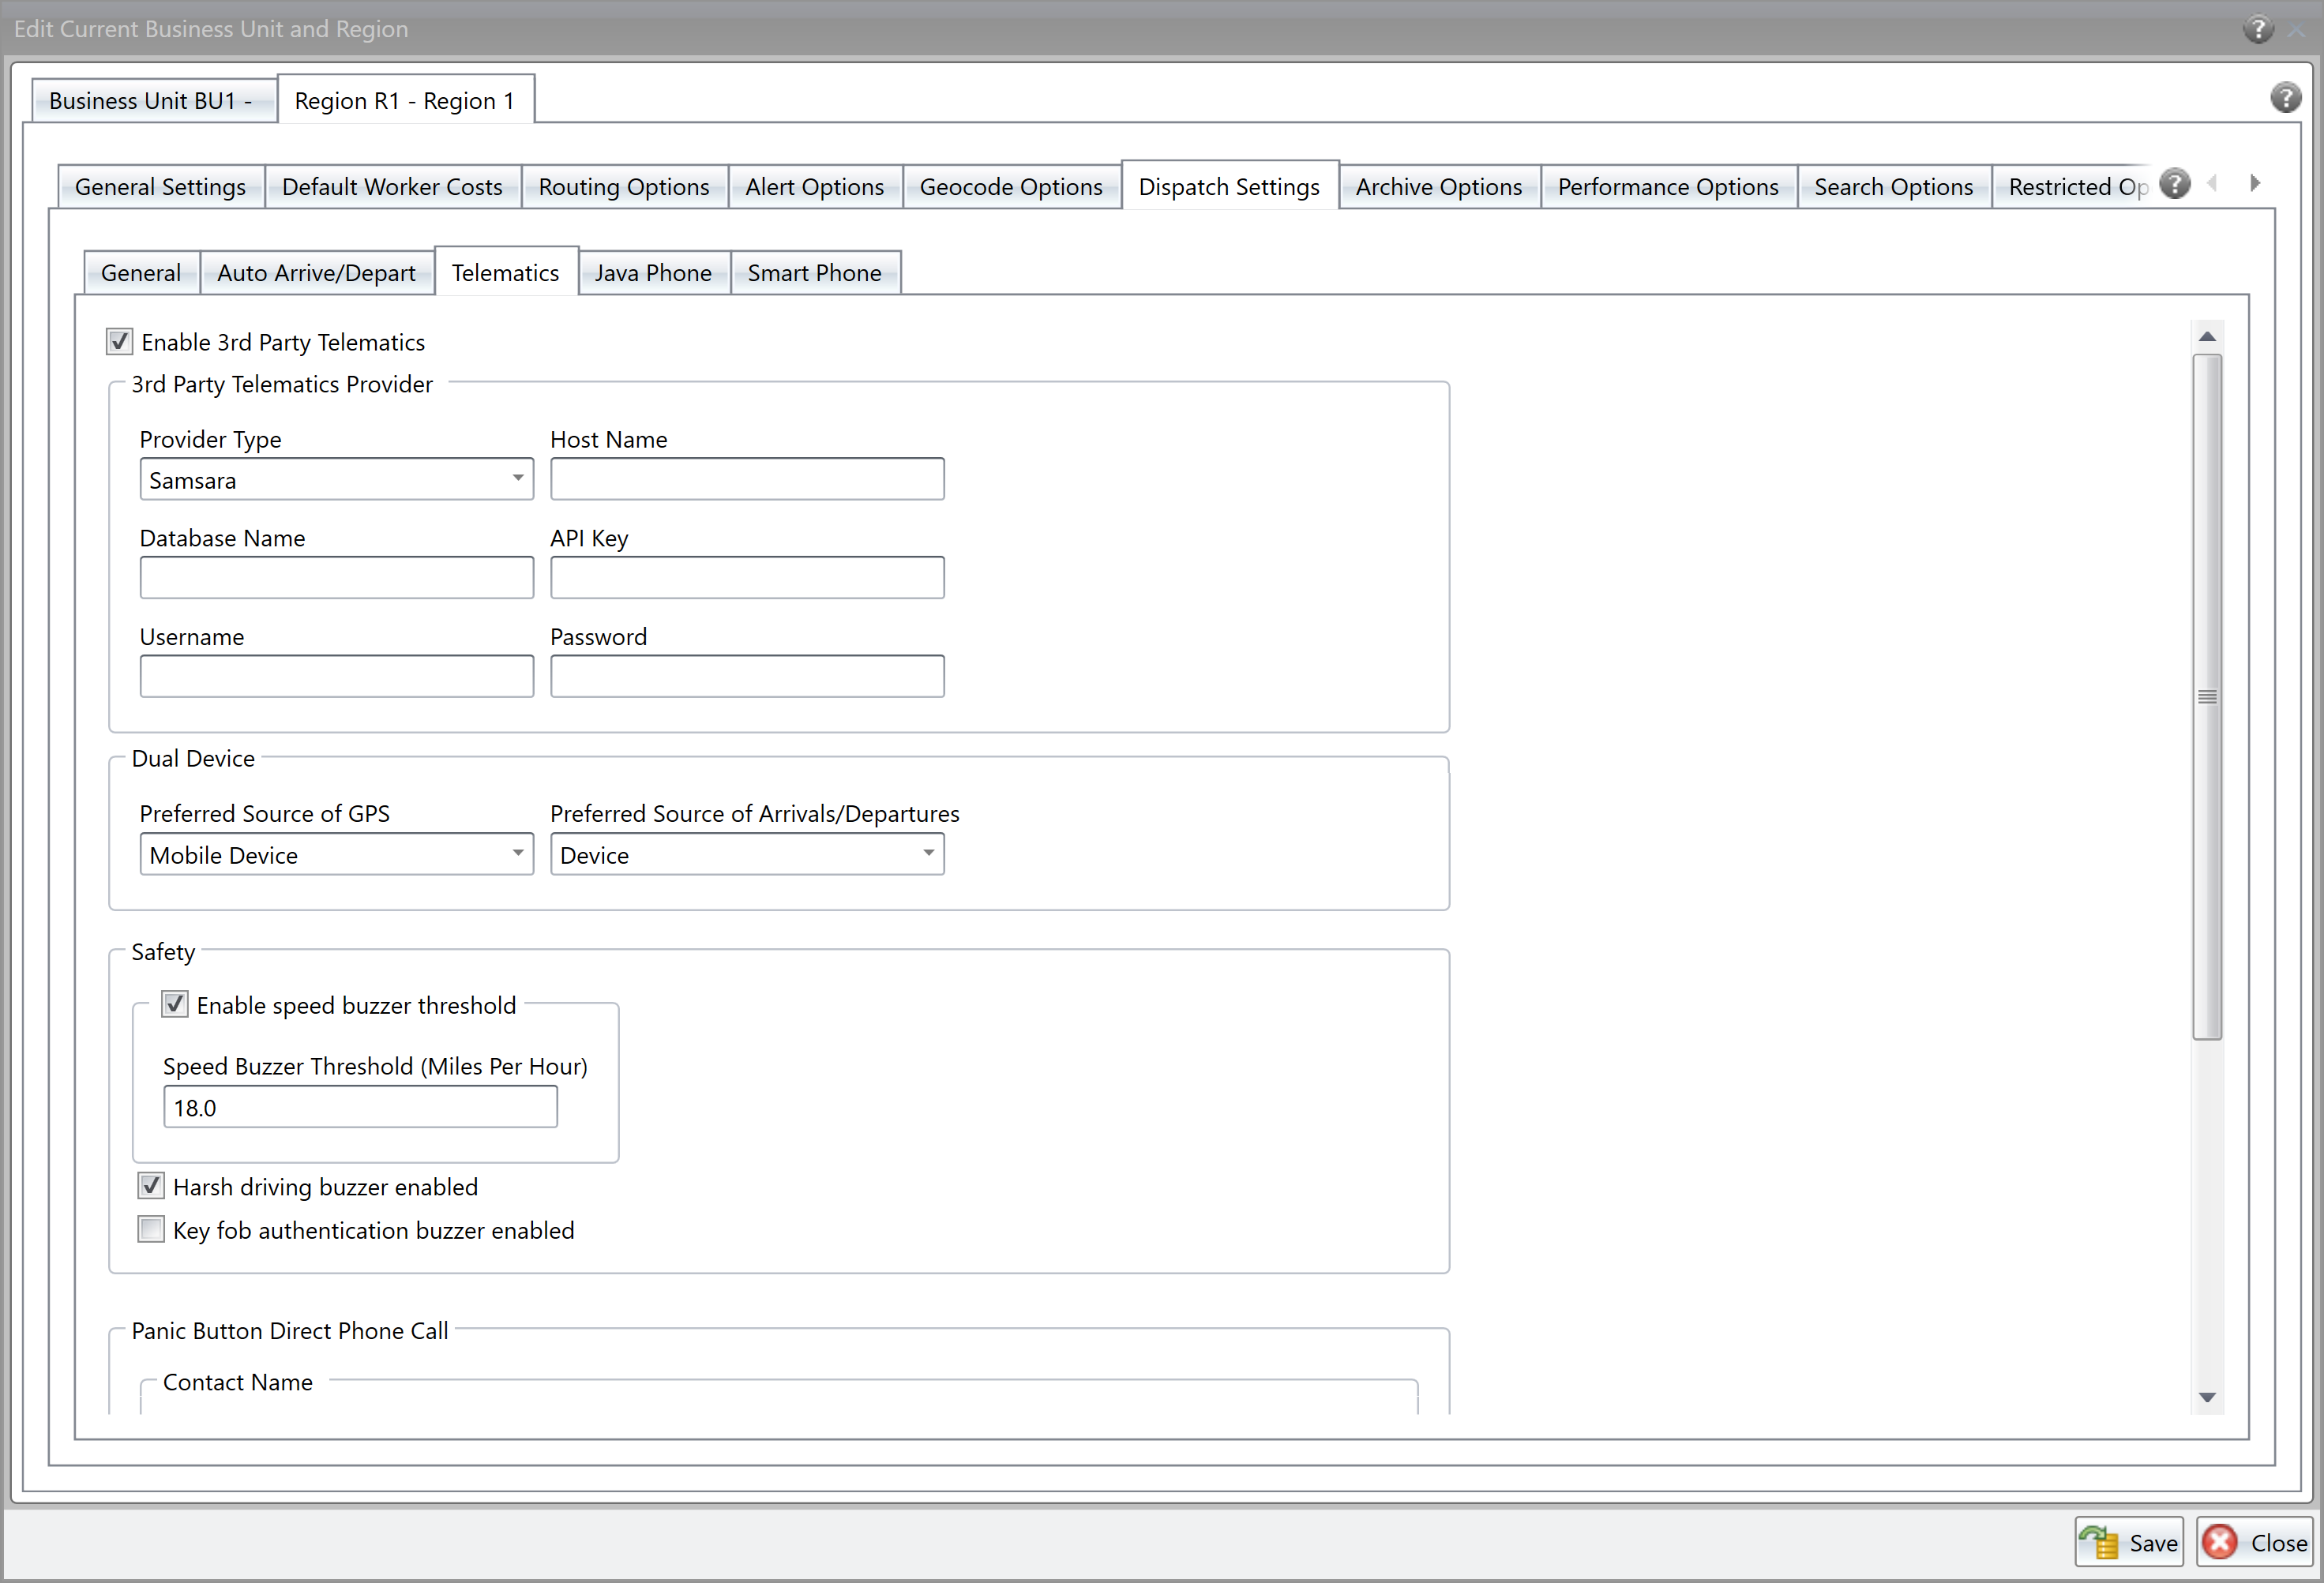
- Click the Admin menu and scroll to Regions. The Regions list opens.
- Click the Add icon to add a region, or the Edit icon to update an existing region.
- Click on the Dispatch Settings tab, then Telematics. The Telematics page opens.

- Check Enable Third Party Telematics.
- Click the Provider arrow and select Blackberry or Samsara from the list.
- If using Blackberry, enter a user name in the Username field.
If using a Samsara, enter your Samsara token as the API Key.
Note: You will need to generate the Samsara token from your Samsara dashboard. - Click [Save].
Adding the Telematics Devices
Once you have completed the region settings, you need to add the Telematics devices.
In Omnitracs Web
- Click the Maintenance icon to open Maintenance.
- Click the green arrow and scroll to Telematics Devices. The Telematics list opens.
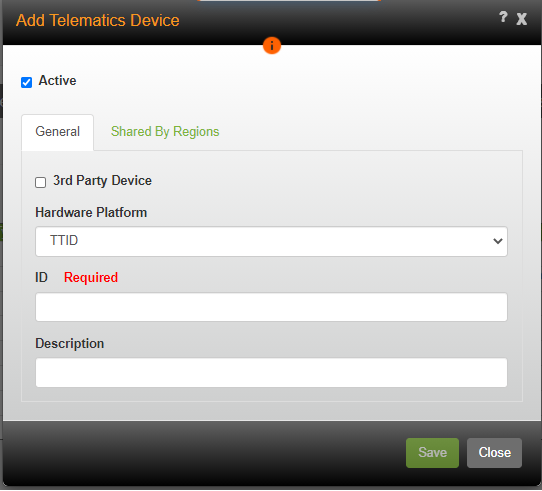
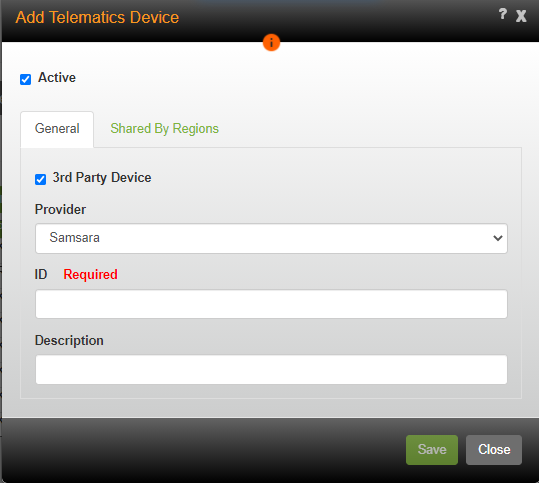
- Click the [Add] button. The Add Telematics Device window opens.

- Check Active if the device will be used. Active devices are counted against your license total.
- Check 3rd Party Device.
- Click the Provider arrow and choose either Blackberry or Samsara.
- Enter an ID and Description. You must enter an ID.
If using a Samsara device, enter the Samsara Vehicle ID.
If using a Blackberry device, enter the Blackberry's asset ID. - If the device can be used by other regions, click the Shared by Regions tab. Select the regions the device can be shared with.
- Click [Save].
In Omnitracs Client
- Click on the Dispatching menu and scroll to Telematics Devices. The Telematics Devices list opens.
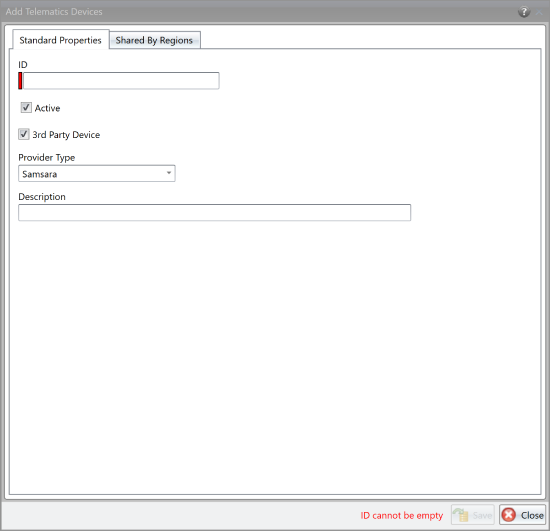
- Click the Add icon. The Add Telematics Device window opens.
-
Check Active is the device will be used. Active devices are counted against your license total.
- Check 3rd Party Device.
- Click the Provider arrow and choose either Blackberry or Samsara.
- Enter an ID and Description. You must enter an ID.
If using a Samsara device, enter the Samsara Vehicle ID.
If using a Blackberry device, enter the Blackberry's asset ID. - If the device can be used by other regions, click the Shared by Regions tab. Select the regions the device can be shared with.
- Click [Save].

Strategic Planner
Integrating with Strategic Planner
A set of REST APIs has been created that allow you to create integration programs. APIs have been created for the following:
- Save Session As
- Save territory
- Save recurring order
- Assign recurring orders to a territory
- Route Recurring Orders
- Add and retrieve service patterns
- Add and retrieve service pattern sets
- Move recurring order to route
- Retrieve routes
Drive/Command
Choosing the Home Page
Note: This option is available for all level of the Drive licensing bundles.
It can be easier for your drivers if the page they most commonly use in Drive is visible when they open the application. Now, you can choose the default home page your drivers will see when they start Drive.
- In Command, select the workflow you want to update.
- Click Universal Config, then Core App Settings. The Core App Settings page opens.
- Scroll down until you see Default Landing Page.
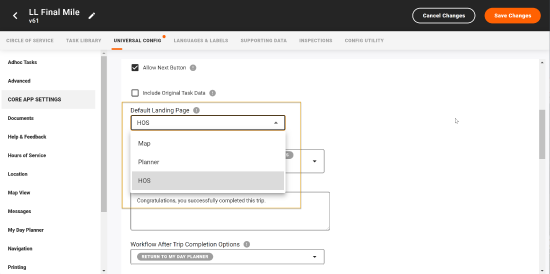
- Click the arrow and choose the proper page for this workflow. The options are Map, Planner, and HOS.
Note: Compliance only/DriveMobile customers that don't send trips to drivers should choose HOS as the default landing page. - Click [Save].

Choosing to Include the Stop Rating
Currently, when a task is ended the driver is given the opportunity to rate the stop. However, you may not want the driver to be able to rate stops and trips. Now, you can choose whether or not the driver can rate the stop/trip in a workflow.
- In Command, select the workflow you want to update.
- Click on Task Library. In the list of tasks, select END. The options for the END task appear.
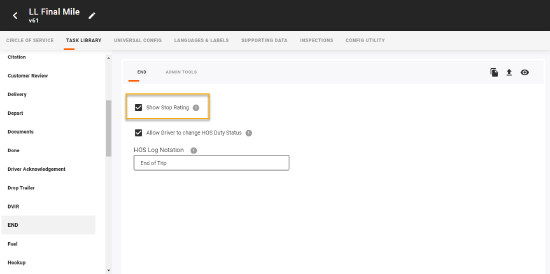
- Remove the check from Show Stop Rating to keep the stop rating from being shown to the driver.
- Click [Save Changes].
Add Ad Hoc as a Tab
Note: Available for all levels of the Drive licensing bundles. Enabling this tab is recommended for any customer that has drivers that regularly record unplanned tasks within or outside of a trip.
You can add an Ad Hoc tab in Drive, making it easier for the driver to open the Ad Hoc page and add an ad hoc task.
- In Command, select the workflow you want to update.
- Click on Universal Config, then Ad Hoc tasks. The Ad Hoc tasks options open.
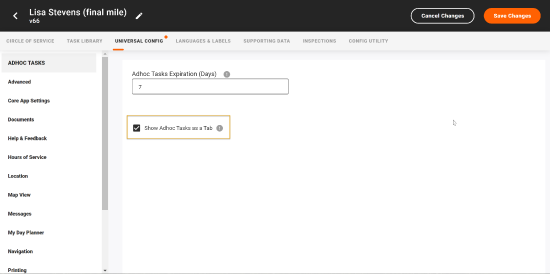
- Check Show Adhoc Tasks as a Tab to have the tab appear in Drive.
- Click [Save Changes].

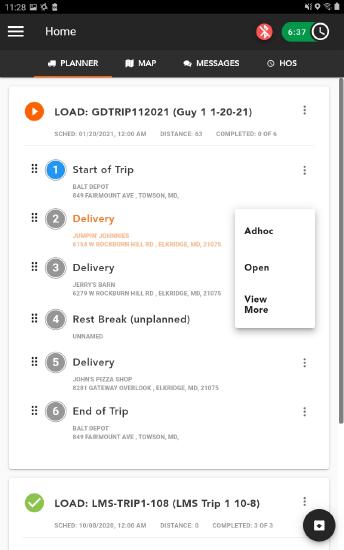
Once you have added Adhoc as a tab, the driver simply taps the AdHoc tab when the driver needs to add an AdHoc task. The Adhoc Task screen displays, listing any current tasks. Drivers can view an existing task or add a new one. To add a new Adhoc Task, tap the Add icon and choose the type of task that needs to be added. Once the driver is done adding the task, it displays in the current list. To return to the Planner screen, the driver will tap Menu and choose My Day Planner.
Removing the My Day Planner Page
Note: This option is available for all levels of the Drive licensing bundles. This tab should not be removed for any customer that sends Trips to drivers.
Drive Mobile bundle customers who do not use trips can remove the My Day Planner page, so that their drivers can focus on the information that they use daily.
- In Command, select the workflow you want to update.
- Click on Universal Config, then My Day Planner. The My Day Planner options open.
- Check Disable My Day Planner.
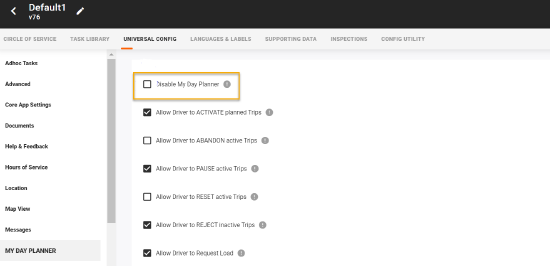
- Click [Save Changes].
Performing a Drop Hook in Drive
You can now create tasks so that drivers can drop a trailer, or pick up a dropped trailer, in Drive.
Note: If you want to use the Drop Hook functionality, contact Customer Service to have it enabled.
Setting Up the Drop Trailer
- In Command, select the workflow you want to update.
- Click on Task Library. The Task Library opens.
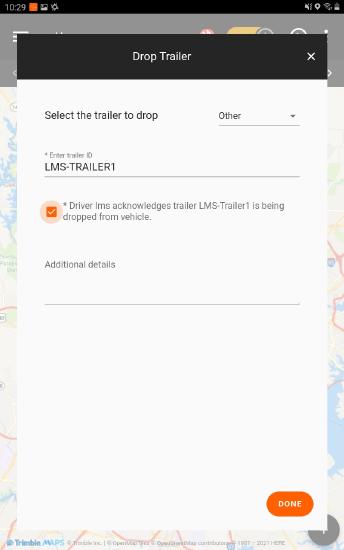
- Scroll down the list of tasks and click on Drop Trailer. The Drop Trailer screen opens.
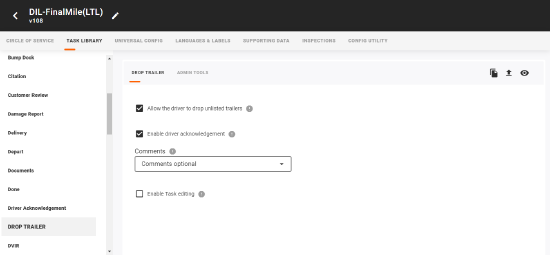
- On the Drop Trailer screen, select the proper options.
Allow the driver to drop unlisted trailers - check to allow the driver to select a trailer that is not currently assigned to the trip.
Enable driver acknowledgement - check to have a confirmation appear when the driver drops the trailer.
Comments - click the arrow and choose the proper option to indicate if the driver can add comments when dropping the trailer.
Enable task editing - check if the driver should be able to change the task after it is completed. - Click on Admin Tools to open the Admin Tools screen. Select the proper options.
- Click [Save].
Setting Up the Hook Trailer
- In Command, select the workflow you want to update.
- Click on Task Library. The Task Library opens.
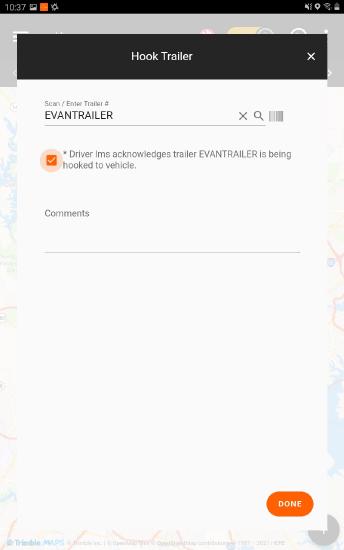
- Scroll down the list of tasks and click on Hook Trailer. The Hook Trailer screen opens.
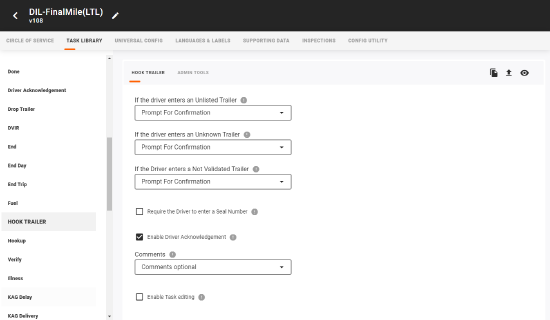
- On the Hook Trailer screen, select the proper options.
If the driver enter an Unlisted Trailer - click the arrow and choose if the driver needs to confirm hooking an unlisted trailer. An unlisted trailer is not assigned to the trip, but does exist in Omnitracs. The device must be online to identify an unlisted trailer.
If the driver enters an Unknown Trailer - click the arrow and choose if the driver needs to confirm hooking an unknown trailer. An unknown trailer is one that does not exist in Omnitracs. The device must be online to identify an unknown trailer.
If the driver enters a Not Validated Trailer - click the arrow and choose if the driver needs to confirm hooking a not validated trailer. A not validated trailer is one that is not assigned to the trip, and the device is offline so Omnitracs can not determine if it exists in the system.
Require the Driver to enter a Seal Number - check if the driver should enter the trailer's seal number. If this option is not checked, the driver will not be able to enter the seal number.
Enable driver acknowledgement - check to have a confirmation appear when the driver hooks the trailer.
Comments - click the arrow and choose the proper option to indicate if the driver can add comments when hooking the trailer.
Enable task editing - check if the driver should be able to change the task after it is completed. - Click on Admin Tools to open the Admin Tools screen. Select the proper options.
- Click [Save].
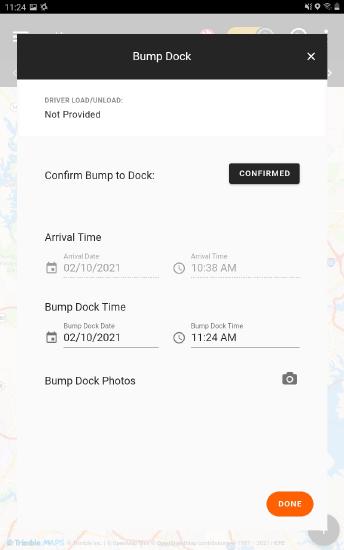
Once these tasks are added to the stops, your drivers will see them. For example, a pickup stop may include hooking a new trailer. The driver may see the task within the circle of service as a required task, optional task, or you can let the driver add it as a manual task. The driver fills out any necessary information and taps Done to complete the task.
Notes: When performing a Drop or Hook Trailer task, you can scan a barcode or search for an existing trailer.
If the equipment does not match an ID that exists in Omnitracs, the driver will need to manually add the dropped or hooked trailer in the Compliance application.
This functionality is only available with Circle of Service Workflow or Advanced Workflow.
Excluding A Stop Type from the Completed Count in My Day Planner
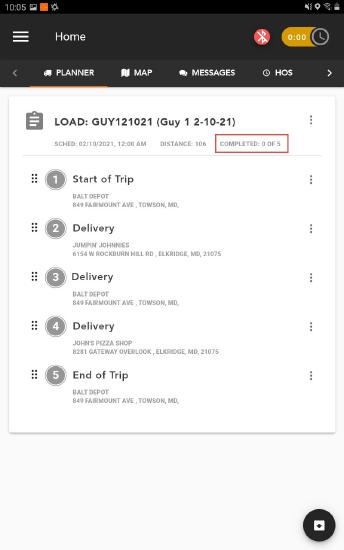
The Completed count in My Day Planner is a handy tool for letting the driver know where he/she stands on his trip. But, there may be some stop types, such as fuel stop, that you don't want included in this count. For example, for a trip with four customer Delivery Stops and one Fuel , the previous stop count would display as five. Now, if you configure Fuel stops to not display in the Completed Stop Count, the number of stops display on the trip header as four, only counting the Delivery Stops. Now, you can exclude selected stop types from this count.
- In Command, select the workflow you want to update.
- On the Circle of Service screen, click ADD STOP TYPE or select a stop type and click the Edit icon. The Stop Type window opens.
- Enter the information for the stop type as necessary.
- Make sure Planned Stop is checked.
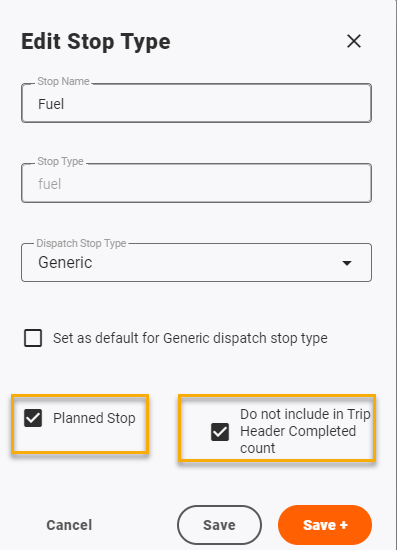
- Check Do not include in Trip Header Completed count.
- Click [Save].
The driver would see the change in
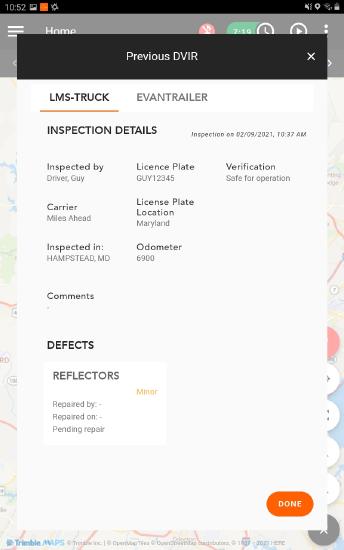
Reviewing Previous Inspections
Found in Drive
So that your drivers can access previous inspections quickly, they have been added to the Adhoc Tasks feature. When a driver needs to open a previous DVIR for a truck or trailer, the driver simply goes to the Adhoc Task screen, taps the plus icon, and chooses Previous DVIR from the list. The DVIR for the active assets on the trip displays. If the driver has already added a Previous DVIR task during the trip, it is already part of the Adhoc Task list. A new one does not need to be added, simply tap the Previous DVIR task in the list. Then, tap the tab for the piece of equipment you want to review. If the driver has dropped or hooked a trailer or changed the current asset on the trip, the driver will need to add a new Previous DVIR adhoc task.
Adding a Roadside Inspection in Drive
Found in Drive
When a driver must stop and present inspection reports to a DOT inspector, it takes time out of the trip and may make the driver late for the next stop. Using Drive's Add Unplanned Stop feature, not only can the driver access a previous inspection quickly, the interruption can be added to the trip as an unplanned stop.
To add a roadside inspection stop to a trip, from the Map screen, the driver taps the plus icon and then taps the Add Unplanned Stop icon. From the Add Unplanned Stop list, tap Roadside Inspection.
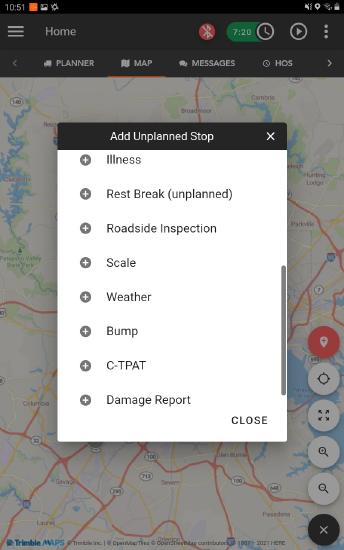
The Roadside Inspection stop opens and requests that the driver confirms the date and time the stop began, along with the driver's current duty status. The driver also has the option to change duty status. Once the driver taps Done, the circle of service displays.
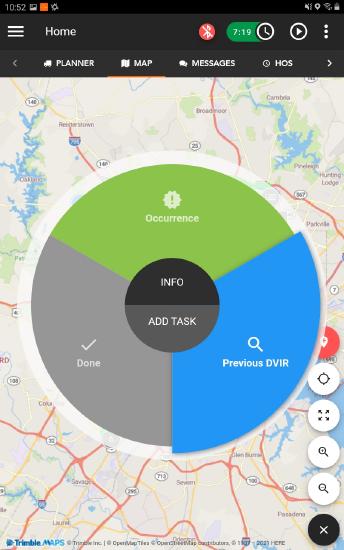
The driver taps Previous DVIR to open the most current inspection for the equipment being used on the trip. After the DOT inspector has looked at the previous inspection, the driver taps Done and the circle of service displays again, showing the Previous DVIR task marked as complete.

The driver taps the Done task to complete the Roadside Inspection stop. The driver confirms the date and time that the inspection was completed. If necessary, the duty status can be changed. Finally, the driver taps Done to complete the task. The Map screen displays. The driver can tap Planner to see that the Roadside Inspection stop was added to the current trip.
Mobile Manager
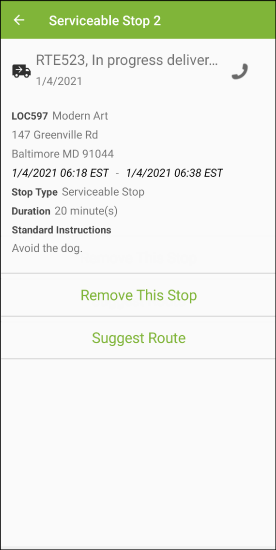
Do More From the Stop Details Screen
Omnitracs Mobile Manager lets you monitor your fleet activity from your mobile device, while you move around the office and warehouse. You can see a list of your routes and details about those routes and you can tap a specific route to see a list of the stops on that route. Mobile Manager now has a stop details screen that shows more information about a stop on the route and lets you perform actions, such as move the stop to a different route or remove the stop completely. Simply tap a stop and the stop details screen shows basic route and stop information, which includes the route ID and description, the session date, the service location ID, description, and address, the planned or actual service date and time, the stop type, duration of the stop, and standard instructions for the service location. Under the information is a list of actions that can be performed.
Standard Instructions Provide More Information
Standard instructions that are entered on the Details tab for a service location are now seen in Mobile Manager, when viewing details about a stop. Although standard instructions are not new to the service location, you are now able to see them in Mobile Manager. Your company can enter any information that is needed for the service location. Instructions may contain details such as who the driver should speak to upon arrival at a stop or which dock to deliver to.
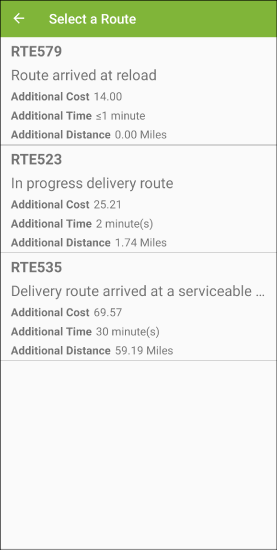
Place a Stop on a Different Route
If a route becomes inefficient due to rush hour traffic and you want to move a stop from one route to another, you can now use Suggest Route. Suggest Route allows you to move a stop from the route it is currently on to a different route; one that has been suggested by Omnitracs. Omnitracs evaluates your routes and provides suggestions as to where a stop fits best.
Note: Autonomous Dispatch must be enabled for the region for you to use Suggest Route in Omnitracs Mobile Manager.
When you tap Suggest Route on the stop details screen, the Select a Route screen opens displaying a list of routes that Omnitracs has determined as the best routes to place the stop on. The additional cost, time, and distance are calculated for each suggestion to help you decide which move would be most efficient.
To move a stop to a suggested route, follow these steps.
- On the Routes screen, tap the route for which you want to see more information.
- Tap #/# Stops. Where #/# is the number of stops completed over the number of stops on the route.
- On the Stops screen, tap the stop for which you want to see more information.
- On the stop details screen, tap Suggest Route.
- Review the suggested routes and tap the route that you want to move the stop to.
- On the prompt that pops up,
Tap Move to remove the stop from the current route and add it to the suggested route. The stop is canceled on the current route and added to the chosen route.
Tap View Route Details to see more information about the chosen route. Tap the Back arrow to return to the Select a Route screen. - Tap the Back arrow to return to the previous screen.
Remove a Stop from a Route
In Fleetview, you are able to remove a stop from a dispatch route, such as when an order is cancelled or if a driver cannot visit a service location as planned. Now, you may remove a stop from a route in Mobile Manager. When you remove a stop, you can choose to have the order moved to the Unassigneds list and the product quantities counted toward the vehicle capacity and available quantities.
To remove a stop from a route in Mobile Manager, follow these steps.
- On the Routes screen, tap the route for which you want to see more information.
- Tap #/# Stops. Where #/# is the number of stops completed over the number of stops on the route.
- On the Stops screen, tap the stop for which you want to see more information.
- On the stop details screen, tap Remove This Stop.
- To have the order for the removed stop moved to the Unassigneds list so it can be reassigned to another route, toggle Unassign the orders to On. If you do not turn this option on, the order on the stop being removed will not be moved to the Unassigneds list and will not be available to reassign to another route.
- If the product quantities for the order being removed from the route are still present on the delivery vehicle, toggle Order quantities are still on a Vehicle. When this option is on, the product quantities for the removed order remain on the vehicle, counting toward the vehicle's capacity and available quantities.
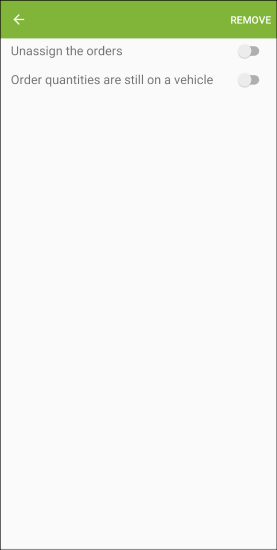
- Tap Remove. The stop is removed from the route. The order and product quantities are handled based on how the options are set. The Stops list for the route displays and the stop you removed is marked as cancelled.
- Tap the Back arrow to return to the previous screen.
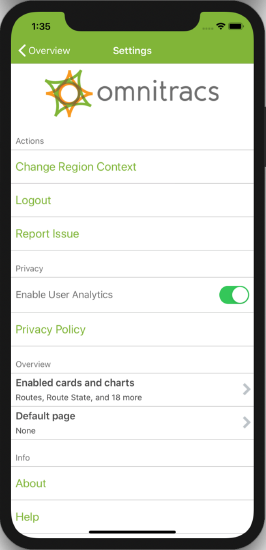
Allowing User Analytics in Mobile Manager
Mobile Manager now has the ability to provide you with new feature explanation pop-ups and focused help on how to use the application. By capturing and sharing your usage data with our partners, we are able to provide new help and learning experiences.
User Analytics is automatically enabled. You can turn User Analytics off if you do not want Omnitracs to capture and share your usage data with our partners. By disabling User Analytics, your access to interactive help functionality will be limited. To turn off User Analytics, from the dashboard tap the settings icon. Then, toggle Enable User Analytics to Off.
Active Alert
Managing Active Alert Recipients
Enhancements have been made to Active Alert to help you better manage recipients that receive alerts from Omnitracs. Rather than add them to a specific service location subscription, you will now add a recipient individually to Omnitracs and then choose it, when adding a subscription to a service location.
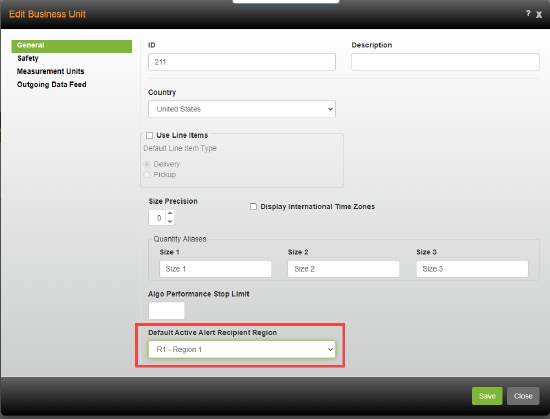
Choosing a Default Active Alert Recipient Region
So that you can quickly create an active alert recipient and define what settings the alerts for that recipient will follow, you will want to set the new Business Unit setting Default Active Alert Recipient Region. The region you choose for the business unit is used to assign the primary region to all newly created Active Alert recipients.
Note: If necessary you can change the Primary Region to a different region, when adding an active alert recipient
To set the Default Active Alert Recipient Region, add or edit the business unit with which you want to work.
Click the Default Active Alert Recipient Region arrow and choose the region you want the Primary Region set to when an active alert recipient is added.
When an active alert recipient is added and a default Active Alert region is set, the settings for the chosen region, such as Business Display Name, message sender, and verification settings are used for the recipient.
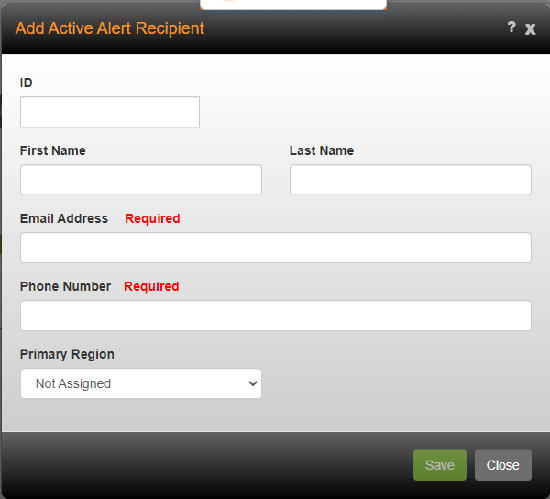
Adding Active Alert Recipients
The Active Alert Recipients page lets you enter contact information for the people who will receive service alerts from Omnitracs Active Alert. Once a recipient's information is added, that recipient can be assigned to service location subscriptions.
Important: In order for the recipients to be sent alerts, the recipient must be added to a service location subscription. For more information on subscriptions, refer to the Active Alert page in Setting Up Service Locations.
Note: Existing recipients that are part of a current service location subscription in Omnitracs have been added to the Active Alert Recipient list.
To enter an active alert recipient, follow these steps.
- In the Maintenance module, click the green button and choose Active Alert Recipients from the list.
- Click Add to add a new recipient.
- Enter a unique ID for the recipient.
- Enter the recipient's First Name and Last Name.
- Enter the email address to which alerts will be sent for the recipient.
- Enter the phone number to which alerts will be sent for the recipient.
Note: A unique email address or phone number is required for the Active Alert Recipient to be saved.
Omnitracs Active Alert supports U.S. and international phone numbers.
- If the region displayed in the Primary Region field is not the region you want assigned to this recipient ass the default, click the Primary Region arrow and choose the appropriate region.
- Click Save. The Active Alert Recipient list displays the recipient you added.
Important: When you search to find items in a field, at least three characters are required. In order to use the search functionality for a field to find your item you will want to make sure the values you enter for an item, such as an ID, Description, or Name are at least three characters in length.
Notes: When using email as the notification method, a link allowing the recipient to unsubscribe from any further alerts appears at the bottom of all Omnitracs Active Alert email notifications. If a recipient chooses to unsubscribe using this link, the email alerts for this subscription are unchecked in Omnitracs.
When using SMS as the notification method, a header appears at the top of each text message informing recipients they can reply STOP to discontinue receiving any future messages. If a recipient replies STOP, no further active alert text messages will be sent to that phone number. However, the phone number will still appear as a recipient and the SMS alerts for this subscription will remain checked in Omnitracs.
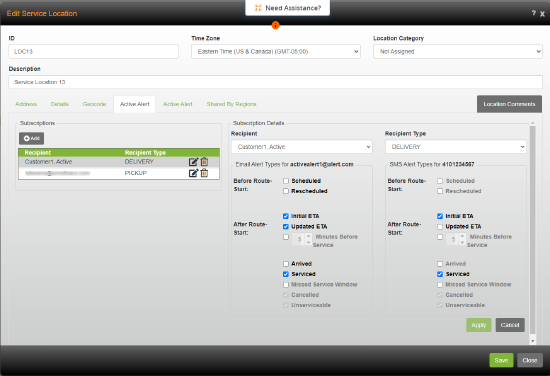
Adding a Recipient to a Service Location Subscription
To send alerts to recipients, you must create a subscription for a service location. A subscription can be added from the Service Location Active Alert page. Subscriptions let you define who will receive service alerts from Omnitracs Active Alert and what type of alerts they will receive.
Existing subscriptions are still listed in the Subscription list.
To add a new subscription to the service location, follow these steps.
- In the Maintenance module, click the green button and scroll to Service Locations. The Service Locations list window appears.
- Add a new service location or edit an existing service location.
- Click the Active Alert tab.
- Click the [Add] subscriptions button
Note: If necessary, click Edit to edit an existing subscription. - Click the Recipient arrow and choose the active alert recipient you want to add to the subscription.
Note: If the list is long, search for the recipient. As you type in the Recipient field, the displayed list is filtered to only show items that start with the characters you typed. You must type at least three characters to begin the search. - Click the Recipient Type arrow and select the recipient type you want to assign to this subscription. Available alerts for the recipient type show as bold.
Notes: The alerts available for the recipient are based on the form of notification that is entered for the recipient, email and/or SMS, and the alert types set up for the Recipient Type. If only an email address is available for the recipient, only email alerts that are set up for the Recipient Type will show as bold. If there is only a phone number available for the recipient, only SMS alerts will show.
When using email as the notification method, a link allowing the recipient to unsubscribe from any further alerts appears at the bottom of all Omnitracs Active Alert email notifications. If a recipient chooses to unsubscribe using this link, the email alerts for this subscription are unchecked in Omnitracs.
When using SMS as the notification method, a header appears at the top of each text message informing recipients they can reply STOP to discontinue receiving any future messages. If a recipient replies STOP, no further active alert text messages will be sent to that phone number. However, the phone number will still appear as a recipient and the SMS alerts for this subscription will remain checked in Omnitracs.
- Check the box for each alert type that you want to send to the recipient. The choices are explained below.
Note: Only those alert types displayed in bold are available to be sent to the recipient.
Scheduled—check to have the recipient(s) receive an alert when the route that a stop is placed on is moved into Built status or Dispatch phase.
Rescheduled—check to have the recipient(s) receive an alert when the ETA of a scheduled stop no longer meets the originally scheduled window.
Initial ETA—check to have the recipient(s) receive an alert when the estimated time of arrival is calculated based on when the driver leaves the depot.
Updated ETA—check to have the recipient(s) receive an alert when the estimated time of arrival changes.
Minutes Before Service—check to have the recipient(s) receive an alert a specified number of minutes before receiving service. Enter the number of minutes before service that you would like the recipient to receive a notification. You can click on the number field and enter any number from 1 to 60 or you can click the up and down arrows to change the number in increments of 5.
Arrived—check to have the recipient(s) receive an alert when the stop is arrived.
Serviced—check if the recipient(s) should receive an alert once service is completed.
Missed Service Window—check to have the recipient(s) receive an alert if the driver's arrival time is projected to miss a service window, such as when a route is running early or late. You can specify the number of minutes a driver must be projected to miss the service window by for this the alert to be sent on the Active Alert page for the business unit settings.
Cancelled and Unserviceable alert types are automatically enabled. You cannot uncheck them. In order to have Cancelled and/or Unserviceable notifications sent, corresponding message templates must exist for the recipient type selected.
Important: In order for the recipients to be sent alerts via email messages or SMS notification, recipient type message templates must exist for them. For example, if you want the recipients to receive initial ETA alerts via email, the recipient type you choose must have a message template set up for initial ETA messages sent by email. For more information on creating message templates for recipient types, refer to Working with Recipient Types.
- Click Apply and the new subscription is added to the list. You can add as many subscriptions as you need.
- Click Save to save the changes to the service location.
Navigation Enhancements
Many changes have been made to Omnitracs Navigation. These enhancements allow for a better driver experience and for more of the map to show when navigating to a stop. The most noticeable is the removal of the top banner. The information contained there has moved to the banner at the bottom of the screen, which now displays the estimated time of arrival, the remaining distance to the destination, and the remaining time to the destination. The Route Status flag is also displayed on the bottom banner.
Tap the orange expand icon to show the vehicle and path settings that were used when creating the path for the trip and to see the complete address of the current destination. The driver can Cancel the trip to the current destination or Arrive at the destination. Detour has been removed as an option. If the driver is forced to make a turn that is different from the calculated path, Omnitracs Navigation will automatically re-calculate the best available path, based on the current settings. Tap the Trips icon at the top of the window to open the Trips screen.
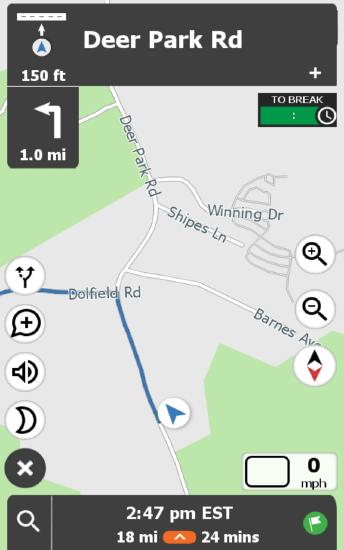
The compass on the map screen has been simplified and reduced in size. The driver no longer sees the heading that states which view the compass is displaying. Instead, when the compass is tapped, the map orientation changes between 3D and 2D views. Similar to the old compass icon, the red arrow tells the driver the direction of true North.
If your drivers change vehicle and path settings during the day, it should be noted that they have moved from under the General Settings option to the top layer of the Main Menu. Now, they are much easier to access.
The Quick Menu has been replaced with the Floating Action Button (FAB) icon. When the icon is tapped, the driver is provided with instant access to day/night mode, volume on/off, and report a problem. When running a trip, the driver also has access to the route overview from the icon.
Roadnet Mobile
Enhancements to Roadnet Mobile for iOS
When you require your drivers to collect signatures for a delivery, they need a way to bypass that requirement if the signer is not available. Drivers are already able to do this on the Android devices. The ability for workers to skip a signature has been added to iOS.
To skip collecting a signature, when a driver is on the Signature screen, they will tap Signer not available. The information is sent to Omnitracs and the driver can proceed with the route.
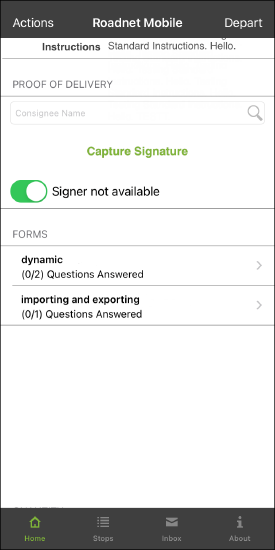
Another feature that has been added to Roadnet Mobile for iOS is the ability to complete order and line item forms.
To see order and line item forms, when verifying quantities for an order or line item, the driver can tap the Forms icon beside the order or line item. If there are more than one order or line item forms, the driver can choose which form to complete. If there is only one, the form automatically opens. Like other types of forms, the list of questions displays and the driver answers the questions.
Software Corrections
| Issue key | Release Notes | Components |
|---|---|---|
| RPE-13832 | There was an issue preventing proof of delivery images from appearing in the Active Alert web app unless contactless signature was enabled. This has been corrected, and the proof of delivery image will appear even if contactless signature is not enabled. | ActiveAlert |
| RPE-12592 | Adding a Role no longer terminates Route Navigator. | Admin |
| XRS-7073 | Some users were receiving an “HOS engine error” message when they tried to save changes to a driver’s logs in the Driver Log Editor. This issue has been resolved. | Compliance |
| RPE-15934 | The Worker Import Template has been updated so that the minimum number of characters required for the password has been changed from 6 to 4. | Data Transfer |
| RPE-14540 | There was an issue that was causing the driver's duty status to show incorrectly in FleetView. This has been corrected. | Dispatching |
| RPE-14331 | There was an issue that was causing the driver's duty status to show incorrectly in FleetView. This has been corrected. | Dispatching |
| RPE-13594 | There was an issue with the minimum duration time for posted road speed violation and user defined road speed violation exceptions, that was causing the exception not to be triggered. This has been corrected. | Dispatching |
| RPE-12514 | There was a misspelled word on the Cease Dispatch dialog in Omnitracs Web. This has been corrected. | Dispatching |
| RPE-12204 | There was an issue that could cause customers using line items to receive an error when resetting a route. This has been corrected. | Dispatching |
| RPE-11238 | There was an issue where opening a route from the Equipment grid in FleetView could open the route with the wrong date. This has been corrected. | Dispatching |
| RPE-15663 | There was an issue where some routes without Telematics devices were not being reported properly in Insight. This has been corrected. | Insight |
| RPE-15224 | There was an issue that was causing drivers to be "Undefined" on the Scorecard in Insight. This has been corrected. | Insight |
| RPE-13792 | There was an issue that was causing the worker's mileage to appear incorrectly on the Operation Profile Report by Worker in Insight. This has been corrected. | Insight |
| RPE-14055 | There was an issue where a depot shared to a higher level region could not be associated with equipment at a lower level region. This has been corrected. | Maintenance |
| RPE-7538 | There was an issue preventing the workers list from populating in some circumstances. This has been corrected. | Maintenance |
| RPE-17782 | Users were no longer being prompted to re-geocode a location when the address was changed. This has been corrected. | Maintenance |
| RPE-16185 | The help has been updated to include information on the Region - Driving Options - Use Shortest Path checkbox. | Miscellaneous |
| RPE-15468 | There was an issue where an order signature may not appear in Order Status if there was a stop level signature that was different. This has been corrected. | Miscellaneous |
| RPE-15168 | There was an issue that was causing the system message to appear every time the user logged in, even if another Remind option was selected. This has been corrected. | Miscellaneous |
| RPE-15072 | There was an issue where some users were not able to make changes to mailing lists that were shared to multiple regions. This has been corrected. | Miscellaneous |
| RPE-16870 | There was an issue preventing some AMG-C devices from properly being added to the customer in the portal. This has been corrected. | Miscellaneous |
| RPE-14970 | There was an issue reported where a user with a system admin role for specific regions was unable to save a new order for that region. This has been resolved. | Miscellaneous |
| RPE-14543 | There was an issue that could cause some routes that were migrated from the Roadnet Transportation Suite to not have a start or complete time. This has been corrected and now the start time will be set to the default start time if it is missing in the RTS data. The complete time will be set to the start time plus the post route time plus 1 hour if it is missing in the RTS data. | Miscellaneous |
| RPE-14456 | There was an issue where a route that had different dates in Routing and Dispatching in the Roadnet Transportation Suite was not able to migrate properly to Omnitracs One. This has been corrected. | Miscellaneous |
| RPE-14453 | There was an issue preventing some stops from being able to migrate properly from the Roadnet Transportation Suite. This has been corrected. | Miscellaneous |
| RPE-14046 | There was an issue where some screens were being cut off at very low resolutions. This has been corrected. | Miscellaneous |
| RPE-13632 | The wrong help page was opening when you clicked on the help ? on the Update Service Times dialog. This has been corrected. | Miscellaneous |
| RPE-12906 | The Roadnet Transportation Suite to Omnitracs One migration report did not Territory Planner session and territory information. This information has been added to the report. | Miscellaneous |
| RPE-12836 | There was an issue that was causing the GPS pings in Equipment History to be different than the pings that appeared in FleetView. This has been corrected. | Miscellaneous |
| RPE-11095 | A new culture has been added to Omnitracs Client for French Canadian. | Miscellaneous |
| RPE-10997 | There were two time zones listed for Caracas. These have been reidentified as Caracas and LaPaz. | Miscellaneous |
| RPE-15645 | There was an issue that prevented a route from loading onto the mobile device if the route was being reset. This has been corrected. | Mobile |
| RPE-16405 | There was a very specific issue that prevent a tracking route from being unloaded. This is corrected. | Mobile |
| RPE-15240 | There was an issue that could prevent a driver from loading routes. This has been corrected. | Mobile |
| RPE-15129 | There was a rare issue that could cause a route suspend to fail. This has been corrected. | Mobile |
| RPE-15052 | There was an issue that could cause stops to be cancelled on a route. This has been corrected. | Mobile |
| RPE-14566 | There was an issue where new stops would be appear on the device but they were not ever added to the route. This has been corrected. | Mobile |
| RPE-13800 | There was an issue that could cause Roadnet Mobile to crash when the route was being reset. This has been corrected. | Mobile |
| RPE-13796 | There was an issue where cancelled stops could appear on a stop redeliver, causing an error in the mobile application. This has been corrected. | Mobile |
| RPE-8540 | There was an issue when switching between Roadnet Mobile and Omnitracs Navigation, where Omnitracs Navigation would not always open at the correct stop. This has been corrected. | Mobile |
| RPE-7867 | There was an issue where the distance to an undelivered stop was appearing as 0 in FleetView. This has been corrected. | Mobile |
| RPE-7725 | The actual quantities on the Edit Orders screen were not displaying comma separators when the application was run in Portuguese. This has been corrected. | Mobile |
| RPE-14469 | During first time configuration, Roadnet Mobile will now automatically add or remove the +1 country code and try again on failure to retrieve configuration. | Mobile |
| RPE-13491 | There was an issue preventing stop arrivals manually completed in Navigation from being arrived in Roadnet Mobile. This has been corrected. | Mobile |
| RPE-11348 | There was an issue causing Mobile Device Diagnostics to show the incorrect version of Omnitracs Navigation loaded on the device. This has been corrected. | Navigation |
| RPE-16381 | There was an issue that could cause the application to freeze when entering the Alerts and Reports page if using region hierarchy. This has been corrected. | Navigation |
| RPE-16357 | In the POI Search with a split map view, the icons are now retained in the map while changing device orientation. | Navigation |
| RPE-16242 | Fixed the issue where the user was unable to access the About, Report a problem page, before the device was activated for Omnitracs Navigation. | Navigation |
| RPE-16235 | There was an issue where the top menu bar was hidden when returning to the map after searching for a POI. This has been corrected. | Navigation |
| RPE-16238 | There was an issue where the HOS clock was overlapping the railroad crossing alert message. This has been corrected. | Navigation |
| RPE-16226 | There was an issue that could cause the mileage to be incorrect on short trips. This has been corrected. | Navigation |
| RPE-15667 | Water bodies, parks, and buildings are now shown on the location preview page. | Navigation |
| RPE-15384 | If a user manually arrived at a destination when the route was being recalculated, the route could automatically be cancelled. This has been corrected. | Navigation |
| RPE-14852 | The link to the Navigation APK was visible in the Application Downloads tp customers who had not purchased Navigation. This has been corrected. | Navigation |
| RPE-13737 | There was an issue that was causing Navigation Speed Alerts to be triggered when the route had not been started. This has been corrected. | Navigation |
| RPE-14495 | Fixed the issue where the wrong drive time was being shown on the HOS menu. | Navigation |
| RPE-15350 | There was an issue that could cause Strategic Planner to time out when using Transfer Session. This has been corrected. | Planning |
| RPE-14351 | A software error when running Transfer Session was reported and has been fixed. | Planning |
| RPE-11516 | There was an issue that could cause some customers to receive an unexpected error when running Create Strategic Routes. This has been corrected. | Planning |
| RPE-11258 | There was an issue that caused an error when users tried to sequence a large number of territories simultaneously. This has been corrected. | Planning |
| RPE-9292 | There was an issue that caused a crash when plotting a territory in Strategic Planner when the culture was set to French. This has been corrected. | Planning |
| RPE-11839 | The DTC History report options have been redesigned to be clearer. | Reporting |
| XRS-5 | If users ran the IFTA - Reconciliation Report and then selected the Generate Report button again without changing anything parameters, the report selector did not retain the vehicle selections. Instead, the report was generated for all vehicles instead of the ones selected. This issue has been resolved. | Reporting |
| XRS-36 | The Jurisdiction Crossing Report selector allowed different date ranges depending on whether users set the range from the report selector in the Reports window or by expanding the selector from the open report. The report now allows users to select a date range going back six years no matter which selector they use. | Reporting |
| RPE-12534 | There was an issue that could prevent the session picker from appearing on reports. This has been corrected. | Reporting |
| XRS-5185 | Some users were receiving an unhandled exception error when they tried to assign UVA. This has been corrected. | UVA |
| XRS-5259 | In rare cases, when customers assigned UVA from the host, all events were being recorded as Off Duty. This has been corrected. | UVA |
| RPE-14923 | There was an issue that would cause Omnitracs Client to crash when opening a session that contained a route with a depot that was not shared to the current region. This has been corrected. | Routing |
| RPE-14203 | The custom properties were not updating properly in the Plot Information window. This has been corrected. | Routing |
| RPE-13633 | There was an issue with how stops were assigned to compartments when the size designated as the Unit of Size was 0 on the orders. This has been corrected. | Routing |
| RPE-14541 | There was an issue that could prevent existing Telematics devices with I/O configurations from being edited or deleted. This has been corrected. | Telematics |
| RPE-13823 | There was an issue that caused exporting data from Telematics Diagnostics to take an excessive amount of time. This has been corrected. | Telematics |
| RPE-5157 | There was an issue that could cause a harsh cornering event to be triggered at the beginning of the day, even when the vehicle was not moving. This has been corrected. | Telematics |
| RPE-14575 | There was an issue adding a layover to a route without adding locationInfo. This has been corrected. | Web Services |
| RPE-17585 | There was an issue where quantities for damaged line items were not being included when events were being retrieved. This has been corrected. | Web Services |
| RPE-17634 | There was an issue preventing route line item custom property values from being returned with a GET Events endpoint. This has been corrected. | Web Service |
| RPE-17636 | There was an issue preventing custom property values from being populated when POST orders is implemented. This has been corrected. | Web Services |
| DCMD-4825 | The url for the help link has been updated to point to the proper level of the help. | Drive |
| DCMD-4563 | There was an issue importing a workflow template that had been exported from a different environment. This has been corrected. | Drive |
| DCMD-4341 | There was an issue passing a Canadian service location's city from FleetView to Drive. This has been corrected. | Drive |
| DCMD-4318 | There was an issue where drivers with long names were not able to access the button to sign out of the app. This has been corrected. | Drive |
| DCMD-5084 | On some devices, users were unable to access the keyboard when searching for an address in CoPilot. This has been corrected. | Drive |
| DCMD-4311 | Drivers were unable to pin HOS clocks to the map when the application was in landscape orientation. This has been corrected. | Drive |
| DCMD-4247 | There was an issue that could prevent all the unplanned stops from being displayed when the driver attempted to add a stop. This has been corrected. | Drive |
| RPE-14849 | There was an issue that prevented the driver from logging into Drive if the driver was associated with the top level region. This has been corrected. | Drive |
| DCMD-2395 | There was an issue where the token was not being properly updated after the AMG-C was using Satellite mode, preventing communication between Drive and the Omnitracs portal. | Drive |
| DCMD-4210 | Drive users were able to enter decimal numbers in smartforms when only integers should have been permitted. This has been corrected. | Drive |
| DCMD-4190 | There was an issue where it appeared that items were scanned, when in fact they were entered manually. This has been corrected. | Drive |
| DCMD-4165 | There was an issue where third party apps were not displaying properly in the slide out menu. This has been corrected. | Drive |
| DCMD-4044 | There was an issue where drivers were not being logged out of Compliance if they logged out of Drive while offline. This has been corrected. | Drive |
| XRS-5461 | In rare instances, ERODS files were displaying the incorrect VIN. This has been corrected. | HOS Mobile |
| XRS-5986 XRS-6263 |
The driver log sometimes showed intermediate location events when the driver was in SB or Off Duty/Logged Out status, and sometimes for the wrong driver. This issue has been resolved. | HOS Mobile |