Omnitracs One (Roadnet Anywhere) 6.2 Release Notes
Omnitracs One (Roadnet Anywhere) 6.2 has several new features to make managing your transportation fleet more efficient and cost effective.
Dispatching
- You can now easily open an unassigned order in Order Status from FleetView.
- A new Map Editor is available, where you can add streets or change the attributes of existing streets on your maps. See the online help for more information on using the Map Editor.
Strategic Planner
- You can now run Service Pattern Analyzer from within Omnitracs Client.
- You can create cells from your territories, which can then be used to create your daily routes.
- There is a new Routed Recurring Orders window that shows you when each recurring order is routed.
- You can now assign workers and equipment to several territories at once on the Assign Workers and Equipment window, without having to press [Assign] after each territory.
Routing
- Enhancements were made to Import Routed Solution that allow you to import additional information about your route.
- If you are using reloads, you can now see the trip number in appropriate lists, as well as export the trip number when using Send Orders.
- You can now install multiple instances of Omnitracs Client on a single computer.
Telematics
- You can now choose to only see GPS pings received over satellite or all GPS pings in Equipment History.
- You can now choose whether unplanned routes will be shown in the equipment or origin's region.
Performance Monitoring
- In cases where valid odometer data is not available, the distances will be calculated using GPS data.
Compliance
- There is a new role permission called Admin Timeclock. Users with this permission are able to log into the Web Time Clock so that drivers can then subsequently log in and clock in and out in the app.
- In compliance with the Hours of Service and ELD regulations in both the U.S. and Canada, users in an AOBRD or Mixed Mode company can not longer edit automatically recorded drive time.
- Customers using devices running Android 10 and below need to permit HOS Mobile to collect location data.
Navigation
- Due to recent Android OS updates, if you use Omnitracs Navigation for Android, you must upgrade to the 6.2 version.
- Changes made to the Allow User To Delete Maps and Allow User To Switch Map Data Storage settings are now tracked in the region's audit log.
Active Alert
- Cancelled and Unserviceable alerts are no longer automatically enabled when creating a service location subscription.
- The Active Alert Web Application now shows the recipient's name and contact information that is entered in Omnitracs Web.
- Your customers can now manage which alerts they receive and how they receive them using the Active Alert Web Application.
- Active Alert setups have been removed from Omnitracs Client.
TripLens
- Omnitracs is introducing TripLens, a new real time fleet visibility solution, providing over the road customers with a real time view of their fleet.
Drive/Command
- When the Driver Can Repair defects option is enabled in Command, drivers can certify a repair when viewing the Inspection Summary in Drive.
- You can define the file formats to use when scanned documents are sent to Omnitracs.
- Several new routing options have been added to Command for Co-Pilot users.
- The third-party navigation application NavGE is now integrated with Drive.
Roadnet Mobile
- Conditional forms can now contain an additional layer of questions.
- You can now have Roadnet Mobile send form results when a stop that has arrived is marked as undelivered.
- You can now require that your drivers verify all items during Scan On, before they can depart the route.
- You can turn off the ability for Roadnet Mobile for Android to collect GPS through a network connection.
- The worker can now add orders and line items in Roadnet Mobile for iOS.
- If there is a front flash on the mobile device, it will now be enabled if there is low light when the driver performs a picture scan.
- Roadnet Mobile now supports Android 11.
Common
- Several options have been copied from the business unit to the region.
- Some application icons have been updated for a new look.
Dispatching
Opening an Unassigned Order in Order Status
Found in: Omnitracs Web
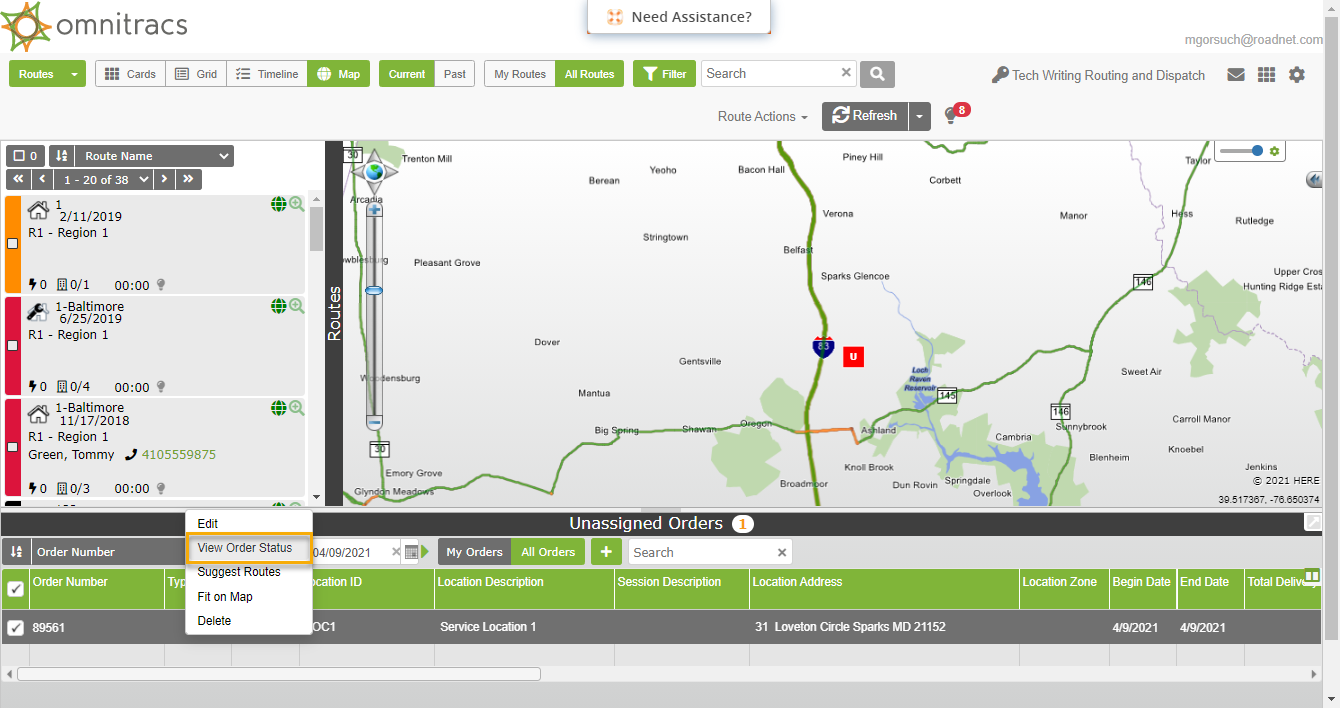
If you want to see more details about an unassigned order, you can open Order Status directly from FleetView, with the selected unassigned order and its details displayed.
To open Order Status from the Unassigned Orders list, right click on the order you want to view and select View Order Status. Order Status opens, showing the selected order.
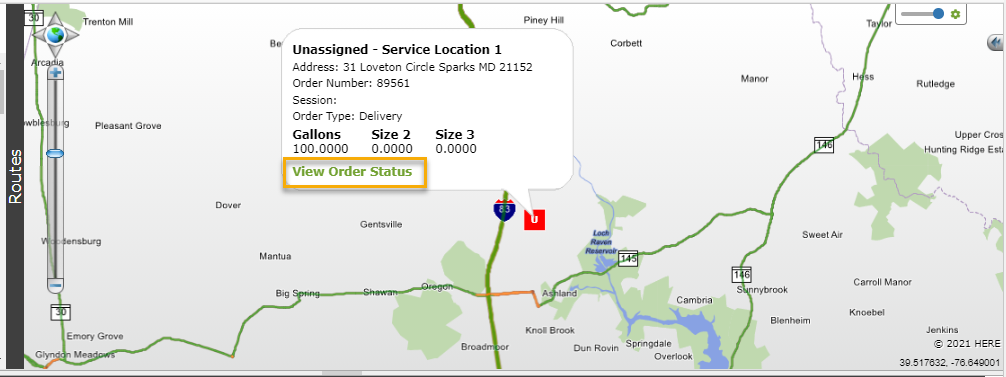
To open Order Status from the map, hover over the unassigned order's marker; click View Order Status from the popup that appears. Order Status opens, showing the selected order.
Strategic Planner
Analyzing Service Patterns in Omnitracs Client
Found in: Omnitracs Client
For some time, Strategic Planner users have been able to use the Service Pattern Analyzer to have Omnitracs analyze their planned or actual deliveries, and suggest the best service pattern set for each service location. Now, you can run Service Pattern Analyzer from within Omnitracs Client, eliminating the need to go to Omnitracs Web to determine the best service patterns for your service locations.
- Click Planning and then Service Pattern Analyzer. The Service Pattern Analyzer opens.
- Choose the Start Date and End Date for the period you want to analyze.
- Choose the number of cycle weeks to use when determining the best service pattern set.
- Select whether to use data from planned routes, or actual data from Dispatch routes.
- In Percent by Day, enter the minimum number of stops for the recurring order than must meet a service pattern in the service pattern set for that service pattern set to be assigned to the order.
- Click [Start]. The Service Pattern Analyzer starts processing the data. The results are displayed in the grid.
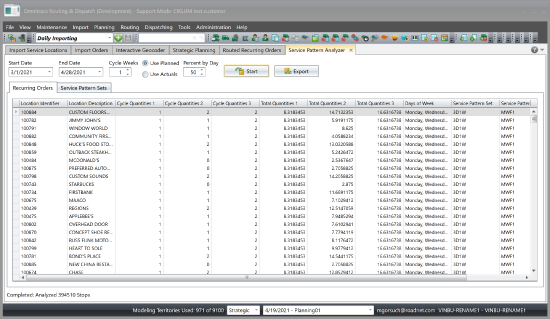
Once the Service Pattern Analyzer finishes, the results are displayed in two tabs: Recurring Orders and Service Pattern Sets. The Recurring Orders list show the cycle quantity and total quantities for each recurring order, as well as the suggested service pattern set and service pattern for that order. The Service Pattern Set list shows all the service pattern sets for each set that is suggested.
To export the results as an Excel file, PDF or .html file, click the [Export] button. Select the file type and location where the file should be saved.
The following columns appear on the Recurring Orders grid:
| Column Header | Description |
|---|---|
| Location Identifier | The unique identifier for the recurring order's service location. |
| Location Description | The description of the recurring order's service location. |
| Cycle Quantities 1, 2, 3 | The recurring order's total quantity for the cycle, measured as size 1, size 2, and size 3. |
| Total Quantities 1, 2, 3 | The recurring order's total quantity for the date range analyzed, measured as size 1, size 2, and size 3. |
| Days of Week | The days of the week the service location is serviced. |
| Service Pattern Set | The recommended service pattern set for the recurring order. |
| Service Pattern | The recommended service pattern for the recurring order. |
| Exceptions | A explanation of why the service location did not have a recommended service pattern set. |
Creating Cells from Territories
Found in: Omnitracs Client
If you use Routing as well as Strategic Planner, you can now create cells based on the territories created in Strategic Planner, and then use those cells when doing your daily routing. A separate cell will be created for each selected territory.
- Right-click on a territory in the Territories list or on a map and select Create Cells from Territories from the menu that pops up. The Create Cells from Territories window opens.
- Check Add Cells to a Cell Set to have the new cells added to a cell set, then choose whether the cells should be added to a new set (New Cell Set ID) or an existing set (Use Existing Cell Set). If you do not check this option, the cells will not be added to a cell set.
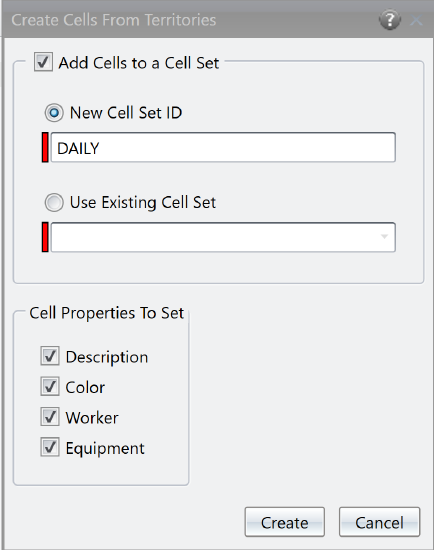
If you choose New Cell Set ID, enter a name for the cell set.
If you choose Use Existing Cell Set, click the arrow to open a list of existing cell sets; click on a cell set to select it. - In the Cell Properties to Set area, check the territory attributes that should be made properties of the new cell.
- Click the [Create] button. The cell is created and added to the specified cell set.

The new cells created from the territories will be used as the basis for daily routes when the cell set is selected while using cell routing.
Viewing the Recurring Orders' Delivery Frequency
Found in: Omnitracs Client
It can be very beneficial to be able to see when all the recurring orders in a session are routed to give you an overall picture of your routing. Now, Strategic Planner has a Routed Recurring Orders list, where you can see all the routed orders, their routed days and weeks, daily frequency or weekly frequency, and even which stop they are on each day of each week. You can even export the information so that you can use it to create reports or update your host system.
Note: There must be routed orders in the planning session to open the Routed Recurring Orders list.
To open the Routed Recurring Orders list, click on the Planning menu and choose Routed Recurring Orders.
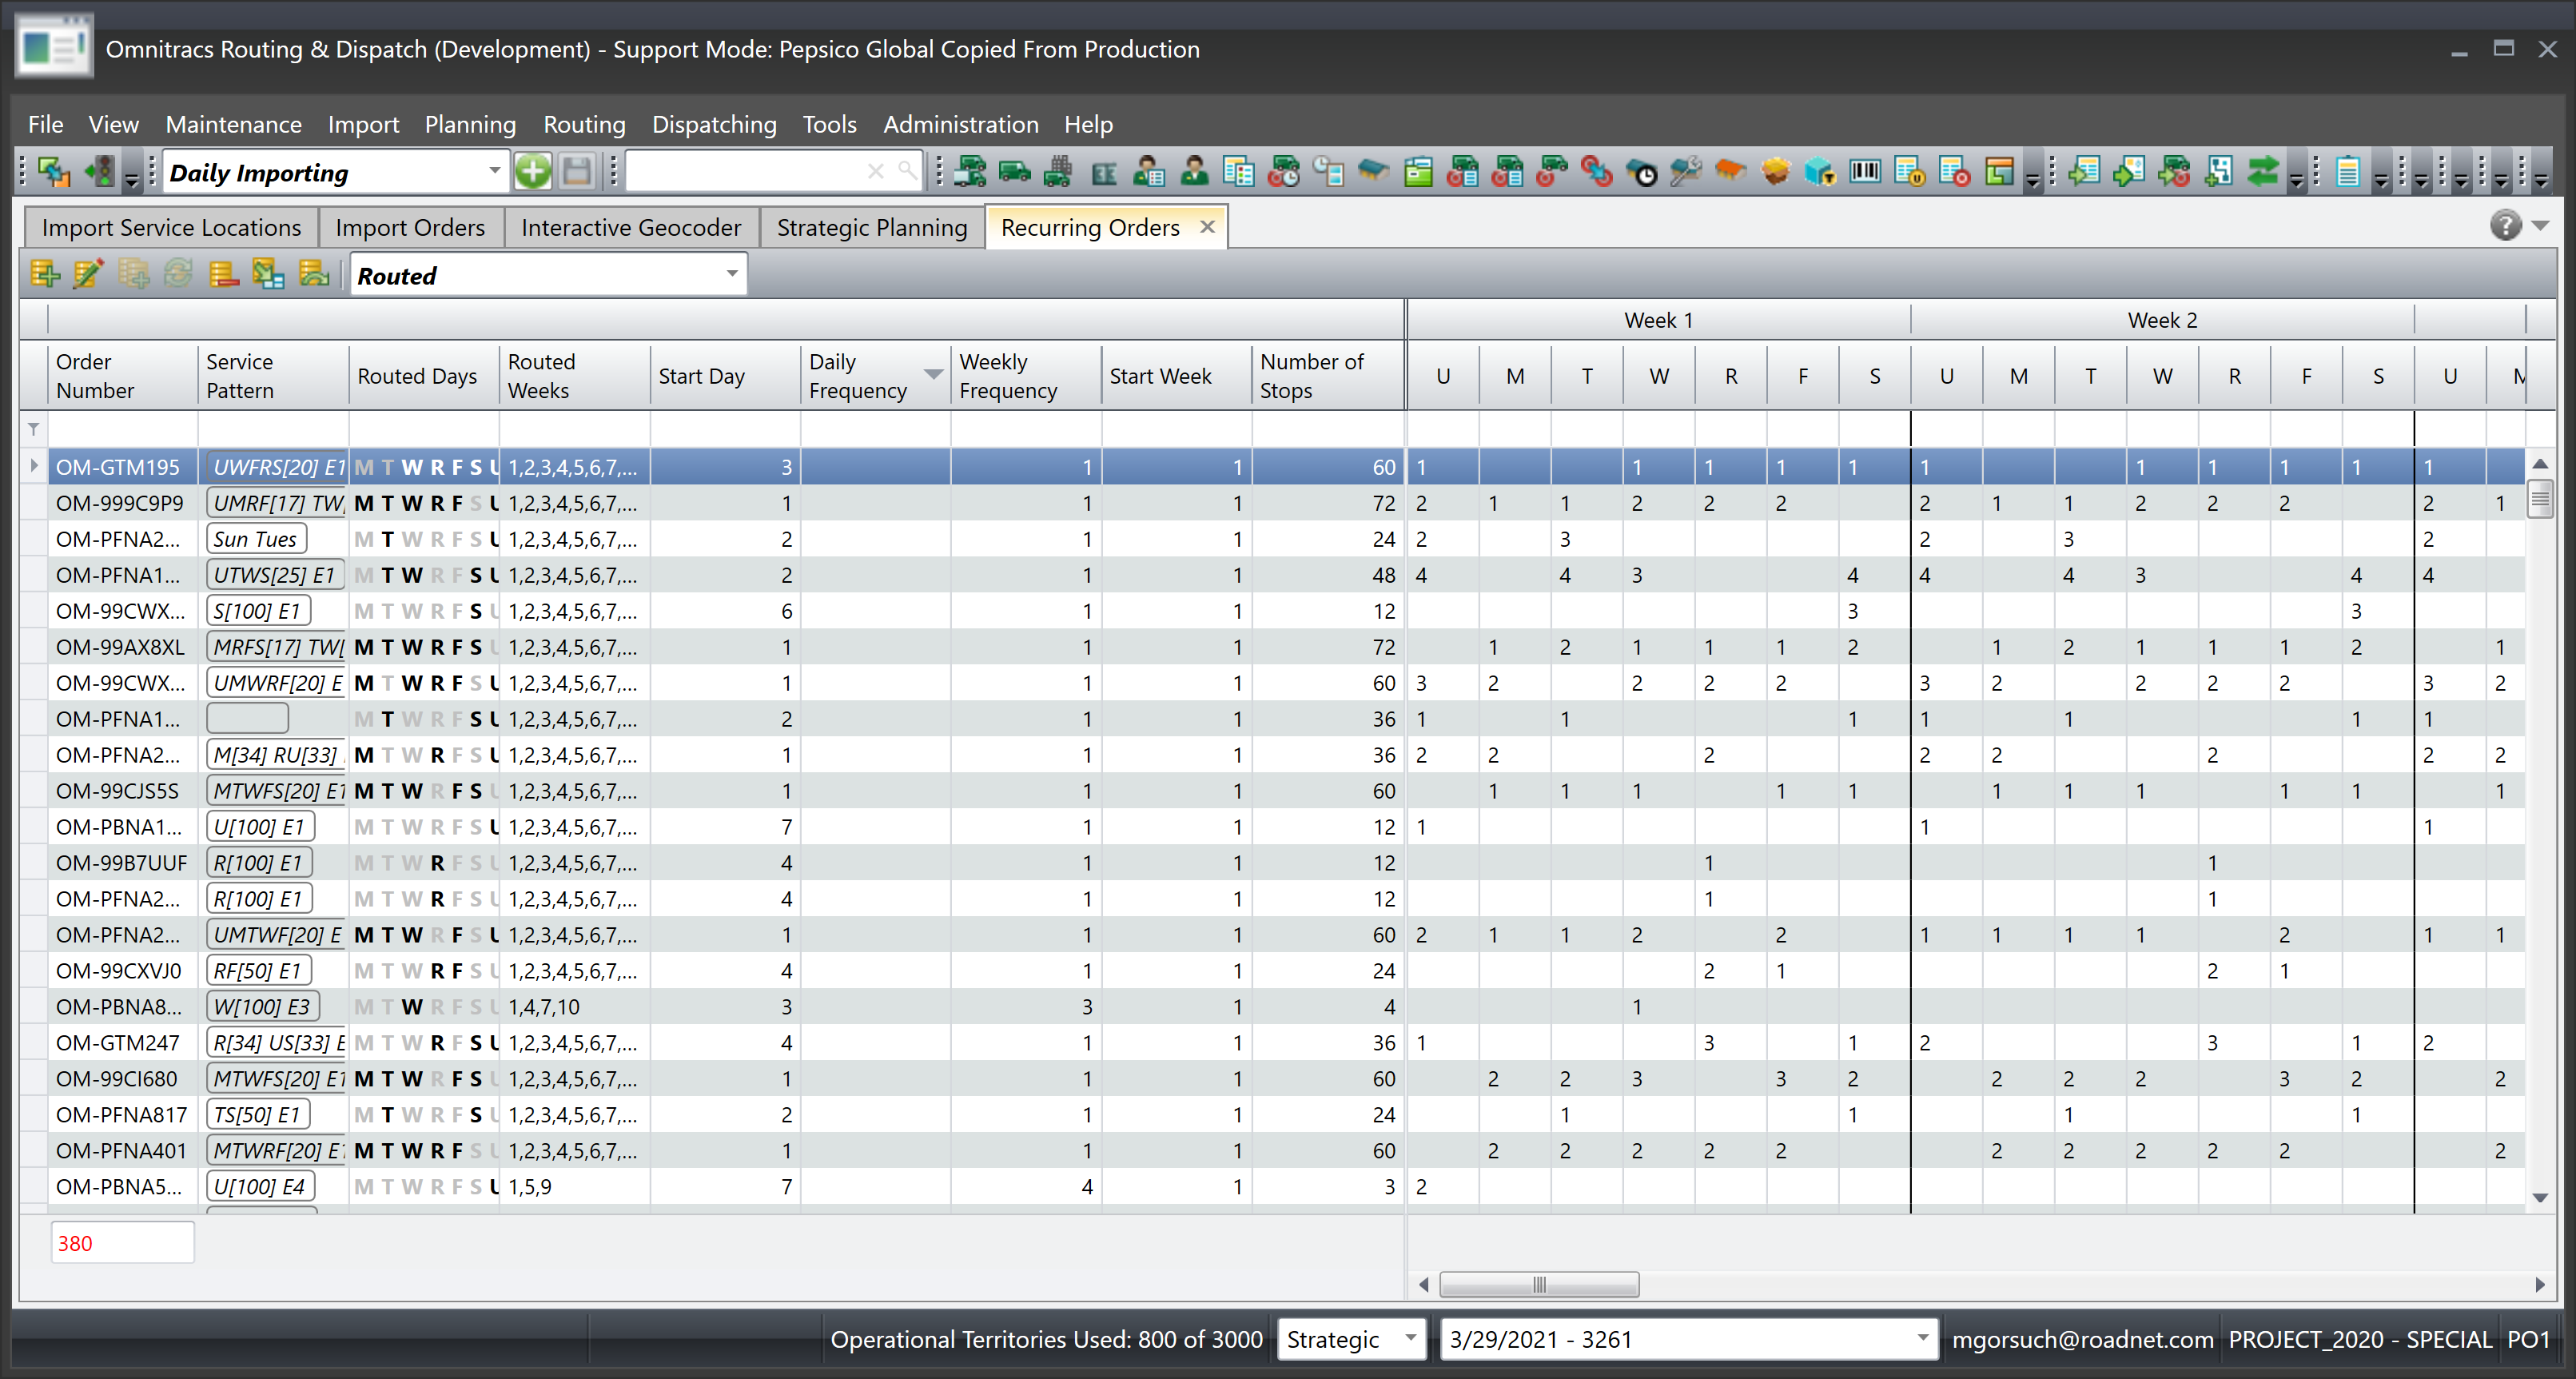
The Routed Recurring Orders window includes the following columns:
| Column | Description |
|---|---|
| Order Number | The recurring order's order number. |
| Service Pattern | The service pattern being used to route the order. |
| Routed Days | The days the order is routed. Based on the option selected in the Edit View Configuration window. |
| Routed Weeks | The weeks in the session the order is routed. Based on the option selected in the Edit View Configuration window. |
| Start Day | The first day in the week the order is routed. |
| Daily Frequency | The number of days between deliveries for the service pattern set if the set is using Days Between Service. |
| Weekly Frequency | The number of weeks between deliveries for the service pattern set if the set is using Weeks Between Service. |
| Start Week | The first week in the session the order is routed for. |
| Number of Stops | The number of stops the order is on during the planning session. |
| Week X UMTWRF | The sequence number for the order's stop for each week, and each day of the week, during the session. |
To export the Routed Recurring Orders list as an Excel file, PDF or .html file, click the Export icon.
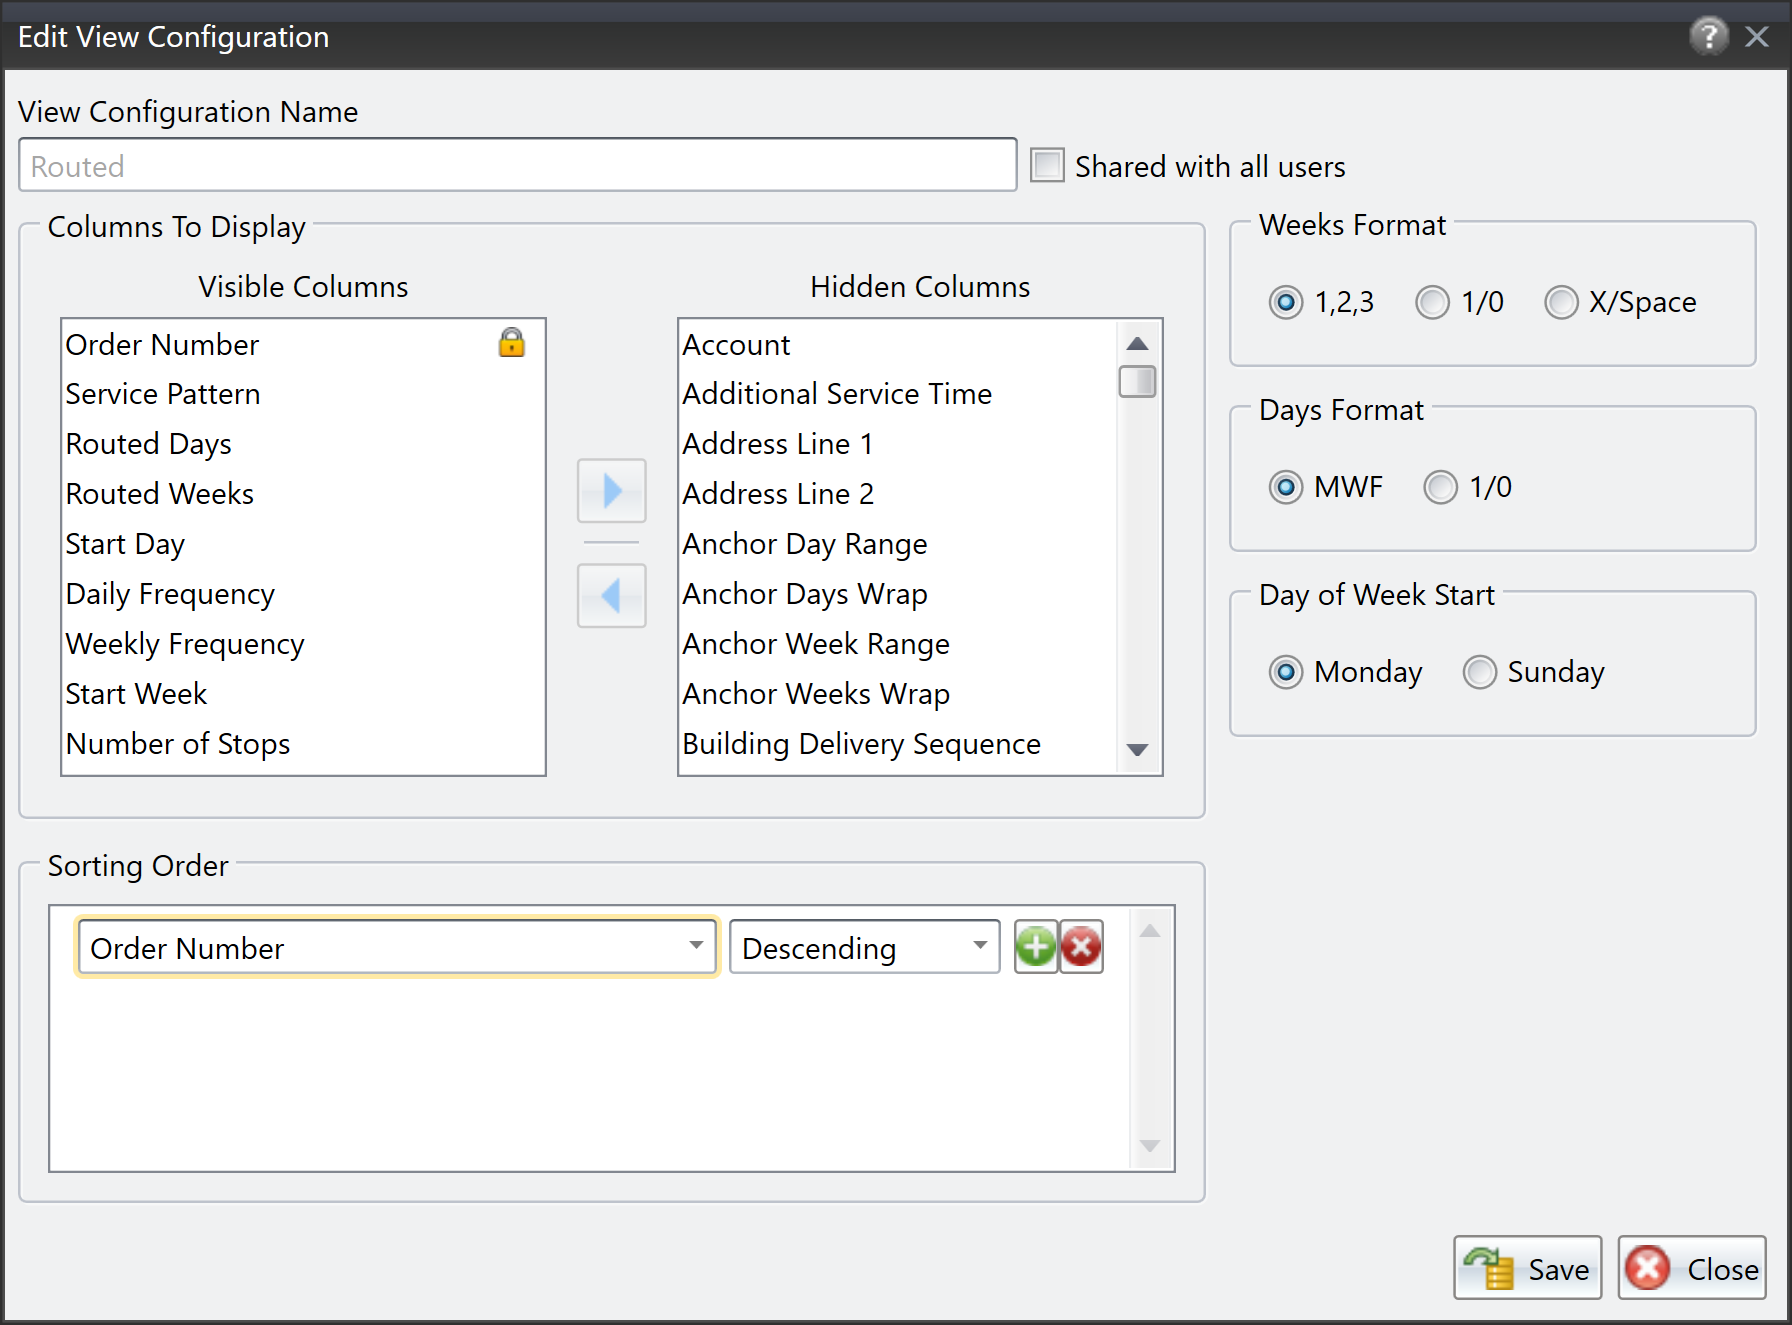
You can change how the Routed Weeks and Routed Days are displayed, as well as whether the first day of the week is considered Sunday or Monday.
- Right click on a column header and scroll to Routed, click the arrow, then click the Edit icon. The Edit View Configuration window opens.
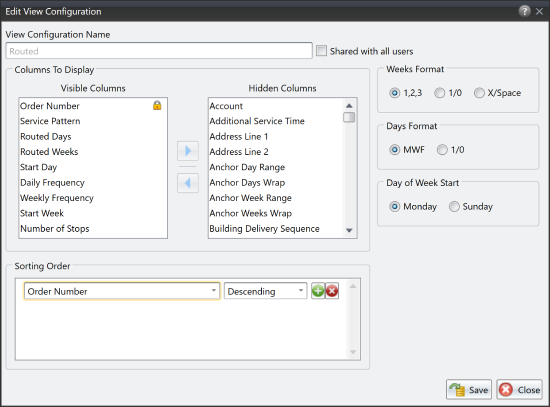
- Choose the Weeks Format, Days Format, and Day of Week Start.
- Make any other configuration changes to the window you need.
- Click [Save].
Routing
Enhancements to Import Routed Solution
Found in: Omnitracs Web and Omnitracs Client
There have been enhancements made to Import Routed Solution that allow you to import more complex routing information. You can now import reload depots, as well as routes with different start dates. In order to use either of these features, update your data transfer layout with the proper information.
You can now import a reload depot, along with information about the action taken and service time needed at the depot.
| Field | Length | Description |
|---|---|---|
| Reload - Depot ID | 32 | The identifier of the mid-route depot. |
| Reload - Load Action | NA | The action taken at the mid-route depot. The options are: Full, Empty, None, As Needed or AsNeeded. |
| Reload - Time Override | Time | The mid-route depot's service time. If no time is entered here, the depot's service time will be 0:00. |
If you have routes that start on date that is not the same as the session date, you can now import a start date as part of the Route - Start Time, and the route will be given that start date.
| Field | Length | Description |
|---|---|---|
| Route - Start Time | Date Time | The starting time of the route. If you include a date with the Route - Start Time, the route will be given that start date in the current routing session. If you are adding a start date, the mask will need to be updated to include the date. |
Indicating the Stop's Trip Number
Found in: Omnitracs Client
If you are using reloads, it can be helpful to know which trip a stop is part of on the route. You can see the trip number on:
- Stop list
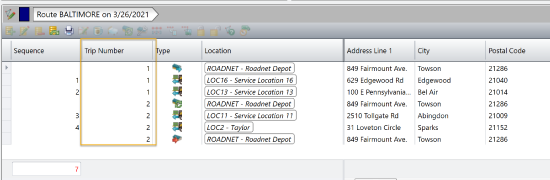
- Plot Info
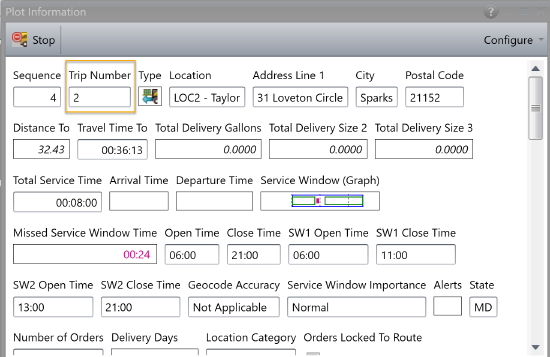
Note: The Trip Number column does not appear on Strategic Planner stop lists.
You can also have the trip number exported when you choose to Send Orders. Simply update your Send Orders data transfer layout to include the trip number.
| Field | Max. Length | Description |
|---|---|---|
| Stop - Trip Number | 10 | The number of the route's trip the stop is on. |
The Trip Number is also included when you retrieve a route plan using the GET call in Web Services.
Installing Multiple Instances of Omnitracs Client on a Single Computer
Found in: Omnitracs Client
There are times when you want to be able to run multiple instances of Omnitracs Client, that are on different environments, on the same computer so that you can compare results. For instance, if you are a customer who uses the Omnitracs Sandbox environment, you may want to run both the sandbox version and the production version of Omnitracs so that you can see how enhancements in the new version affect your operation. Now, you are able to easily install multiple instances of Omnitracs Client, with each one pointing to a different environment.
When you upgrade your Omnitracs Client, you will see a couple of changes indicate which environment you are in.
- The install wizard shows the environment that is being installed.

- The desktop shortcut includes the environment in the description.
- The title bar of Omnitracs Client indicates the current environment.
Customers upgrading a client running against the production environment can simply upgrade their Omnitracs Client as normal.
Customer who want to upgrade a client running in the sandbox environment should remove their programs, and then re-install them with the Omnitracs 6.2 install.
Telematics
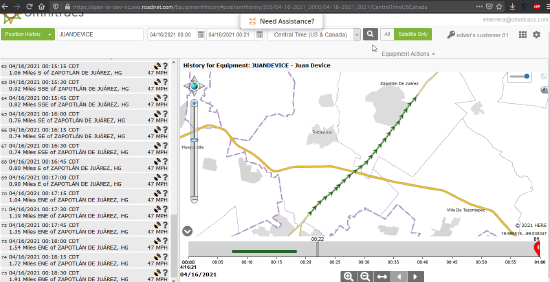
Viewing only Satellite GPS Pings in Equipment History
Found in: Omnitracs Web
You can use Equipment History to see where a piece of equipment traveled during a selected period of time. Usually the GPS pings come through the cellular network, but in areas where there is no cellular service satellites are used to transmit the data to Omnitracs. At times you may only want to see these GPS pings that are received from satellites to help determine areas with poor cellular service. Now, you can toggle between seeing all GPS pings, or only the satellite ones.
- Click the Equipment History icon to open Equipment History.
- Choose the equipment and dates you want to view.
- To view all the GPS pings, click [All].
To view only the GPS pings received from satellite, click [Satellite Only].
Choosing the Region for an Unplanned Route
Found in: Omnitracs Web
If you have equipment that travels between depots in different regions, or for some other reason may not depart from a depot that is in the same region as the equipment, it can be challenging to know which region to check in FleetView to track that route. Now, you can choose whether unplanned routes will be associated with the equipment's region or the origin's region.
- Click the Administration icon to open Administration.
- Click the Edit icon for the business unit you want to update.
- On the General page, click the Unplanned Route Region Assignment arrow and choose the proper option.
Use Origin Depot - the route will be assigned to the origin's region.
Use Equipment - the route will be assigned to the equipment's region.
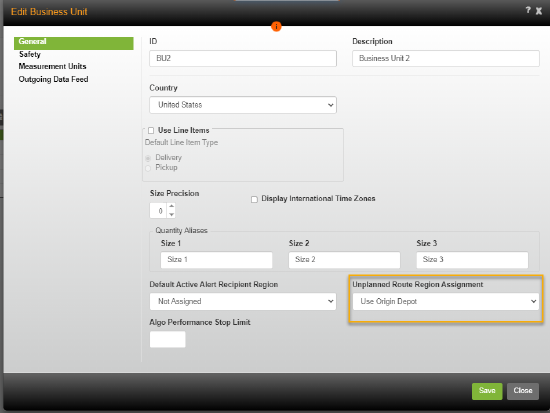
- Click [Save].
Compliance
Users Cannot Edit Automatically Recorded Drive Time for AOBRD and Mixed Mode Vehicles
Administrative users will no longer be permitted to edit automatically recorded driving time created on the ELD by switching to AOBRD mode on the host (this is also the case for driving records created in AOBRD/ERD-equipped vehicles). Hours of Service (HOS) regulations in both the United States and Canada prevent the editing of automatically recorded drive time. This includes a prohibition against shortening, changing to a non-driving status, or reassigning drive time to anyone other than an authenticated co-driver in a team driving situation. Per the HOS regulations, drivers and motor carriers are limited to annotating the driving events recorded on a driver's log, if they are deemed incorrect or in error.
In compliance with Hours of Service and ELD regulations in both the U.S. and Canada, host users in an AOBRD or Mixed Mode company can no longer edit automatically recorded drive time. This means that users will not be able to edit automatically recorded drive time in any company mode (AOBRD, Mixed, or ELD).
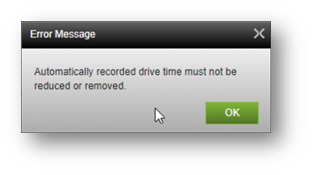
If you make changes to automatically recorded drive time in the Driver Log Editor, you will receive an error message when you try to save the changes. Select OK to cancel the edits.
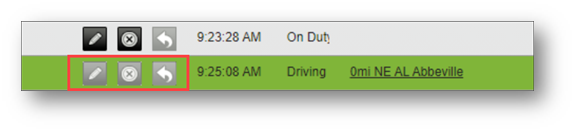
In the UVA editor, the edit icon will be grayed out and unavailable for automatically recorded driving events.
Manually added drive time can still be edited.
Location Permission Requirements
To enable RODS record creation, and to comply with Google’s location permission requirements for Android 10 and below, HOS Mobile now collects location data even when the app is closed or not in use.
When you install Omnitracs HOS Mobile on an Android device that uses operating system version 10 or below, a message pops up to inform you that “Omnitracs XRS collects location data to enable RODS record creation even when the app is closed or not in use.” Select Accept to continue. In the next screen, choose “Allow all the time” to grant the background location permission.
Navigation
Required Update to Omnitracs Navigation 6.2
The recent update to Android's Operating System has made it necessary for Omnitracs to change the storage location of the files used with Omnitracs Navigation. This ensures that future Android OS changes do not affect Navigation functionality. If you are using an Android mobile device, you MUST update to the 6.2 version of Omnitracs Navigation.
Whether you update using the Omnitracs Installer, manually copy and install via the .apk, or use MDM software, the 6.2 installation will automatically move all Navigation files to the new location. A message displays to alert you to the change. The move should take less than five minutes to complete. You cannot continue without moving the files.
Upgrading to Omnitracs Navigation 6.2 for Android is MANDATORY. If you do not upgrade, Navigation will not work properly in the future.
Note: Omnitracs recommends that MDM users test the 6.2 update on a small number of devices before distributing it to all devices.
Manually Loading Map Data
If you side-load your map data onto mobile devices, you will need to change where you manually copy the map data on the mobile device. Based on if your maps are stored internally or on an external SD card, you will copy map files to the following locations:
For internal map data storage, your map data should be copied to: /storage(0/1)/Android/data/com.omnitracs.otnav/files/Navi/NaviMaps/Routenet10
For external map data storage, your map data should be copied to: /storage/sdcard/Android/data/com.omnitracs.otnav/files/Navi/NaviMaps/Routenet10
Notes: You will need to create the NaviMaps directory, as you did previously.
If prompted, you must allow Omnitracs Navigation permission to manage external storage.
Pre-Authenticating Mobile Devices
With the increased security protections administered in Android 10, customers can no longer set their mobile devices to Pre-Authenticate in Omnitracs One. Prior to Android 10, Navigation would pre-authenticate in Omnitracs One using the device’s serial number or phone number. With the new security protections in place, both the serial number and phone number are unavailable to Navigation, disabling the pre-authentication feature. Now when drivers open Navigation for the first time on an OS10 or OS11 device they will be asked to manually enter their device ID.
Active Alert
Managing Cancelled and Unserviceable Alerts
Found in: Omnitracs Web
Previously, when creating service location subscriptions for Active Alert, the cancelled and unserviceable alerts were automatically enabled. Your customers always received these alerts when an order was cancelled or a stop was marked as unserviceable, provided that templates were set up for those alerts. Now, you can choose if these alerts are sent to your customers.
Cancelled and Unserviceable alerts for existing service location subscriptions will remain checked, but you will notice that for new subscriptions the box is not checked for these alert types. Like the other alert types, you can enable them by checking the box.
Notes: When importing service location subscriptions, the cancelled and unserviceable columns default to True. Meaning, these alert types are enabled automatically on import. If you import subscriptions and do not want your customers to receive cancelled or unservicable alerts, you must change the column value to False.
When using Web Services, when you update an existing service location subscription or create a new one, you must include the cancelled or unserviceable message type in the MessageTypes field to have the alert type turned on for that service location subscription.
Recipient Information Added to Active Alert Web Application
So that your customers can see the contact information that is used to send alerts to them, the recipient information that you entered in Omnitracs Web now shows at the top of the Active Alert Web Application screen. Your customer's first and last name, and if you entered one or both, an email address and mobile number will display.
Note: You can add and edit recipients in Omnitracs Web at Maintenance > Active Alert Recipients
Letting Your Customers Self-Manage Their Alerts
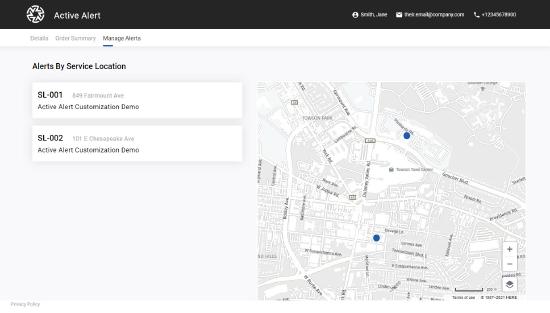
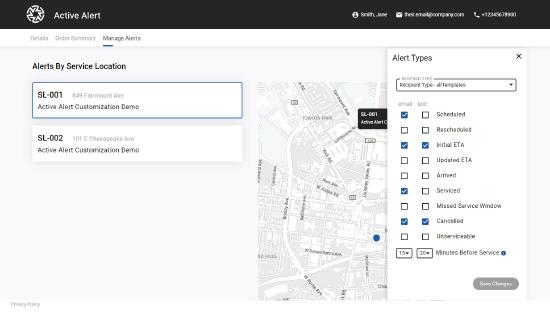
To improve your customer's experience with Active Alert Web Application, a new Manage Alerts tab has been added to the Web Application. This tab allows your customers to manage the alerts they receive and how they receive them. Based on what subscriptions you have added to a service location in Omnitracs Web, your customer can choose which emails and texts they receive. The Manage Alerts tab is similar to an Active Alert subscription in Omnitracs Web. On the service location, you choose the recipient type, notification method, and alert types to send to a recipient. Now your customers can make changes to the alerts they receive for themselves.
Your customer sees all the service locations that they have been added to and from which they receive alerts.
When a service location is tapped, all of the alert types that are part of the chosen recipient type display. There may be more than one recipient type for a service location. The recipient can press the Recipient Type arrow and choose a different one to manage.
Note: Active Alert Recipient Types are assigned to service locations in Omnitracs Web at Maintenance > Service Locations > Add/Edit > Active Alert.
Only the alert types and notification methods that you enabled as part of the chosen recipient type are available for the customer to turn on or off. For example, if you only have the recipient's email entered in Omnitracs Web, the recipient can only turn on email alerts, even if you included text alerts as part of the recipient type. But, if you entered an email address and a mobile number for the recipient in Omnitracs Web, the recipient can choose to turn one or both off for an alert, as long as the recipient type includes alerts for both email and text.
The alerts that the recipient currently receives are checked, for the appropriate notification method, email or text. The recipient can also change the number of minutes before service, if it is included in the recipient type.
Once all changes are made, the customer presses Save Changes.
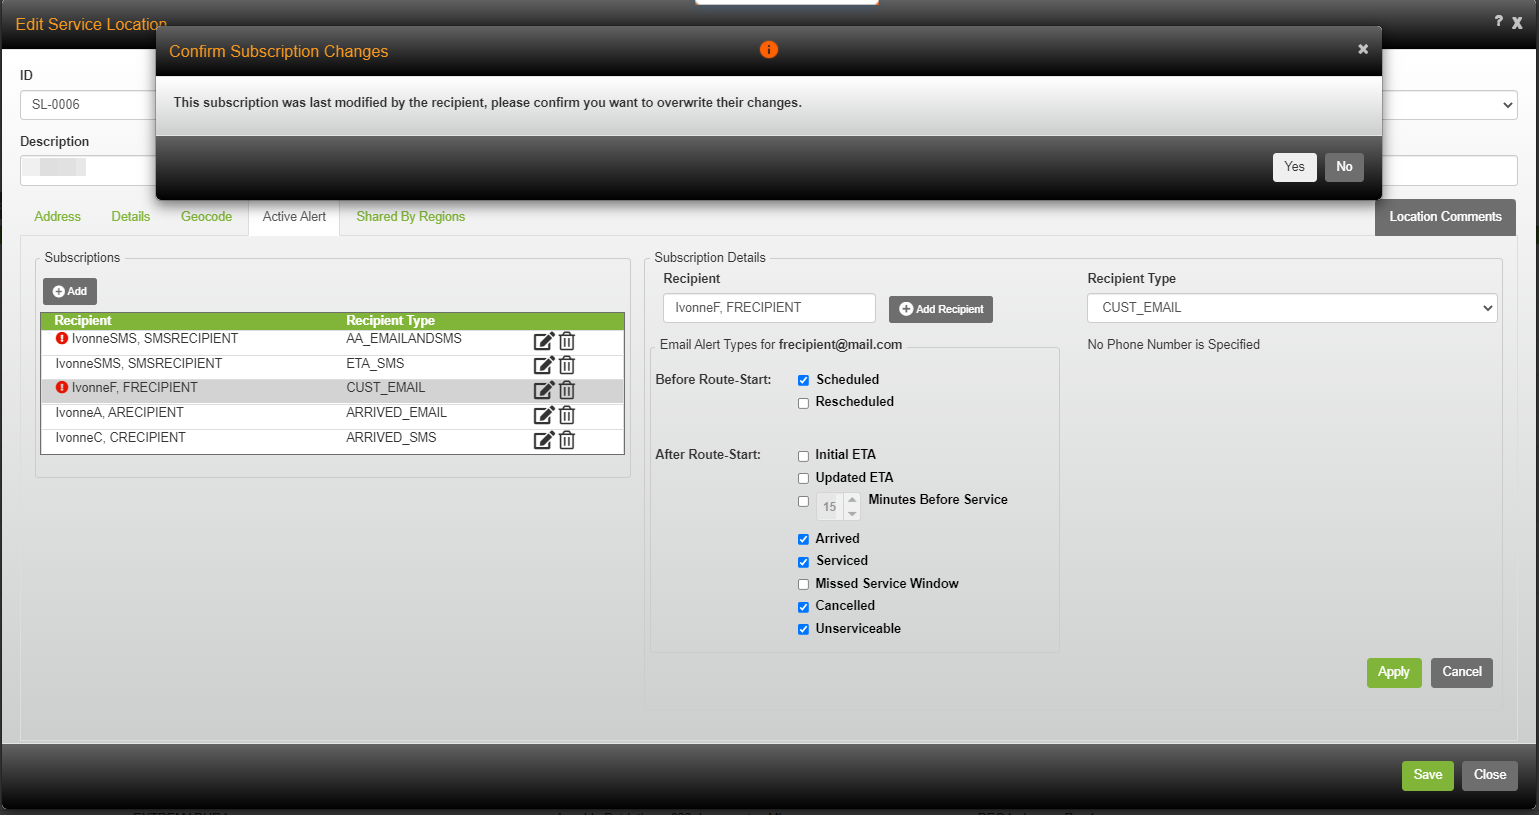
If the recipient makes changes in the Active Alert Web Application, you will see an exclamation beside the changed subscription on the Active Alert tab for the service location. If you attempt to make a change to a subscription that the recipient modified within the Active Alert Web Application, you must confirm that you want to overwrite those changes. When you overwrite changes that a recipient has made, that recipient receives an email and/or a text message that states that their service notifications have been modified and provides a link to the Active Alert Web Application to review current alerts. The email includes additional details about the changes that you made.
Note: All links to the Active Alert Web Application will allow the recipient to see the Manage Alerts tab
TripLens
Found in: Omnitracs Web
Omnitracs TripLens is a new solution that helps position Omnitracs as a Real-Time Transportation Visibility Platform (RTTVP) to the Over-The-Road (OTR), Truck Load(TL) and Less-Than-Truck Load (LTL) markets to provide customers detailed, real-time views of their planned trips and current fleet activity. Transportation managers can use the FleetView user interface, as well as the Mobile Manager application on their tablets and phones, to provide on demand access of their fleet and trip activity. Omnitracs TripLens users can:
- See detailed grid views of exceptions, workers and vehicles
- Schedule routine vehicle maintenance
- Access real time actual data about the trips
- Insert breaks, layovers, and delays on trips in progress
- Sequence stops on routes and transfer stops between trips
- Send messages between back office and drivers in the field
- View live and historical info about the trips
- View trips in progress on maps
- Detect of actual stops and breaks
- Detect delays, such as at border crossings
- Analyze stop locations to more accurately reflect workers actions compared to plan
Contact your Omnitacs Sales Representative for more information.
Drive/Command
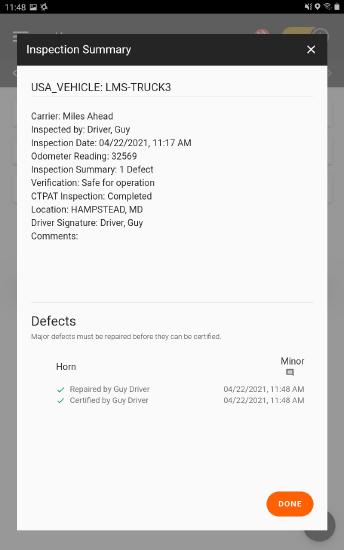
Certifying Repairs on the Mobile Device
If the driver marks an inspection point as needing repair when completing a DVIR, that designation is part of all future DVIRs for that piece of equipment until the repair is certified in Omnitracs Web. Now, the driver can certify a defect from the mobile device, when a repair is made by a third party.
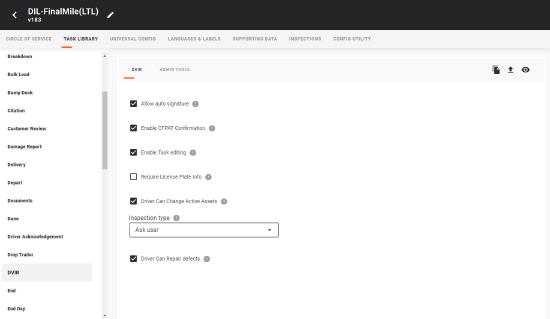
Before the driver is able to certify a repair on the mobile device, you must enable the option in Command. To turn this option on, choose the workflow that you want to change. Press Task Library and then press DVIR. The DVIR task settings for the workflow display. Check the Driver Can Repair defects box. Press Save Changes and the option is sent to the mobile devices that use the workflow.
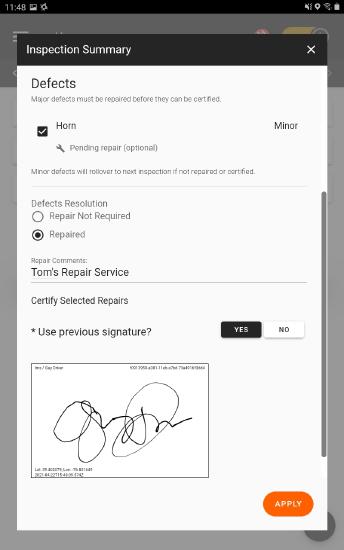
To certify a repair while on the road, the driver must perform a DVIR for the equipment that has the repaired defect. When prompted, the driver views the previous inspection; the one that was marked with the defect. The Inspection Summary shows the defects that were previously recorded for the equipment. When the defect is checked, more details and options display. The driver chooses how the defect was resolved and adds any necessary comments, such as who made the repair. Once the driver signs for the certification of the selected repairs, the Inspection Summary reflects that the defect was repaired and certified by the driver.

When the driver starts the next DVIR for that piece of equipment or views the Previous DVIR through Adhoc tasks, the repaired defects are no longer reflected.
Repairs certified by a driver can be viewed in the Certified Repairs module in Omnitracs.
Choosing a File Format for Scanned Documents
Previously when Drive returned scanned document files to Omnitracs, it saved and sent back multiple formats. This causes unnecessary data plan usage. Now, to use less data, and save on your data plan the files sent to Omnitracs have been optimized. You can now choose which file formats Drive will return scanned.
To minimize the number of files that are sent when a document is scanned, in Command choose the workflow that you want to change. On the Universal Config page, press Documents. Press the Document File Format Captured arrow and check one or more file formats that scanned documents will be returned in: Optimized image, Scanned image, and Original image.
Notes: The default Document File Format Captured is Optimized image.
A TIFF is always returned to Omnitracs. The options in the Document File Format Captured list are .JPG.
CoPilot Routing Options Added
The following options have been added to Command and will be passed to CoPilot to configure the routing profile for generating paths. These options only display when you choose CoPilot as the Navigation provider in the Navigation Integration field.
To define CoPilot routing options, choose the workflow to which you want to make changes. Press Universal Config and then press Map/Navigation. Ensure that CoPilot Navigation is chosen in the Navigation Integration field or these options will not display.
Vehicle Type - Define the type of vehicle for which the route is being generated.
Routing Type - Define the way the route path is generated.
Favor National Network (US Only) - Check to favor US National Network.
Use 53' Trailer Routing - Check to use 53' tailer routing.
Toll Road Usage - Define when to use toll roads.
Discourage Ferry Usage - Check to discourage using a ferry when routing.
Display Truck Restrictions - Define when to show road restrictions.
Discourage Routing Based on Elevation - Enter the maximum elevation to use when generating the route path. Entering 0 disables this option.
Stop Side Adherence Level - Define how well the route will adhere to side of the street routing, based on the side of the street the destination is located on. The level options range from Minimal to Strongly Adhere.
Governor Speed Limit - Enter the maximum road speed to use when calculating routes. Entering 0 disables this option.
Press Save Changes to have these settings saved and sent to mobile devices using this workflow.
NavGE Integration With Drive
Note: This feature is being released in beta only at this time. If you are interested in participating in the beta, please contact your account manager.
Drive is now integrated with the navigation application NavGE. When Drive and NavGE are both installed on a mobile device and the driver departs their trip, DRIVE will automatically open NavGE. NavGE will provide turn-by-turn directions based on the trip information received from DRIVE. When the destination is reached, the driver is taken back to Drive.
To make your driver's interaction with this application seamless, you will need to define NavGE as the choice for Navigation Integration. In Command, choose the workflow to which you want to make changes. Press Universal Config and then press Map/Navigation. Under Navigation Integration, choose NavGE. Press Save Changes and the setting will be sent to the mobile devices with this workflow.
Roadnet Mobile
Creating Multi-Layer Conditional Forms
Found in: Omnitracs Web
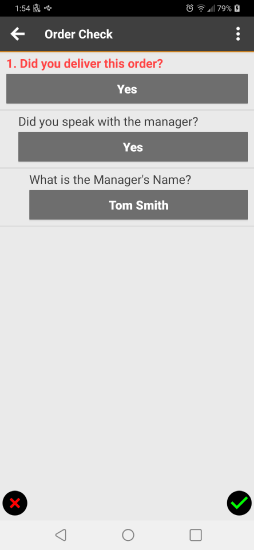
Previously, conditional forms could only accommodate one extra layer of questions and answers. You could ask a question and based on the answer, ask one additional question. For example, if you ask the driver "Did you deliver this order?" Based on the driver's answer, you could ask another question. For a yes answer, you could ask "Did you talk to the Manager?, for a no answer, you could ask "Why not?". Once the driver completed the second question, that series of questions was complete.
Now, you are able to add a second layer of questions and answers to the form. So when you ask the initial question "Did you deliver this order?" If the driver answers yes, and you ask the first conditional question "Did you talk to the Manager?," when the driver answers "Yes," you can ask one more conditional question, such as "What is the manager's name?".
To create the additional layer of questions, when creating a conditional form in Mobile Workflow, you will simply drag a form control to the Assigned Form Controls area and drop it on to the previous form control. When the Assign Form Control Conditionally window displays, choose if this question should display, when the driver answers with a Yes/True or a No/False.
Note: Conditional forms are not supported on iOS. Only the initial question displays with iOS.
On the Android device, based on the driver's answer to the first question, another question displays. Then, based on the driver's answer to that question, the third and final question displays.
Form Results for Undelivered Stops
Found in: Omnitracs Web
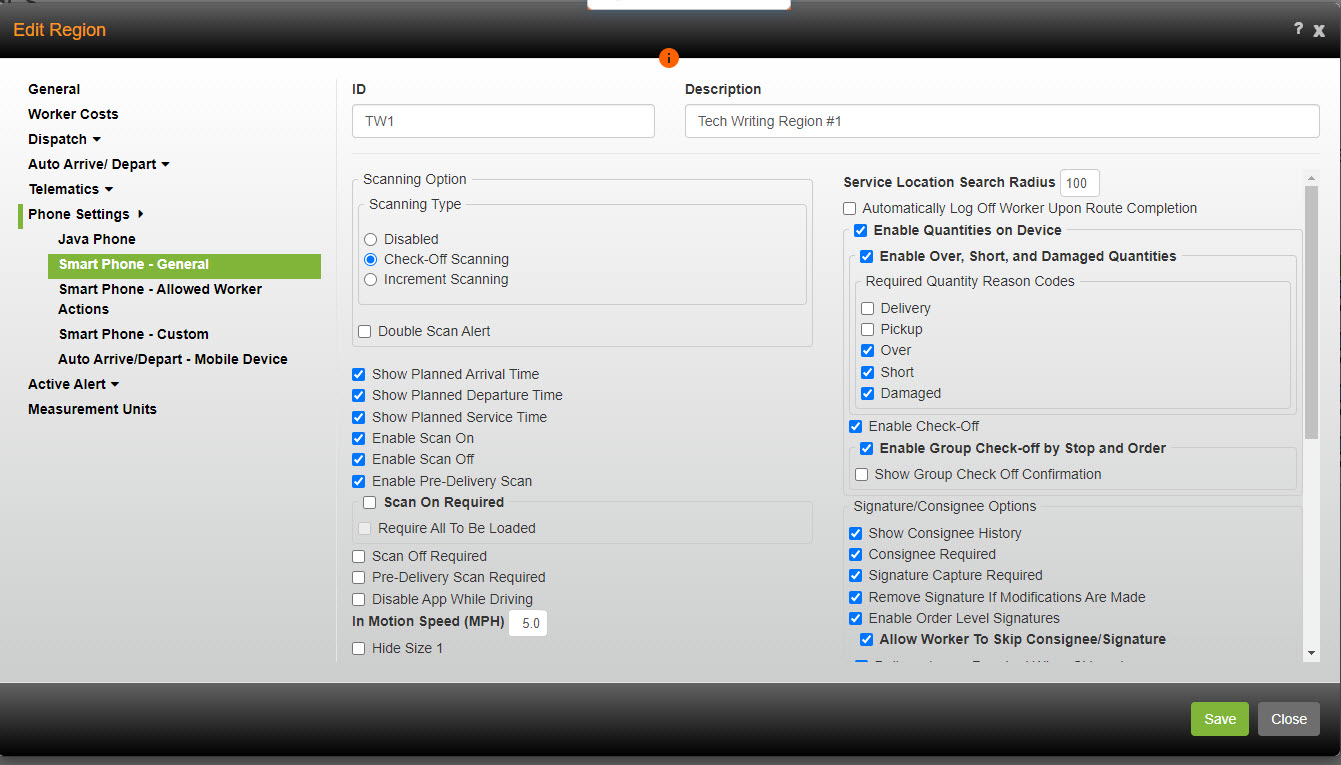
Typically, completed forms are sent to Omnitracs when a stop is departed. Now, you can choose to have form results returned when the worker marks an arrived stop as undelivered. A new region setting has been added to the Phone setting > Smart Phone - Allowed Worker Actions page in Omnitracs Web. Check the Send Form Results on Undeliver box to have form results for undelivered stops sent to Omnitracs.
Like other mobile form results, you can see this information on mobile form reports found in the Reports module under Tracking and Execution.
Requiring All Items to Be Verified During Scan On
Found in: Omnitracs Web
When you enable Scan On Required, depending on if you allow check-off scanning or increment scanning, your workers can check a single item or scan a single barcode and Roadnet Mobile will allow them to complete the Scan On function and depart the route. Some companies want their workers to scan each individual barcode or check off every item before they can complete Scan On and depart the route. A new region setting has been added that requires the worker to verify every item included in the starting load.
To turn this option on, in the Administration module, edit the region you want to make changes to or add a new one, if necessary. On the Phone Settings > Smart Phone - General page, check Require All To Be Loaded. Checking this option will require the worker to verify every item of the starting load before departing the route. The worker can scan stop/order/items using the scanner on the mobile device or if check-off scanning is enabled, manually check them off on the Scan On screen. If increment scanning is enabled, each item must be scanned until the actual value matches the planned value.
Note: Scan On Required must be enabled in order for Require All To Be Loaded to be available.
On the mobile device, the worker will not be able to depart the route until all the items listed in Scan On are verified.
Disabling Network GPS
Found in: Omnitracs Web
If you collect satellite or hardware GPS in Roadnet Mobile, your mobile devices may encounter invalid GPS pings when they come near cell towers or wi-fi networks. Invalid pings may add mileage to a trip.
A new Omnitracs Web region setting, Disable Network GPS, on the Smart Phone - General page, keeps the mobile device from gathering invalid network GPS pings. Check the Disable Network GPS box to keep network GPS pings from being generated when satellite or hardware GPS is not available.
Adding Orders and Line Items in Roadnet Mobile for iOS
Currently, Roadnet Mobile for Android allows workers to add orders and line items on the mobile device, but Roadnet Mobile for iOS does not. To close this gap, iOS users can now add orders and line items when completing a route in Roadnet Mobile.
The Add Orders and if appropriate, the Add Line Items region settings must be enabled on the Smart Phone - Allowed Worker Actions page to allow workers using Roadnet Mobile for iOS to add orders and line items on the mobile device.
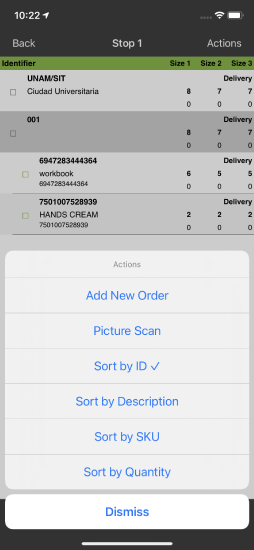
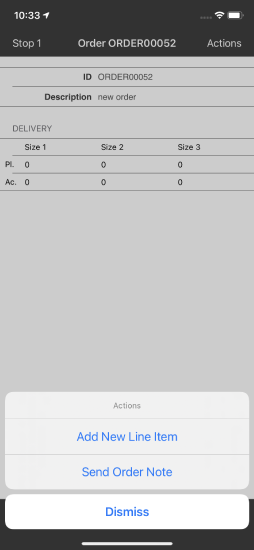
To add an order on the mobile device, when arrived at a stop, the worker taps the Quantity table and while viewing the order list for the stop, taps Actions, and then Add New Order.
The worker can scan or enter an ID for the order.
To scan in Roadnet Mobile for iOS, the worker simply places the cursor in the field and taps Actions. When the worker taps Picture Scan, the camera opens. The worker aims the camera at the barcode and taps the screen to capture the scan.
A Reference number can also be added to the order.
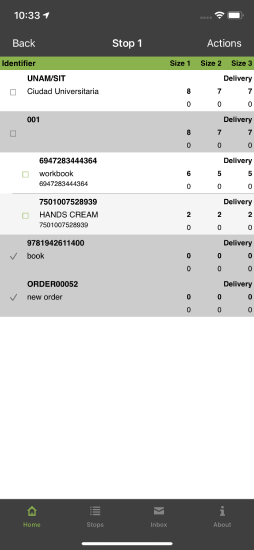
To save the order, the worker taps Actions and then Save Item. The new order displays in the list of orders for the stop.

To add a line item to an order on the mobile device, when arrived at a stop, the worker taps the order to which the line item will be added. Then the worker taps Actions and taps Add New Line Item.
The worker can scan or enter an ID for the line item. A Description is entered to help easily identify the item.
To enter the SKU for the line item, begin typing the SKU and when the proper SKU displays, tap it to assign it to the line item. A barcode can also be scanned to fill in the SKU.
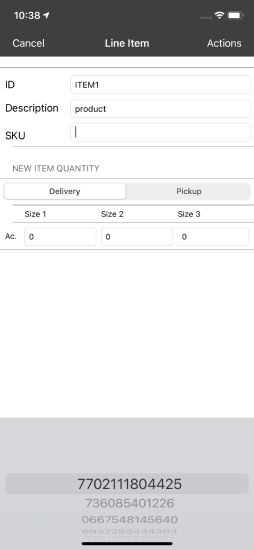
The worker taps the appropriate service type, Delivery or Pickup and then enters the actual quantity for the appropriate size.
To save the new line items, the worker taps Actions and selects Save Item. The item displays under the order to which it was added.

Common
Business Unit Settings Available on the Region
Several important settings that were only available on the business unit are now also available on the region. Being able to set the default country and the available time zones to choose on the region allow you to more easily customize Omnitracs One to meet your organization's needs. For instance, if you have one region that operates in the United States, and one region that operates in Canada, you would probably want use a different default country in each of these regions.
The following settings are now available on the Region - General page:
- Country
- Display International Time Zones
Important: Your current business unit settings will automatically be copied to all your regions, so you do not need to make any changes, unless you want to make changes to individual regions.
If you are using region hierarchy, the order the settings are used remains the same. Parent region settings are copied to the lower regions, but settings can be overridden for any single region.
In Omnitracs Web
- Click on the Administration icon to open Administration.
- Click the green button and choose Regions; the Regions list opens.
- Select the region you want to update and click the Edit icon. The Regions window opens.
- If necessary, on the left side click General; the General page opens. Change the Country and status of Display International Time Zones as appropriate.
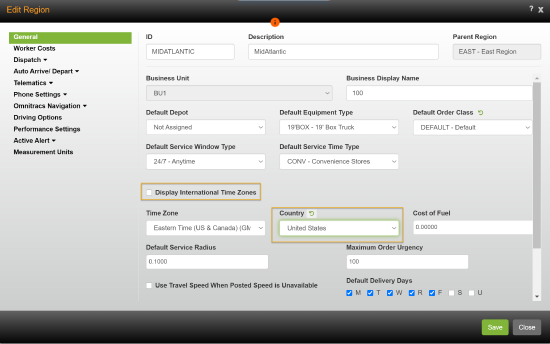
- Click [Save].
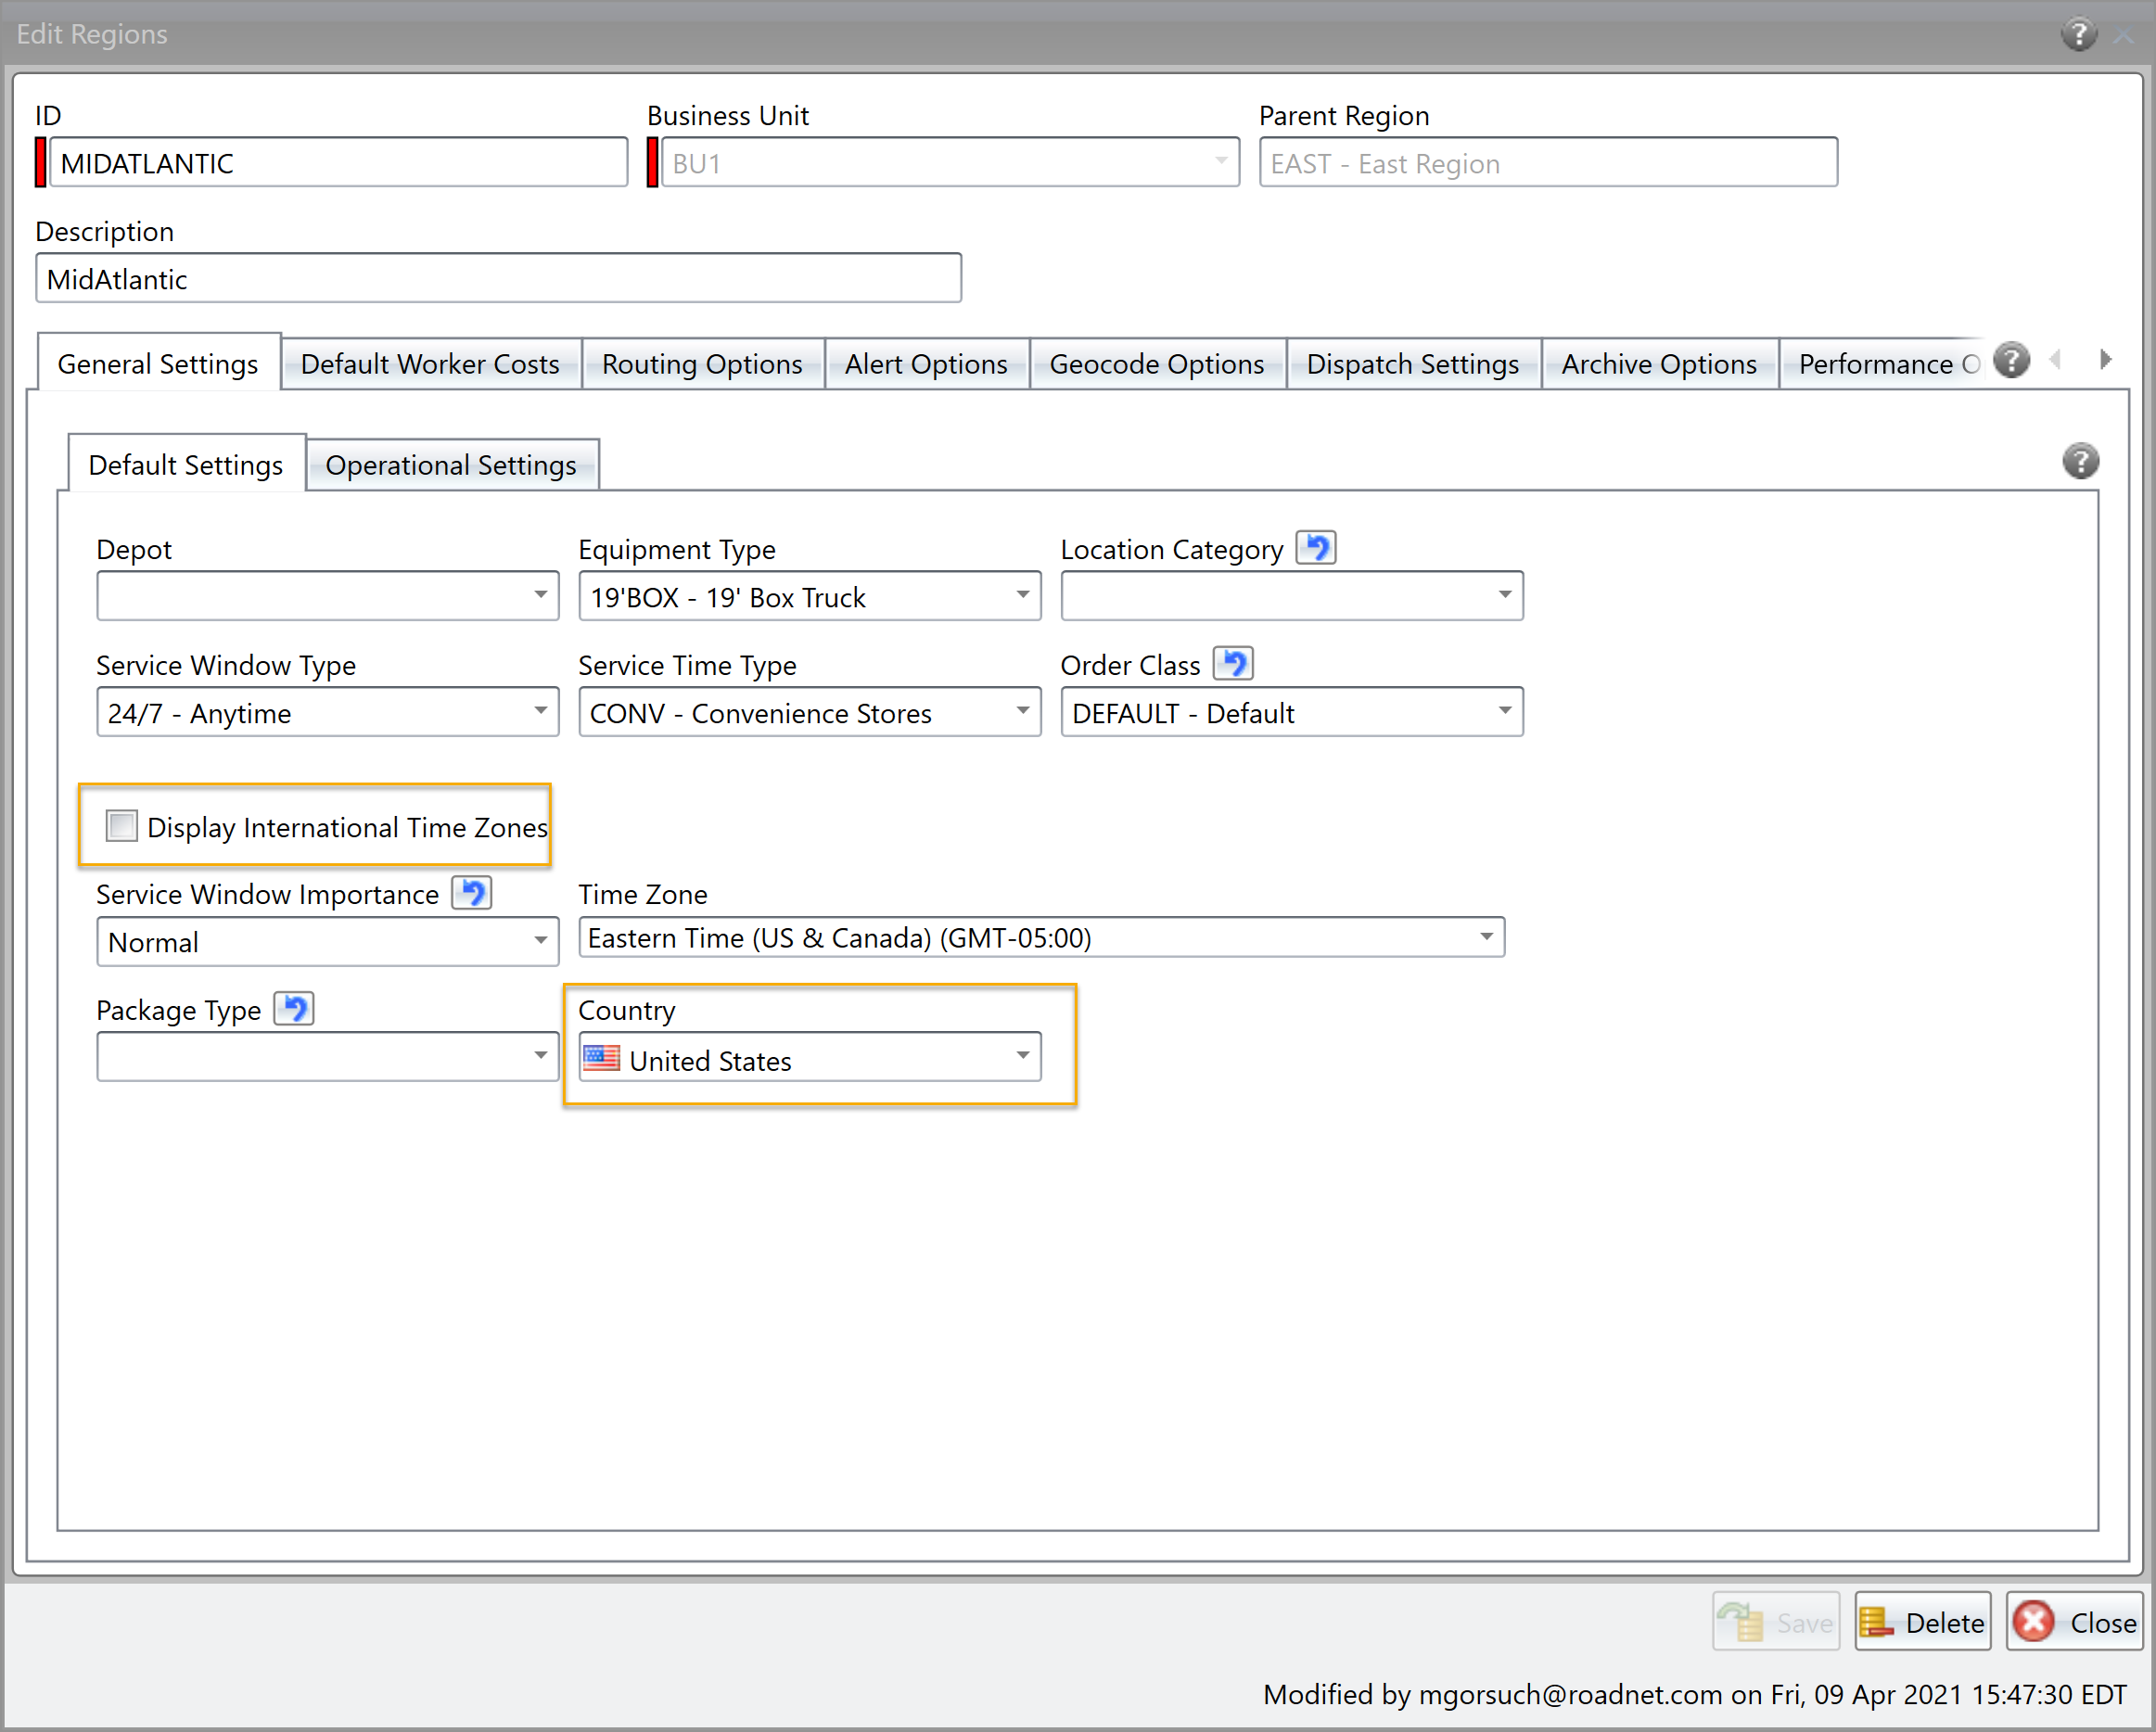
In Omnitracs Client
- Click on the Admin menu to open Admin and choose Regions; the Regions list opens.
- Select the region you want to update and click the Edit icon. The Regions window opens.
- If necessary, click on the General tab; the General Defaults page opens. Change the Country and status of Display International Time Zones as appropriate.

- Click [Save].
Updated Application Icons
Application icons have been updated for the following in the Omnitracs Installer:
- Omnitracs Navigation
- Omnitracs Drive
- Omnitracs Installer
- Omnitracs Telematics
- Omnitracs Scanning
Note: Omnitracs Installer manages the installation and updates of Omnitracs applications that are used on mobile devices within your organization. If available, Omnitracs Installer can be downloaded from Application Downloads in Omnitracs Web.
You will see these new icons when you access the applications. Look for more icon updates in future releases.
Software Corrections
The following software corrections are included in Omnitracs One (Roadnet Anywhere) 6.2.
| Issue key | Release Notes | Components |
|---|---|---|
| RPE-15944 | There was an issue where line breaks in older email templates were not being recognized, causing the email to appear as one long line. This has been corrected. | Active Alert |
| RPE-17133 | The date/time format on the template preview now matches the format selected for the current region. | Active Alert |
| RPE-17920 | The Region Telematics - Dual Device settings page was visible to users assigned an administrative role. This has been corrected and the page is no longer available to administrative users. | Admin |
| RPE-15968 | There was an error that occurred when trying to change a user's role. This has been corrected. | Admin |
| XRS-9202 | An issue that caused the post trip vehicle inspection report to show an incorrect location has been resolved. | Compliance |
| XRS-8887 | When a GET call is made using the Driver Log Event Web Service, a “Day End” duty status event will be created and inserted at the end of the driver's log day (midnight). This event will not appear in the database or on the driver’s log; it will appear in the GET call response and the value “Day End” will be included in the Comment field. | Compliance |
| RPE-24732 | An issue that caused driver log edits from being saved properly has been corrected. | Compliance |
| RPE-17952 | Performing Equipment History Search by Location on large data sets could receive a time out error. Changes were made to reduce the instances of the time out errors. | Dispatching |
| RPE-17663 | An issue was discovered where the complete list of Exceptions for a given date in Fleetview's Exception grid were not being returned for a given date. This has been resolved. | Dispatching |
| RPE-17640 | There was a rare issue that could cause unusual GPS pings to appear. This has been corrected. | Dispatching |
| RPE-16384 | References to "Roadnet Anywhere" have been changed to "Omnitracs" in notification emails and text messages. | Dispatching |
| DCMD-5512 | An issue that prevented the user from being able to scroll properly on the Planner tab after changing the tablet's orientation has been resolved. | Drive |
| DCMD-5511 | On Android phones, there was an issue that could cause portions of the screen to be cut off if other screens are pinned to the map. This has been corrected. | Drive |
| DVIR-766 | There was an issue that was causing the DVIR form not to appear when the driver added an Ad HOC DVIR task. This has been corrected. | Drive |
| DVIR-895 | There was an issue that could cause assets to appear in the wrong order in the DVIR. This has been corrected and trucks are now listed before trailers. | Drive |
| DVIR-890 | The DVIR Inspection Type selected by the driver was not always being reported properly. This has been corrected. | Drive |
| DVIR-891 | There was an issue that allowed the driver to complete a breakdown task without entering notes, even if notes were required. This has been corrected. | Drive |
| DVIR-897 | There was an issue where breakdown tasks were not properly registering as a DVIR Mid-Trip inspection. This has been corrected. | Drive |
| DVIR-892 | As issue preventing drivers from being able to edit breakdown tasks and identify which asset is involved has been resolved. | Drive |
| DVIR-894 | There was an issue that was preventing drivers from removing tractors from a DVIR. This has been corrected. | Drive |
| DCMD-5271 | Changes were made so that addresses appear correctly in the Planner. | Drive |
| XRS-5525 | On occasion, the comments a driver entered next to defects in the pre-trip inspection did not appear on the post-trip inspection list or on the Vehicle Inspection Form on the host. This issue has been resolved. | HOS Mobile |
| XRS-6637 | Some completed stops that were marked as complete were becoming unmarked during the course of the day. This issue has been resolved. | HOS Mobile |
| XRS-8950 | For drivers who set the language option to Spanish, the vehicle inspection Pre-Defect screen was blank; if they switched to English, however, they could see the defect list. As a temporary fix, the Pre-Defect list now appears in English even when the language is set to Spanish. A more permanent fix will be part of an upcoming release | HOS Mobile |
| RPE-19116 | There was an issue that could cause some regions not to appear on KPIs if the customer is using custom hierarchy. A change was made that will allow the custom hierarchy to be corrected. | Insight |
| RPE-16089 | There was a rare issue that prevented users from changing the level of a region in Insight when region hierarchy was enabled. This has been corrected. | Insight |
| RPE-19567 | There was an issue that could cause Omnitracs Client to crash when editing multiple service locations. This has been corrected. | Maintenance |
| RPE-37281 | There was an issue that caused the worker's mobile login to not appear in the Workers dialog for non-Compliance customers. This has been corrected. | Maintenance |
| RPE-18046 | Unserviceable stops are no longer included in the calculations when running the Service Time Updater. | Maintenance |
| RPE-16220 | There was an issue preventing users from being able to edit Exception Rules in Omnitracs Web if the rule was created in Omnitracs Client. This has been corrected. | Maintenance |
| RPE-3407 | There was a rare issue that caused the equipment's total distance to be incorrect if the mileage decreased when the odometer was calibrated. This has been corrected. | Maintenance |
| RPE-16600 | There was an issue that caused an unexpected error when plotting a route with Show Unassigned enabled. This has been corrected. | Maps |
| RPE-18995 | There was an issue that could prevent users from logging into Omnitracs One if they did not log out previously. This has been corrected. | Miscellaneous |
| RPE-18508 | When users were printing selected items on a grid, custom properties for all items on the grid were being printed. This has been corrected. | Miscellaneous |
| RPE-18028 | There was an issue that could cause Omnitracs Client to crash for some users when logging in. This has been corrected. | Miscellaneous |
| RPE-18002 | There was an issue preventing all localized strings from being shown in the culture set on the business unit in Omnitracs Client after the language pack was installed. This has been corrected. | Miscellaneous |
| RPE-14972 | There was an issue preventing some AMG-C devices from properly being added to the customer in the portal. This has been corrected. | Miscellaneous |
| RPE-31251 | The User Account and Omintracs One Devices buttons have been removed from the home page. These buttons are for future functionality. | Miscellaneous |
| RPE-32499 | There was an issue that could cause the user to be logged into the wrong environment after upgrading. This has been corrected. | Miscellaneous |
| RPE-18974 | There was an issue that was causing breaks to appear on routes when none were taken. This has been corrected. | Mobile |
| RPE-18120 | There was an issue that could cause stops to be grouped, even when the group stop permission was not enabled. This has been corrected. | Mobile |
| RPE-15973 | There was a very specific issue that prevent a tracking route from being unloaded. This is corrected. | Mobile |
| RPE-15859 | A new Disable Network GPS region setting on the Smart Phone - General page keeps the device from gathering GPS pings from the network. This will keep network GPS pings from being used when satellite is not available. | Mobile |
| RPE-19195 | There was an issue that could prevent users from being able to access the Omnitracs Navigation options in the Customer Portal. This has been corrected. | Navigation |
| RPE-18371 | There were two changes made to the spoken directions. First, distances are included in the spoken directions for the next turn if the turn occurs in the next 620 miles. Second, the spoken distance for shorter distances is now a more conversational distance; for instance the spoken distance is now "three quarters of a mile" not ".75 miles". | Navigation |
| RPE-17408 | In the Turn by Turn directions and in the current maneuver text bar, the words "Unknown Street" will appear if the street does not have a name. | Navigation |
| RPE-15014 | There was an issue that was causing the path to include unreasonable U-turns. This has been corrected. | Navigation |
| RPE-33889 | There was an issue preventing some users from being able to access the Omnitracs Navigation application from the Customer Portal. This has been corrected. | Navigation |
| RPE-18976 | There was an issue where the vehicle settings displayed in the Route Status did not match the vehicle settings sent from Drive with the trip. This has been corrected. | Navigation |
| RPE-19083 | After using the Route Query to search for a planning route, choosing Show now opens the route's planning session so the user can see the route. | Planning |
| RPE-18466 | An issue that was causing the incorrect number of service locations to be shown in the Territories grid has been corrected. | Planning |
| RPE-18191 | There was an issue that caused a fatal error when trying to plot a route. This has been corrected. | Planning |
| RPE-16401 | There was an issue where the column positions were not being saved properly in the map pick list. This has been corrected. | Planning |
| RPE-18080 | You can now see the device's current battery voltage on the Telematics Diagnostic Report. | Reporting |
| RPE-15900 | There was an issue that prevented the Performance Monitoring report from running if there was no worker associated with the data. This has been corrected. | Reporting |
| XRS-6203 | If Show Fuel Detail was set to No in the Fleet Report selector and the user exported the report as a .csv file, the exported report did not show all the expected information (including the vehicle ID). This issue has been resolved. | Reporting |
| XRS-9259 | When the ELD Driver Log Report was generated for a single day, it did not always show all log events. This issue has been resolved. | Reporting |
| XRS-6059 | When users selected the vehicle ID in the Distance Discrepancy Report to view the details about a gap, no data was displayed. This issue has been resolved. | Reporting |
| XRS-8672 | An issue that prevented some customers from receiving scheduled HOS reports has been resolved. | Reporting |
| RPE-18717 | Fixed a problem with sequencing routes that only have breaks and/or layovers with no actual service stops | Routing |
| RPE-29719 | There was an issue that could cause less efficient routes to be created when driver selected layovers were used. This has been corrected. | Routing |
| RPE-16589 | There was an issue that could cause routes to exceed the Max Runtime when stops were moved between routes that did not have the same driver service time adjustment. This has been corrected. | Routing |
| RPE-18893 | Numeric values in Text Custom Properties no longer cause an unexpected error. | Web Services |
| RPE-18180 | There was an issue that could prevent two orders for the same location from getting the order or line item custom properties. This has been corrected. | Web Services |
| RPE-24374 | There was an occassional issue when users attempted to POST orders with custom properties which has been corrected. | Web Services |