The Fuel Screen
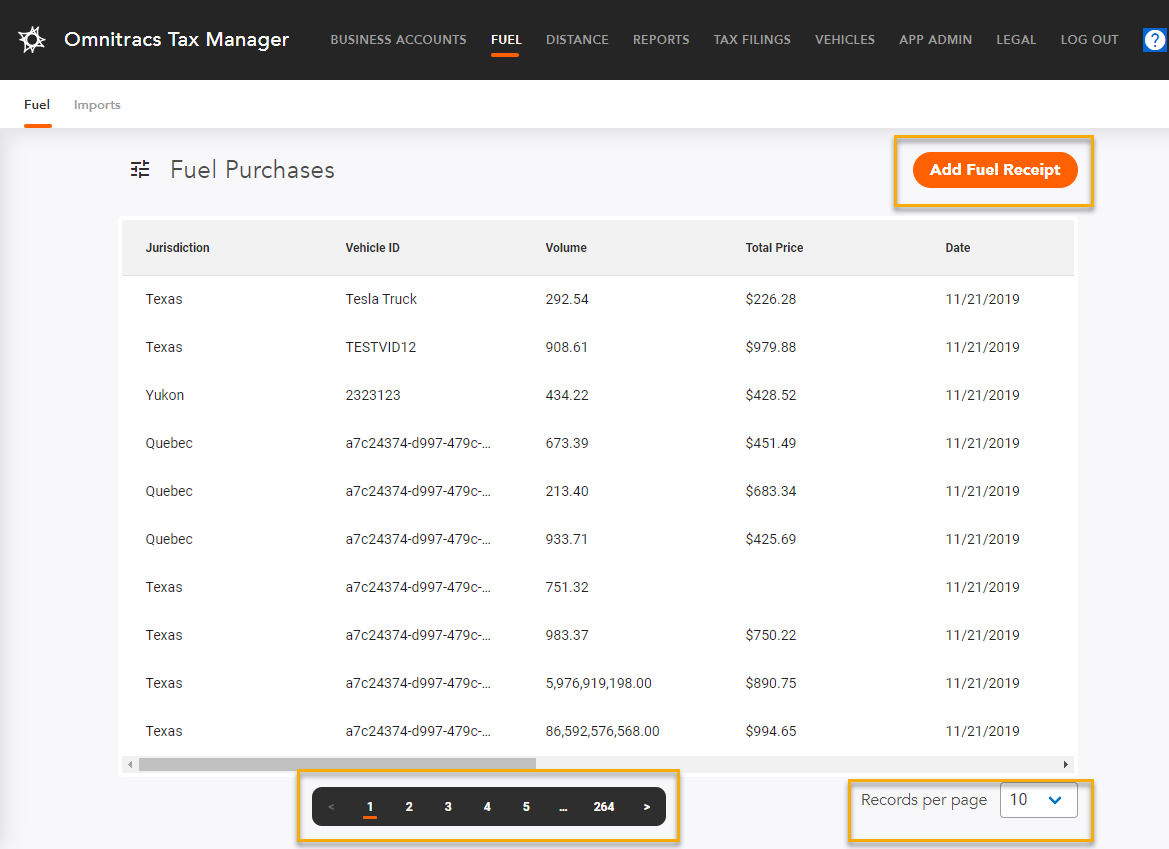
The Fuel Purchases screen is a list of Fuel Purchase records currently entered in the Omnitracs system. From this screen, users can view fuel purchase records, add fuel purchase records, or edit existing records.
When the Fuel Purchase screen opens all items are displayed in a paged list. To move from page to page, click the page number or arrows on the page bar at the bottom of the list.
There are several ways you can affect the items are that are displayed.
To change the number of items shown on a single page, click the Records per Page arrow and choose the appropriate number.
To limit the list to only selected items, click the Filter icon.
![]()
The Filter panel opens. You can choose to filter on a Date Range, Jurisdiction, Vehicle ID and/or Tax Account. Choose the proper criteria; items that meet at least one of the selected criteria will be displayed in the list.
- Date Range - enter the beginning (From) and end (To) date that you want included in the list. To select a date, click the Calendar icon; a calendar opens. Click the arrows to change the month, and click on a date to select it.
- Jurisdiction - click Jurisdiction to open a list of possible jurisdictions. Jurisdictions with a check will be included in the list; to include/exclude a jurisdiction, check/uncheck the box.
- Vehicle ID - click Vehicle ID; a Search field opens. Start typing the vehicle ID in the field. A list of IDs that match the search pops up, select the IDs you want to include in the list.
- Tax Account - click the arrow to open a list of tax accounts. Click on the tax account you want to include in the list.
Note: If Tax Account is part of the filter, all vehicles in that tax account will be shown until additional filters are applied.
Once you have all of your filters selected, click the Apply button. The list is filtered to show only those items that meet at least one of the selected criteria.
Adding Fuel Receipts
Perform the following to add a Fuel Receipt.
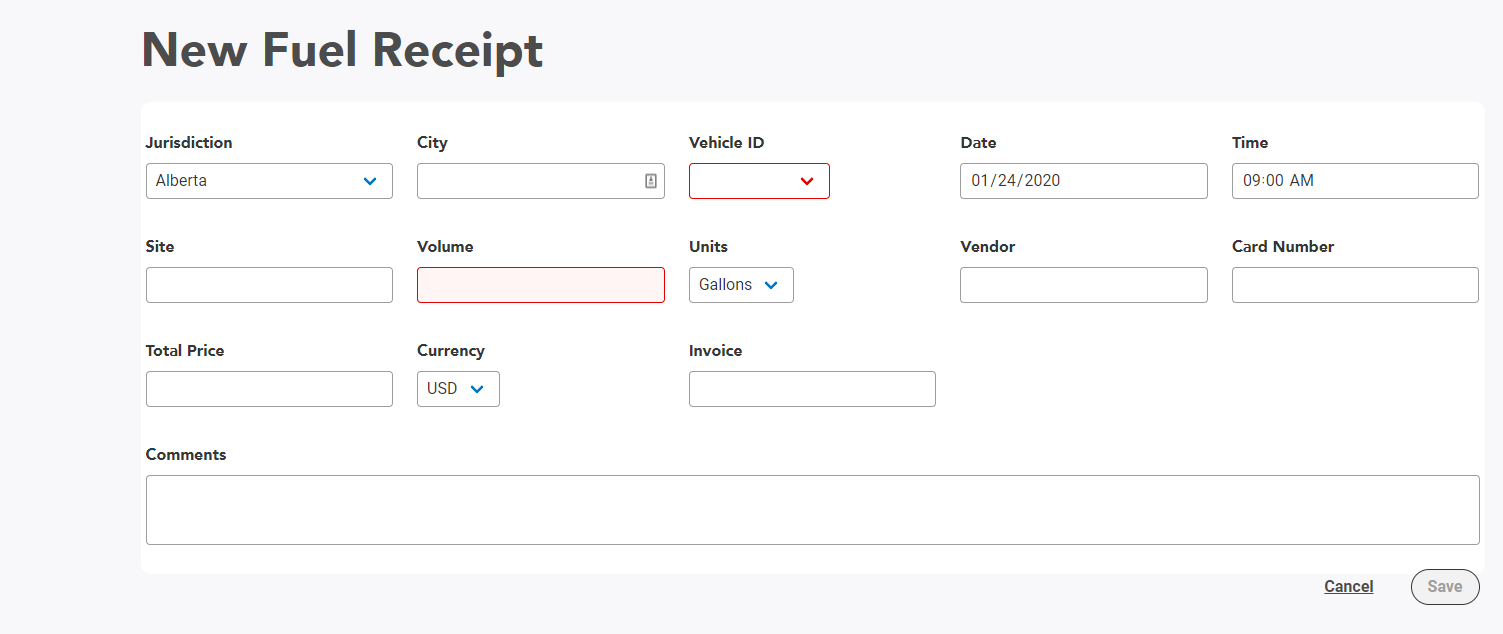
- From the Fuel Purchases screen, select the Add Fuel Receipt button. The New Fuel Receipt screen appears.
- Enter information into the fields as necessary. Fields highlighted in red are required.
- Enter any relevant comments in the Comments field, and select Save.

New Fuel Receipt Field Definitions
| Field | Values | Definition |
|---|---|---|
| Jurisdiction | Drop-down menu, State or Province | Jurisdiction in which fuel was purchased. |
| City | Alphanumeric | City in which fuel was purchased. |
| Vehicle ID * | Drop-down menu, varies by completely | Vehicle ID for whom fuel was purchased. |
| Date | Date (MM/DD/YYYY) | Date of fuel purchase. You can navigate to the next individual value in the field (e.g., move from month to day) by pressing TAB. |
| Time | Time (HH:MM / AM / PM) | Time of fuel purchase. You can navigate to the next individual value in the field (e.g., move from hours to minutes) by pressing TAB. |
| Site | Alphanumeric | |
| Volume * | Numeric | The number of fuel units (gallons or liters) purchased. |
| Units | Drop-down | The unit used to measure fuel, gallons or liters. |
| Vendor | Alphanumeric | Vendor from whom fuel was purchased. |
| Card Number | Alphanumeric | Card number used to purchase the fuel. |
| Total Price | Numeric | Amount charged. |
| Currency | Drop-down | Currency used. |
| Invoice | Alphanumeric | |
| Comments | Alphanumeric | Enter any comments about this purchase. |
Editing Fuel Receipts
Clicking on an entry in the Fuel Purchases screen brings up the Edit Fuel Receipt window. Perform the following to edit a Fuel Receipt entry.
- Select the Edit icon. The fields in the Edit Fuel Receipt window become editable.
- Edit the fields as necessary.
- Enter any comments in the Comments field. This may be a good practice for edited receipts, as it allows the editor to make notes as to why the receipt is being edited.
- Select Save.
Edit Fuel Receipt Field Definitions
The field definitions for the Edit Fuel Receipt window are the same as the definitions for the New Fuel Receipt window.
