Omnitracs Navigation for Android User Manual version 5.5
Introduction
Navigation provides distraction-free routes that are efficient, optimized for your truck’s parameters, and use historical data to provide the most accurate routing, improved safety, and on-time arrival. Road information like posted road speeds and toll roads as well as historical use and traffic volume to provide more consistent, predictable, and accurate routes.
As maps are updated, you are prompted to download them. If you are in an area with poor cellular or WiFi connectivity, you may not receive updates until your device can communicate over-the- air.
Select the Play button below for a video overview of Navigation.
Overview of Omnitracs Navigation
1m 34s
Overview of Omnitracs Navigation features.
| Be sure you’re safely parked before you view these videos or enter routes, trips, or destinations. |
Using the Map
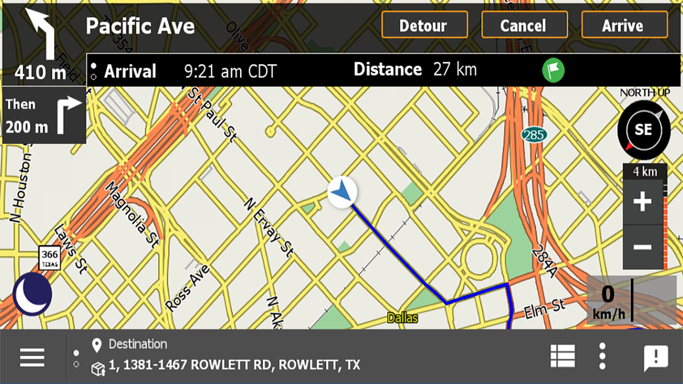
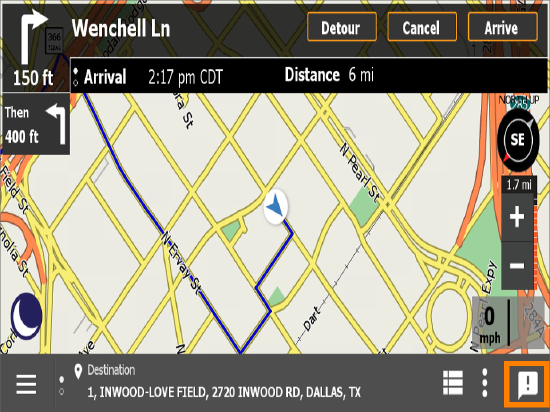
The map shows your current location and any route you may be following. You can adjust zoom level, map orientation, and what points of interest (POIs) display. If you are en route to a destination, have the option to detour, cancel the route, add a stop, and display turn-by-turn directions. The status bar at the bottom of the screen shows upcoming turns, current location, or selected points of interest.

- Next turn – Indicates the next two steps or turns and their distance.
- ETA pane – Indicates the anticipated time of arrival and distance to your next stop. Tap it to switch between anticipated time of arrival and estimated duration of the remainder of the trip.
- Detour – Tap to find a detour for the next 1, 2, 5, 15, or 20 miles (1, 8, 16, or 24 km) of the route.
- Cancel – Tap to cancel the current route.
- Arrive – If you aren’t automatically marked as having arrived, tap Arrive. You may need to do this if you park or stop at a location that is not near your stop’s street address.
- Flag – Tap see what configurations are set and affect how this path was generated. This may be useful if you dropped off a hazmat load and need verify that you disabled hazmat restricted roads.
- Compass – Indicates your current direction of travel. Tap the compass to change the map orientation to show your current heading always at the top of the screen (heading up), North always at the top of the screen (North up), or a tilted, three-dimensional view (3D).
- Zoom – Tap these buttons to zoom in or out on the map. The number above the zoom buttons indicates the distance you see horizontally across the map.
- Speed pane – Depicts your current speed on the left and the posted road speed for the road on the right, if known. If speed alerts are enabled and the vehicle’s speed exceeds the posted road speed, the vehicle’s speed displays is yellow, and if you exceed the speeding threshold the vehicle’s speed displays in red.
- Day/Night Mode – Tap to switch between a light or dark background.
- Menu – Tap to access more features.
- Skip Next Waypoint/Cancel Detour – The notification changes depending on if you’re on a path to a location via a waypoint or if you’re detouring from the original path. If you skip the next waypoint, you don’t go through the next point you were required to pass through between your current location and destination. If you cancel the detour, Navigation re-routes you to the destination from your current location.
- Destination – Shows you destination, tap it to view your current location.
- Directions – Tap to view turn-by-turn directions.
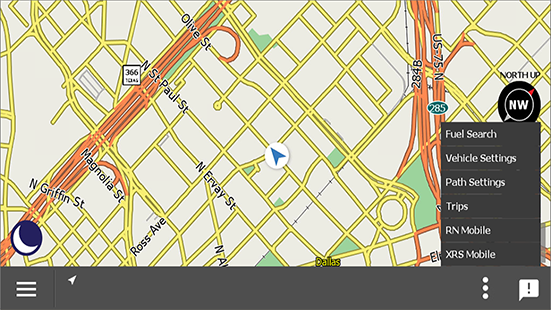
- Shortcuts – Tap for a list of functions in Navigation that you or your company identified for quick access. used in. If you haven’t set any shortcuts, this list is blank.
- Incident – Tap to record your current location and a timestamp. When you’re safely stopped, go back to the list of incidents you created to make notes and submit feedback about routes and improve future routing
| Items 1-6 and 12-14 display if you're en route. |
For more detail on how to use the map’s on-screen features, see the video below.
On-screen Map Features
2m 14s
View a demonstration of how to use the on-screen buttons to set the Navigation map to meet your needs.
Route to Destinations
You may receive a trip (a series of stops and associate tasks) from your dispatch office or route to individual destinations manually. You can manually route to destinations by using:
- Full or partial address
- The city center
- A pre-defined list of points of interest
- Your destination history
- A list of your previously saved favorites
- A location on a map
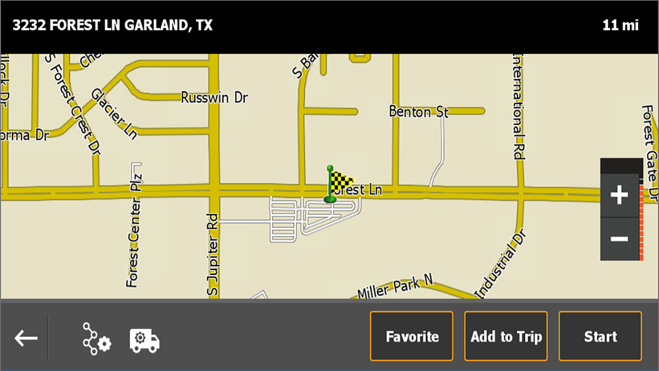
After you choose a destination, you can create a route, save the destination as a favorite, or add the destination to an existing trip. Routing to destinations through trips is covered later.
Before you generate a path to a destination, be sure you have defined your vehicle parameters (weight and dimensions) as well as any route restrictions like avoiding toll roads or dirt roads, hazmat restrictions, or prefer trucking roads. If you forget, you can do so from the destination screen.
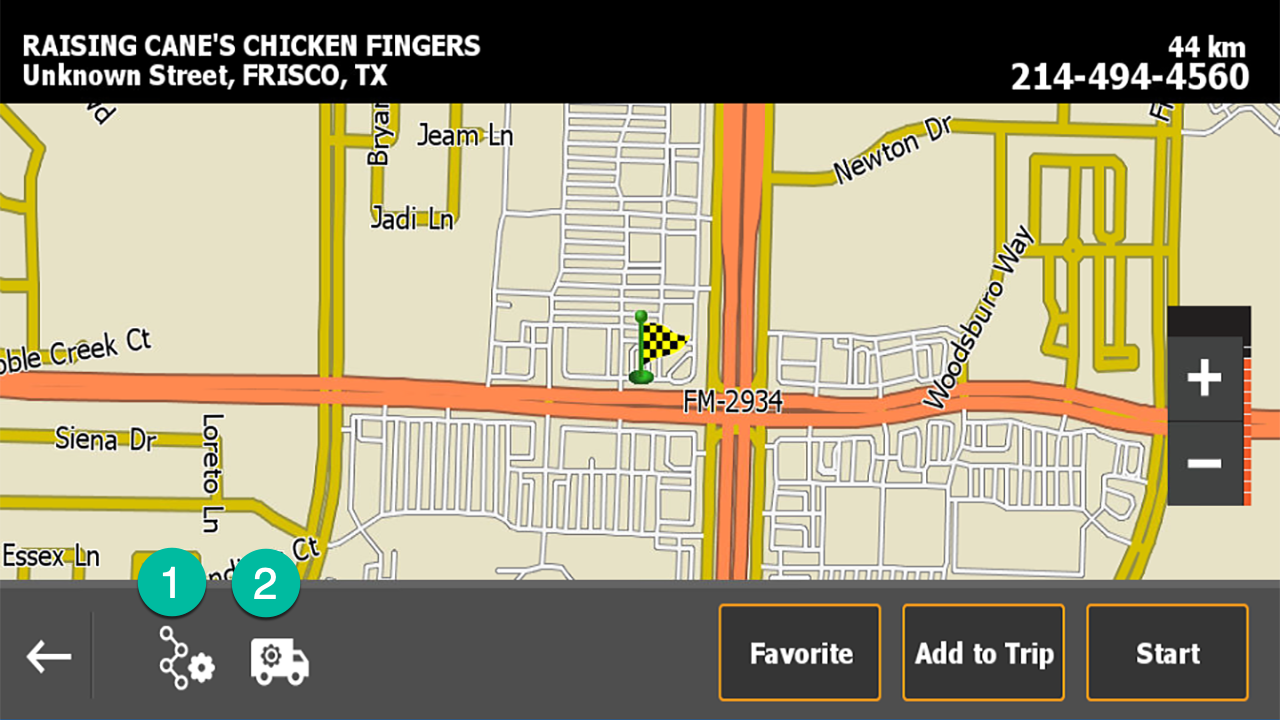
- Path Settings – Tap to define restrictions like avoid tollways and u-turns, prefer trucking roads, or hazmat class for the directions to this location.
- Vehicle Settings – Tap to define vehicle parameters like weight, dimensions, and if it’s a commercial vehicle.
Manually Generate Paths to Destinations
Play the video below to see how to generate a path to a destination.
Routing Overview
4m 59s
An overview of how drivers navigate to stops or points of interest by entering an address, selecting from a list of favorites or saved stops, or using the map.
If you are en route, either to a single destination or as part of a route, you can add destinations as waypoints. A waypoint is a location that you must drive through as part of the point-to-point path.
Full or Partial Address
If you know the address of your destination, follow these steps.
|
 |
If you didn't provide a building number, you are prompted to select a range of building numbers after you select a street.
If the city or street don't appear in the list, type only the first few letters of the name and scroll through the list of possible matches. Omnitracs recommends that you type fewer letters to populate the list; then scroll through the list to find the entry or type more letters to narrow the list.
City Center
If you just need directions to a city or town but not a specific location, follow these steps.
- Tap Menu
- Tap New Destination
- Tap Address
- Tap City Center
- Type in name of city
- As you type, the device will begin showing a list of possible matches, sorted alphabetically
- Tap your destination if it appears in the list or tap list to scroll through the full list
- Tap Start
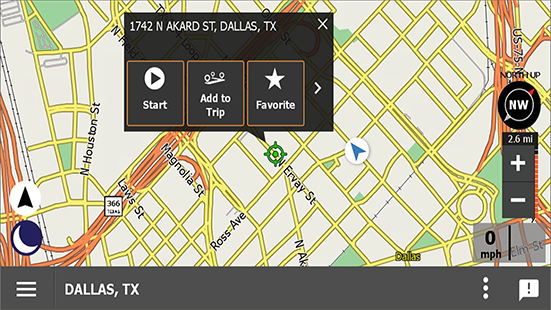
Point on a Map
You can tap on the map to identify a location; then navigate to that location.
- Scroll to and tap the location on the map.
- When the green target appears, tap the green crosshair and select an action from the pop-up menu.
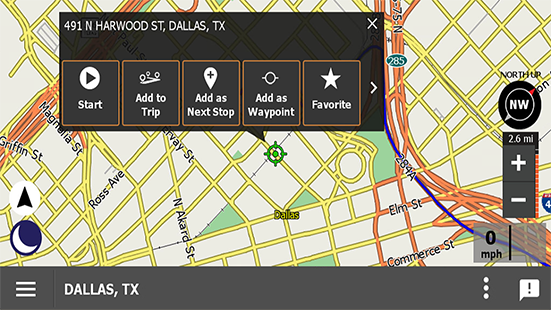
If you are on a trip and want to route to a location that’s not part of your trip, after you select a point on the map and tap the crosshair, you are prompted to:
- Add to Trip – you are prompted to define what kind of stop it will be and in what sequence it will be
- Add as Next Stop – you are routed to this location next
- Add as Waypoint – forces Navigation to route through this location on the way to the next stop
- Favorite – saves this location in your list of favorite locations
After you select how the trip is added to your trip, you’ll be prompted to define the stop type and re-sequence your stops as needed.
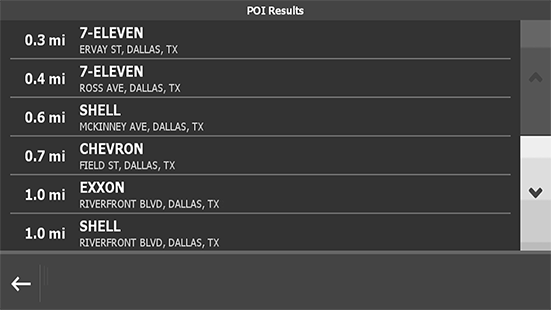
Point-of-Interest (POI)
Navigation has a default set of points-of-interest (POI) and your company can create custom POIs. The POIs are grouped into sub-types as shown in the Appendix.
Near Vehicle
|
 |
Near City
- Tap Menu.
- Tap Navigate To.
- Tap POI or Fleet POI.
- Tap Near City.
- Type the city name.
As you type, you’ll see an alphabetical list of possible matches. - Tap your destination or tap List to view the full list.
- Tap a POI type.
- Tap a POI sub-type.
- Tap a destination. You may need to scroll through the list.
- Tap Start.
-
Near Destination
| This option is available only if you are en route. |
1. Tap Menu.
2. Tap Navigate To.
3. Tap POI or Fleet POI.
4. Tap Near Destination.
5. Tap a POI type.
6. Tap a POI sub-type.
7. Tap a destination. You may need to scroll through the list.
8. Tap Start.
Previously Visited Destination (History)
Destinations you calculate a path to a location, they are stored in your history.
- Tap Menu.
- Tap Navigate To.
- Tap Favorites.
- Tap a destination. You may need to scroll through the list.
- Tap Start.
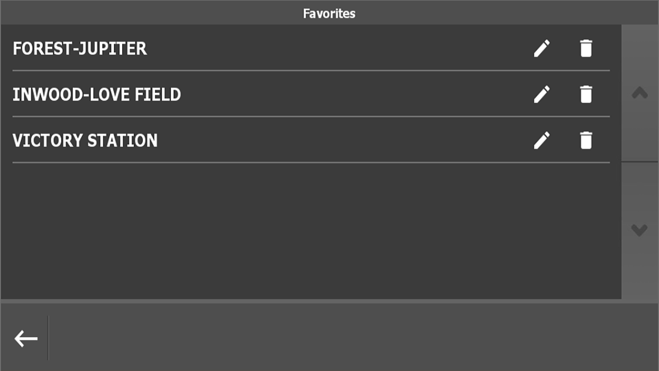
Saved Destination (Favorites)
Favorites are locations you visit regularly and can be added to trips or navigated to directly.
- Tap Menu.
- Tap Navigate To.
- Tap History.
- Tap a destination. You may need to scroll through the list.
- Tap Start.
Create a Favorite
- Follow steps 1-7 to find destination by address or destination from a POI.
- Tap Favorite.
- Type a name.
- Tap OK.
Edit a Favorite
After you save a favorite you can rename, change the location, or delete it.
|
 |
Search for Fuel
If shortcuts are enabled and one is defined for Fuel Search, you can quickly locate a fueling station near you.
|
 |
Trips
A trip is a sequence of destinations or stops that may be associated with tasks you perform at these locations. You may receive a trip from your dispatcher as a printed list of stops that you manually search for and assemble into a trip or as a file that you load on the mobile device.
When a trip is started, Navigation calculates a path to the first destination based on the preferred route settings and any restrictions. After you arrive at the destination, perform any tasks, and are ready to depart to the next stop, Navigation provides a path to the next stop.
If you’re using a transportation management system (TMS) on your mobile device, all stop configuration and task activities are done in that application and paths to the next destination are generated Navigation when called by the TMS.
| Be aware that by default, trips are stored on your device for 10 hours. This value can be reset by your administrator. |
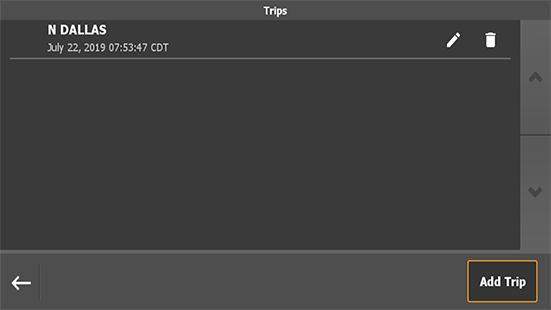
Start a Trip
After you have a trip loaded in Navigation, review it to see if you need to resequence stops, add or remove stops, or are ready to start it. By default, when you start the trip, Navigation generates a route from your current location to the first stop in the sequence. Before you start the trip you can select at a different stop and have Navigation plot a route from your current location to that stop; then sequentially to all other stops on the trip.
To start a trip from the beginning:
- Tap Menu.
- Tap Trips.
- Tap the trip.
- Tap Start.
To start a trip from a stop in the middle of a trip:
- Tap Menu.
- Tap Trips.
- Tap the trip you want to use, use the arrow buttons to scroll through the list
- Tap the stop you want to start the trip from.
- Tap Yes.
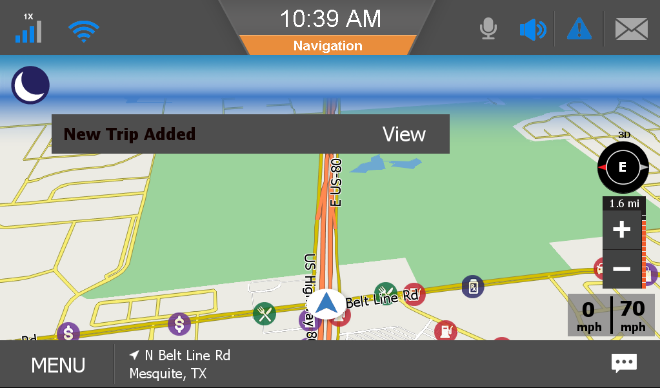
Receive a Trip from Dispatch
|
If your company integrates with a transportation management system (TMS), Navigation allows you to receive trips and calculate a route to start the trip. You are notified when you receive a trip and the notification stays on the screen for 15 seconds. If you are stopped, you can view the trip. If you tap View, you are taken to the trip where can edit or start the trip. If your vehicle is moving, the notification displays, but you cannot view it. After your vehicle is stopped, you can tap Menu > Trips to view the trip. When you receive an update to an existing trip, the on-screen notification informs you that a trip was updated. If the update affects the stop you’re currently routed to, you are notified that the current trip changed and Navigation recalculates the route to the updated stop. |
 |
Create a Trip
|
Trips are created in two steps: create a named trip that has no stops; then add stops to the trip. To create a trip:
Now you add stops by finding locations and adding them to the trip. |
 |
Modify an Existing Trip
After you create a trip, you can add or re-sequence stops or waypoints, edit stops, rename the trip, or delete it.
Add a Stop to a Trip
- Tap Menu.
- Tap Trips.
- Select a trip.
- Tap Add Stop.
- Follow steps 1-7 to find destination by address or destination from a POI.
- Choose Add to Trip.
- Add additional stops as needed.
- Tap the back arrow to return to the map.
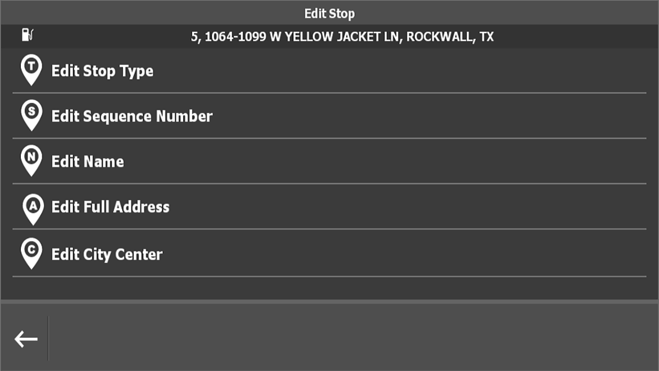
Edit Stops on a Trip
You can modify destinations or tasks for a stop, resequence stops, or remove stops.
|
 |
Rename a Trip
- Tap Menu.
- Tap Trips.
- Tap the pencil next to the trip.
- Tap the back arrow to delete the old name and type in a new name for the trip
- Tap Save.
A confirmation message appears on screen and you can tap OK to dismiss it or it closes after five seconds.
Delete a Trip
- Tap Menu.
- Tap Trips.
- Tap the trash can next to a trip.
- Tap Yes.
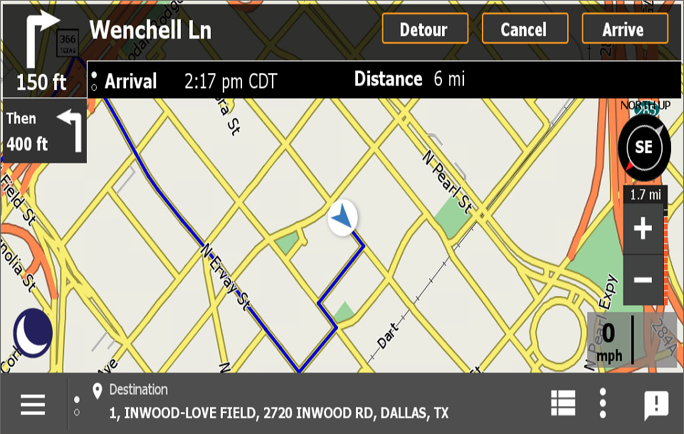
En Route
After you select a destination, Navigation generates the most efficient route based on waypoints, your vehicle parameters, and any restrictions; then displays your route and upcoming turns on the map. If you prefer, you can view turn-by-turn directions for that destination.
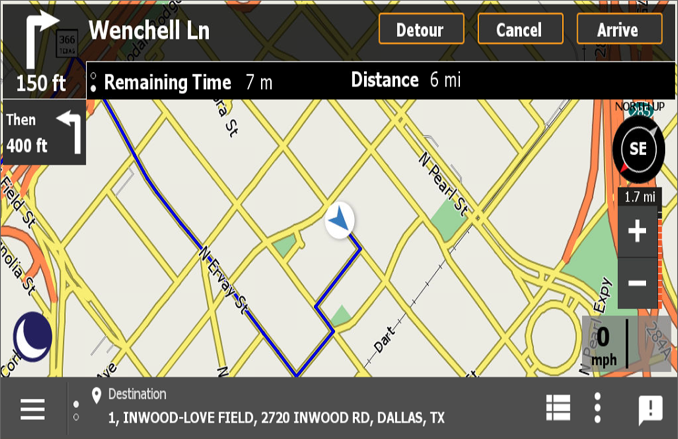
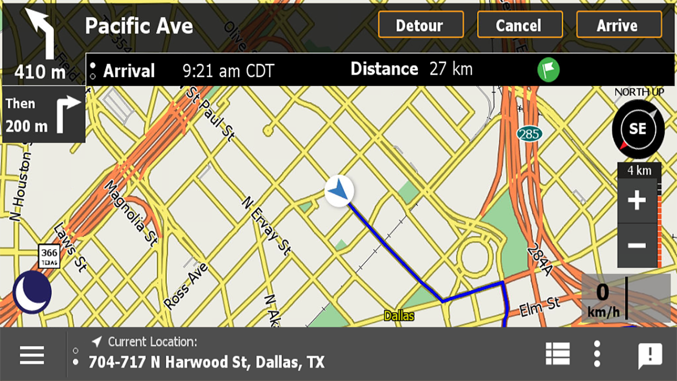
ETA and Location
When en route, the map displays ETA and location information. By default, the ETA banner shows the estimated time of arrival. Tap it to switch between the ETA and the estimated remaining duration of the route to that stop.
 |
 |
The banner at the bottom of the map shows your destination. Tap it to switch between showing your destination and current location.
 |
 |
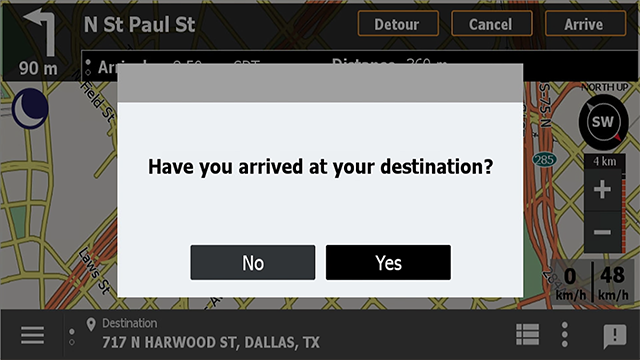
Arrive
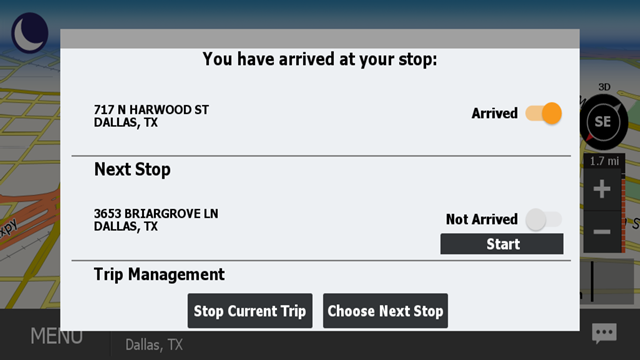
When Navigation detects that you're at your destination, you see a pop-up indicating you automatically arrived, and if you are currently on a trip, you may stop the trip, calculate a route to the next stop, or choose the next stop through the notification.
 |
 |
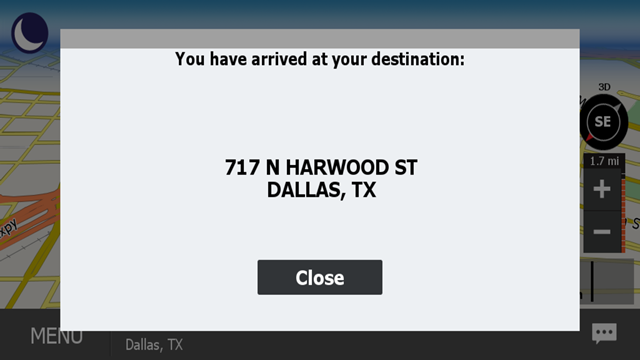
Manually Arrive
If you weren't able to park at the location identified by the street address, you may need to manually mark yourself as arrived.
- Tap Arrive and tap Yes.
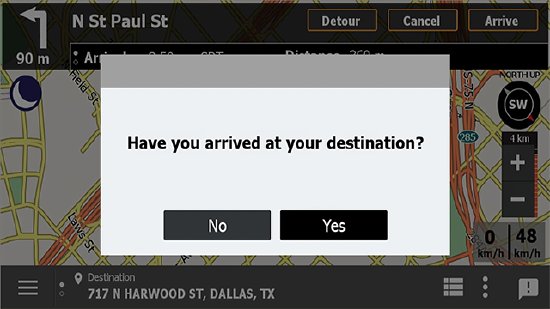
- Tap Close.
Arrive at Next Stop
You may mark the next stop as arrived if you already serviced that stop or your current and next stop are very close to each other like in a strip mall.
Choose Next Stop
You may need to choose you next stop instead of automatically being routed to the next in the stop list if you need to rearrange stops quickly due to last minute delivery priority changes, operating hours conflicts, or various other business needs.
Stop Current Trip
You may need to stop your current trip if you’re going off duty before the trip ends.
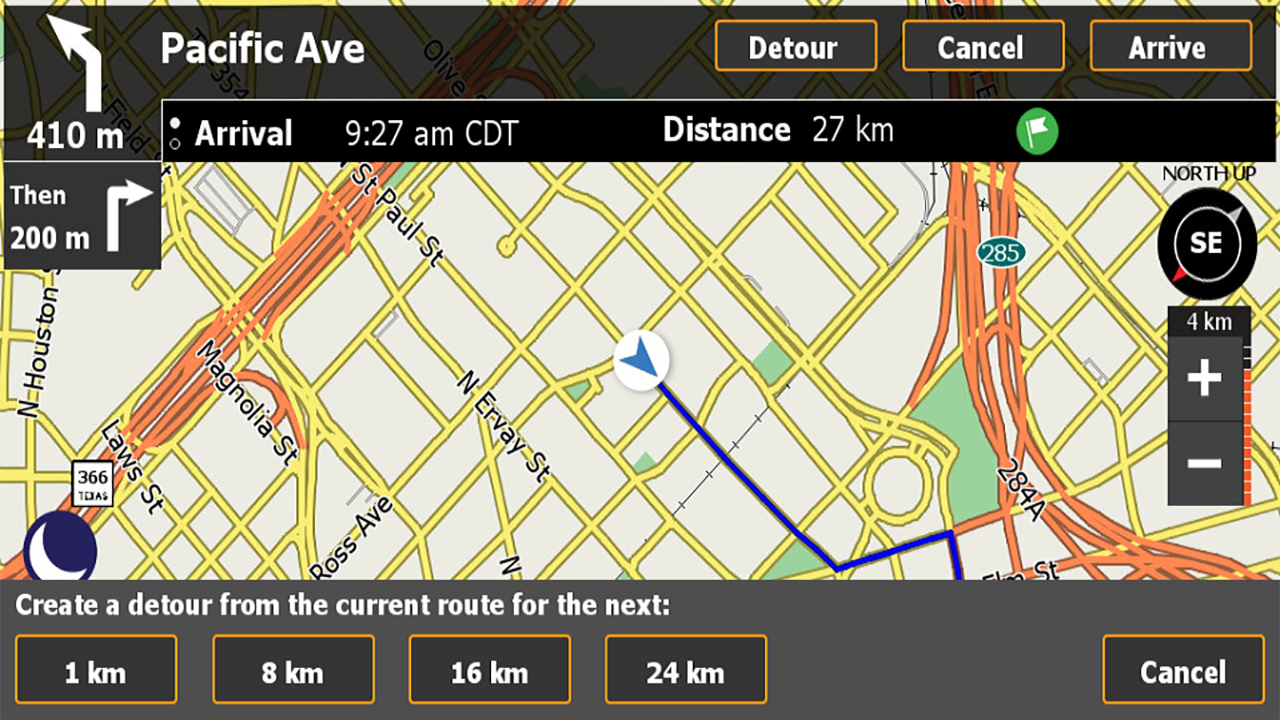
Detour
If you are en route and need to be temporarily routed around a delay, tap Detour and identify if you want to avoid the next 1, 5, 10, or 15 miles (1, 8, 16, or 24 km) of the route.
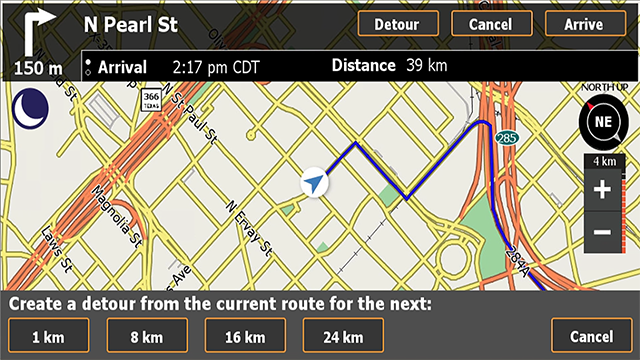
You can cancel the detour at any time by tapping Cancel.
Settings
Your back office may have defined and locked settings for how Navigation is configured. If the settings are unlocked, you can configure your vehicle's parameters including dimensions and weight. Additionally, you might have permission to define what roadways or restrictions apply when generating routes, set triggers for speeding alerts, and set how the map displays. Other information like GPS fix, map updates, and current software version may be used to troubleshoot problems if they arise.
| If a closed padlock displays next to any settings, they are locked by your back office and you cannot modify them. |
Select Play below for a video on settings.
Driver Route Settings
1m 17s
View a demonstration of how to define settings to optimize routes generated by Navigation.
Vehicle Settings
Navigation uses the vehicle profile (dimensions and weight) when routing. Set or review these settings before you generate a route at your start of day ensure they are accurate. Tap edit next to any parameter to adjust the parameter.
| Units are defined under Settings > Units. |
| Parameter | Definition |
|---|---|
| Overall Length | Enter the trailer length in inches/centimeters. |
| Height | Enter the vehicle’s height (the highest part of the vehicle) in inches/centimeters. |
| Gross Vehicle Weight | Enter the vehicle’s gross weight (including load) in pounds/kilograms. |
| Commercial | Toggle this setting ON to indicate that you want to be routed over commercial vehicle-approved roadways only. Toggle it off to generate routes that use commercial and non-commercial vehicle-approved roadways. |
Map Settings
Auto Zoom
When off, you manually adjust the zoom using the + and – buttons on the map. When on, the zoom level of the map dynamically adjusts to show the level of detail you need at that point of your route.
POI On/Off
You may set which, if any, points-of-interest (POIs) display on the map. You can choose to show or hide all POIs by checking or unchecking the box next to All, or display only certain types of POIs. If a POI type has a + sign next to it, there are sub types available. Tap the type to select sub-types of POIs. When a partial list of POIs is selected, the box next to the type and All shows a minus sign instead of a check mark.
The Appendix lists all the POI types and sub-types. The sub-types for restaurant and hotel/motel also break down into a third level, which is reflected in subsequent tables.
Map Orientation
You can set your map to display as heading up, north up, or 3D. In heading up orientation, the map continuously rotates so that the vehicle’s current heading is always at the top of the map. In north up orientation, north is always at the top and the map does not turn as the vehicle turns. The 3D setting uses a heading up orientation, but displays the map in a three-dimensional view. Tap the compass on the map to cycle through these orientations. If you zoom out to a very large scale, the map automatically switches to North Up orientation, but switches back to your chosen orientation after you zoom back in.
Path Settings
Path settings are related to the types of roads and help determine the best route. You can select or change these options after a route has already been calculated and the route will be recalculated using your new preferences.
| Parameter | Behavior |
|---|---|
| Use Tollways | Routes may be include toll roads. Turn this setting off to avoid toll roads in routing, which may result in less efficient routes. |
| Use Dirt Roads | Routes may include dirt roads. Turn this setting off to avoid dirt roads in routing. |
| Prefer Trucking Roads | If enabled, routing will prefer state highways and interstates that are part of the National Network based on the Surface Transportation Assistance Act. |
| Historic Traffic | The application considers historic traffic patterns when calculating routes to generate the most efficient routes. |
Speed Alerts
Speed alerts are audible and on-screen notifications trigged by exceeding a configurable, overspeed threshold for a set duration. This configuration may set and locked from the Navigation portal back office application.
| Parameter | Definition |
|---|---|
| Speed Alerts | Choose whether speed alerts are enabled or disabled on this device. |
| Alert Sound | Choose whether an audible alert will sound or not when you exceed the speeding threshold and speeding duration. This sound will repeat every 15 seconds until you reduce speed or the posted road speed changes. |
| Speeding Threshold | Set how much faster than the posted road speed that the vehicle needs to be moving to trigger a speed alert. The threshold can be set to any speed between 0-20 mph or 0-40 km/h. |
| Speeding Duration | Set the duration of time the speeding threshold must be exceeded before an alert is triggered. The duration can be set to any length of time between 0 seconds and 30 minutes. |
Sounds – Volume
Tap the toggle to enable or disable Navigation sounds. Volume for these sounds is controlled through the device’s volume settings.
Color Scheme
You can choose what display that works best for your lighting situation. Day mode is brighter and easy to see when there is a lot of surrounding light. Night mode dims the screen so that, in low light situations, you don’t have to adjust between a bright screen and the road.
Units
You can view and enter values in imperial units or metric units.
GPS Status
The GPS status gives the current signal strength of the mobile device, location of the vehicle according to GPS calculations, and the Doppler (DOP) value. It also identifies how many GPS satellites are seen and how many are being used to calculate the current position.
Configure Shortcut
If not locked by your back office, you can identify what shortcuts appear on the shortcut menu on the map screen. By enabling these shortcuts, you can quickly navigate to these features.
About
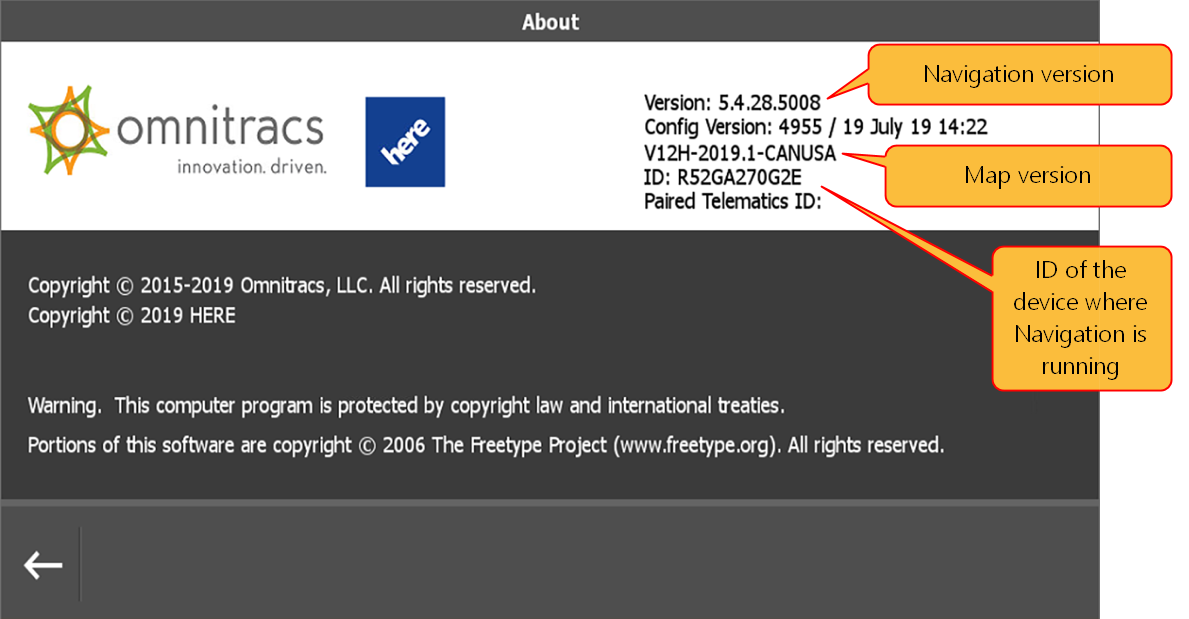
This screen displays the version of Navigation you are running, the version of the map set that’s installed, your device’s ID, and copyright/disclosures/disclaimers as related to Navigation and our partners.
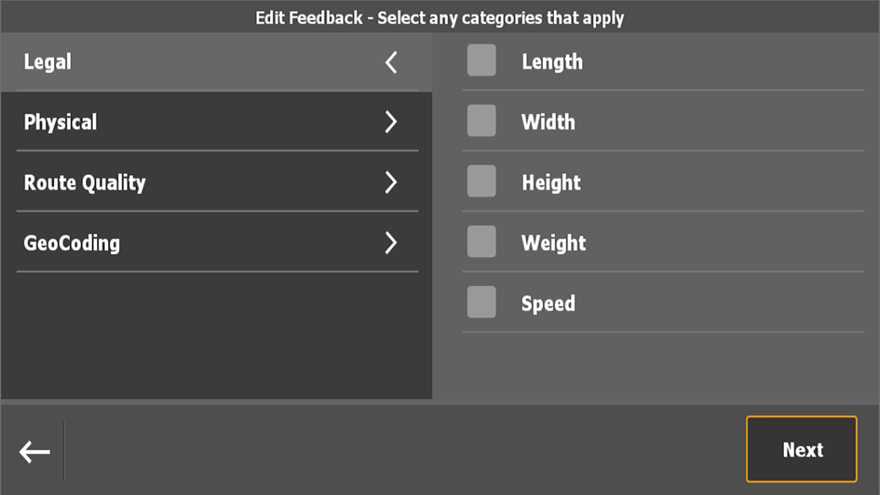
Feedback
Navigation provides the most current road data available by adjusting dynamically based on feedback from drivers as they encounter issues or changes to route conditions such as road closures, construction, changes to POIs, or speed limit changes.
| Feedback cannot be used to communicate with your back office. |
Create an Incident
To create an incident while driving, tap the incident button on the display screen and your current location and a timestamp are recorded. You see an acknowledgement that the incident has been recorded. Later, when you’re safely parked, you can add more details to the incident before sending it.
Report an Incident
After you stop the vehicle, you can modify and submit the incident you recorded while driving or submit other comments.
|
 |
Other Comments
You can also submit feedback or any other comments related to the Navigation application through the feedback section. These comments are not seen by your dispatcher.
- Tap Menu.
- Tap Feedback.
- Tap Add Feedback.
- Tap Other Comment.
- Type a comment.
- Tap OK.
- Tap Send.
Appendix
The following are POI types and sub-types.
| Main POI Types | Sub Type | |
|---|---|---|
| Fuel Station | • Arco • BP • Chevron • Exxon • Mobil |
• Valero • Shell • Texaco • Union (Unocal) ‘76 |
| Trucking | • Rest Area • Truck Stops |
• Weigh Stations • Truck Dealerships |
| Restaurant* | • Coffee Shop • Fast Food • American • Asian • African • Australian • Bar/Pub • Canadian |
• European • Latin/South American • Middle Eastern • Mexican • Seafood • Vegetarian • Other |
| Parking | • Open Parking Areas • Park and Ride |
• Parking Garage • Rest Area |
| Shopping | • Book Store • Grocery Store • Shopping Center • Cleaning & Laundry • Clothing • Department Stores • Electronic Stores |
• Health & Beauty • Home & Garden • Office Supply • Pharmacy & Optical • Photo, Video, Games • Sporting Goods |
| Bank/ATM | • Bank | • ATM |
| Car Dealer/Repair | • Car Dealership • Auto Service • Auto Parts |
• Car Wash/Detailing • Auto Dealership |
| Hospital/Emergency | • Hospital • Pharmacy |
• Police Station • Fire Station |
| Hotel/Motel* | • Budget • Leisure/Business |
• Luxury |
| Airport | No Sub Types | |
| Business | • Business Facility | • Business Service |
| Bus Station | No Sub Types | |
| Exhibition Center | No Sub Types | |
| Ferry | No Sub Types | |
| Golf Course | No Sub Types | |
| Government | • City Hall • Court House |
• Community Center |
| Recreation/Entertainment | • Amusement Park • Casino • Cinema |
• Marina • Recreation Facility |
| Rental Car | No Sub Types | |
| School/Library | • Library • School |
• University/College |
| Religious | No Sub Types | |
| Sports | • Bowling Center • Community Center • Ice Skating Rink • Public Sport Airport • Recreation Facility |
• Recreation • Ski Resort • Sports Activity • Sports Center |
| Tourist | • Amusement Park • Historical Monument • Museum |
• Performing Arts • Tourist Attraction • Tourist Office |
| Train Station | • Railway Station | • Commuter Rail |
| Restaurant Type | Sub Type | |
|---|---|---|
| Coffee Shop | No Sub Types | |
| Fast Food | • Sandwich • Chicken |
• Hamburger |
| American | • American Cuisine • Barbecue/Southern • Bistro • Californian • Chicken • Continental |
• Grill • Hamburger • Sandwich/Deli • Southwestern • Steak House |
| Asian | • Chinese • Japanese • Vietnamese • Korean • Southeast Asian |
• Filipino • Hawaiian/Polynesian • Indian • Indonesian/Malaysian • Thai |
| African | No Sub Types | |
| Australian | No Sub Types | |
| Bar/Pub | No Sub Types | |
| Canadian | No Sub Types | |
| European | • Belgian • Austrian • British Isles • Balkan • Bohemian • Dutch • East European • Finnish • French • German • Greek |
• Hungarian • Italian • Jewish/Kosher • Polish • Portuguese • Russian • Scandinavian • Swiss • Turkish • Spanish |
| Latin/South American | • Latin American • South American |
• Surinamese |
| Middle Eastern | • Maltese | • Middle Eastern |
| Mexican | No Sub Types | |
| Seafood | No Sub Types | |
| Vegetarian | No Sub Types | |
| Other | • Other Cuisine | • International |
| Hotel/Motel Type | Sub Type | |
|---|---|---|
| Budget | • Budget Host Inn • Days Inn • Econo Lodge • Economy Inn • Microtel |
• Motel 6 • Red Roof Inn • Scottish Inn • Super 8 |
| Leisure/Business | • AmeriHost • Best Western • Best Inn, Suites • Comfort Inn • Country Hearth Inn • Country Inn and Suites • Courtyard by Mariott • Doubletree • Holiday Inn • Homewood Suites • Howard Johnson |
• Knights Inn • La Quinta Inn • Park Inns International • Ramada • Red Lion • Shilo Inn • Sleep Inn • Hyatt Summerfield Suites • Travelodge • Travelers Inn |
| Luxury | • Clarion Hotel • Crown Plaza Hotel • Embassy Suites • Fairfield Inn • Fairmont Hotel • Four Seasons • Hilton • Hampton Inn • Hyatt Hotels and Resorts • Grand Hyatt |
• Loews Hotel • Marriott • Radisson Hotels and Resorts • Renaissance • Ritz-Carlton • Sheraton • Sofitel • Westin • Wyndham |
Contact Us
If you have any questions or concerns, please feel free to contact us.
Email: www-ocus@omnitracs.com
Phone: 1‐800‐541‐7490
Open Source code policy
Open source code libraries from SpatialLite and ZIPVFS are used in this application – some of the open source code files have been modified. Under the Mozilla Public License (MPL), modifications have been made to SpatiaLite open source code library. These modifications can be made available on request – to submit a request for this information, please contact legal@omnitracs.com