Omnitracs Navigation for Android User Manual version 5.8
Introduction
Omnitracs Navigation optimizes paths for your truck’s specific parameters, resulting in more on-time arrivals and improved safety. The use of historical data, current traffic volume, and road information, like posted road speeds and toll roads, provides you with the most consistent, predictable, and efficient routes.
If you are using Omnitracs Navigation for the first time, you must download maps for your region. If you are in an area with poor cellular or Wi-Fi connectivity, you may not receive updates until your device can communicate over-the- air. Refer to the Omnitracs Navigation Getting Started Guide for Device Installation for information on installing Omnitracs Navigation and maps.
Notes: Not all screens are available in portrait mode.
Be sure you are safely parked before you view or enter route, trips, or destinations.
For an overview of Navigation, play the video below.
Overview of Omnitracs Navigation1m 34s Overview of Omnitracs Navigation features. |
Menu Options in Omnitracs Navigation
The Menu allows you easy access to many functions in Omnitracs Navigation. Use options within the menu to change information that is important to how your paths are calculated, to gain quick access to specific functions that you use frequently, to send feedback about a trip or incident that occurred, to see and edit trips that are assigned to you, and to search for destinations, waypoints, and POIs on your trip.
To open the menu, tap Menu. To close it, tap the X in the upper corner of the list.
Note: The menu will automatically close after 15 seconds.
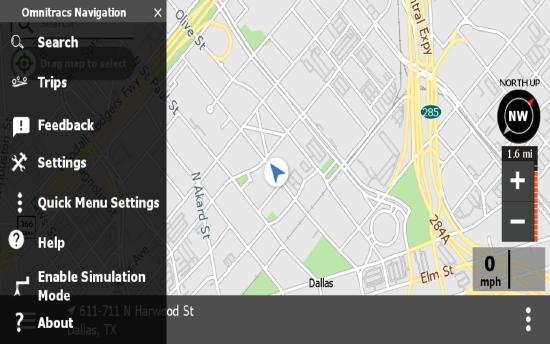
Search – Allows you to find locations using the city center, a full or partial address, previous trip history, and locations marked as favorites. You can also select a location from the map and find points of interest.
Trips – Allows you to add, edit, and remove trips that are assigned to you.
Feedback – Lets you provide feedback when you encounter issues and changes to route conditions such as road closures, construction, changes to POIs, or speed limit changes.
Settings – Allows you to set vehicle parameters, change what shows on your map and how your map displays, define what roadways or restrictions apply when generating routes, and set triggers for speeding alerts. You can also see your GPS status and map updates and find your current software version.
Quick Menu Settings – Lets you choose which frequently used options you want added to the Quick Menu, such as Vehicle Settings, Path Settings, Trips, RN Mobile, XRS Mobile, Omnitracs Drive, and POI Search.
Help – Provides access to the driver user guide.
Enable/Disable Simulation Mode – Lets you see a trip being run on the map in Omnitracs Navigation, as well as hear the directional cues given during the trip. The trip simulation uses the vehicle and path settings defined on the mobile device. Start a trip and then enable simulation mode to see the trip run through the planned path.
Warning: Simulation mode should not be used while the vehicle is in motion.
About – Displays information concerning Omnitracs Navigation, the version of the map set that’s installed, your device’s ID, and copyright/disclosures/disclaimers.
Using Omnitracs Navigation
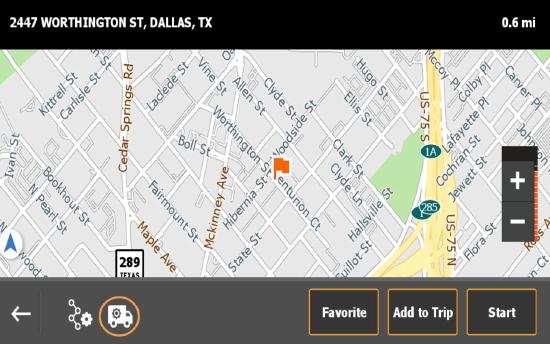
From the Omnitracs Navigation map screen you can see your current location, search for a destination, use the map to find a location, adjust the zoom level and map orientation, as well as access the Menu and the Quick Menu.
Note: Pop-up windows, such a s Route Status and the Quick Menu, will automatically close after 15 seconds of being open. While on a trip, the map will re-center to the vehicle position after 15 seconds of inactivity.
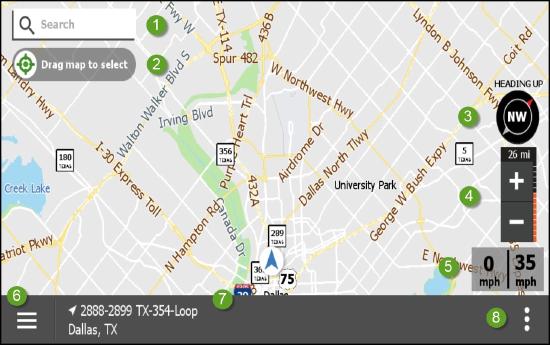
- Search – Use the search function to find locations that you want to add to your trip.
- Drag map to select– Use the map to find a location that is not part of your path on the map and mark it. You can navigate to the location, add it to your trip, or mark it as a favorite.
- Compass – Indicates your current direction of travel. Tap the compass to change the map orientation to always show your current heading at the top of the screen (Heading up), North always at the top of the screen (North up), or a tilted, three-dimensional view (3D).
Note: If the device's Location setting is turned off or not set to High Accuracy, the No GPS icon displays on the map, instead of the compass, to indicate poor or no GPS available for the navigation application. When Omnitracs Navigation is not able to gather GPS data, there will also be an audible signal that GPS data is lost. - Zoom – Tap these buttons to zoom in or out on the map. The number above the zoom buttons indicates the distance you see horizontally across the map. You can also pinch and push the map with your fingers to zoom in and out.
Note: The map will return to the default zoom level after 15-30 seconds of inactivity. - Speed pane – Depicts your current speed on the left and the posted speed for the road on the right, if known. If speed alerts are enabled and the vehicle’s speed exceeds the posted road speed, the vehicle’s speed displays in yellow. If you exceed the speeding threshold the vehicle’s speed displays in red.
- Menu – Tap to access more features. The Menu closes automatically after 15 seconds.
- Destination – Shows your destination. Tap it to view your current location.
- Quick Menu – Tap for a list of functions used in Omnitracs Navigation that you or your company identified for quick access. If you haven’t turned on any Quick Menu settings, this list is blank. The Quick Menu closes automatically after 15 seconds.
When you navigate to a location, additional options are available to you from the map. The map shows your current location and any path you may be following. If you are on your way to a destination, you have the option to detour, cancel the route, add a stop, and display turn-by-turn directions. The status bar shows information such as upcoming turns, your current location, or selected points of interest.
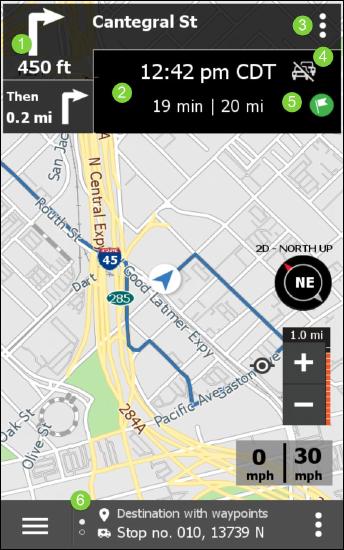
- Next and subsequent turn – Indicates the next two steps or turns and their distance. Tap the next turn to see turn-by-turn directions.
- ETA/Time Remaining – Indicates the anticipated time of arrival and distance to your next stop. Tap it to switch between anticipated time of arrival and estimated duration of the remainder of the trip.
- Options Menu – Tap to access options for Detour, Cancel, and Arrive.
- Detour – Tap to find a detour for the next 1, 5, 10, or 15 miles (1, 8, 16, or 24 km) of the route.
- Cancel – Tap to cancel the current route.
- Arrive –If you are not automatically marked as having arrived at your destination, you can tap Arrive to manually arrive at the stop. You may need to do this if you park or stop at a location that is not near your stop’s street address.
- Real Time Traffic Status – Indicates that the Use Real Time Traffic setting is disabled or the mobile device is not able to access real time traffic data.
- Route Status – Provides a quick view of the path and vehicle settings that were or were not followed for the current path. A green flag indicates no violations. An orange flag indicates a violation has occurred. Tap the flag to see which setting(s) were not followed. The Route Status closes automatically after 15 seconds.
- Destination/Current Location – Shows your destination or current location. Tap it to toggle between the two options. If there are waypoints on your route, it is stated above the location address.
Notes: Depending on the screen that is displayed, you may not see all items.
Maps must be loaded to the device before you can use Omnitracs Navigation. For information on installing and updating maps, see Map Downloads and Map Updates.
To learn how to use the map’s on-screen features, play the video below.
On-screen Map Features
2m 14s
Hours of Service in Omnitracs Navigation
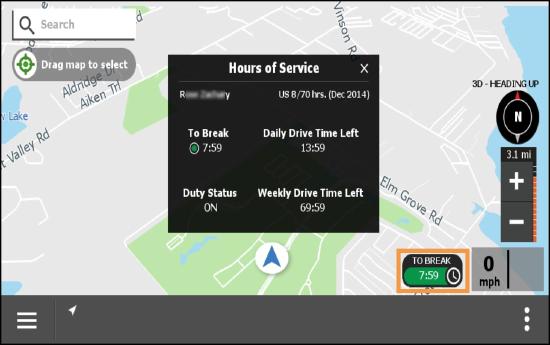
If you have Omnitracs Hours of Service integrated with Omnitracs Navigation, you will see the Hours of Service clock on your map screens. The clock tells you how many hours you have remaining until you are required to take a break. The clock is green and changes based on the amount of time you have left before entering violation. The clock turns yellow when there is an hour left before entering violation. When you run out of time on the clock, you are in violation and the clock turns red. If your volume is set, you will hear an audible alert when the clock changes to yellow and red.
When you tap the Hours of Service Clock, you can see more compliance information related to your work day, such as your Duty Status and drive time left for the day and week.
Searching for a Destination
You may receive a trip, a series of stops and associated tasks, from your dispatcher or you might manually route to individual destinations. The Search option allows you to find locations to which you want to manually route. You can search using:
- The city
- A full or partial address
- A location on a map
- Your destination history
- A list of your previously saved favorites
- A pre-defined list of points of interest
Note: The Search option can be accessed from the map or Menu.
After you choose a destination, you can create a route, save the destination as a favorite, or add the destination to an existing trip. For information on following existing trip paths, see Managing Your Trips.
Note: Before you generate a path to a destination, be sure you define your vehicle settings (weight and dimensions) as well as any route restrictions like avoiding toll roads or dirt roads, adherence to hazmat restrictions, or a preference for trucking roads.
Manually Generating Paths to Destinations
Play the video below to learn how to manually generate a path to a destination.
Routing Overview4m 59s An overview of how drivers navigate to stops or points of interest by entering an address, selecting from a list of favorites or saved stops, or using the map. |
Omnitracs Navigation lets you search for a single destination and navigate to it or add it to an existing trip as a waypoint. A waypoint is a location that you must drive through as part of the point-to-point path.
Finding a Destination Using the City Search
If you need directions to a city or town, but not a specific location, follow these steps.
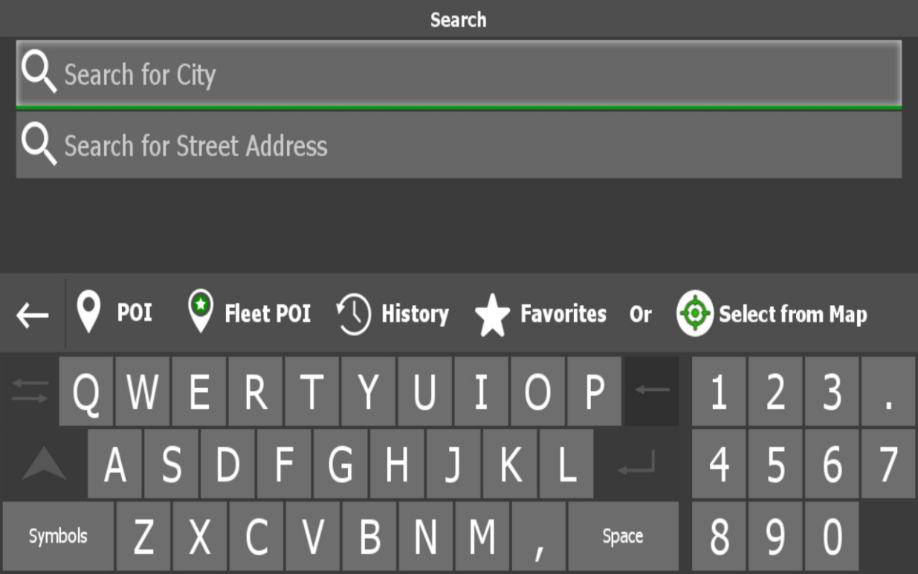
- Tap Search.
- Tap Search for City.
- Type in the name of the city and state to which you want to navigate. As you type, you see an alphabetical list of possible matches. If the list is long, tap the down arrow to see a full list of matches, and then use the arrows to page up or down to find the name.
- Tap the city or town that is your destination.
- Tap Review Location.
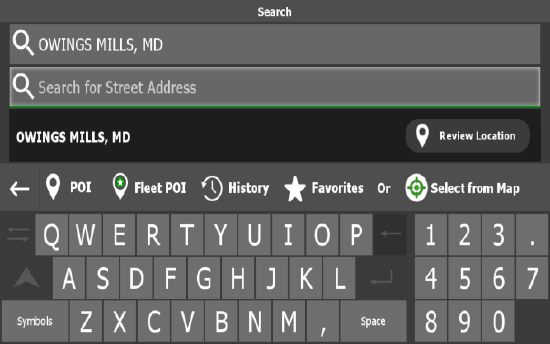
Note: If the address is not found, you cannot review the location. Tap Search Online to use Roadnet Anywhere’s advanced search function.
Your destination displays on the map. You can add it as a favorite, add it to your trip, or start navigating to it.
Finding a Destination Using a Full or Partial Address
If you need directions to a known address, follow these steps.
- Tap Search.
- Tap Search for Street Address.
Note: If you are searching for an address that is not in the city where you are currently located, enter the city you want to navigate to in the Search for City line first, then enter a street address. - Type in the full street address, building number and street name, to which you want to navigate. As you type, you see an alphabetical list of possible matches. If the list is long, tap the down arrow to see a full list of matches, and then use the arrows to page up or down to find the name.
Note: If you do not enter a building number, you will be prompted to choose a range of numbers before you can review the location. - Tap the Street Address that is your destination.
Note: If the city or street does not appear in the list, type only the first few letters of the name and page through the list of possible matches. Omnitracs recommends that you type fewer letters to populate the list; then page through the list to find the entry. Type more letters to narrow the list. If you didn't provide a building number, you are prompted to select a range of building numbers after you select a street. - Tap Review Location.
Note: If the address is not found, you cannot review the location. Tap Search Online to use Roadnet Anywhere’s advanced search function.
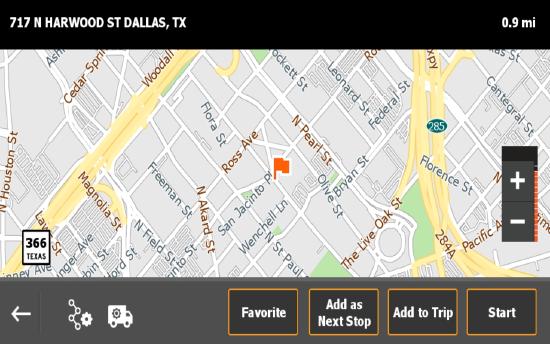
Your destination displays on the map. You can add it as a favorite, add it as the next stop, add it to your trip, or start navigating to it.
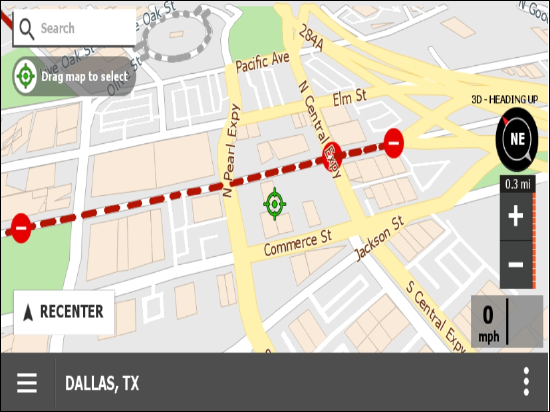
Directions to a Point on the Map
If you are on your way to a destination and want to add a location that is not part of your path, you can locate it on the map and mark it. You can then start to navigate to the location, add it to your trip, or mark it as a favorite.
- Tap Search.
- Tap Select from Map.
- Find the location on the map for which you want information and place it within the green crosshair.
- Tap the green crosshair. Information about the location displays.
- Select an action from the pop-up menu.
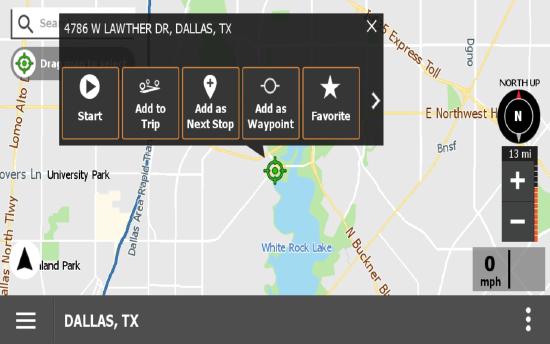
Note: Depending on the screen you are on, some options may not be available.
- Start – your path changes and directs you to the location you marked.
- Add to Trip – you are prompted to define what kind of stop it is and if you have trips assigned to you, to which trip it should be added.
- Add as Next Stop – your path changes and you are directed to the location you marked.
- Add as Waypoint – forces Omnitracs Navigation to route through this location on the way to the next stop.
- Favorite – saves this location in your list of favorite locations.
Your next destination displays on the map.
Finding a Point-of-Interest (POI)
Omnitracs Navigation has a list of general points-of-interest (POI). This list changes as your current location changes. It can also reflect POIs based on your destination. For a list of POI types and sub-types that can be found in Omnitracs Navigation, see the Appendix.
Notes: Your company can add Fleet POI categories and locations.
Custom POIs are a combination of like categories from POI and Fleet POI.
- Tap Search.
- Tap POI.
- Tap the POI type that you want to see: Custom, general POI, or Fleet POI.
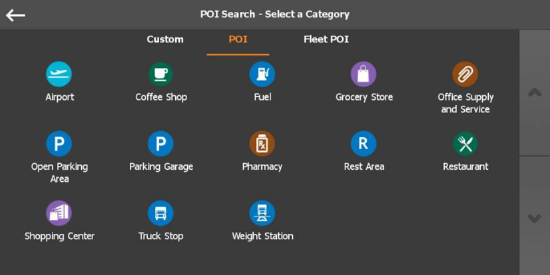
- Tap a POI category, such as Fuel, Grocery Store, or Restaurant.
- At the top of the Search Results screen, tap the arrow and choose where during your path you want to find the POI: Nearby, In Route, or At Destination.
Note: Your choice is saved and used each time you search for a POI. It will remain the same until you change it.
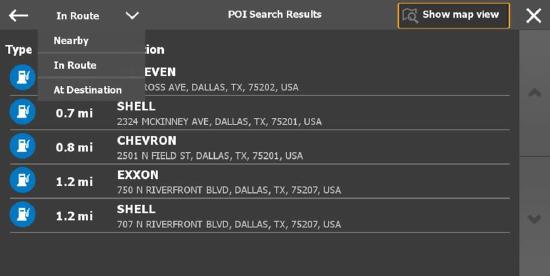
- Tap the Distance arrow, if you want to sort the POI list in the opposite order, ascending or descending.
- Tap Show map view to see your search results on a map.
- Tap the POI destination you want to visit. Use the up and down buttons to page through the list.
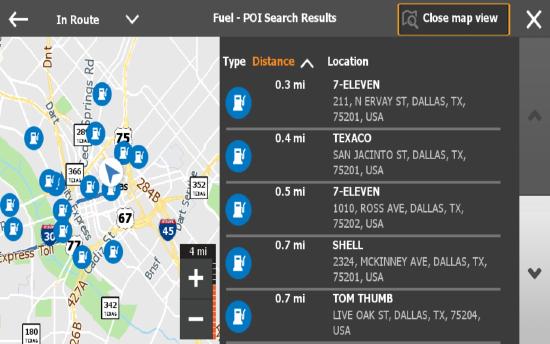

You can add the POI as a favorite, add it to your trip, or start navigation to it.
Revisiting A Destination
Omnitracs Navigation stores the locations you visited. You can use your History to quickly generate a path to visit them again.
- Tap Search.
- Tap History.
- Find and tap a destination. Use the arrows to page through the list.
You can add the destination as a favorite, add it to your trip, or start navigation to it.
Note: Tap Delete to remove a destination that has been saved in your History list.
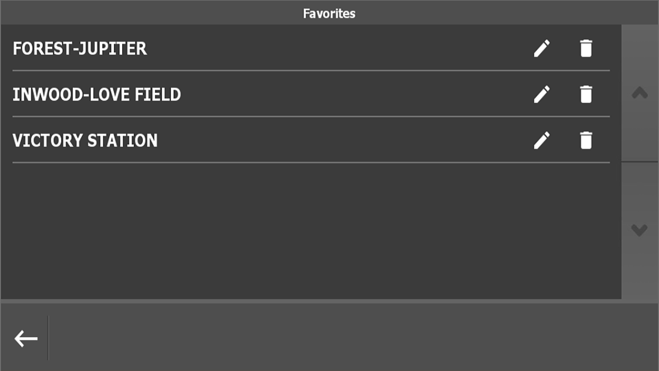
Using a Favorite Destination
Favorites are locations you visit regularly. They can be added to trips or navigated to directly. You choose which destinations to add to your Favorites list.
- Tap Search.
- Tap Favorites.
- Find and tap a destination. Use the arrows to page through the list.
You can add the destination as a favorite, add it to your trip, or start navigation to it.
Note: Tap Delete to remove a destination that has been saved in your History list.
Adding a Favorite
- After you have found a destination, tap Favorite.
- Type a name.
- Tap OK.
Editing a Favorite
After you save a favorite you can rename it, change the location, or delete it.
- Tap Search.
- Tap Favorites.
- Tap Edit next to the favorite you want to change.
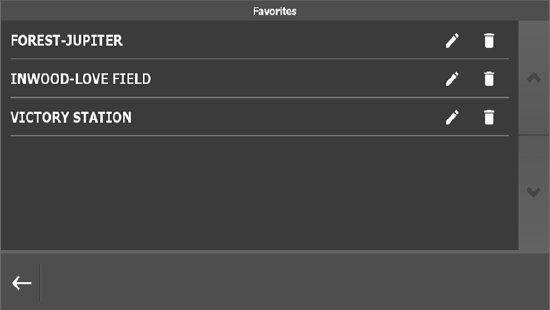
- Choose Rename or Edit Address.
- Steps for editing the address are the same as searching for a location.
Managing Your Trips
A trip is a sequence of destinations or stops which you visit so that you can perform certain tasks. Waypoints may be added to your trip to help navigate you in a particular direction. They are points that you will pass through with no intention of stopping. You may receive a trip from your dispatcher as a printed list of stops that you manually search for and assemble into a trip or as a file that you load on the mobile device.
When a trip is started, Omnitracs Navigation calculates a path to the first destination based on the preferred route settings and any restrictions. After you arrive at the destination, perform any tasks, and are ready to depart to the next stop, Omnitracs Navigation marks that stop completed in the Trip list and provides a path to the next stop.
If you are using a transportation management system (TMS) on your mobile device, all stop configuration and task activities are done in that application and paths to the next destination are generated by Omnitracs Navigation when called by the TMS.
Note: By default, trips are stored on your device for 10 hours. This value can be reset by your administrator.
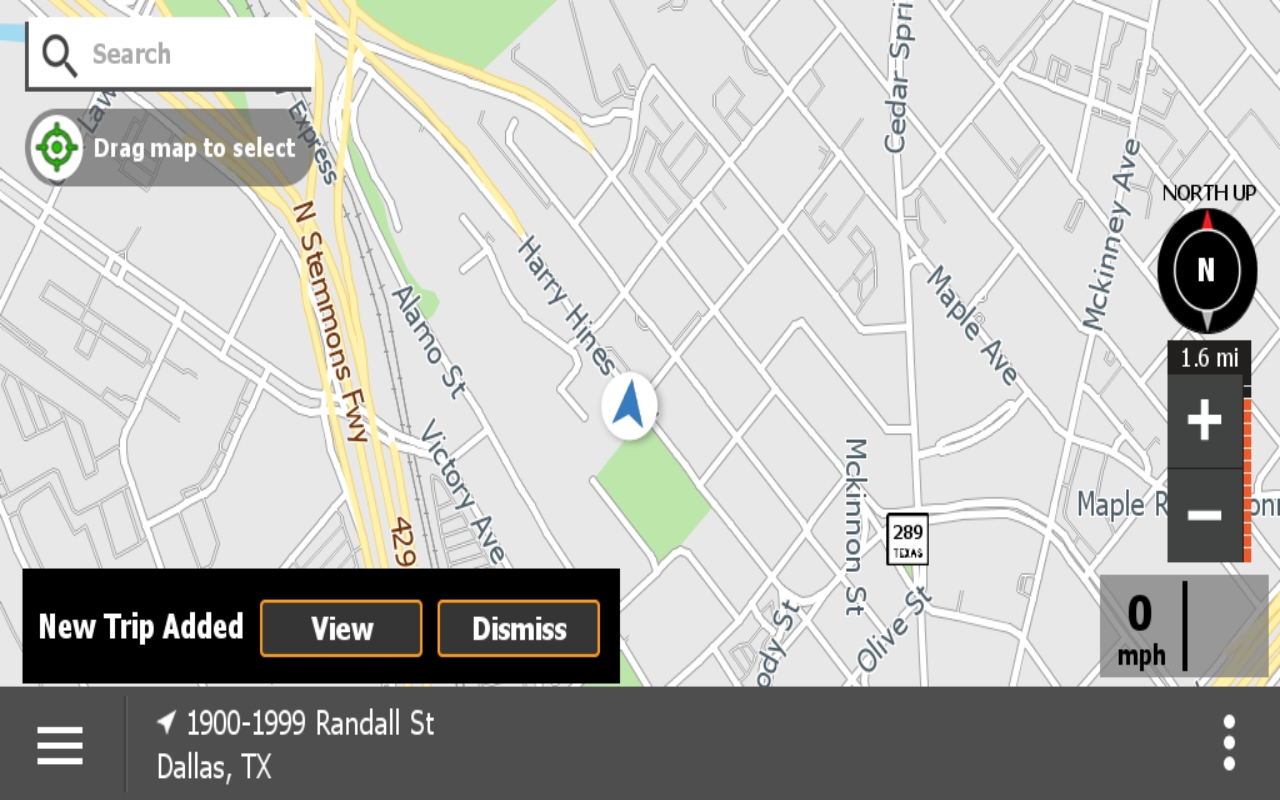
Receiving a Trip from Dispatch
If your company integrates with a transportation management system (TMS), Omnitracs Navigation allows you to receive trips from the TMW and calculate a route for the trip.
You are notified when you receive a new trip. Tap View, to see the new trip and if necessary, edit or start it. If your vehicle is moving, the notification displays, but you cannot view it. Tap Dismiss to view the trip later at Menu > Trips.
When you receive an update to an existing trip, the on-screen notification informs you that a trip was updated. If the update affects the stop you are currently routed to, you are notified that the current trip changed, and Omnitracs Navigation recalculates the route to the updated stop.
Geocoded Stops on a Dispatch Trip
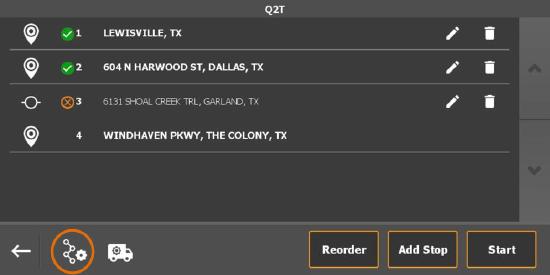
When you receive a Dispatch trip, Omnitracs Navigation attempts to assign a latitude and longitude to any stop on the trip that does not already have them assigned. When viewing the stops on a trip, a green bar indicates a successful geocode, while a red bar and an alert icon display beside stops with unsuccessful geocodes.
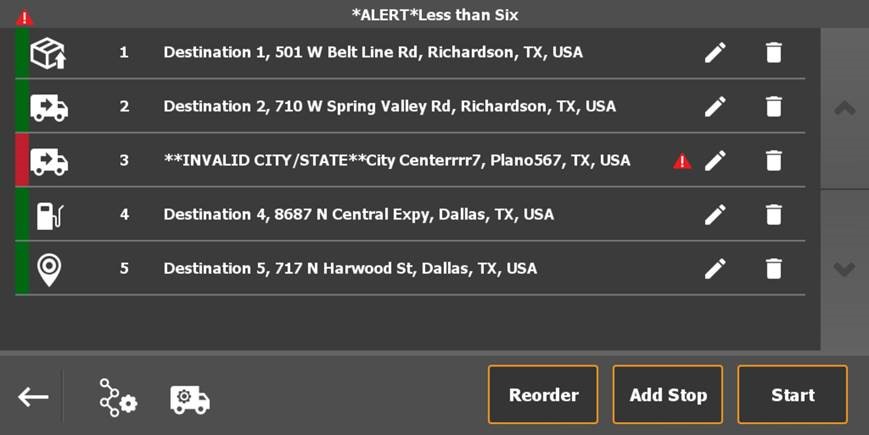
Note: A bad geocode can result in bad directions to a destination.
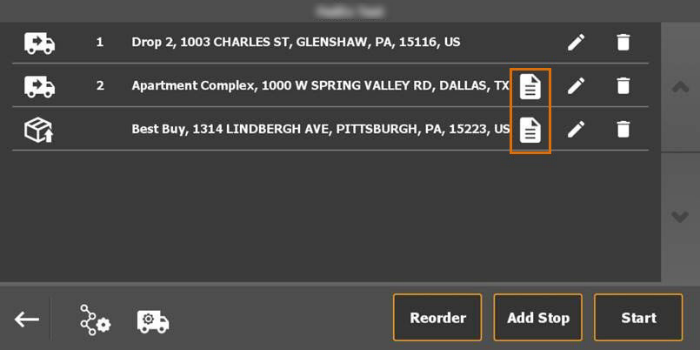
Reading Stop Notes for a Dispatch Trip
If a note is included with a Dispatch trip, a Note icon displays next to the stop. Tap it to read the note.
Creating a New Trip
To manually create a new trip, you must first add the trip and then add stops to it.
- Tap Menu.
- Tap Trips.
- Tap Add Trip.
- Type in a name for the trip
- Tap Save.
Now you can add stops to the trip by searching for locations and adding them to the trip.
Modifying an Existing Trip
After you create a trip, or while you are running a trip, you can add, edit, or re-sequence stops and waypoints. You can also rename or delete an existing trip.
Adding a Stop to a Trip
- Tap Menu.
- Tap Trips.
- Tap the trip with which you want to work.

- Tap Add Stop.
- Search for the destination or POI you want to add.
- Tap Add to Trip.
- Add additional stops as needed.
- Tap the back arrow to return to the map.
Editing Stops on a Trip
You can change the type of stop you are visiting, the sequence number, the stop name, and the address of the stop.
- Tap Menu.
- Tap Trips.
- Tap the trip with which you want to work.
- Tap Edit next to a stop you want to change.
- Tap the type of edit you want to make.
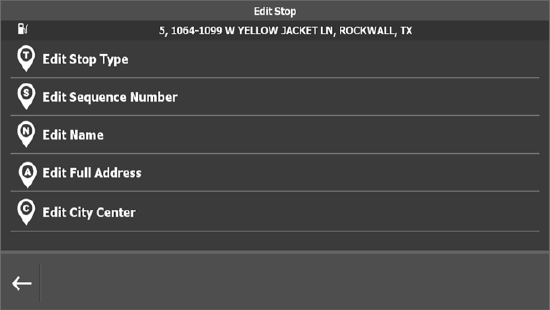
- Make your changes.
- Tap the back arrow to return to the stop list.
Resequencing Stops on a Trip
You can modify your trip by moving stops around on it.
- Tap Menu.
- Tap Trips.
- Tap the trip with which you want to work.
- Tap Reorder to change the sequence of the stops on the trip.
- Tap the stop you want to move and use the up and down arrows to place it on the trip where you want it.
Removing Stops from a Trip
- Tap Menu.
- Tap Trips.
- Tap the trip with which you want to work.
- Tap Delete next to the stop you want to remove.
- Tap Yes when asked if you want to remove the stop.
Renaming a Trip
- Tap Menu.
- Tap Trips.
- Tap Edit next to the trip with which you want to work.
- Use the back arrow to delete the old name and then enter a new name for the trip.
- Tap Save. A confirmation message displays. You can tap OK to dismiss it or it closes after five seconds.
Note: You can tap the Path Settings or Vehicle Settings icon to review your settings before starting the trip.
Deleting a Trip
- Tap Menu.
- Tap Trips.
- Tap Delete next to the trip you want to remove.
- Tap Yes when asked if you are sure.
Starting a Trip
After you have a trip loaded in Omnitracs Navigation, review it to see if you need to resequence, add, or remove any stops. By default, when you start a trip, Omnitracs Navigation generates a path from your current location to the first stop in the trip. You can always select a different stop and have Omnitracs Navigation plot a route from your current location to that stop.
To start a trip from your current position:
- Tap Menu.
- Tap Trips.
- Tap the trip to start navigation.
- Review the trip.
- Tap Start.
To start a trip from a stop in the middle of a trip:
- Tap Menu.
- Tap Trips.
- Tap the trip you want to use, use the arrows to page through the list.
- Review the trip
- Tap the stop you want to start the trip from.
- Tap Yes when asked if you want to begin the trip from this stop.
In Route
After you select a destination, Omnitracs Navigation generates the most efficient route based on waypoints, your vehicle parameters, and any path restrictions, and then displays your route and upcoming turns on the map. If you prefer, you can view turn-by-turn directions for that destination.
Viewing Your Path Status
Before you start your trip, you may set or change vehicle and path settings based on the type of load you are carrying or the kind of road you prefer to travel on. The Route Status flag on the banner at the top of the map displays green if the trip has adhered to the vehicle and path settings. An orange flag means that a violation has occurred based on a vehicle or path setting. Tap the flag to see which setting was not followed.
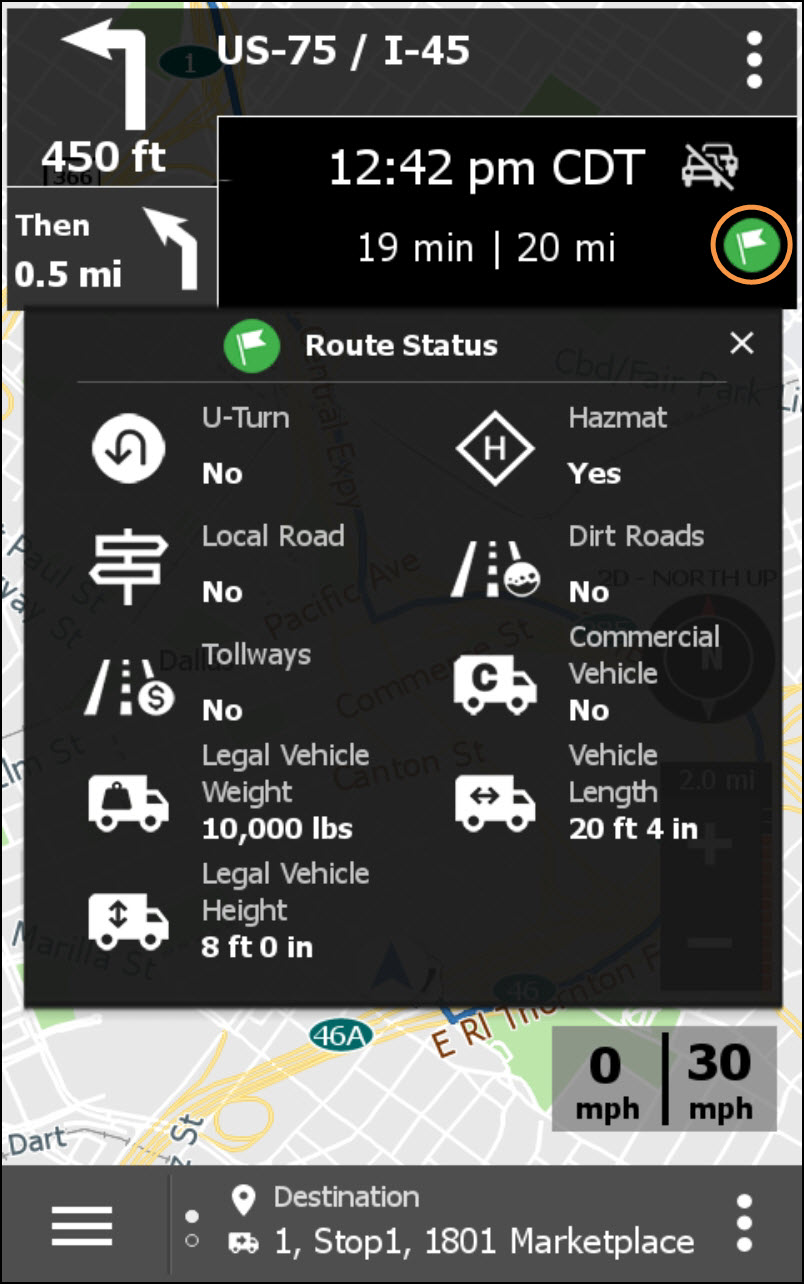
You can change vehicle and path settings at Menu > Settings > Vehicle Settings / Path Settings.
Turn-By-Turn Directions
Omnitracs Navigation defaults to showing you your path on the map. If you prefer to get turn-by-turn directions, tap the area above the map that shows you the next turn on your trip. Directions display that spell out each turn that you will make to reach your destination. Tap that area again to return to the map view.
ETA and Location
When in route, the map displays ETA and location information. By default, the ETA banner shows the estimated time of arrival. Tap it to switch between the ETA and the estimated remaining duration of the route to that stop.
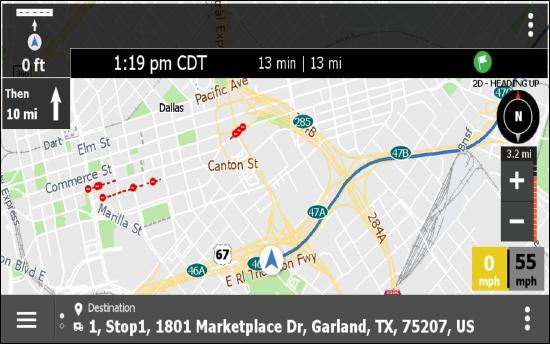
The banner at the bottom of the map shows your destination.
Tap it to switch between showing your destination and current location.

Understanding Road Types
When viewing the map, you may see that some of the roads display in different colors.
The following are some road types you may encounter.
- Disabled Road –– The roadway appears as a gray striped line.
- Blocked Road –– The roadway appears as a red striped line.
- Heavy Traffic –– The roadway displays with a solid red line.
- Medium Traffic –– The roadway displays with a solid orange line.
Automatically Arriving at a Destination
When Omnitracs Navigation detects that you are at your destination, you see a pop-up indicating you automatically arrived. If you do not want the stop to be marked as arrived, simply toggle Arrived to off. From this prompt, you can also arrive the next stop, start traveling to the next stop, stop the current trip, or choose the next stop. You are also able to quickly access the vehicle and path settings using the Trip Management icons.
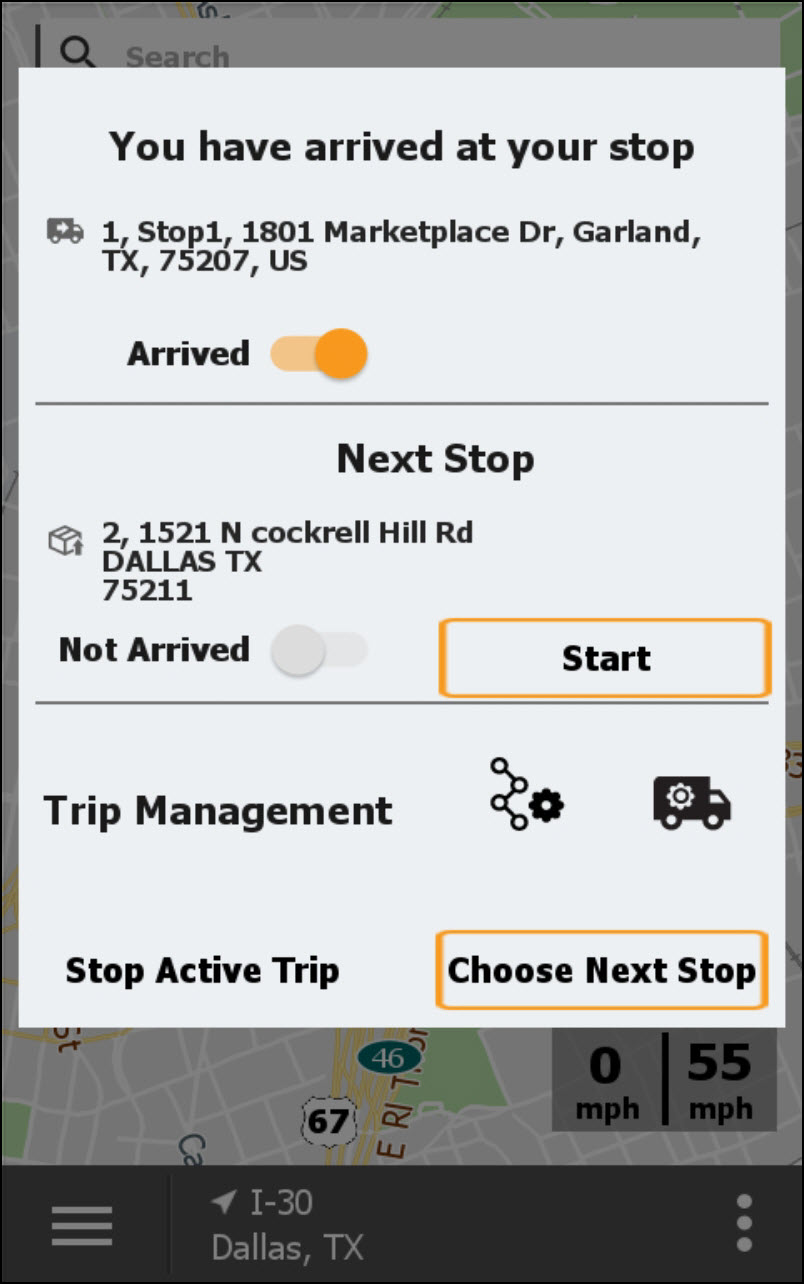
You Have Arrived
When you reach your destination, Omnitracs Navigation prompts you to verify that you have arrived and automatically marks the stop arrived. If you are not ready to arrive the stop, toggle Arrived to off. Mark the stop Arrived when you are ready.
Arriving at the Next Stop
You may mark the next stop as arrived if you already serviced that stop or your current and next stop are very close to each other, like in a strip mall. Toggle Next Stop to Arrived.
You can also start navigating to the next stop. Tap Start.
Choosing the Next Stop
If you need to rearrange stops quickly to meet a delivery time window or if delivery priorities change, you can choose your next stop instead of automatically being routed to the next stop on your trip.
Tap Choose Next Stop.
Stopping the Current Trip
You may need to stop your current trip if you’re going off duty before the trip ends.
Tap Stop Active Trip.
Manually Arriving a Stop
If you were not able to park at the location identified by the street address, you may need to manually mark yourself as arrived.
- Tap Arrive and tap Yes when asked if you have arrived at your destination.
- Tap Close.
Completed or Skipped Stops and Waypoints
When you arrive at a stop or pass a waypoint, Omnitracs Navigation automatically marks it completed, with a green checkmark. If a stop or waypoint is skipped, an orange x mark displays beside the stop or waypoint.
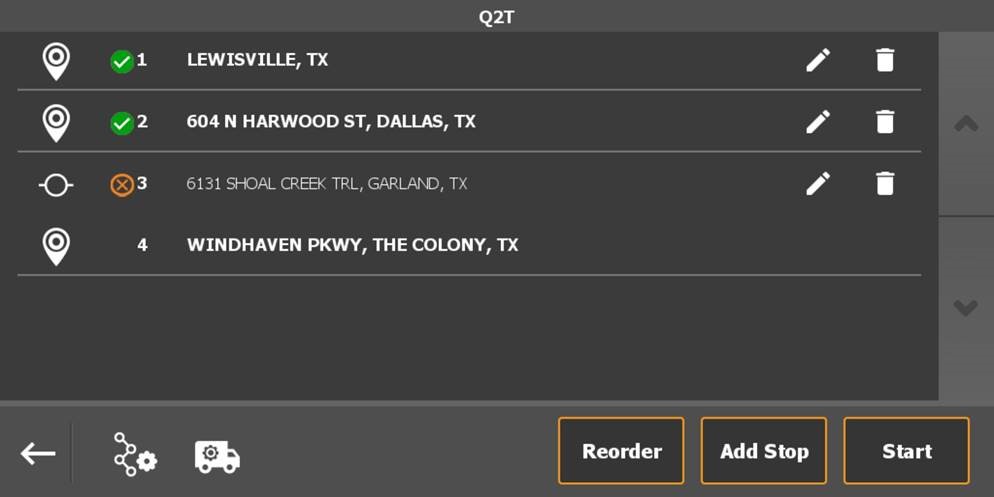
Notes: If the Path Setting Enforce Route Plan is set to No, the most efficient route will be calculated and waypoints may be skipped.
Waypoints can be manually skipped by tapping Quick Menu and then Skip Next Waypoint
Taking a Detour
If you are in route to a destination and need to be routed around a delay, tap the Options icon and then tap Detour. Choose if you want to avoid the next 1, 5, 10, or 15 miles (1, 8, 16, or 24 km) of the route.
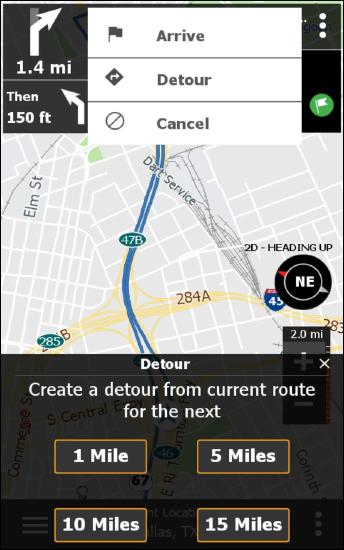
You can cancel the detour at any time by tapping Cancel.
Settings
You may be able to configure some, if not all, settings in Omnitracs Navigation. If you can make changes, you can set vehicle parameters, change what shows on your map and how your map displays, define what roadways or restrictions apply when generating routes, and set triggers for speeding alerts. Other information like GPS status, map updates, and current software version may be used to troubleshoot problems if they arise.
Note: Depending on permissions, you may not be able to make changes to some settings. If a setting is locked, you will see a closed padlock.
You can play the video below for an overview on settings.
Driver Route Settings
1m 17s
View a demonstration of how to define settings to optimize routes generated by Navigation.
Vehicle Settings
Omnitracs Navigation uses the vehicle profile (dimensions and weight) to determine what roads to avoid when generating a path. Define or review these settings to ensure they are accurate, before you generate a route.
- Tap Menu > Settings > Vehicle Settings. You can also tap the Vehicle Parameter icon on the Trip page or when previewing a location found in a Search.
- Tap on any parameter to adjust it.
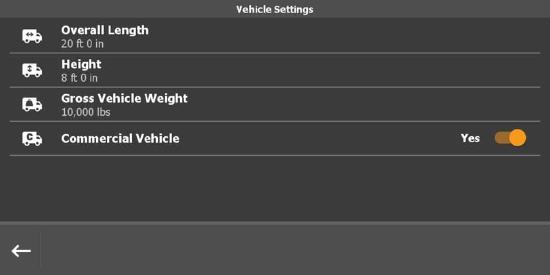
Note: The units that display are defined under Menu > Settings > Units.
| Parameter | Definition |
|---|---|
| Overall Length | Enter the trailer length in feet and inches/meters and centimeters. |
| Height | Enter the vehicle’s height (the highest part of the vehicle) in feet and inches/meters and centimeters. |
| Gross Vehicle Weight | Enter the vehicle’s gross weight (including load) in pounds/kilograms. |
| Commercial | Toggle this setting ON to indicate that you want to be routed over commercial vehicle-approved roadways only. Toggle it off to generate routes that use commercial and non-commercial vehicle-approved roadways. |
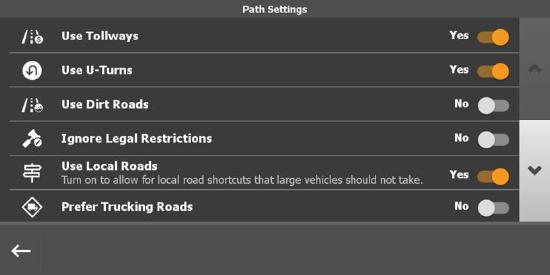
Path Settings
Path settings are related to the types of roads you want to travel on and help to determine the best route. You can turn any of these options on or off after a route has already been calculated and the route will be recalculated using your new preferences.
- Tap Menu > Settings > Path Settings. You can also tap the Path Parameter icon on the Trip page or when previewing a location found in a Search.
- Turn settings on or off as appropriate.
| Parameter | Behavior |
|---|---|
| Use Tollways | Paths may include toll roads. Turn this setting off to avoid toll roads when generating the route. Paths may be less efficient. |
| Use U-Turns | Paths may include U-Turns. Turn this setting off to avoid adding U-Turns to your path. |
| Use Dirt Roads | Paths may include dirt roads. Turn this setting off to avoid adding dirt roads to your path. |
| Ignore Legal Restrictions | Paths may include roads that are restricted for reasons such as size or class of vehicle. Turn this setting on to allow your generated paths to include restricted roads. |
| Use Local Roads | Paths may include local roads. Turn this setting on to allow for local roads, which large vehicles should not travel on, to be added to your path. |
| Prefer Trucking Roads | Paths will favor state highways and interstates. Turn this setting on to favor state highways and interstates that are part of the National Network based on the Surface Transportation Assistance Act. |
| Historic Traffic | Historic traffic patterns are considered when calculating routes so the most efficient paths are generated. Turn this setting on to consider historic traffic patterns when generating paths. |
| Use Real Time Traffic | Real time traffic is considered when calculating routes. Turn this setting on to have current traffic conditions considered when calculating a route. When there is a faster path available, a new path suggestion is read aloud and displays on the screen. The path is automatically re-routed unless the suggestion is manually dismissed. |
| Minimum ETA Improvement for a New Recommendation | Enter the minimum number of minutes that a change must save on a route to have a new path suggested. This option is only available if Use Real Time Traffic is selected and Enforce Route Plan is not selected. |
| Enforce Route Plan | Applies only when the route has waypoints. When set to No, the most efficient route will be calculated by skipping one or more waypoints. When set to Yes, the path is calculated to follow the plan and continue to the next waypoint. |
| Hazmat Class | Turn on the appropriate hazardous material classes and the generated paths will only travel on roads where that class of hazardous material is allowed. |
Map Settings
You can determine which POIs display on your map, if your map zooms automatically, how your map positions on the screen, and which maps are loaded on your mobile device.
- Tap Menu > Settings > Map Settings.
- Tap on any setting to adjust it.
Auto Zoom
When Off, you manually adjust the zoom using the + and – buttons on the map. When On, the zoom level of the map dynamically adjusts to show the level of detail you need at that point of your route.
POI On/Off
You may select which, if any, points-of-interest (POIs) display on the map. You can show or hide all POIs by checking or unchecking the box next to All. You can also choose which types of POIs display. If a POI type has a + next to it, there are sub types available. Tap the type to select which sub-types of POIs display. When a partial list of POIs is selected, the boxes next to the POI type and All show a - instead of a check mark.
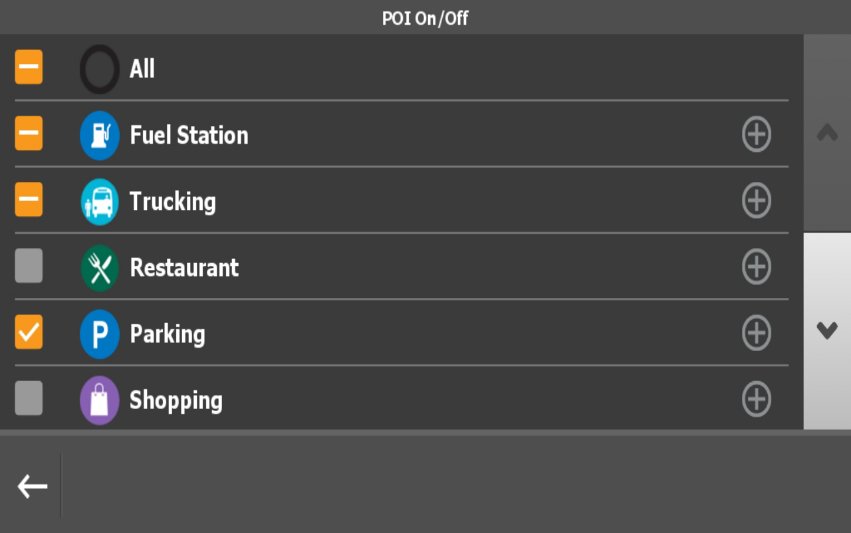
The Appendix lists all the POI types and sub-types. The sub-types for restaurant and hotel/motel also break down into a third level, which is reflected in subsequent tables.
Map Orientation
You can set your map to display as Heading Up, North Up, or 3D. In Heading Up orientation, the map continuously rotates so that the vehicle’s current heading is always at the top of the map. In North Up orientation, north is always at the top and the map does not turn as the vehicle turns. The 3D setting uses a heading up orientation but displays the map in a three-dimensional view.
When viewing the map, tap the compass to cycle through these orientations. If you zoom out to a very large scale, the map automatically switches to North Up orientation, but switches back to your chosen orientation after you zoom back in.
Map Downloads
Before you can use Omnitracs Navigation, you must install maps. You can select all US or all Canadian maps or you can download specific regions and states or provinces.
By downloading regional or state maps, less storage is used on the mobile device and both installation and updates complete faster.

When you tap Download, you see information about the current map version, region, required space for download, available space on your mobile device, and if the connection is correct so that you can begin the download. Tap Download Maps to start the download.
Maps must finish downloading before you can use Omnitracs Navigation. You must close and re-launch Omnitracs Navigation before you see the new maps.
Map Updates
If the maps on your mobile device have an update available, Omnitracs Navigation prompts you to update them.
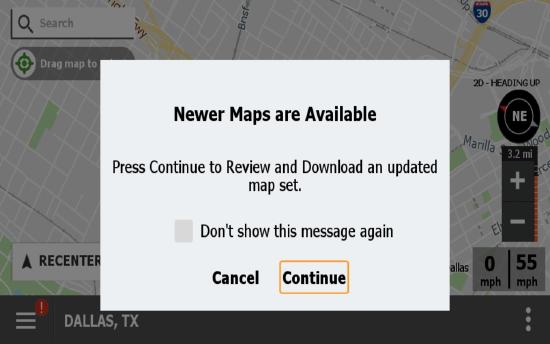
Updating of Maps
When you receive a prompt that states newer maps are available, tap Continue. Information about the new maps displays, such as the current and new map versions, the regions that are included in the update, and storage and connection information.
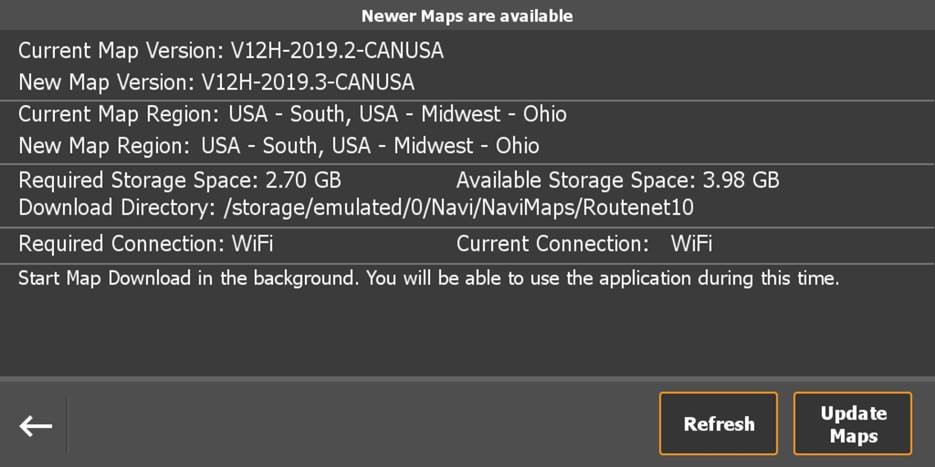
Note: You are not required to update your maps immediately. To delay the map upgrade, tap Cancel.
Tap Update Maps to have your out-of-date maps replaced with the newer versions. You are prompted when the maps are updated and ready to use. Tap Continue to start using the new maps.
Manually Updating Maps
If you disregard a newer map prompt, or you choose not to show new map prompts, when updates are available, you can manually update maps from Map Update under Map Settings.
Note: You won't see the Map Update button unless the maps loaded to your mobile device have newer maps available.
Map Style
You can set your map to show in a color other than the Omnitracs Navigation default and change the screen brightness, to make it easier to see your maps in low light situations.
Tap Menu > Settings > Map Settings > Map Style.
| Parameter | Definition |
|---|---|
| Map Color | Choose the color of the roads on the map to make it easier to distinguish the road when other features clutter the map. |
| Night Mode | Turn Night Mode On or Off. When turned off, Day Mode is brighter and easy to see when there is a lot of surrounding light. When turned on, Night Mode dims the screen so that in low light situations your eyes don’t have to adjust between a bright screen and the road. |
| Show Buildings | Turn On or Off. When on, building outlines display on the map. |
Alerts
Alerts occur when you exceed a threshold or when there is something that you need to be informed of, while you are running your trip.
Note: Depending on settings, you may not be able to change alert settings on your mobile device.
Speed Alerts
Speed alerts are audible on-screen notifications triggered by exceeding a configurable speed threshold for a set duration.
Tap Menu > Settings > Alerts > Speed Alerts.
| Parameter | Definition |
|---|---|
| Speed Alerts | Turn the alert On or Off for this device. |
| Alert Sound | Turn this setting on if you want an audible alert to sound when you exceed the speeding threshold and speeding duration. This sound will repeat every 15 seconds until you reduce speed or the posted road speed changes. |
| Speeding Threshold | Set how much faster than the posted road speed that the vehicle needs to be moving to trigger a speed alert. The threshold can be set to any speed between 0-20 mph or 0-40 km/h. |
| Speeding Duration | Set the duration of time the speeding threshold must be exceeded before an alert is triggered. The duration can be set to any length of time between 0 seconds and 30 minutes. |
Risk of Grounding
The Risk of Grounding alert lets you know when there is a risk nearby of your vehicle grinding on the road surface and getting stuck.
Tap Menu > Settings > Alerts > Risk of Grounding.
| Parameter | Definition |
|---|---|
| Risk of Grounding | Turn the alert On or Off for this device. |
| Alert Sound | Turn this setting on if you want an audible alert to sound when you reach the Alert Distance that is set. |
| Alert Distance | Set the distance away from the grounding risk that you want to be when an alert is triggered. The distance can be set between .1 and 1.0 miles. |
Protected Railway Crossing
The Protected Railway Crossing alert lets you know when a railway crossing with automatic barriers and signals is nearby, so you can approach it with caution.
Tap Menu > Settings > Alerts > Protected Railway Crossing.
| Parameter | Definition |
|---|---|
| Protected Railway Crossing | Turn the alert On or Off for this device. |
| Alert Sound | Turn this setting on if you want an audible alert to sound when you reach the Alert Distance that is set. |
| Alert Distance | Set the distance away from the railway crossing that you want to be when an alert is triggered. The distance can be set between .1 and 1.0 miles. |
Unprotected Railway Crossing
The Unprotected Railway Crossing alert lets you know when a railway crossing that does not have barriers or signals is nearby, so you can approach it with caution.
Tap Menu > Settings > Alerts > Unprotected Railway Crossing.
| Parameter | Definition |
|---|---|
| Unprotected Railway Crossing | Turn the alert On or Off for this device. |
| Alert Sound | Turn this setting On if you want an audible alert to sound when you reach the Alert Distance that is set. |
| Alert Distance | Set the distance away from the railway crossing that you want to be when an alert is triggered. The distance can be set between .1 and 1.0 miles. |
Sounds – Volume
Toggle this setting On to have Omnitracs Navigation use your mobile device volume setting. You can then choose to use the devices maximum volume or 50% of the current volume setting. When this setting is Off, Omnitracs Navigation sound is muted.
Tap Menu > Settings > Sounds > Volume.
| Parameter | Definition |
|---|---|
| Navigation Sound | Turn On to have the current volume settings on the device used when speaking messages and alerts. If Navigation Sound is turned Off, messages and alerts will not be read aloud. |
| Max Volume | Turn On to have Navigation Sound use the maximum volume of the device. If Off, the current volume setting is used. |
| Navigation Sound When Device Has No Volume | Turn On to have Navigation Sound turn on the device's volume to speak messages and alerts if the device's volume is turned off. If Off, messages and alerts will not be read aloud when the device volume is off. |
Units
Choose which unit type you want to view on your mobile device, U.S. Standard or Metric.
Tap Menu > Settings > Unit Settings.
GPS Status
The GPS status gives the current signal strength of the mobile device, location of the vehicle according to GPS calculations, and the Doppler (DOP) value. It also identifies how many GPS satellites are seen and how many are being used to calculate the current position.
Tap Menu > Settings > GPS Status.
Using the Quick Menu
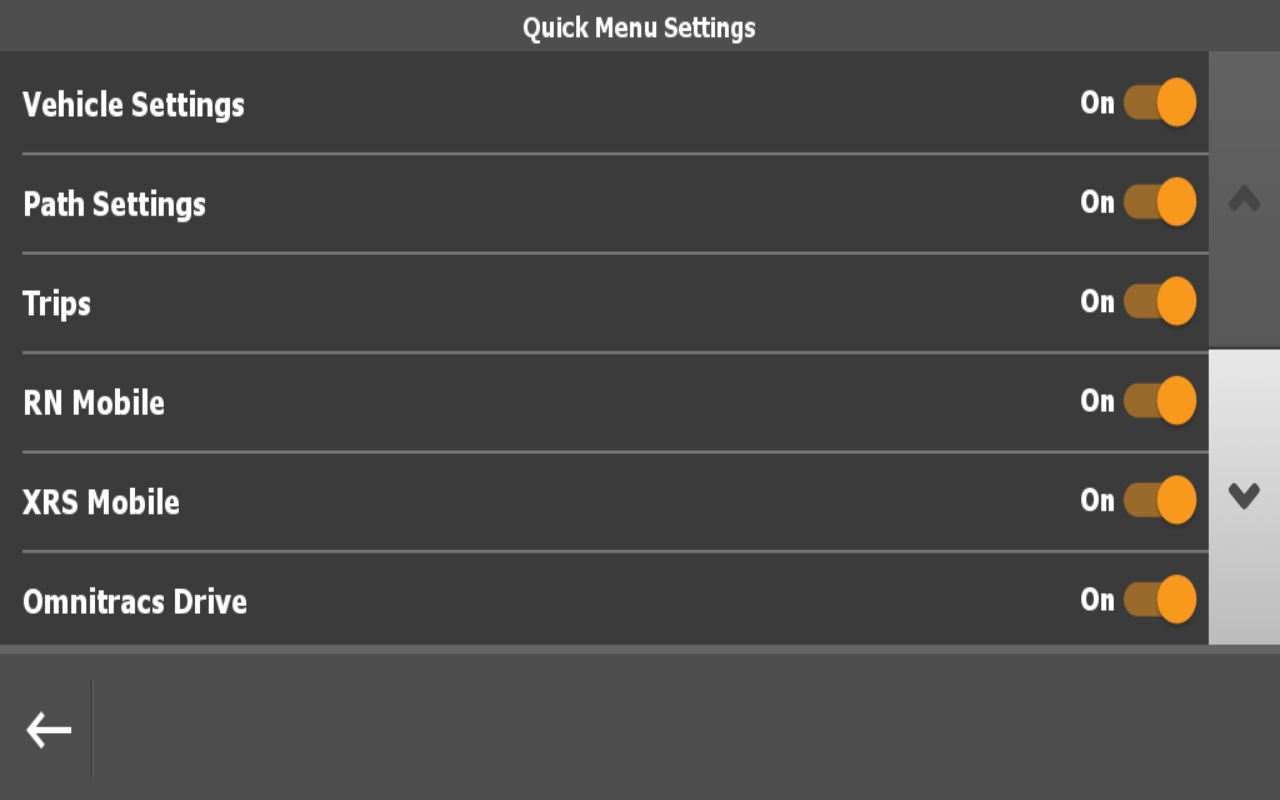
You can add Omnitracs Navigation features like Vehicle Settings, Path Settings, or Trips to the Quick Menu, and depending on what other applications are installed, you may also add RN Mobile, XRS Mobile, Omnitracs Drive, and POI Search.
Note: Depending on settings, some Quick Menu options may not be available. Day/Night Mode, Mark for Feedback, and Volume are automatically listed in the Quick Menu
To add options to the Quick Menu, do the following.
- Tap Menu.
- Tap Quick Menu Settings.
- Turn an option On to see it on the Quick Menu or turn it Off if you do not want the option to display.

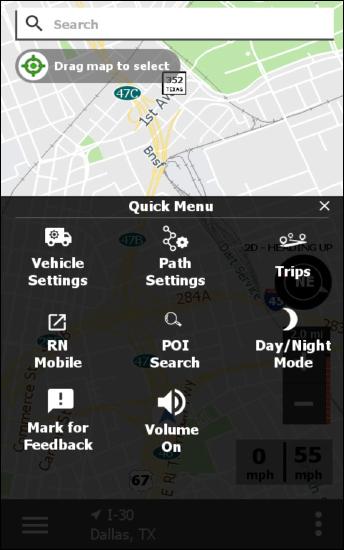
To access a feature or application using the Quick Menu, do the following:
- Tap Quick Menu.
- Tap the option you want to use.
Simulation Mode
You can use the simulation mode to see a trip being run and hear the turn-by-turn cues that Omnitracs Navigation will direct you to take when running the trip. The simulation mode uses the vehicle and path settings defined on your mobile device. You can change your settings and run the trip simulation again to see if changing your settings results in a different path.
To start simulation mode, do the following.
- Start a trip.
- Press Menu.
- Press Enable Simulation Mode.
Omnitracs Navigation quickly runs through the trip on the map, simultaneously speaking each turn that is part of the path
Warning: You should not use simulation mode while the vehicle is in motion.
To end simulation mode, do the following:
- Press Menu.
- Press Disable Simulation Mode.
Feedback
Omnitracs Navigation provides the most current road data available by dynamically adjusting path generation, based on feedback from drivers as they encounter issues and changes to route conditions such as road closures, construction, changes to POIs, or speed limit changes.
Note: Feedback is used by Omnitracs to improve how paths are generated. This information is not sent to your dispatcher.
Create an Incident
You can quickly record your current location and a timestamp so that you can send feedback to Omnitracs about an incident that occurred on your trip.
- Tap Quick Menu.
- Tap Mark for Feedback.
A message displays stating that your location is saved for feedback. Later, when you are safely parked, you can add more details to the incident before sending it.
Sending an Incident
After you stop the vehicle, you can modify and submit the incident you recorded or submit other comments. These incidents are not seen by your dispatcher.
- Tap Menu.
- Tap Feedback.
- Select an incident for which you want to enter more details.
Notes: If you did not create an incident while on the road, you can tap Add Feedback and choose if you want to add an incident or add a comment.
If necessary, edit the information you previously saved. Tap Edit. Make your changes and then save the incident.
- Tap Next.
- Choose the incident type and check the sub-types that apply. Incidents and sub-types can include:
- I – Length, Width, Height, Weight, Speed
- Physical – No Turns, Low Bridge
- Route Quality – Different, TTS
- Geocoding – Wrong POI Address, Can’t Find POI/Address, Wrong Destination
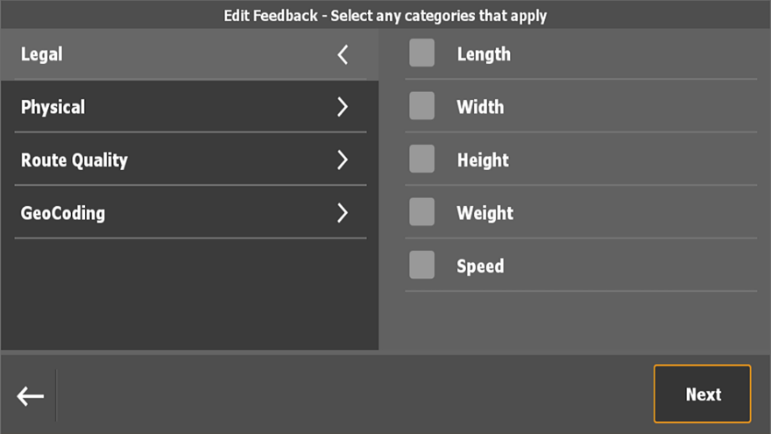
- Tap Next.
- Enter any comments you think are necessary.
- Tap OK.
- Review the summary.
- Tap Send.
Other Comments
You can also submit other comments related to the Omnitracs Navigation application through the feedback section. These comments are not seen by your dispatcher.
- Tap Menu.
- Tap Feedback.
- Tap Add Feedback.
- Tap Other Comment.
- Enter your comment.
- Tap OK.
- Review your summary.
- Tap Send.
About
The About screen displays the version of Navigation you are running, the version of the map set that’s installed, your device’s ID, and copyright/disclosures/disclaimers as related to Omnitracs Navigation and our partners.
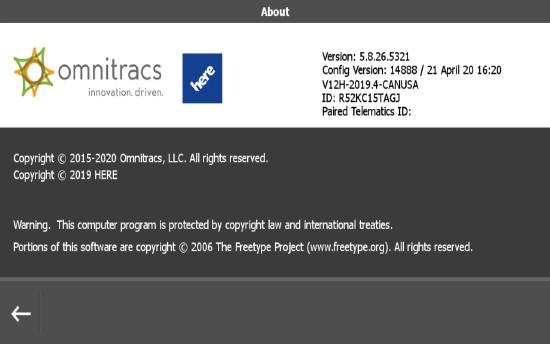
Tap Menu > Settings > About.
Appendix
The following are POI types and sub-types.
|
Main POI Types |
Sub Type |
|
|---|---|---|
|
Fuel Station |
|
|
|
Trucking |
|
|
|
Restaurant* |
|
|
|
Parking |
|
|
|
Shopping |
|
|
|
Bank/ATM |
|
|
|
Car Dealer/Repair |
|
|
|
Hospital/Emergency |
|
|
|
Hotel/Motel* |
|
|
|
Airport |
No Sub Types |
|
|
Business |
|
|
|
Bus Station |
No Sub Types |
|
|
Exhibition Center |
No Sub Types |
|
|
Ferry |
No Sub Types |
|
|
Golf Course |
No Sub Types |
|
|
Government |
|
|
|
Recreation/Entertainment |
|
|
|
Rental Car |
No Sub Types |
|
|
School/Library |
|
|
|
Religious |
No Sub Types |
|
|
Sports |
|
|
|
Tourist |
|
|
|
Train Station |
|
|
|
Restaurant Type |
Sub Type |
|
|
Coffee Shop |
No Sub Types |
|
|
Fast Food |
|
|
|
American |
|
|
|
Asian |
|
|
|
African |
No Sub Types |
|
|
Australian |
No Sub Types |
|
|
Bar/Pub |
No Sub Types |
|
|
Canadian |
No Sub Types |
|
|
European |
|
|
|
Latin/South American |
|
|
|
Middle Eastern |
|
|
|
Mexican |
No Sub Types |
|
|
Seafood |
No Sub Types |
|
|
Vegetarian |
No Sub Types |
|
|
Other |
|
|
|
Hotel/Motel Type |
Sub Type |
|
|
Budget |
|
|
|
Leisure/Business |
|
|
|
Luxury |
|
|
Contact Us
If you have any questions or concerns, please feel free to contact us.
Email: www-ocus@omnitracs.com
Phone: 1‐800‐541‐7490